Uvod
Hvala na kupoviniasing the Douk Audio P7 Vacuum Tube Phono Preamplifier. This device is designed to enhance your audio experience by providing a high-quality pre-amplification stage for turntables and other audio sources, featuring vacuum tube warmth, balanced XLR output, and precise tone controls. Please read this manual thoroughly before operation to ensure proper setup and optimal performance.
Šta je u kutiji?
- 1x Douk Audio P7 Preamp Jedinica
- 2x PSVANE ECC83 Tubes
- 1x DC 12V adapter za napajanje
- 1x uputstvo za upotrebu

Image: The Douk Audio P7 package contents, showing the main unit, two PSVANE ECC83 tubes, a DC 12V power adapter, and the user manual.
Sigurnosna uputstva
- Ne izlažite ovaj uređaj kiši ili vlazi.
- Ne rastavljajte uređaj. Za sve servisne radove obratite se kvalifikovanom osoblju.
- Osigurajte odgovarajuću ventilaciju oko jedinice kako biste spriječili pregrijavanje.
- Use only the provided power adapter. Using an incorrect adapter may damage the unit and void the warranty.
- Čuvati van domašaja djece.
- Izbjegavajte postavljanje jedinice u blizini izvora topline ili na direktnu sunčevu svjetlost.
Product Overview
Izgled prednjeg i zadnjeg panela
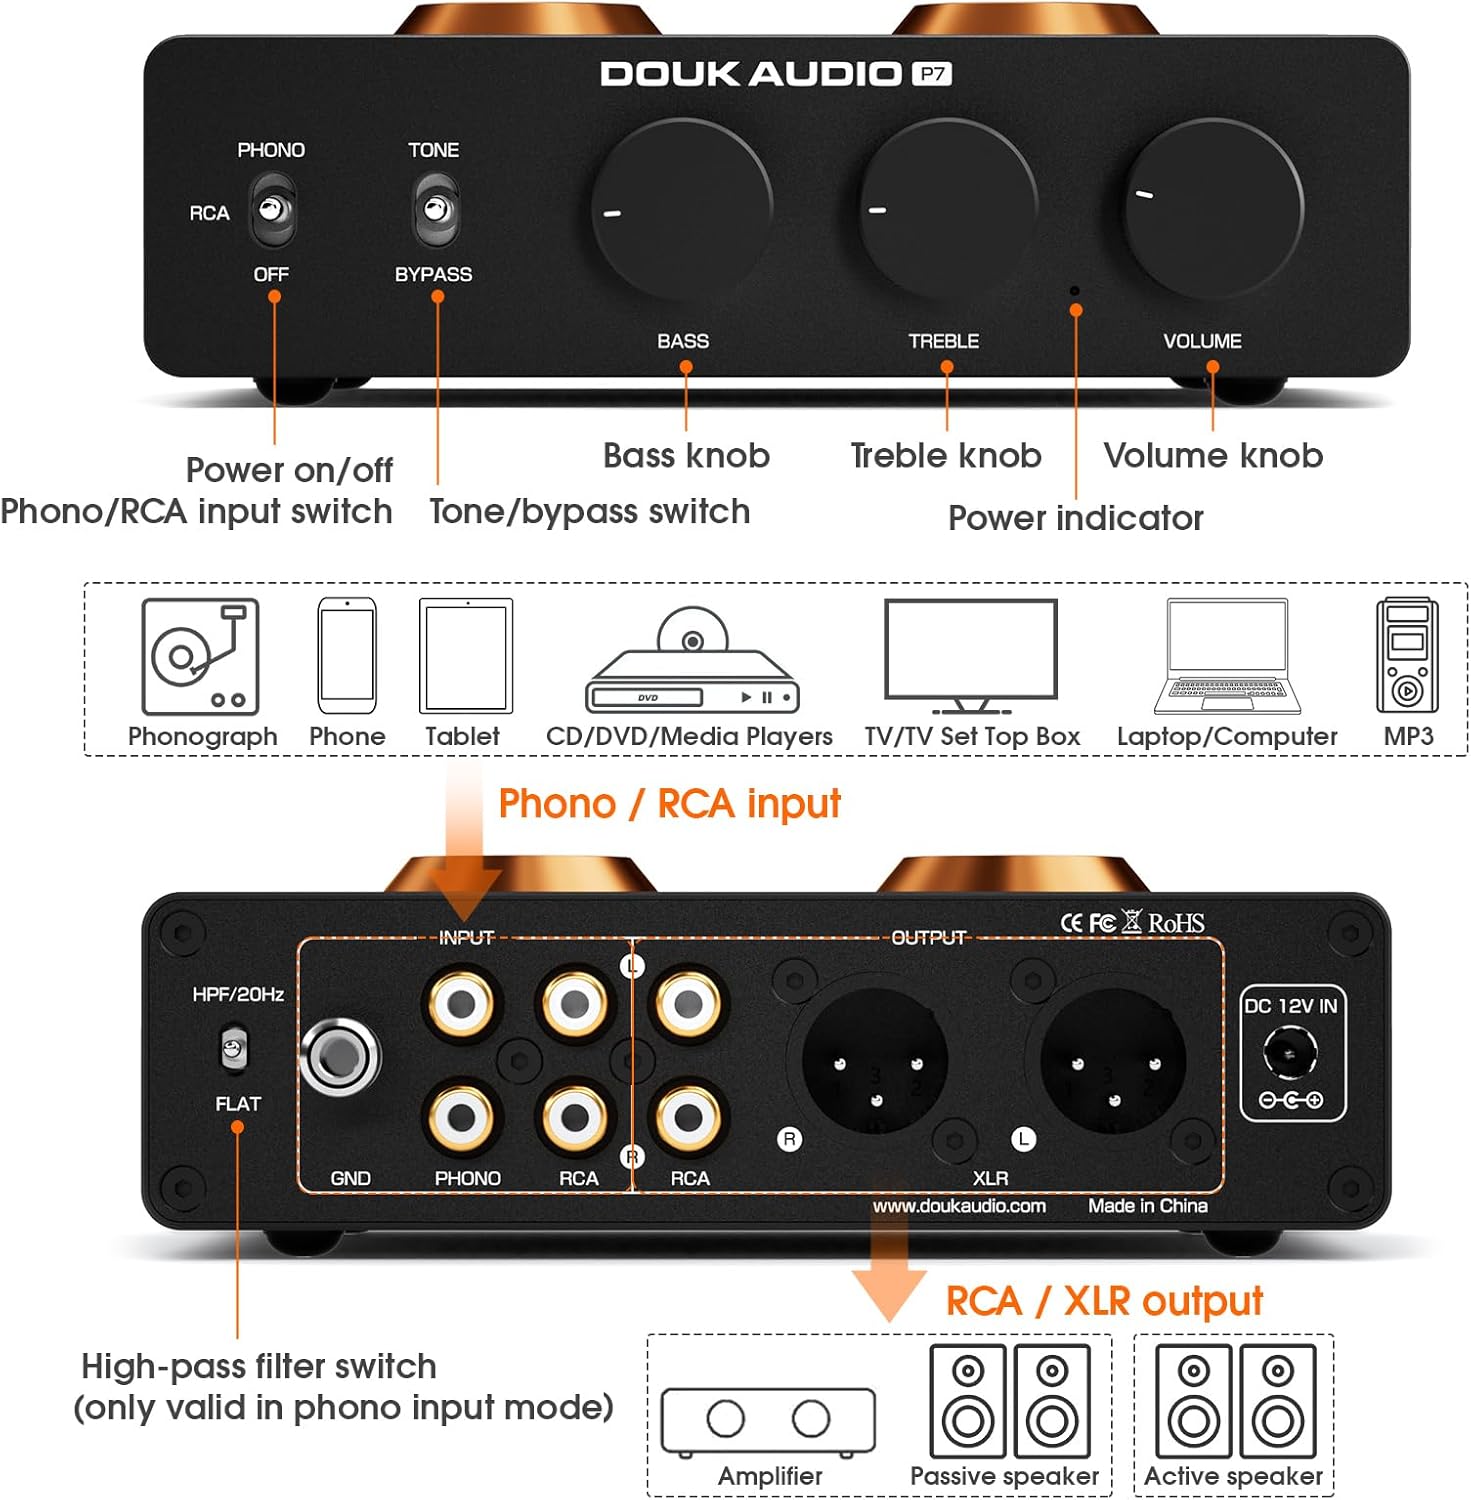
Image: A comprehensive diagram illustrating the front and rear panels of the Douk Audio P7, highlighting the location and function of each control, input, and output.
Kontrole na prednjoj ploči:
- Prekidač za uključivanje/isključivanje: Toggles the unit's power.
- Phono/RCA Input Switch: Selects between Phono (turntable) and RCA (line-level) inputs.
- Tone/Bypass Switch: Engages or bypasses the Bass and Treble tone controls.
- bas dugme: Podešava niskofrekventni odziv.
- Visokotonsko dugme: Podešava visokofrekventni odziv.
- Gumb za jačinu zvuka: Kontrolira ukupnu izlaznu jačinu zvuka.
- Indikator napajanja: Svijetli kada je jedinica uključena.
Priključci na stražnjoj ploči:
- High-Pass Filter (HPF) Switch: Activates a 20Hz high-pass filter (only for Phono input).
- GND terminal: Ground connection for turntables.
- PHONO Input (RCA L/R): Connects to a turntable with MM cartridge.
- RCA ulaz (L/R): Connects to line-level audio sources (CD player, TV, phone, etc.).
- RCA izlaz (L/R): Standard unbalanced audio output.
- XLR Output (L/R): Balanced audio output for reduced noise and improved dynamic range.
- DC 12V IN: Power input for the included DC 12V adapter.
Setup
1. Ugradnja cijevi
Carefully insert the two PSVANE ECC83 tubes into their respective sockets on the top of the unit. Ensure the pins align correctly with the socket holes and gently push down until the tubes are seated firmly. Do not force them.

Slika: Detaljna view of two PSVANE ECC83 vacuum tubes, ready for installation into the preamplifier.
2. Povezivanje audio izvora
- For Turntables (MM Cartridge): Connect your turntable's RCA output cables to the PHONO input (L/R) on the rear panel. Connect the turntable's ground wire to the GND terminal on the P7.
- For Line-Level Sources (CD Player, Phone, TV, etc.): Connect your audio source's RCA output cables to the RCA input (L/R) on the rear panel.
3. Povezivanje sa Ampzvucnici/zvučnici
- Using RCA Output: Connect the P7's RCA Output (L/R) to the RCA input of your amplifier ili aktivni zvučnici.
- Using Balanced XLR Output: For optimal noise reduction and dynamic range, connect the P7's XLR Output (L/R) to the balanced XLR input of your amplifier ili aktivni zvučnici.

Slika: Detaljna view of the Douk Audio P7's rear panel, focusing on the balanced XLR output connections.
4. Priključak za napajanje
Connect the provided DC 12V power adapter to the DC 12V IN port on the rear panel of the P7, then plug the adapter into a wall outlet.
Uputstvo za upotrebu
1. Uključivanje / isključivanje napajanja
Press the Power On/Off switch on the front panel to turn the unit on. The power indicator light will illuminate. Press it again to turn off the unit.
2. Izbor ulaza
Use the Phono/RCA Input Switch on the front panel to select the appropriate input source:
- Postavite na PHONE for turntables.
- Postavite na RCA for line-level devices.
3. Kontrola jačine zvuka
Adjust the Volume Knob on the front panel to achieve your desired listening level. Start with a low volume and gradually increase it.
4. Tone Control and Bypass
The P7 features Bass and Treble controls for sound customization. Use the Tone/Bypass Switch to engage or disengage these controls:
- Postavite na TONE to enable the Bass and Treble knobs. Adjust them to your preference.
- Postavite na OBLAST for a pure, unaltered audio signal, bypassing the tone control circuit.

Image: The front panel controls of the Douk Audio P7, illustrating the Bass, Treble, and Volume knobs, and the Tone/Bypass switch.
5. High-Pass Filter (HPF)
The High-Pass Filter (HPF) switch on the rear panel is only active when the Phono input is selected. It cuts off subsonic noise below 20Hz, which can improve sound clarity and reduce distortion from turntable rumble.
- Postavite na HPF/20Hz to activate the filter.
- Postavite na STAN to disable the filter.

Image: The rear panel of the Douk Audio P7, showing the High-Pass Filter switch with its two settings: HPF/20Hz and FLAT.
Zamjena cijevi
The PSVANE ECC83 tubes are designed to be easily swappable, allowing for tube rolling to tailor the sound to your preference. To replace tubes:
- Ensure the unit is powered off and unplugged from the wall outlet.
- Allow the tubes to cool down completely if the unit has been in use.
- Gently pull the existing tubes straight up from their sockets. Avoid twisting or bending.
- Carefully insert the new ECC83 tubes, aligning the pins with the socket holes. Push down gently until they are seated firmly.
- Ponovo priključite napajanje i testirajte uređaj.
Održavanje
- čišćenje: Za čišćenje vanjske strane uređaja koristite meku, suhu krpu. Ne koristite tekuća sredstva za čišćenje ili otapala.
- ventilacija: Ensure the ventilation holes on the unit are not obstructed to maintain proper airflow.
- Skladištenje: Kada se uređaj ne koristi duži period, čuvajte ga na hladnom i suhom mjestu, dalje od direktne sunčeve svjetlosti i ekstremnih temperatura.
Rješavanje problema
| Problem | Mogući uzrok | Rješenje |
|---|---|---|
| Nema struje | Power adapter not connected; Power outlet faulty; Unit switched off. | Check power connections; Try a different outlet; Ensure power switch is ON. |
| Nema izlaza zvuka | Incorrect input selected; Cables not connected properly; Volume too low; Ampzvuk/zvučnici isključeni. | Select correct input (Phono/RCA); Check all audio cable connections; Increase volume; Ensure amplifier/speakers are on. |
| Humming/Buzzing noise (Phono) | Turntable ground not connected; Ground loop; HPF not engaged. | Connect turntable ground wire to GND terminal; Try engaging HPF; Ensure all components are properly grounded. |
| Izobličen zvuk | Volume too high; Faulty cables; Damaged tubes. | Reduce volume; Replace audio cables; Inspect tubes for damage or try new tubes. |
| Tone controls not working | Tone/Bypass switch set to BYPASS. | Set Tone/Bypass switch to TONE. |
Specifikacije
| Feature | Detalj |
|---|---|
| Broj modela | SUC-P7 |
| Dimenzije proizvoda | 4.88 x 6.1 x 1.65 inča |
| Težina artikla | 1.56 funte |
| Tipovi ulaza | MM Phono, RCA Line-level |
| Vrste izlaza | RCA, Balanced XLR |
| Cijevi | 2x PSVANE ECC83 |
| Visokopropusni filter | 20Hz (Phono input only) |
| Kontrola tona | Bass & Treble (with Bypass function) |
| Proizvođač | Douk Audio |
Garancija i podrška
Douk Audio proizvodi su dizajnirani za pouzdanost i performanse. Za informacije o garanciji i tehničkoj podršci, molimo vas da se obratite službenim Douk Audio stranicama. webweb-mjesto ili kontaktirajte prodavača. Sačuvajte račun kao dokaz o kupovini za reklamacije.
For further assistance, you may visit the Douk Audio store on Amazon: Prodavnica audio opreme Douk