1. Uvod
The Oasser Airbrush Kit with Air Compressor AK2-2 is a versatile tool designed for various spraying, painting, and airbrushing tasks. This manual provides essential information for the safe and effective use of your airbrush kit, covering setup, operation, maintenance, and troubleshooting.
This kit is suitable for art painting, model coloring, crafts, DIY projects, makeup application, nail art, and more. Its dual-action airbrush gun and adjustable high-pressure compressor offer precise control for a wide range of applications.
2. Šta se nalazi u kutiji
Please ensure all components are present before beginning. The Oasser Airbrush Kit AK2-2 includes:
- Airbrush kompresor
- Dual-Action Airbrush Gun
- Air Hose
- 12V DC adapter za napajanje
- Multiple Nozzles (0.2mm, 0.3mm, 0.5mm)
- Cleaning Brushes and Needles
- Ključ
- Dropper
- Seal Rings

3. Podešavanje
Follow these steps to set up your Oasser Airbrush Kit:
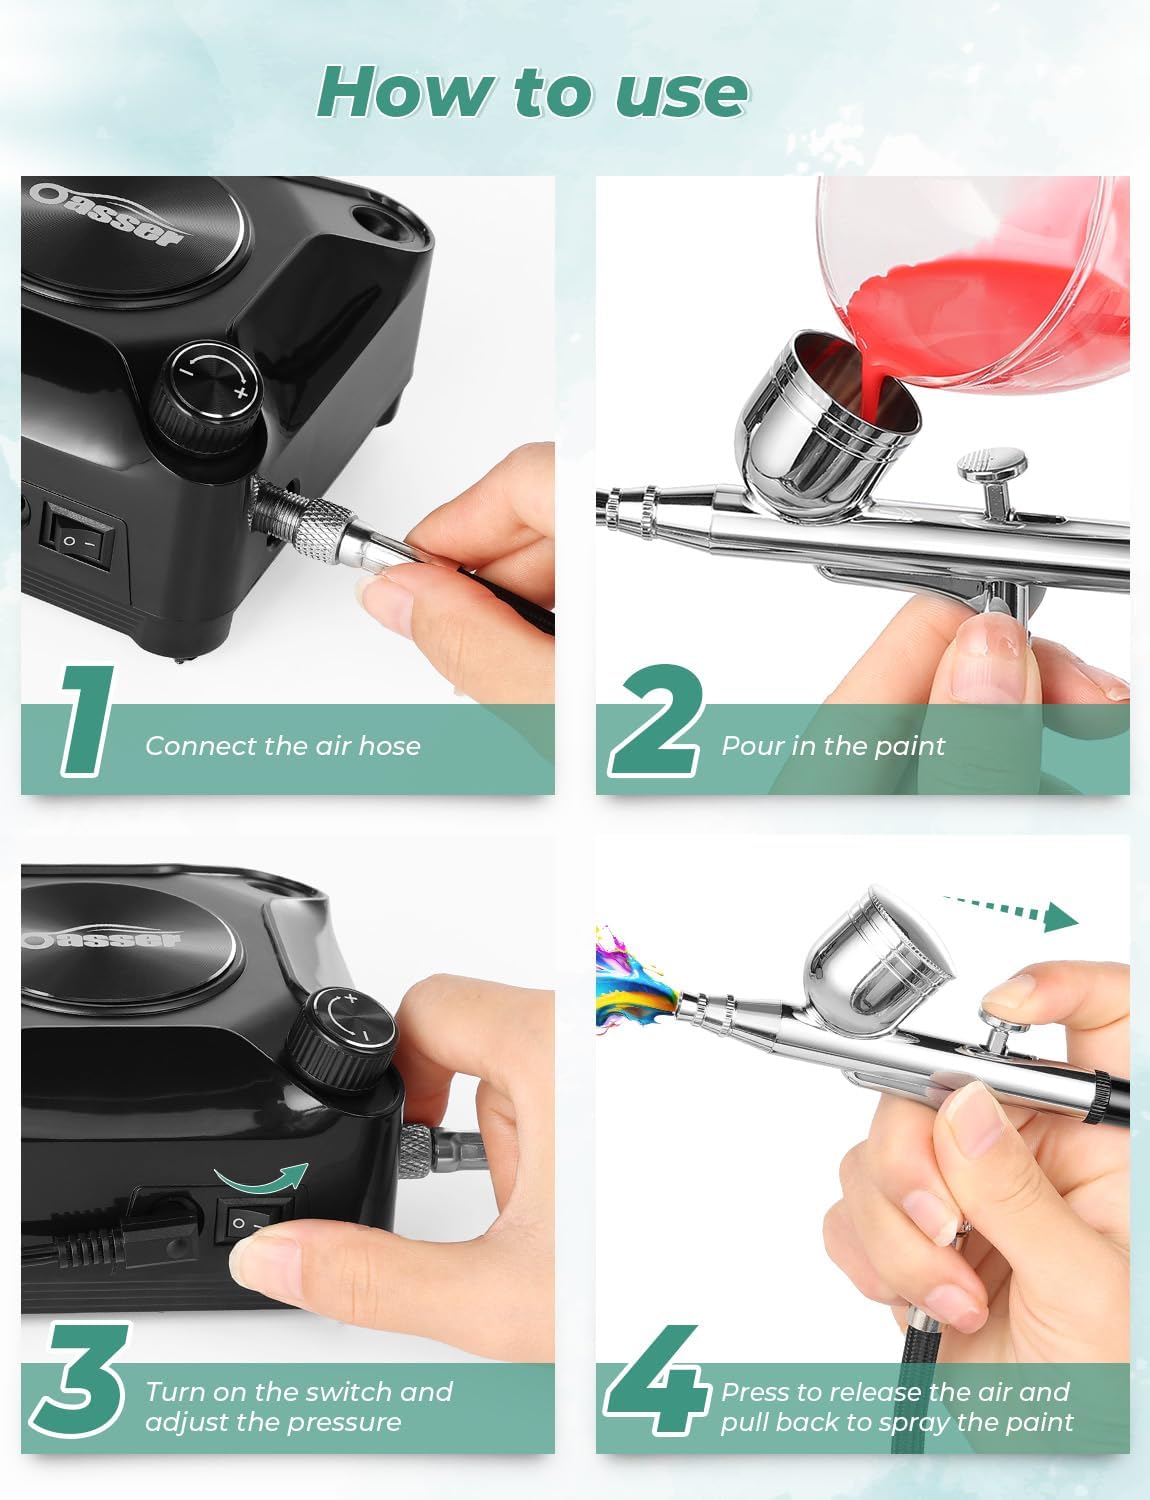
- Spojite crijevo za zrak: Securely attach one end of the air hose to the air outlet on the compressor and the other end to the air inlet on the airbrush gun. Ensure connections are tight to prevent air leaks.
- Povežite adapter za napajanje: Plug the 12V DC power adapter into the compressor's power input port, then plug the adapter into a suitable power outlet.
- Attach the Airbrush Gun: The airbrush gun connects directly to the air hose. Ensure the correct nozzle and needle size are installed for your intended application. The kit includes 0.2mm, 0.3mm, and 0.5mm nozzles and needles for various detail levels.
4. Uputstvo za upotrebu
Operating your airbrush kit involves a few key steps to achieve optimal results:
- Pour in the Paint: Open the paint cup on top of the airbrush gun and carefully pour in your desired paint. Ensure the paint is properly thinned to a milk-like consistency for smooth flow.
- Turn on and Adjust Pressure: Flip the power switch on the compressor to turn it on. Use the stepless pressure adjustment knob to fine-tune the airflow from 2 to 40 PSI, depending on your project's needs.
- Dual-Action Operation: The airbrush gun features a dual-action trigger. Press the trigger down for air, and pull it back for paint. This allows for precise control over both air volume and paint flow. The screw at the tail of the airbrush gun can be rotated to further control the spray range.
- Izbor mlaznica: Choose the appropriate nozzle size for your task:
- 0.2 mm: Suitable for fine details and intricate work.
- 0.3 mm: Ideal for general purpose and model painting.
- 0.5 mm: Best for larger areas and broader coverage.
- Auto Start/Stop Function: The compressor will only run continuously when you hold down the spray gun trigger for painting. If the compressor stops automatically, simply restart the spraying operation to activate it again.


Demonstracioni video zapisi
Oasser Airbrush Kit with Air Compressor
Ovaj video pruža opći pregledview of the Oasser Airbrush Kit, demonstrating its components and basic functionality. It shows the airbrush in action for various creative projects.
Everything to know! -airbrush kit
A detailed video explaining various aspects of the airbrush kit, including setup, operation, and tips for achieving different effects. Useful for both beginners and experienced users.
Initial impressions, it’s an awesome kit to get started with!
This short video demonstrates the airbrush in use for priming small models and shows how easy it is for a beginner, including a child, to operate.
5. Održavanje i čišćenje
Proper cleaning and maintenance are crucial for the longevity and optimal performance of your airbrush kit. Always clean thoroughly after each use to prevent nozzle clogging.
- Početno ispiranje: After spraying paint, empty any remaining paint from the cup. Add a small amount of appropriate cleaning solution (or water for water-based paints) to the cup. Spray it through the airbrush until the spray runs clear.
- Rastavljanje: Carefully disassemble the airbrush gun, including the nozzle, needle, and paint cup. Refer to the diagram in the included manual for detailed disassembly steps.
- Temeljno čišćenje: Use the provided cleaning brushes and needles to clean all paint residue from the paint cup, nozzle, needle, and airbrush body. Pay special attention to the fine tip of the nozzle and needle.
- Ponovno sastavljanje: Once all parts are clean and dry, reassemble the airbrush gun. Ensure all components are correctly seated and tightened.

pažnja:
- Avoid using this product for food-related purposes if it has been used for chemical spraying.
- Before each use, test the gun by spraying pure water. If it sprays correctly, the gun is clear and ready for paint. If not, it indicates residual blockage from incomplete cleaning, and a complete teardown and cleaning is required.

6. Otkrivanje problema
If you encounter issues with your airbrush kit, consider the following common problems and solutions:
- Nema prskanja ili slabo prskanje:
- Check if the air hose is securely connected and the compressor is on.
- Ensure the nozzle is not clogged. Disassemble and clean thoroughly.
- Verify the paint is properly thinned. Thick paint can cause blockages.
- Check the air pressure setting on the compressor. Increase if too low.
- Nedosljedan uzorak prskanja:
- Clean the nozzle and needle for any partial blockages.
- Ensure the needle is seated correctly and not bent.
- Check for air leaks in connections.
- Paint Bubbling in Cup:
- This often indicates a clogged nozzle or a loose nozzle cap. Clean or tighten as needed.
- Provjerite ima li oštećenja na mlaznici ili igli.
7. Specifikacije
| Feature | Specifikacija |
|---|---|
| Brand | Oasser |
| Naziv modela | Airbrush Kit (AK2-2) |
| Preporučena upotreba | Zračno četkanje |
| Kapacitet protoka zraka | 10.5 litara u minuti |
| Maksimalni radni pritisak | 40 funte po kvadratnom inču (PSI) |
| Uključene komponente | Air hose, multiple nozzles (0.2/0.3/0.5mm), cleaning brushes and needles, wrench, dropper, seal rings, 12v DC adapter |
| Težina artikla | 2.09 funti (950 grama) |
| Dimenzije proizvoda | 4.9 x 4.9 x 2.9 inča |
8. Jamstvo i podrška
Oasser products are manufactured to high-quality standards and are backed by a standard product warranty. For specific warranty details, please refer to the warranty card included in your product packaging or contact Oasser customer service.
If you require technical assistance, have questions about product operation, or need to report a defect, please contact Oasser customer support through the retailer's platform or the official Oasser website. Our team is dedicated to providing prompt and helpful solutions.


