1. Uvod
This manual provides detailed instructions for the installation, operation, and maintenance of your Jennov 5MP Wireless Security Camera System P48. This system includes an 8-channel NVR with a built-in monitor and four 5MP wireless cameras, designed for both indoor and outdoor surveillance. Please read this manual thoroughly before using the product to ensure proper setup and functionality.
2. Sadržaj paketa
Verify that all items listed below are included in your package. If any items are missing or damaged, please contact Jennov customer support.
- 4 x Security Cameras (Outdoor Wireless)
- 1 x NVR Monitor
- 1 x P48 Security System (Integrated NVR with Monitor)
- 1 x 1TB Hard Disk (Pre-installed)
- 1 x Ethernet kabel
- 1 x miš
- 4 x Hole Stickers (for camera mounting)
- 4 x Camera Bases
- 1 x NVR napajanje
- 4 x Camera Power Supplies
- 1 x HDMI kabl
- 1 x Nalepnica upozorenja
- 1 x Korisnički priručnik (ovaj dokument)
- 1 x Screws Pack (for mounting)
3. Proizvod je gotovview
The Jennov P48 system is a comprehensive wireless security solution designed for ease of use and reliable performance. Key features include:
- 5MP HD rezolucija: Cameras capture clear, detailed video.
- Bežična povezanost: Cameras connect to the NVR wirelessly, simplifying installation.
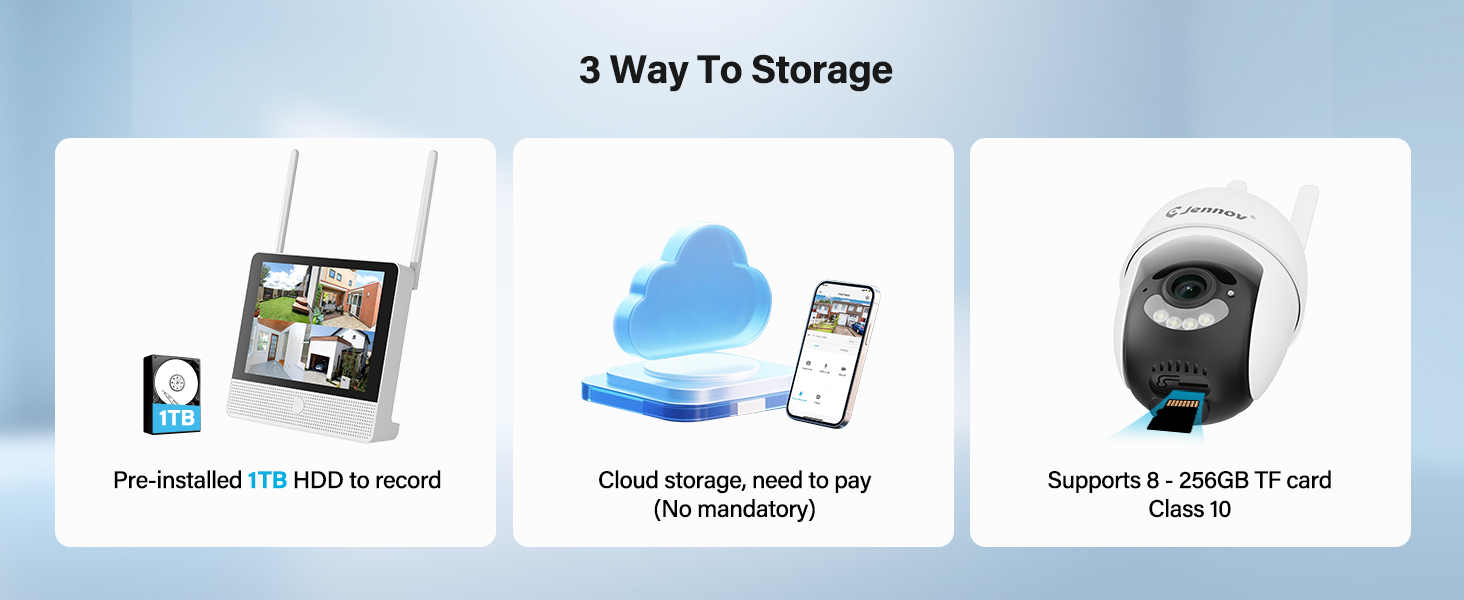
- 1TB HDD Storage: Pre-installed hard drive for local recording without subscription fees.
- noćni vid: Enhanced visibility in low-light conditions up to 15 meters.
- Detekcija pokreta: Triggers recording and alerts upon detecting movement.
- IP66 Otporan na vremenske uslove: Cameras are designed to withstand various outdoor weather conditions.
- Plug-and-Play: Simple setup with cameras pre-paired to the NVR.
- Dvosmjerni zvuk: Communicate through the cameras using the mobile app.
- Daljinski pristup: View live feeds and recordings from anywhere via the Jennov app.
3.1 Komponente sistema

The system consists of a Network Video Recorder (NVR) with an integrated monitor and four wireless IP cameras. The NVR manages video recording, storage, and provides a local viewing interface. The cameras capture video and transmit it wirelessly to the NVR.
3.2 NVR Ports and Connections
- Napajanje: Connect the NVR power adapter.
- USB port: For connecting the included mouse or a USB drive for backup.
- HDMI priključak: Connect to an external monitor for larger display (optional).
- LAN port: Connect to your router for internet access and remote viewing.
- Dugme za resetiranje: Used to reset the NVR to factory settings.
- Utor za SD karticu: For additional local storage (supports up to 256GB TF card, Class 10).
4. Vodič za postavljanje
4.1 Početno podešavanje NVR-a
- Priključite napajanje: Connect the NVR power adapter to the Power Port and plug it into an electrical outlet. The NVR will power on automatically.
- Povezivanje miša: Plug the included USB mouse into the USB Port on the NVR.
- Početno pokretanje: The NVR will boot up and display the live view from the pre-paired cameras on its integrated monitor.
- Mrežna veza (opciono za udaljeni pristup): Za daljinski viewing via the mobile app, connect the NVR's LAN Port to your internet router using the provided Ethernet cable.
4.2 Instalacija kamere
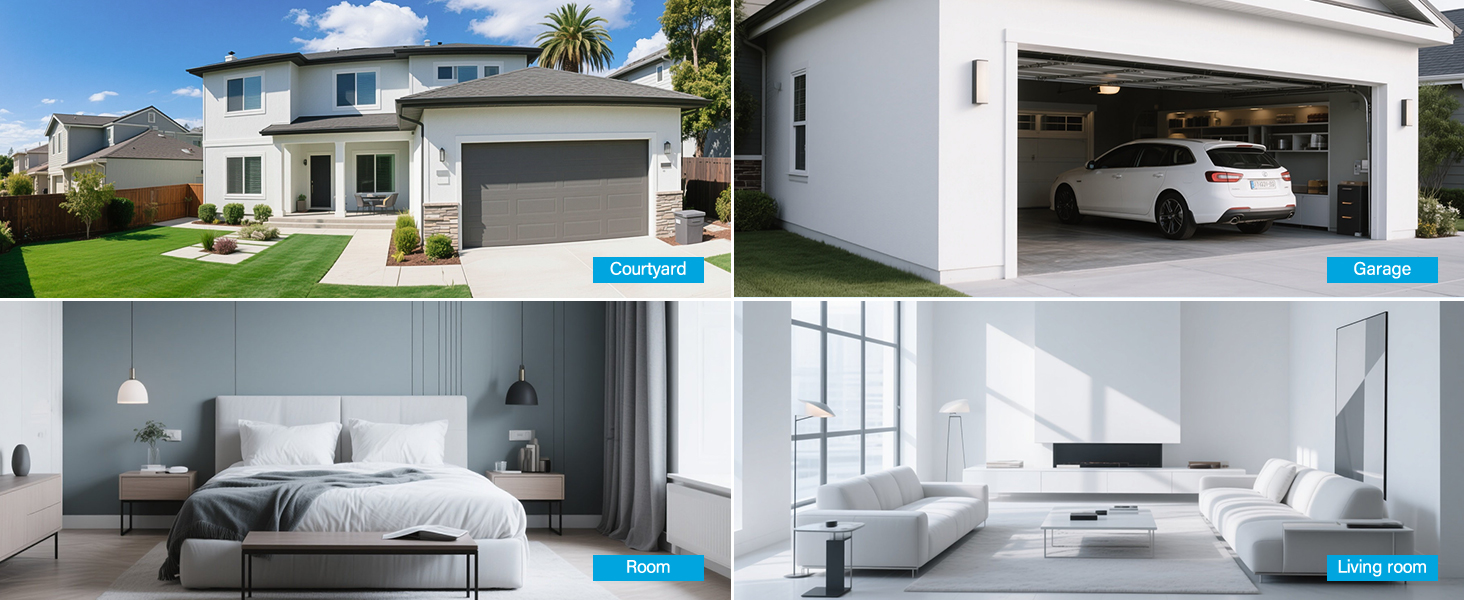
The cameras are designed for both indoor and outdoor use (IP66 rated). Choose mounting locations that provide optimal coverage and are within range of a power outlet.
- Odaberite lokaciju: Identify suitable locations for each camera. Consider areas like entryways, driveways, garages, and backyards. Ensure the camera has a clear line of sight to the area you wish to monitor.
- Montaža:
- Use the included hole stickers to mark drilling points on the wall or ceiling.
- Drill pilot holes and insert the wall anchors if necessary.
- Pričvrstite bazu kamere pomoću priloženih vijaka.
- Attach the camera to the base and adjust its angle.
- Priključite napajanje: Connect each camera to its individual power adapter and plug it into an electrical outlet. The cameras will power on and automatically connect to the NVR.
Napomena: The cameras are pre-paired to the NVR. If a camera does not display a live feed, ensure it is powered on and within wireless range of the NVR. You may need to re-pair it if issues persist (refer to Troubleshooting section).
5. Uputstvo za upotrebu
5.1 Uživo View i Navigacija
Once the system is powered on, the NVR's integrated monitor will display the live feeds from all connected cameras. Use the included mouse to navigate the NVR interface.
- Glavni meni: Desni klik bilo gdje na uživo view ekran za pristup glavnom meniju.
- Promjena kanala: Click on a specific camera feed to view it in full screen, or use the layout options to change the multi-camera display.
5.2 Snimanje i reprodukcija
The system records continuously to the pre-installed 1TB HDD. Recording settings can be adjusted via the NVR's menu.
- Kontinuirano snimanje: The system is configured for 24/7 continuous recording by default.
- Snimanje aktivirano pokretom: You can configure cameras to record only when motion is detected, saving storage space.
- Reprodukcija: From the main menu, select "Playback" to review snimljeno footage. You can search by date, time, and event type (e.g., motion detection).
5.3 Detekcija pokreta i upozorenja
The cameras feature smart motion detection to alert you to activity.
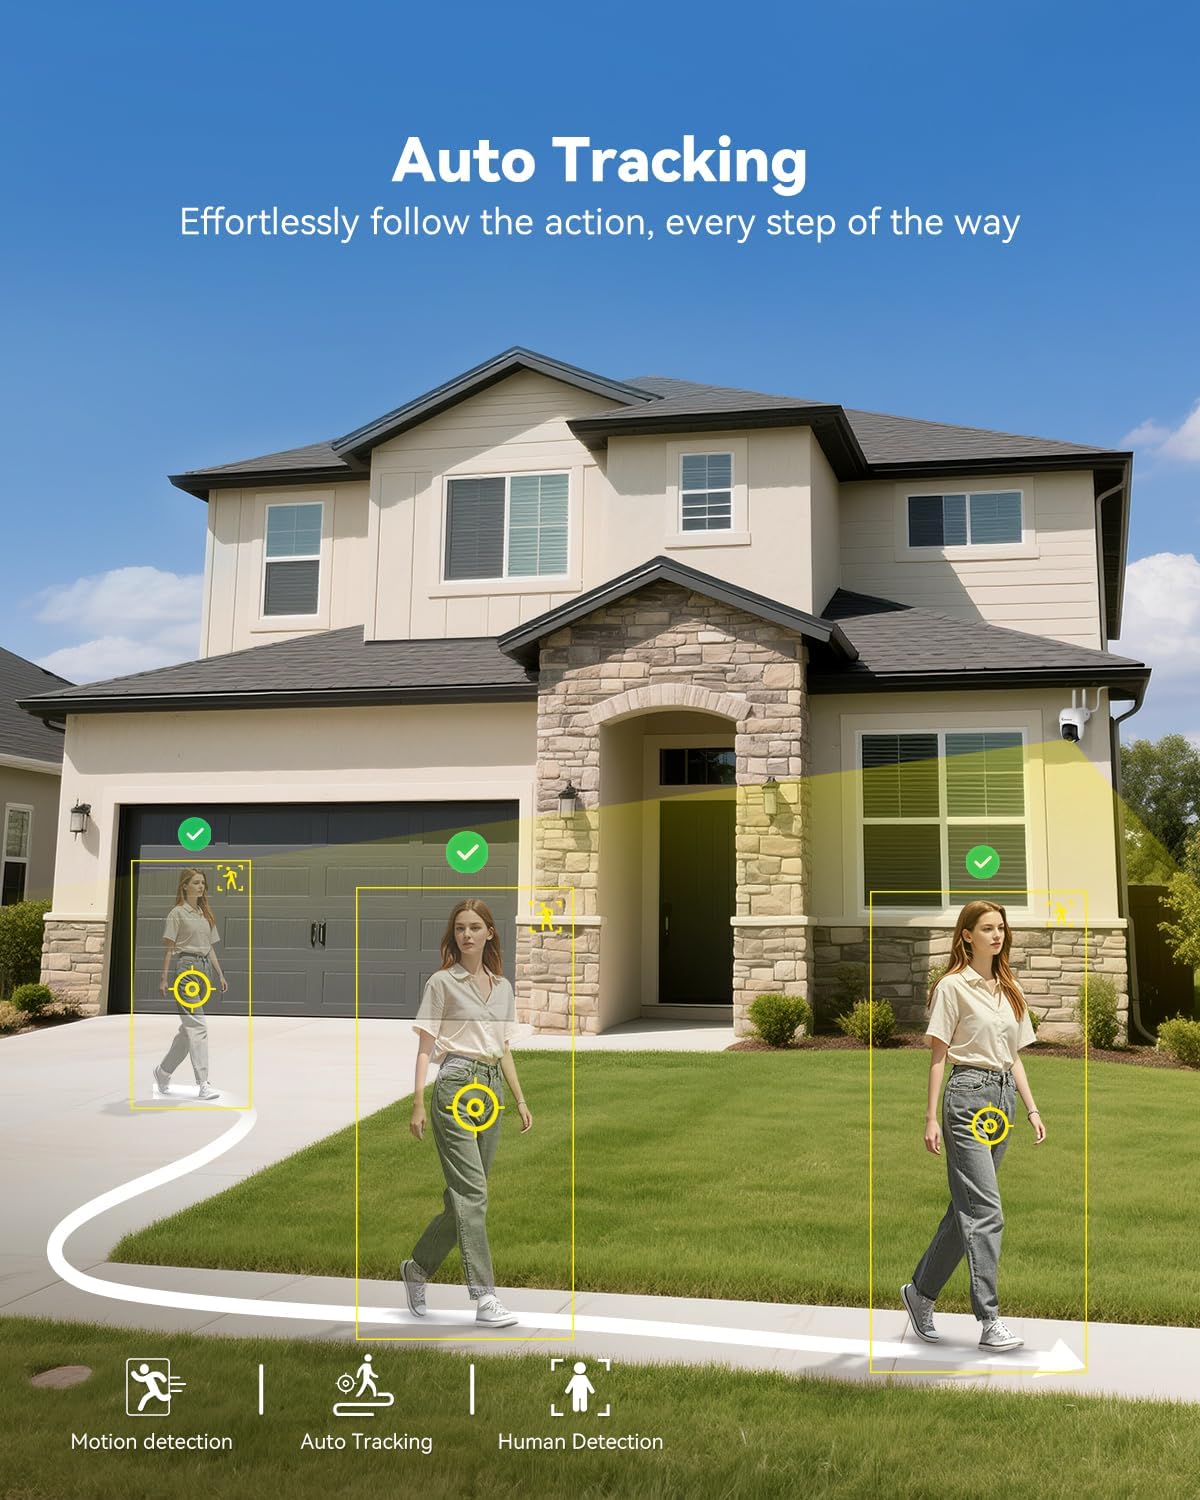
- Konfiguracija: Access motion detection settings from the NVR's main menu. You can define detection zones and sensitivity levels for each camera.
- Upozorenja: When motion is detected, the system can trigger recordings, send push notifications to your mobile app (if configured), and activate audible alarms or spotlights on the camera (if supported and enabled).

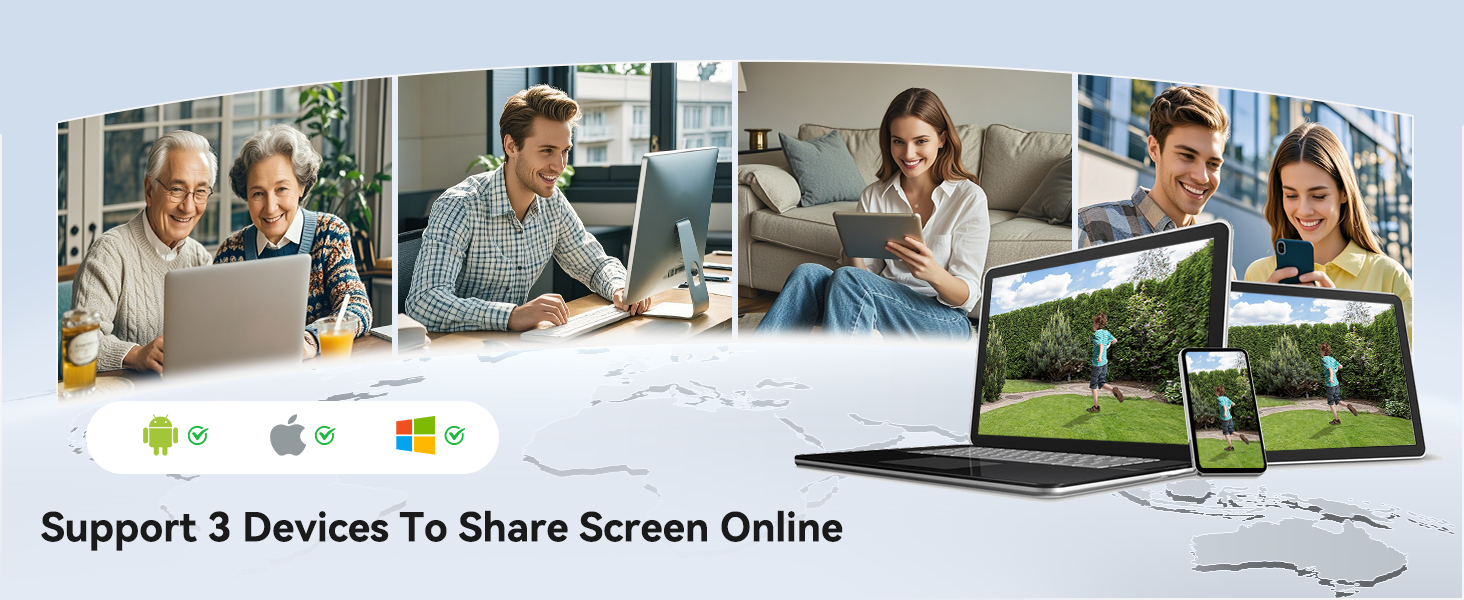
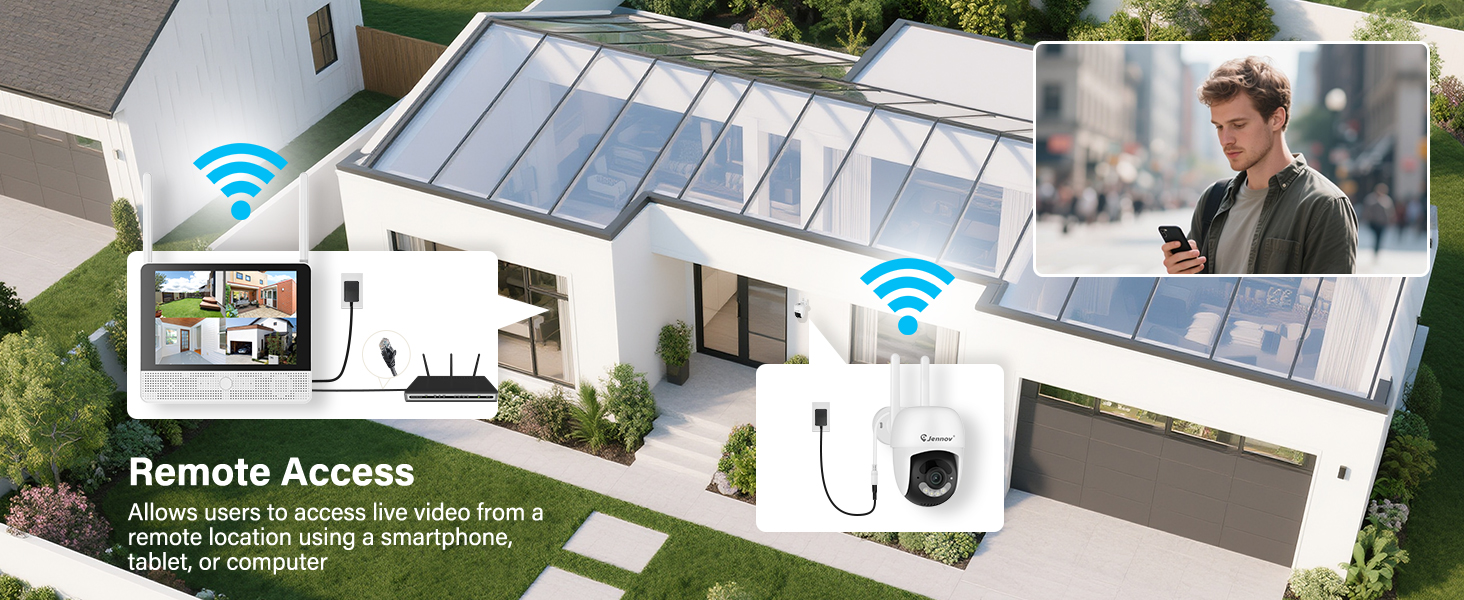
5.4 Remote Access (Jennov App)
To view your cameras remotely, download the Jennov app on your smartphone or tablet.
- Preuzmi aplikaciju: Traži "Jennov" in your device's app store (iOS or Android).
- Registrirajte račun: Kreirajte novi korisnički račun unutar aplikacije.
- Dodaj uređaj: Follow the in-app instructions to add your NVR system. This typically involves scanning a QR code displayed on the NVR's monitor or entering the device ID manually.
- Uživo View & Reprodukcija: Nakon što ga dodate, možete view live feeds, play back recordings, and receive alerts directly on your mobile device.
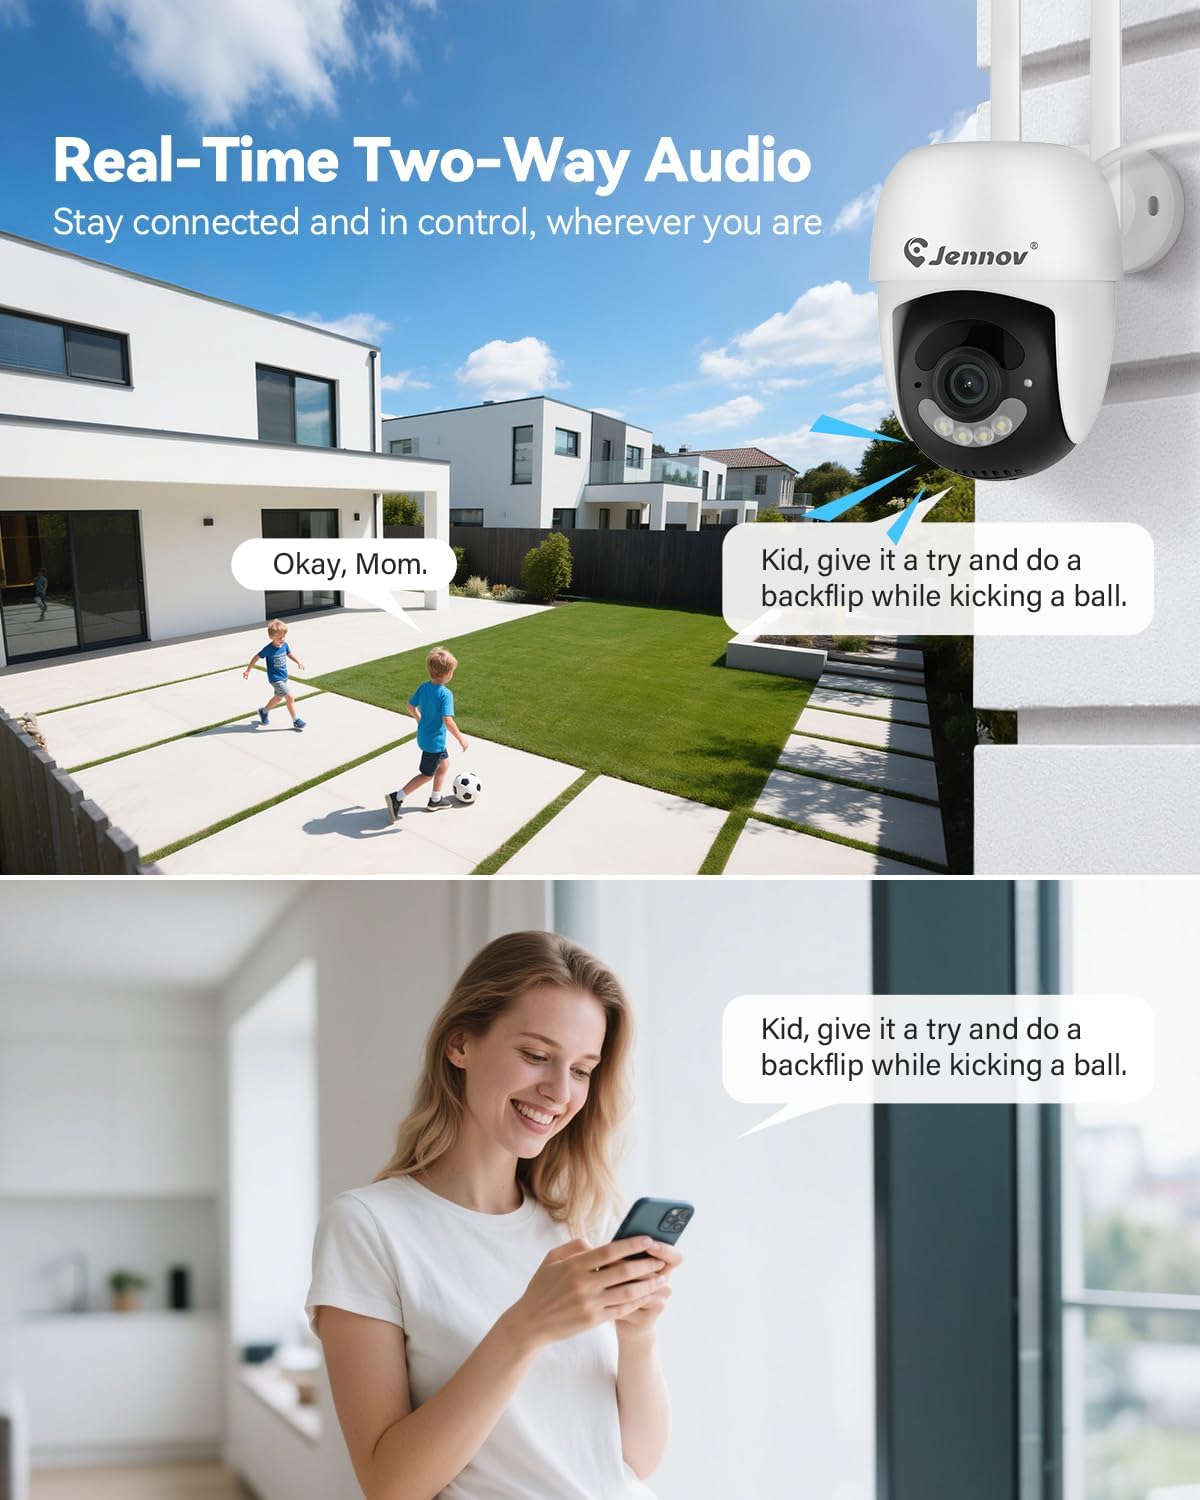
5.5 Dvosmjerni audio
Each camera is equipped with a microphone and speaker, enabling two-way communication through the Jennov app.
- Aktiviraj: U živo view of a specific camera on the app, locate the microphone icon. Tap it to speak, and your voice will be transmitted through the camera's speaker.
- slušaj: The camera's microphone will pick up audio from its surroundings, which you can hear through the app.
5.6 Noćni vid
The cameras automatically switch to night vision mode in low-light conditions, providing clear surveillance even in darkness.

- Automatsko aktiviranje: Infrared (IR) LEDs enable black-and-white night vision. Some models may also offer color night vision under certain conditions (e.g., with ambient light or activated spotlight).
- Raspon: Night vision is effective up to 15 meters (50 feet).
6. Održavanje
6.1 Upravljanje tvrdim diskom
The 1TB HDD will automatically overwrite the oldest footage when full. No manual intervention is typically required for continuous recording.
- Backup Footage: If you need to save specific recordings, use the NVR's backup function (via USB port) or download from the mobile app.
- Provjera stanja tvrdog diska: Periodically check the HDD status in the NVR's system settings to ensure proper functioning.
6.2 Čišćenje
- kamere: Nježno obrišite sočiva kamere mekom krpomamp cloth to remove dust or smudges. Do not use harsh chemicals.
- NVR: Keep the NVR monitor and unit free from dust. Use a dry, soft cloth for cleaning.
6.3 Ažuriranja firmvera
Periodically check the Jennov website or contact customer support for available firmware updates. Updates can improve system performance, add new features, or address security vulnerabilities. Follow the provided instructions carefully when performing updates.
7. Otkrivanje problema
| Problem | Mogući uzrok | Rješenje |
|---|---|---|
| Nema slike na NVR monitoru | NVR not powered on; Power adapter faulty; Monitor cable loose. | Ensure NVR power adapter is securely connected and plugged in. Check power outlet. If using external monitor, ensure HDMI cable is connected properly. |
| Camera not displaying live feed | Camera not powered; Out of wireless range; Not paired with NVR. | Ensure camera power adapter is connected and plugged in. Move camera closer to NVR. If still no feed, re-pair the camera: access NVR menu, go to "Camera Management" and follow instructions to add/re-pair cameras. |
| Cannot access system via mobile app | NVR nije povezan na internet; Neispravne postavke aplikacije; Problemi sa zaštitnim zidom (firewall). | Ensure NVR is connected to your router via Ethernet cable. Verify your phone has internet access. Double-check device ID/QR code in the app. Ensure router firewall is not blocking NVR access. |
| Loš kvalitet videa ili kašnjenje | Weak wireless signal; Obstructions; Interference. | Relocate camera or NVR to improve signal strength. Minimize obstructions (thick walls, metal objects). Avoid placing near other wireless devices that may cause interference. |
| Detekcija pokreta ne radi | Settings incorrect; Sensitivity too low; Detection zone not set. | Access NVR menu, go to "Motion Detection" settings. Adjust sensitivity, define detection zones, and ensure motion recording/alerts are enabled. |
8. Specifikacije
| Feature | Detalj |
|---|---|
| Brand | Jennov |
| Broj modela | K4-P48HC55AS-V2108-1F2 (P48 System) |
| Tehnologija povezivanja | Bežični |
| Rezolucija video snimanja | 5MP (Ultra-HD) |
| Broj kanala | 8 (System includes 4 cameras, expandable) |
| Kapacitet memorije | 1 TB HDD (pre-installed), supports up to 256GB TF card |
| Izvor napajanja | Corded Electric (Outlet-Powered Cameras) |
| Dimenzije artikla (D x Š x V) | 13.39 x 7.48 x 11.42 inča |
| Preporučena upotreba | Unutrašnji i vanjski nadzor |
| Noćni vid | 10-15 Meters (approx. 33-50 feet) |
| Vodootpornost | IP66 ocijenjeno |
| Radna temperatura | -20°C do 60°C (-4°F do 140°F) |
9. Garancija i podrška
For warranty information, technical support, or any questions regarding your Jennov P48 Wireless Security Camera System, please refer to the warranty card included in your package or visit the official Jennov website. You can also contact Jennov customer service directly for assistance.
Jennov Official Webstranica: Visit Jennov Store on Amazon


