Uvod
This manual provides detailed instructions for the installation, operation, and maintenance of your Diyeeni H511 Gaming Motherboard. Please read this manual thoroughly before proceeding with installation to ensure correct setup and optimal performance.
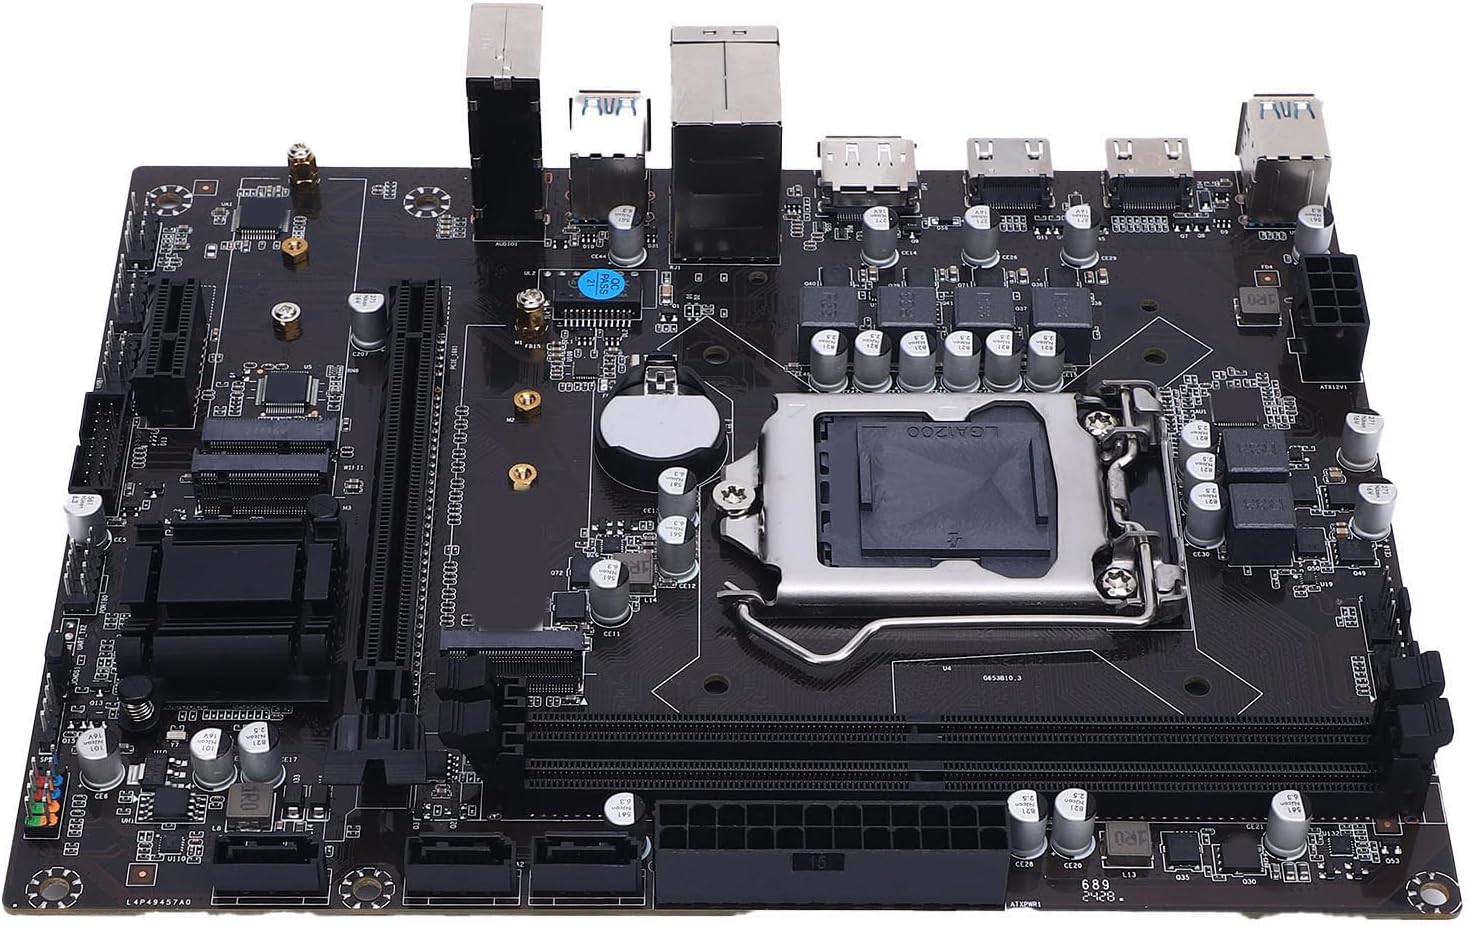
Slika: Vrh view of the Diyeeni H511 Gaming Motherboard, showcasing the CPU socket, RAM slots, and various connectors.
Sigurnosne informacije
- Uvijek isključite napajanje iz računara prije instaliranja ili uklanjanja bilo kakvih komponenti.
- Nosite antistatičku narukvicu kako biste spriječili oštećenje komponenti usljed elektrostatičkog pražnjenja (ESD).
- Handle components by their edges to avoid touching sensitive circuits.
- Osigurajte odgovarajuću ventilaciju unutar kućišta računara kako biste spriječili pregrijavanje.
- Držite matičnu ploču dalje od vlage i ekstremnih temperatura.
Sadržaj paketa
Provjerite da li su sve stavke prisutne u paketu:
- 1 x Diyeeni H511 Gaming Motherboard
- (Additional accessories such as SATA cables, I/O shield, and manual may be included depending on the specific retail package.)
Specifikacije
| Vrsta stavke | Gaming Matična ploča |
| Materijal | PCB |
| Baterija | Built-in CR2032 240mAh |
| Čipset | H511 Express Chipset |
| Socket | LGA 1200 |
| Podrška za CPU | 10th and 11th Gen Core i3, i5, i7, i9, and Celeron Series Processors |
| Memorija | 2 x 288-pin DDR4 SDRAM slots, Dual Channel, Max 64GB, Supports 3200/2933/2800/2666/2400/2133MHz |
| Slotovi za proširenje | 1 x PCI Express x16, 1 x PCI Express x1, 1 x WIFI interface, 2 x NVME-M.2 interface |
| Integrated Sound Card | Realtek ALC 6-channel HD Sound Codec |
| Skladištenje | 3 x Serial ATA 3.0 (6Gb/s) ports |
| I/O portovi | 2 x USB 2.0, 4 x USB 3.0, 1 x DisplayPort, 2 x HD Multimedia Interface, 1 x RJ45, 1 x 3-in-1 Sound Port |
| Konektori na ploči | 1 x 24-pin ATX Power, 1 x 8-pin ATX 12V Power, 2 x USB 2.0 (supports 4 x USB 2.0), 1 x USB 3.0 (supports 2 x USB 3.0), 1 x F-Sound, 1 x PROT80, 1 x UART, 1 x F-SPK1, 1 x JCMOS1, 2 x Fan, 1 x F-PANEL1 |
| Veličina proizvoda | Približno 16.8 x 21.5 cm (6.61 x 8.46 inča) |
| Broj modela | Diyeenieuy6i4doza |
| Težina artikla | 1.09 funte |
Vodič za postavljanje
Slijedite ove korake za pravilnu instalaciju matične ploče i komponenti.
1. Instalacija CPU-a
Carefully install the CPU into the LGA 1200 socket.
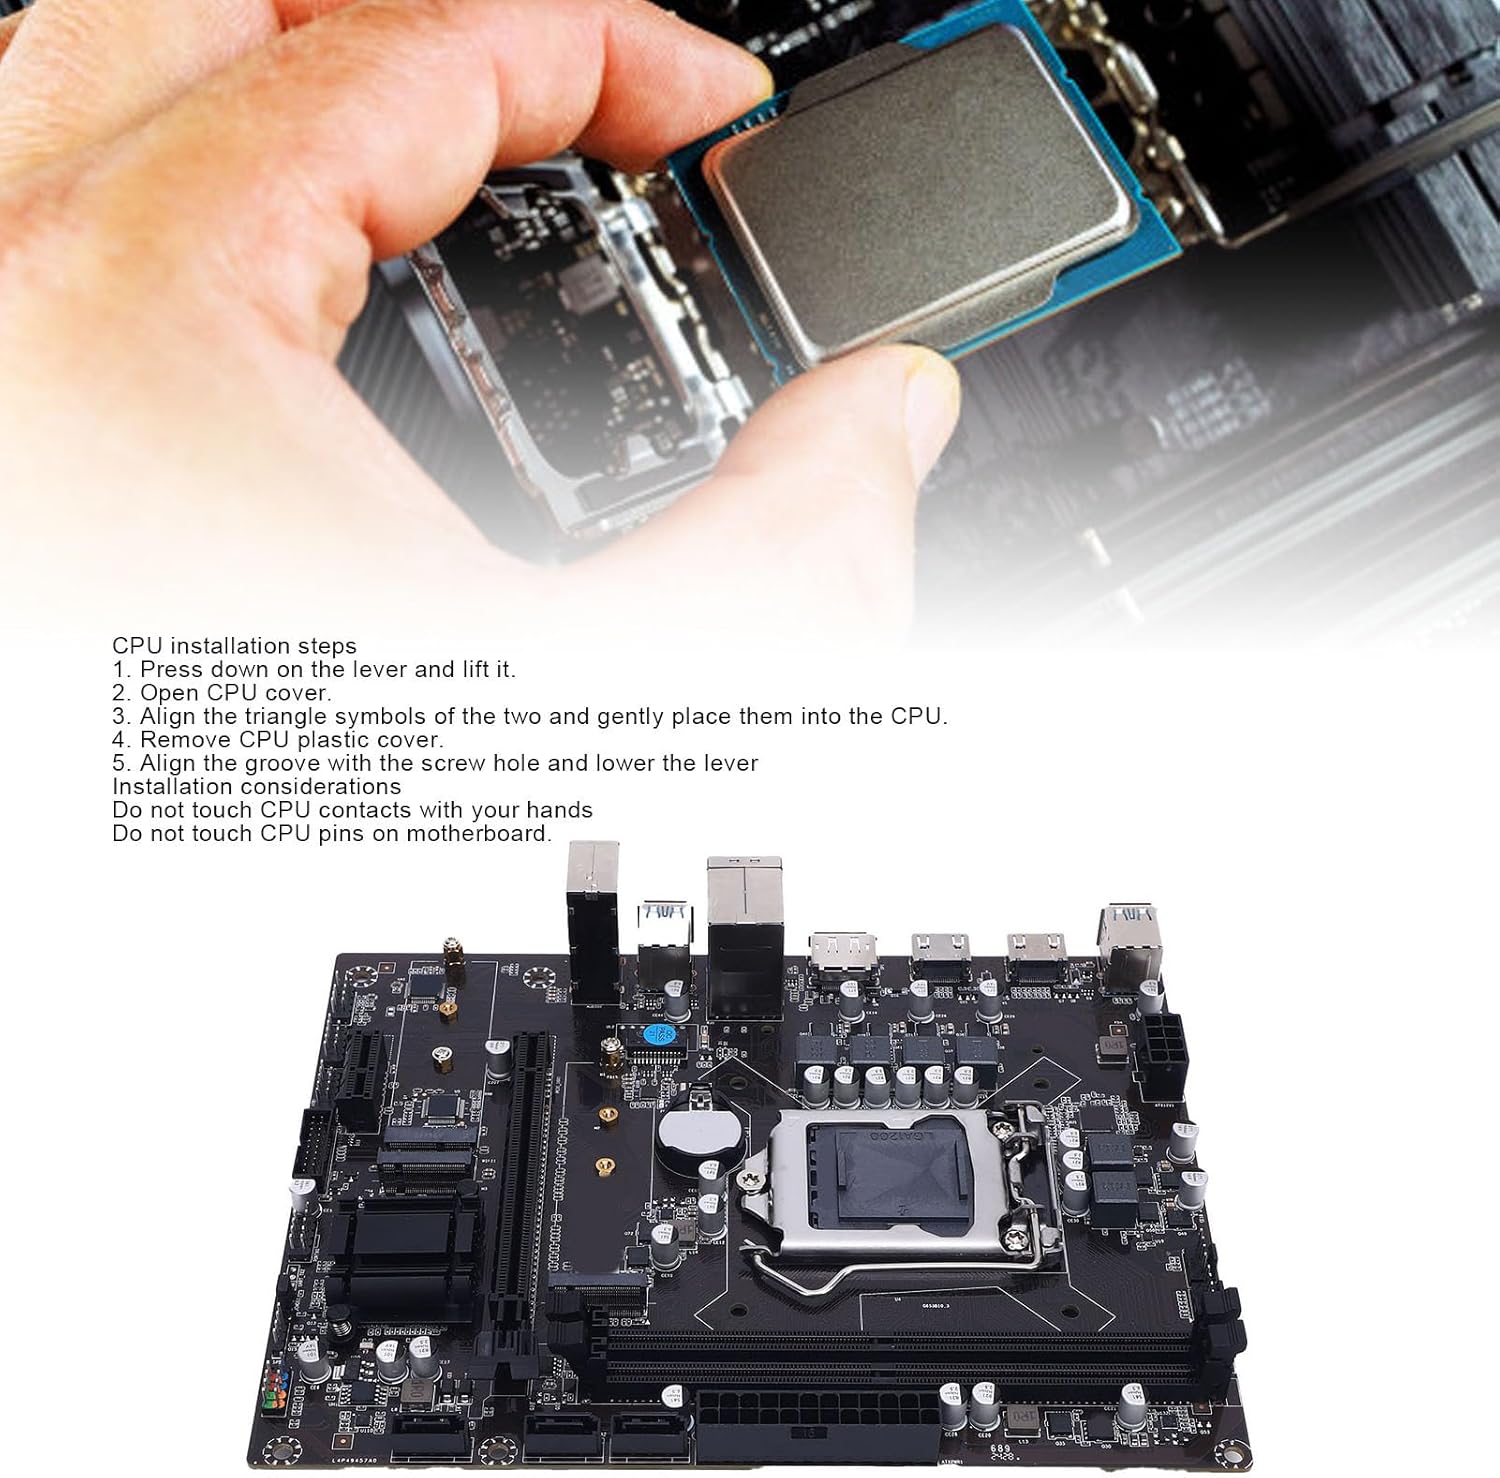
Image: A hand carefully placing a CPU into the motherboard's LGA 1200 socket, with installation steps visible.
- Press down on the lever next to the CPU socket and lift it.
- Open the CPU cover.
- Align the triangle symbols on the CPU and the socket, then gently place the CPU into the socket.
- Remove the CPU plastic cover.
- Align the groove with the screw hole and lower the lever to secure the CPU.
Važna razmatranja:
- Do not touch CPU contacts with your hands.
- Do not touch CPU pins on the motherboard socket.

Slika: Krupni plan view of the LGA 1200 CPU socket on the motherboard, showing the retention mechanism.
2. Instalacija memorije (RAM)
The motherboard features two 288-pin DDR4 SDRAM slots. Install DDR4 memory modules into these slots.
- Otvorite kopče na oba kraja DIMM utora.
- Poravnajte zarez na DDR4 memorijskom modulu s ključem u DIMM utoru.
- Čvrsto pritisnite oba kraja memorijskog modula dok se kopče ne uklope na svoje mjesto.
3. Instalacija uređaja za pohranu podataka
The motherboard supports M.2 NVMe SSDs and SATA 3.0 devices.
M.2 NVMe SSD Installation:
- Locate the two NVME-M.2 interfaces on the motherboard.
- Umetnite M.2 SSD u utor pod uglom od 30 stepeni.
- Gently push the SSD down and secure it with the provided screw.
SATA 3.0 Device Installation:
- Connect one end of a SATA data cable to one of the three Serial ATA 3.0 ports on the motherboard.
- Drugi kraj SATA podatkovnog kabela spojite na vaš SATA tvrdi disk ili SSD.
- Connect a SATA power cable from your power supply to the SATA device.
4. Instalacija kartice za proširenje
Install graphics cards or other expansion cards into the PCI Express slots.
- Locate the PCI Express x16 slot (for graphics cards) and the PCI Express x1 slot.
- Align the expansion card with the chosen slot and press down firmly until it is seated correctly.
- Pričvrstite karticu vijkom na kućište računara.
5. Priključci za napajanje
Connect the main power cables from your power supply to the motherboard.
- Connect the 24-pin ATX power connector to the main power socket on the motherboard.
- Connect the 8-pin ATX 12V power connector to the CPU power socket.
6. Front Panel and Internal Connections
Connect the various cables from your computer case to the motherboard's internal headers.
- USB zaglavlja: Connect front panel USB 2.0 and USB 3.0 cables to the corresponding headers (2 x USB 2.0 connectors, 1 x USB 3.0 connector).
- Zaglavlje zvuka: Connect the front panel audio cable to the F-Sound connector.
- Priključci na prednjoj ploči: Connect power switch, reset switch, power LED, and HDD LED cables to the F-PANEL1 connector. Refer to your case manual for specific pin assignments.
- Zaglavlja ventilatora: Connect case fans to the two available fan connectors.

Slika: Krupni plan view of the internal USB 3.0 header and other power/data connectors on the motherboard.
7. Priključci I/O panela
Connect external peripherals to the rear I/O panel ports.

Image: Diagram illustrating the various I/O ports on the motherboard, including USB 3.0, HD Multimedia Interface, DisplayPort, USB 2.0, and Audio jacks.
- USB portovi: Connect USB devices (keyboard, mouse, external drives) to the 2 x USB 2.0 and 4 x USB 3.0 ports.
- Video izlazi: Connect your monitor(s) to the DisplayPort or one of the two HD Multimedia Interface ports. Note: Integrated graphics support is required from your CPU to utilize these outputs.
- LAN port: Connect an Ethernet cable to the RJ45 port for network access.
- Audio priključci: Connect speakers, headphones, or a microphone to the 3-in-1 sound port (Sound In, Sound Out, Mic In).
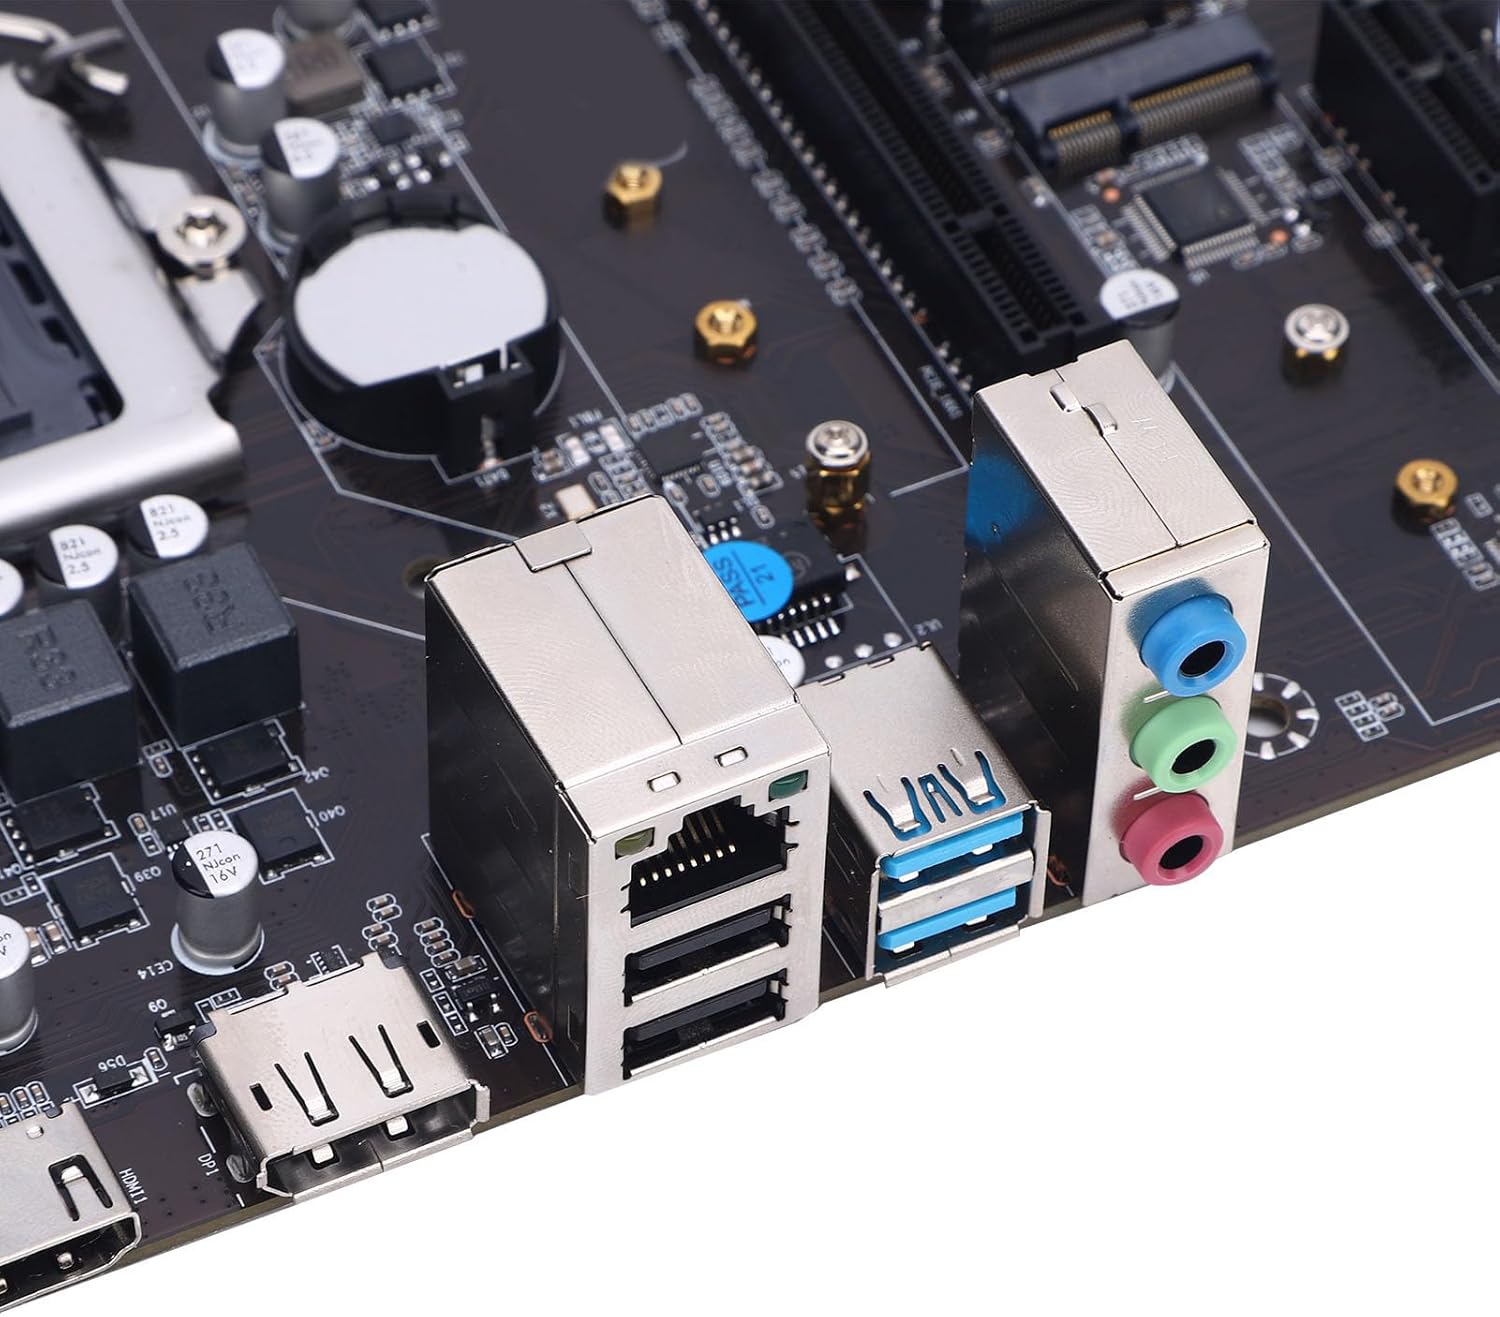
Slika: Krupni plan view of the rear I/O panel, showing the Ethernet port, USB ports, and audio jacks.
Uputstvo za upotrebu
Prvo pokretanje i podešavanje BIOS-a
- Nakon što sastavite sve komponente, povežite monitor, tastaturu i miš.
- Connect the power cord to your power supply and turn on the power switch.
- Pritisnite dugme za napajanje na kućištu računara.
- Tokom pokretanja, više puta pritisnite DEL key (or F2, F10, F12 depending on BIOS version) to enter the BIOS/UEFI setup utility.
- In the BIOS, you can configure boot order, system time, enable/disable integrated peripherals, and adjust performance settings. Save changes and exit to boot into your operating system installer.
Instalacija drajvera
After installing your operating system, install the necessary drivers for optimal performance.
- Drajveri za čipset: Install the chipset drivers first, usually found on the manufacturer's website or an included driver CD/USB.
- Drajveri za grafiku: Install drivers for your dedicated graphics card (if applicable) or the integrated graphics from your CPU.
- Audio drajveri: Install Realtek ALC audio drivers.
- LAN drajveri: Install network drivers for the RJ45 port.
- M.2/SATA Drivers: Ensure storage drivers are up to date for optimal SSD/HDD performance.
Always download the latest drivers from the official Diyeeni website or the component manufacturers' websites (e.g., Intel for chipset, Realtek for audio).
Održavanje
- čišćenje: Redovno čistite prašinu sa matične ploče i komponenti komprimiranim zrakom. Prije čišćenja provjerite je li sistem isključen iz struje.
- Ažuriranja BIOS-a/UEFI-ja: Periodically check the Diyeeni support website for BIOS/UEFI updates. Updates can improve stability, compatibility, and add new features. Follow the update instructions carefully to avoid damaging the motherboard.
- Ažuriranja drajvera: Keep all system drivers updated to ensure optimal performance and security.
- CMOS baterija: The motherboard uses a CR2032 battery for CMOS settings. If you experience issues with system time or BIOS settings resetting, the battery may need replacement.
Rješavanje problema
- Nema napajanja:
- Check all power connections (24-pin ATX, 8-pin ATX 12V) are securely seated.
- Provjerite je li prekidač za napajanje u položaju 'UKLJUČENO'.
- Test the power supply with another system or a power supply tester.
- Bez prikaza:
- Ensure your monitor is connected to the correct video output (motherboard or dedicated graphics card).
- Verify that your CPU has integrated graphics if using motherboard video outputs.
- Ponovo instalirajte grafičku karticu i RAM module.
- Pokušajte pokrenuti sistem samo s jednom RAM memorijom.
- Nestabilnost/Padovi sistema:
- Provjerite temperaturu CPU-a i GPU-a.
- Provjerite jesu li svi upravljački programi ispravno instalirani i ažurirani.
- Pokrenite alate za dijagnostiku memorije da biste provjerili integritet RAM-a.
- Provjerite napajanjetage je dovoljno za sve komponente.
- Operativni sistem se ne pokreće:
- Check boot order in BIOS/UEFI to ensure the correct drive is selected.
- Verify SATA/M.2 connections for your storage drive.
- If recently installed, ensure the OS installation media is properly configured.
Garancija i podrška
For warranty information, please refer to the documentation provided with your purchase or visit the official Diyeeni webstranica. Uslovi i odredbe garancije mogu se razlikovati u zavisnosti od regije i prodavca.
For technical support, driver downloads, and further assistance, please visit the official Diyeeni support page or contact their customer service. Keep your product model number (H511) and serial number (if applicable) ready when seeking support.
Diyeeni Official Store: Visit Diyeeni Store on Amazon


