1. Uvod
Thank you for choosing the ASD 12 Inch Smart RGBW Flush Mount Ceiling Light. This fixture combines a stylish minimalist design with efficient, versatile lighting solutions. Featuring multicolor RGBW capabilities, smart app control, and remote operation, it offers a wide range of lighting effects for your space. This manual provides essential information for safe installation, effective operation, and proper maintenance of your new lighting fixture.

Figure 1.1: ASD 12 Inch Smart RGBW Flush Mount Ceiling Light with accessories.
3. Sadržaj paketa
Prije početka instalacije provjerite da li su sve komponente prisutne:
- ASD 12 Inch Smart RGBW Flush Mount Ceiling Light Fixture (4 units)
- Daljinski upravljač
- Pribor za montažu (vijci, matice)
- Uputstvo za upotrebu
4. Specifikacije
| Feature | Detalj |
|---|
| Brand | ASD |
| Naziv modela | LOFT |
| Broj dijela | A-LFM12D20SRGBW-N-4p |
| Boja | 12" | Nickel | RGBW |
| Materijal | Legirani čelik, akril |
| Stil | Moderna |
| Dimenzije proizvoda | 11.3 cm D x 11.3 cm Š x 3.4 cm V |
| Specifične upotrebe | Samo za unutrašnju upotrebu |
| Izvor napajanja | Hardwired |
| Vrsta izvora svjetlosti | LED |
| Tip završetka | Painted |
| Shade Material | Plastika |
| Voltage | 120 Volts |
| Wattage | 20 vati |
| Vrsta montaže | Flushmount |
| Average Life | 50,000 sata |
| Posebne karakteristike | 1064/1220LM, Remote Control, RGBW, Smart App, CCT Adjustable 2700-6500K |

Slika 4.1: Dimenzije proizvoda i ključne karakteristike.
5. Instalacija
Follow these steps to install your ASD Smart RGBW Flush Mount Ceiling Light:
- Pripremite se za instalaciju: Turn off power at the circuit breaker before starting. Ensure the mounting surface is clean and stable.
- Remove the Lens: Gently remove the lens from the fixture by rotating it clockwise. This will expose the mounting holes and wiring connections.
- Montirajte uređaj: Attach the fixture's base to the electrical outlet box using the provided screws. Ensure it is securely fastened.
- Žične veze: Connect the wires: Black to Black (Live), White to White (Neutral), and Ground to Ground. Secure all connections with wire nuts. Carefully tuck all wires back into the outlet box.
- Pričvrstite objektiv: Once wiring is complete and secure, attach the lens by aligning it with the fixture and rotating it counter-clockwise until it locks into place.
- Vrati snagu: Ponovo uključite struju na prekidaču.
- Download ASD SMART App: For smart control features, download the "ASD SMART" application from your smartphone's app store. Scan the QR codes below or click the links to download.
Google Play trgovina (Android)
Apple App Store (iOS) - Add Fixture to App: Follow the in-app instructions to add your new ceiling light to the ASD SMART app. This typically involves putting the light into pairing mode and connecting it to your Wi-Fi network.

Figure 5.1: Initial installation steps: removing the lens and wiring.
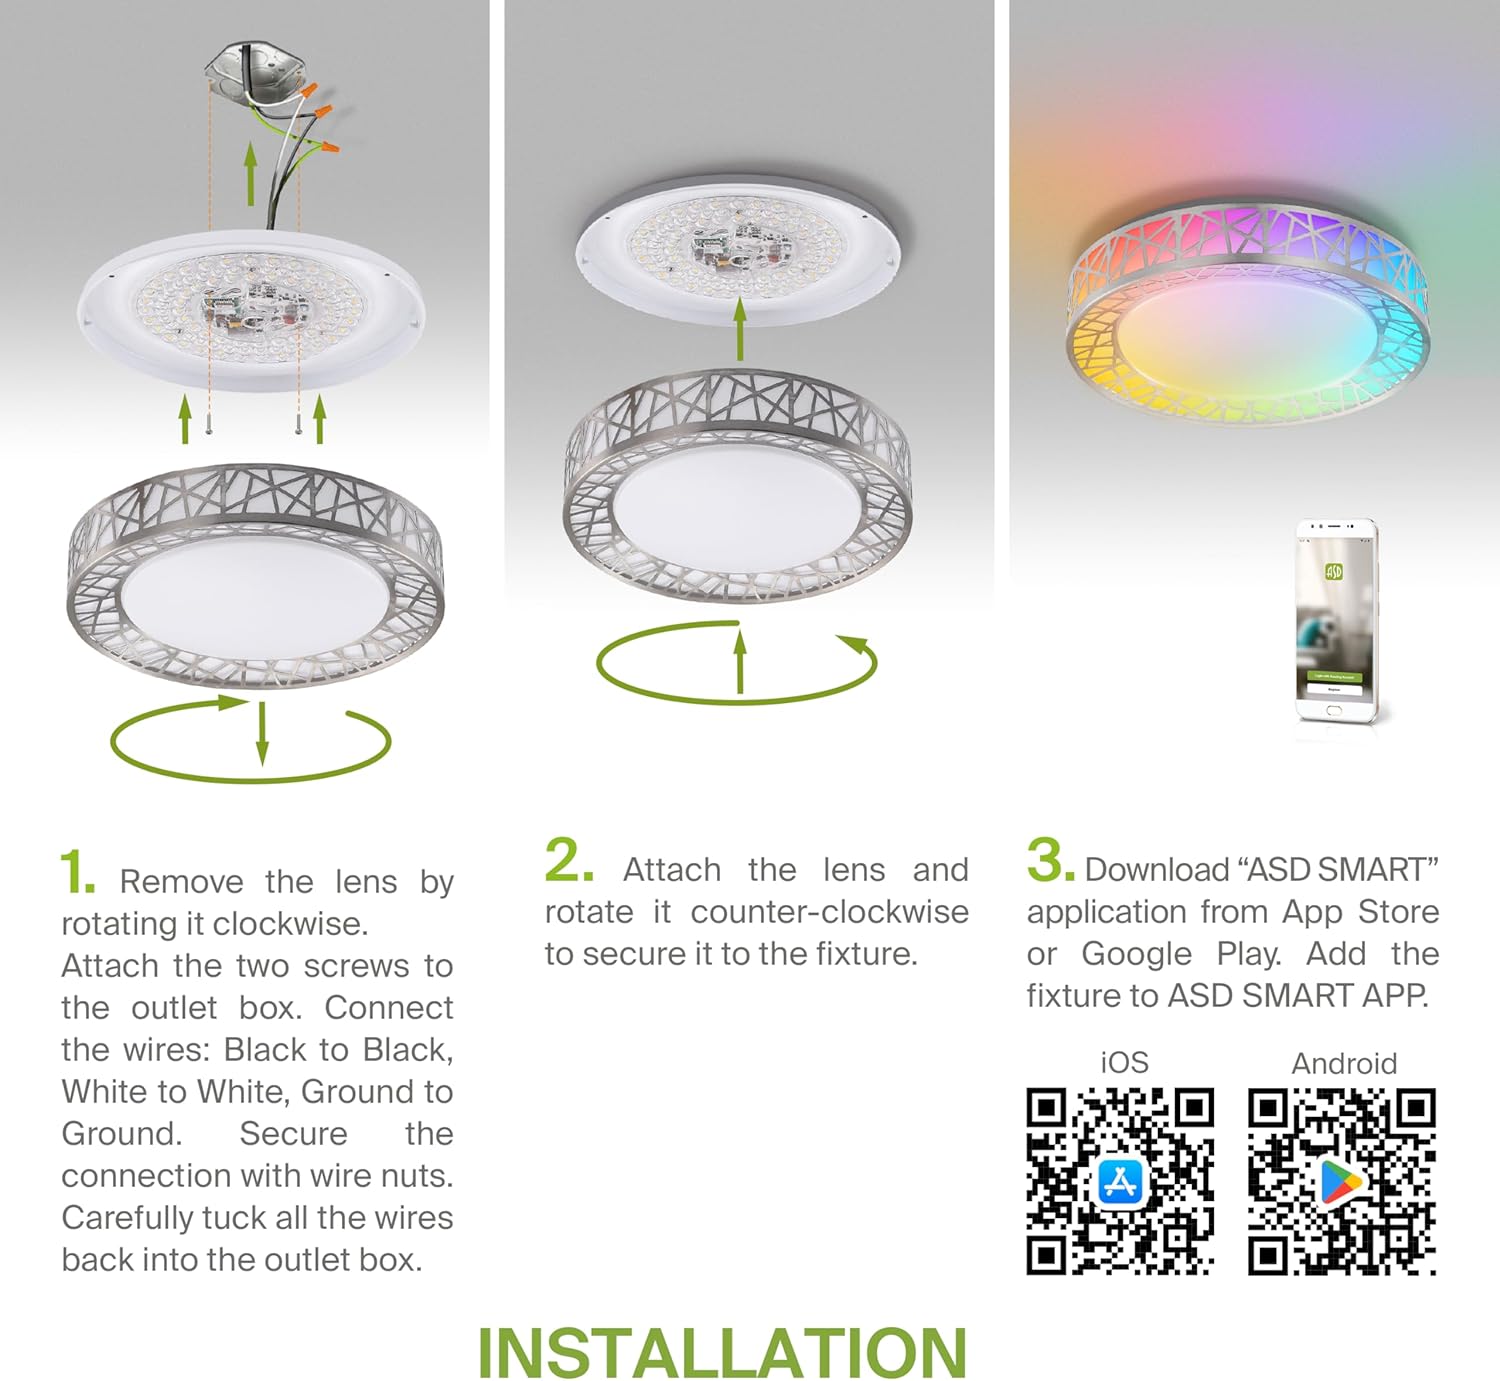
Figure 5.2: Complete installation overview including app download.
6. Uputstvo za upotrebu
Your ASD Smart RGBW Flush Mount Ceiling Light offers multiple control methods:
6.1 Daljinski upravljač
Priloženi daljinski upravljač omogućava osnovne funkcije:
- On/Off: Uključite ili isključite svjetlo.
- Dimming: Adjust brightness levels smoothly.
- CCT podešavanje: Change color temperature (e.g., from warm white to cool white).
- Izbor RGB boja: Cycle through or select specific RGB colors.
6.2 ASD SMART App Control
The ASD SMART app provides full control and advanced features:
- 16.7 miliona boja: Choose any color from the full RGBW spectrum.
- Smooth Dimming & CCT: Precisely adjust brightness and color temperature (2700K-6500K).
- Lighting Patterns: Select pre-set or custom lighting scenes and effects.
- Grupisanje: Control multiple fixtures simultaneously.
- Zakazivanje: Set timers for lights to turn on/off or change settings automatically.

Figure 6.1: RGBW color capabilities.

Figure 6.2: Control via remote and smart app.

Figure 6.3: Seamless dimming functionality.
6.3 Glasovno upravljanje (Alexa i Google asistent)
The fixture is compatible with Amazon Alexa and Google Assistant for convenient voice commands:
- Ensure your ASD SMART app is linked to your Alexa or Google Home account.
- Use commands such as "Alexa, turn on the living room light" or "Hey Google, set the bedroom light to blue."

Figure 6.4: Compatibility with Alexa and Google Assistant.
7. Održavanje
To ensure the longevity and optimal performance of your ceiling light:
- čišćenje: Isključite napajanje prije čišćenja. Obrišite uređaj mekom, suhom krpom. Ne koristite abrazivna sredstva za čišćenje ili rastvarače.
- Zamjena žarulje: This fixture uses integrated LED technology and does not require bulb replacement.
8. Otkrivanje problema
Ako imate problema sa stropnom rasvjetom, pogledajte sljedeće uobičajene probleme i rješenja:
| Problem | Mogući uzrok | Rješenje |
|---|
| Svjetlo se ne pali | Nema struje, labavo ožičenje, neispravan prekidač | Provjerite prekidač. Osigurajte da su svi priključci žica sigurni. Testirajte zidni prekidač. |
| Daljinski upravljač ne radi | Dead battery, out of range, interference | Replace remote battery. Ensure you are within range. Remove any obstructions. |
| App cannot connect to light | Incorrect Wi-Fi password, light not in pairing mode, 5GHz Wi-Fi network | Verify Wi-Fi password. Reset light to pairing mode (refer to app instructions). Ensure you are on a 2.4GHz Wi-Fi network. |
| Glasovno upravljanje ne reaguje | App not linked to voice assistant, incorrect device name | Check linking in ASD SMART app and voice assistant app. Verify device name in voice assistant app. |
9. Garancija i podrška
ASD pruža 5 godine ograničene garancije for this product, guaranteeing top quality and safety. The fixture is ETL certified, ensuring compliance with North American safety standards.
For technical support, warranty claims, or any questions not covered in this manual, please contact ASD customer service. Refer to the product packaging or the official ASD webstranica za kontakt informacije.


