1. Uvod
This manual provides essential information for the safe and effective operation of your ION Audio Retro Glow Boombox. This device combines classic audio playback with modern connectivity, featuring an AM/FM radio, cassette player/recorder, Bluetooth 5.3, USB, and SD card playback capabilities. Please read this manual thoroughly before use and retain it for future reference.
2. Sigurnosne informacije
- Ne izlažite jedinicu vodi ili vlazi.
- Izbjegavajte postavljanje jedinice u blizini izvora topline ili na direktnu sunčevu svjetlost.
- Osigurajte odgovarajuću ventilaciju; ne blokirajte ventilacijske otvore.
- Koristite samo dodatke/pribor koje je odredio proizvođač.
- Isključite jedinicu iz struje tokom oluja sa grmljavinom ili kada se ne koristi duže vreme.
- Sav servis prepustite kvalifikovanom serviseru.
3. Šta je uključeno
Prilikom raspakivanja, provjerite da li su sve dolje navedene stavke prisutne i u dobrom stanju:
- ION Audio Retro Glow Boombox
- Power Cable
- Vodič za brzi početak
4. Proizvod je gotovview
The Retro Glow Boombox features a translucent housing with multi-colored LED lights that synchronize with music. It includes dual full-range speakers for robust audio output.
Prednja ploča

Slika 1: Prednja strana view of the Retro Glow Boombox, showcasing the cassette deck, radio tuner, and illuminated dual speakers.
Top Controls

Slika 2: Detaljno view of the top panel, including volume, bass, treble controls, cassette function buttons (Pause, Stop/Eject, F.FWD, REW, Play, REC), and mode selectors (Tape, Aux, Radio, Bluetooth/USB/SD).
Side Panel and Rear
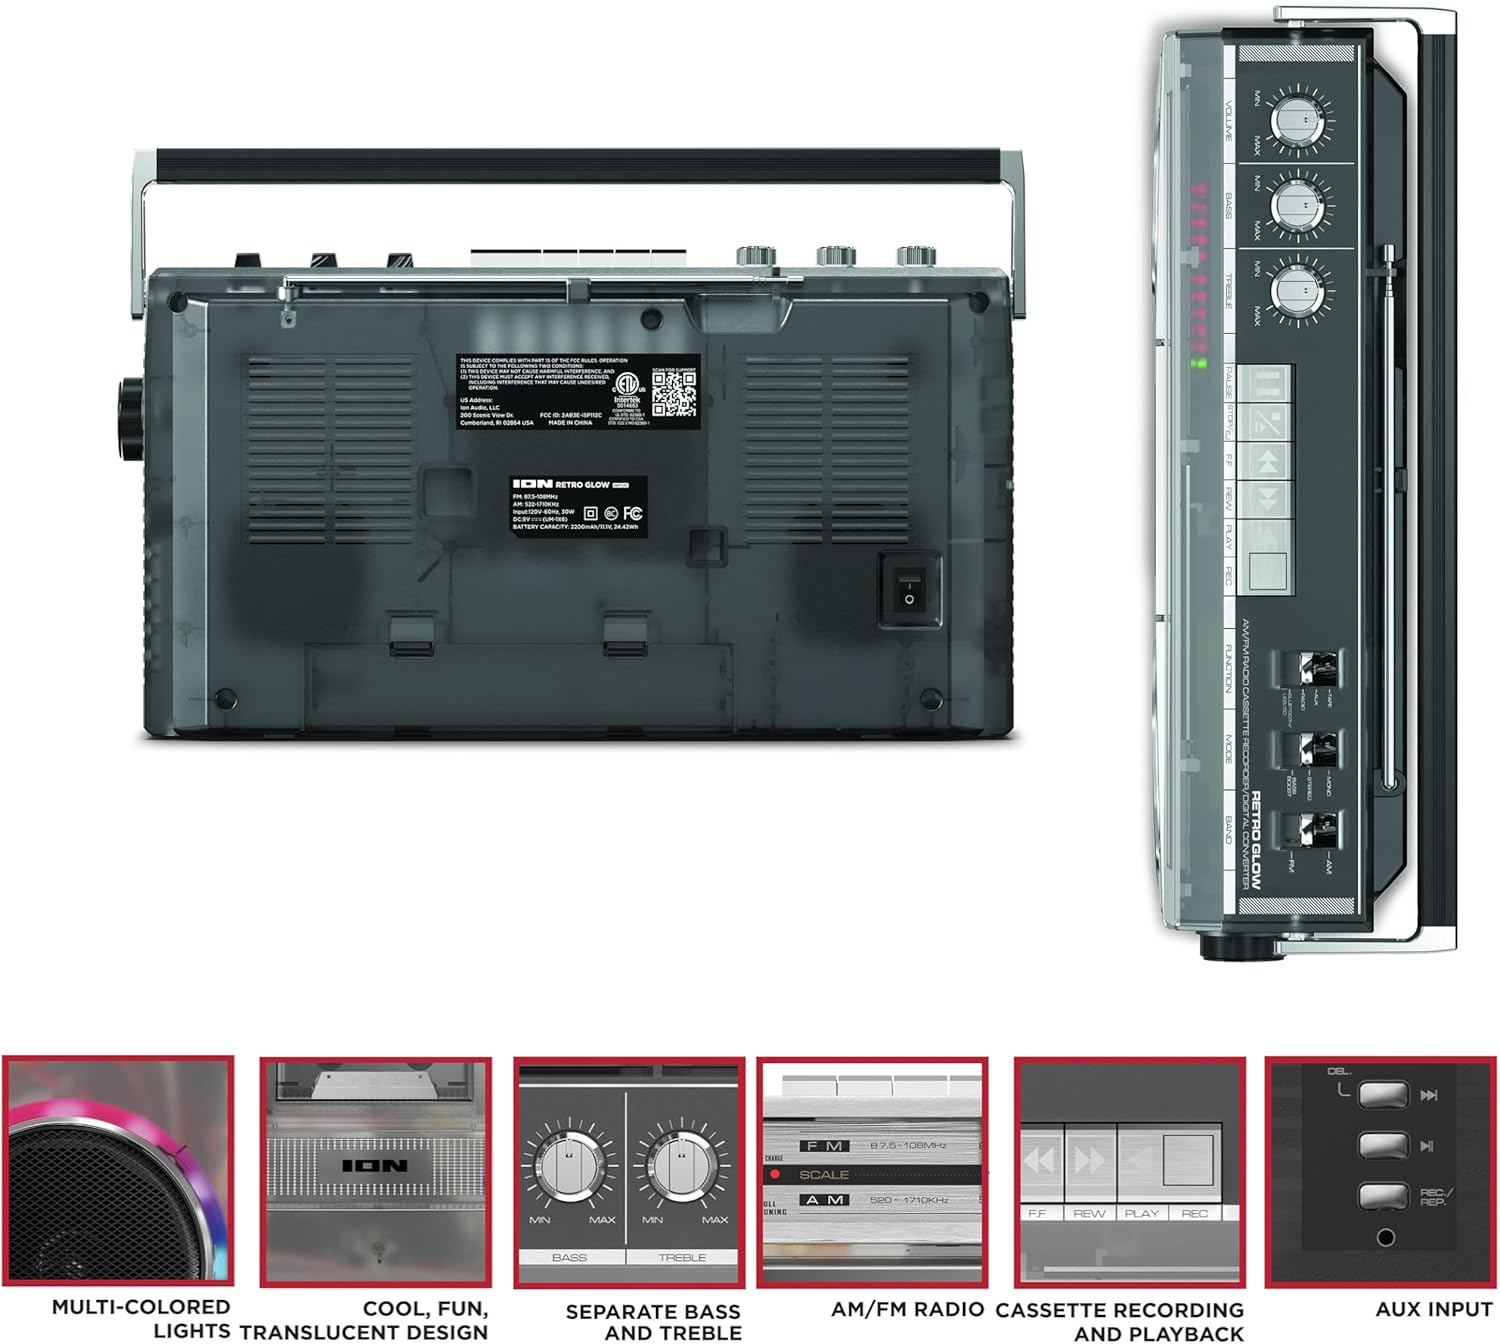
Figure 3: Side panel illustrating the USB port, SD card slot, and playback control buttons. The rear panel includes the power input and battery compartment.
5. Podešavanje
Powering the Boombox
The Retro Glow Boombox can be powered via the included AC power cable or by batteries for portable use.
- AC napajanje: Connect the power cable to the AC input on the rear of the unit and then to a wall outlet.
- Snaga baterije: Open the battery compartment on the rear and insert the required batteries (type and quantity specified in specifications).

Slika 4: Pozadi view of the boombox, highlighting the power input and the battery compartment for portable operation.
6. Uputstvo za upotrebu
General Operation
- Uključivanje/isključivanje: Use the power switch to turn the unit on or off.
- Kontrola jačine zvuka: Adjust the 'VOLUME' knob on the top panel to increase or decrease the sound level.
- Kontrola tonova: Use the 'BASS' and 'TREBLE' knobs to customize the audio output to your preference.
- LED svjetla: The multi-colored LED lights around the speakers dance in sync with the music. Refer to the Quickstart Guide for specific controls to change light modes or turn them off.
Funkcionalnost radija
- Switch the 'FUNCTION' selector to 'RADIO'.
- Select 'AM' or 'FM' using the 'BAND' switch.
- Izvucite teleskopsku antenu za optimalni FM prijem. Za AM, okrenite uređaj radi najboljeg prijema.
- Use the 'TUNING' knob to scan for stations.
Cassette Player/Recorder
- Reprodukcija: Press the 'STOP/EJ' button to open the cassette door. Insert a cassette tape and close the door. Press 'PLAY' to begin playback.
- Snimanje: To record from the radio, built-in microphone, or an external source (via Aux input), ensure a blank cassette is inserted. Select the desired source using the 'FUNCTION' switch. Press the 'REC' button (often simultaneously with 'PLAY') to start recording.
- Premotavanje naprijed/nazad: Use the 'F.FWD' and 'REW' buttons for tape navigation.
Bluetooth povezivanje
- Switch the 'FUNCTION' selector to 'BLUETOOTH/USB/SD'. The unit will enter pairing mode.
- On your Bluetooth-enabled device, search for 'Retro Glow Boombox' and select it to pair.
- Once paired, you can stream audio wirelessly to the boombox.
Reprodukcija sa USB-a i SD kartice
- Insert a USB drive or SD card into the respective slot on the side panel.
- Switch the 'FUNCTION' selector to 'BLUETOOTH/USB/SD'. The unit should automatically detect and begin playing audio files umetnutog medija.
- Use the playback control buttons (play/pause, skip forward/backward) on the side panel to manage your audio.
Pomoćni ulaz
- Povežite eksterni audio uređaj (npr. pametni telefon, MP3 plejer) na 'AUX' ulaz pomoću 3.5 mm audio kabla (nije uključen).
- Switch the 'FUNCTION' selector to 'AUX'. Audio from your external device will play through the boombox speakers.
7. Održavanje
- čišćenje: Za čišćenje vanjske strane uređaja koristite meku, suhu krpu. Ne koristite abrazivna sredstva za čišćenje ili rastvarače.
- Cassette Deck Care: Regularly clean the tape heads and pinch rollers with a cotton swab lightly damptretirano izopropilnim alkoholom kako bi se osigurala optimalna kvaliteta zvuka i spriječilo oštećenje trake.
- Skladištenje: When not in use, store the boombox in a cool, dry place away from direct sunlight and extreme temperatures.
8. Otkrivanje problema
Nema snage
- Provjerite je li kabel za napajanje sigurno spojen i na uređaj i na ispravnu utičnicu.
- Ako koristite baterije, provjerite da li su pravilno umetnute i da li su ispražnjene.
Nema zvuka
- Check the volume level on the boombox and the connected audio source (if applicable).
- Ensure the correct function mode (Radio, Tape, Bluetooth, USB/SD, Aux) is selected.
- For cassette playback, verify the tape is inserted correctly and the heads are clean.
Problemi sa Bluetooth uparivanjem
- Make sure the boombox is in Bluetooth pairing mode.
- Ensure your Bluetooth device is within range (typically 30 feet or 10 meters).
- Pokušajte odvojiti i ponovo upariti uređaj.
9. Specifikacije
| Dimenzije proizvoda | 9.25 x 16.25 x 5.25 inča |
| Težina artikla | 8.93 funte |
| Tehnologija povezivanja | Bluetooth 5.3, USB, SD Card, Aux Input |
| Vrsta zvučnika | Stereo, Full-Range |
| Izvor napajanja | AC Power Cable, Rechargeable Battery (approx. 10-hour life) |
| Posebne karakteristike | AM/FM Radio, Cassette Player/Recorder, Multi-colored LED Lights, Retro VU Meters, Separate Bass and Treble Controls |
10. Garancija i podrška
For warranty information or technical support, please refer to the Quickstart Guide included with your product or visit the official ION Audio website. Keep your purchase receipt as proof of purchase may be required for warranty claims.


