1. Uvod
Thank you for choosing the PUTORSEN Ultrawide Monitor Wall Mount. This heavy-duty monitor arm is designed to securely support ultra-wide monitors up to 57 inches and weighing up to 44 lbs (20 kg). Featuring a gas spring mechanism, it offers full motion adjustability for optimal viewing angles and ergonomic positioning. This manual provides essential information for safe installation, operation, and maintenance of your monitor mount.
2. Sigurnosne informacije
Please read all instructions carefully before installation and use. Improper installation or use may result in property damage or personal injury.
- Kapacitet težine: Do not exceed the maximum weight capacity of 44 lbs (20 kg). This mount is suitable for monitors between 17 and 57 inches.
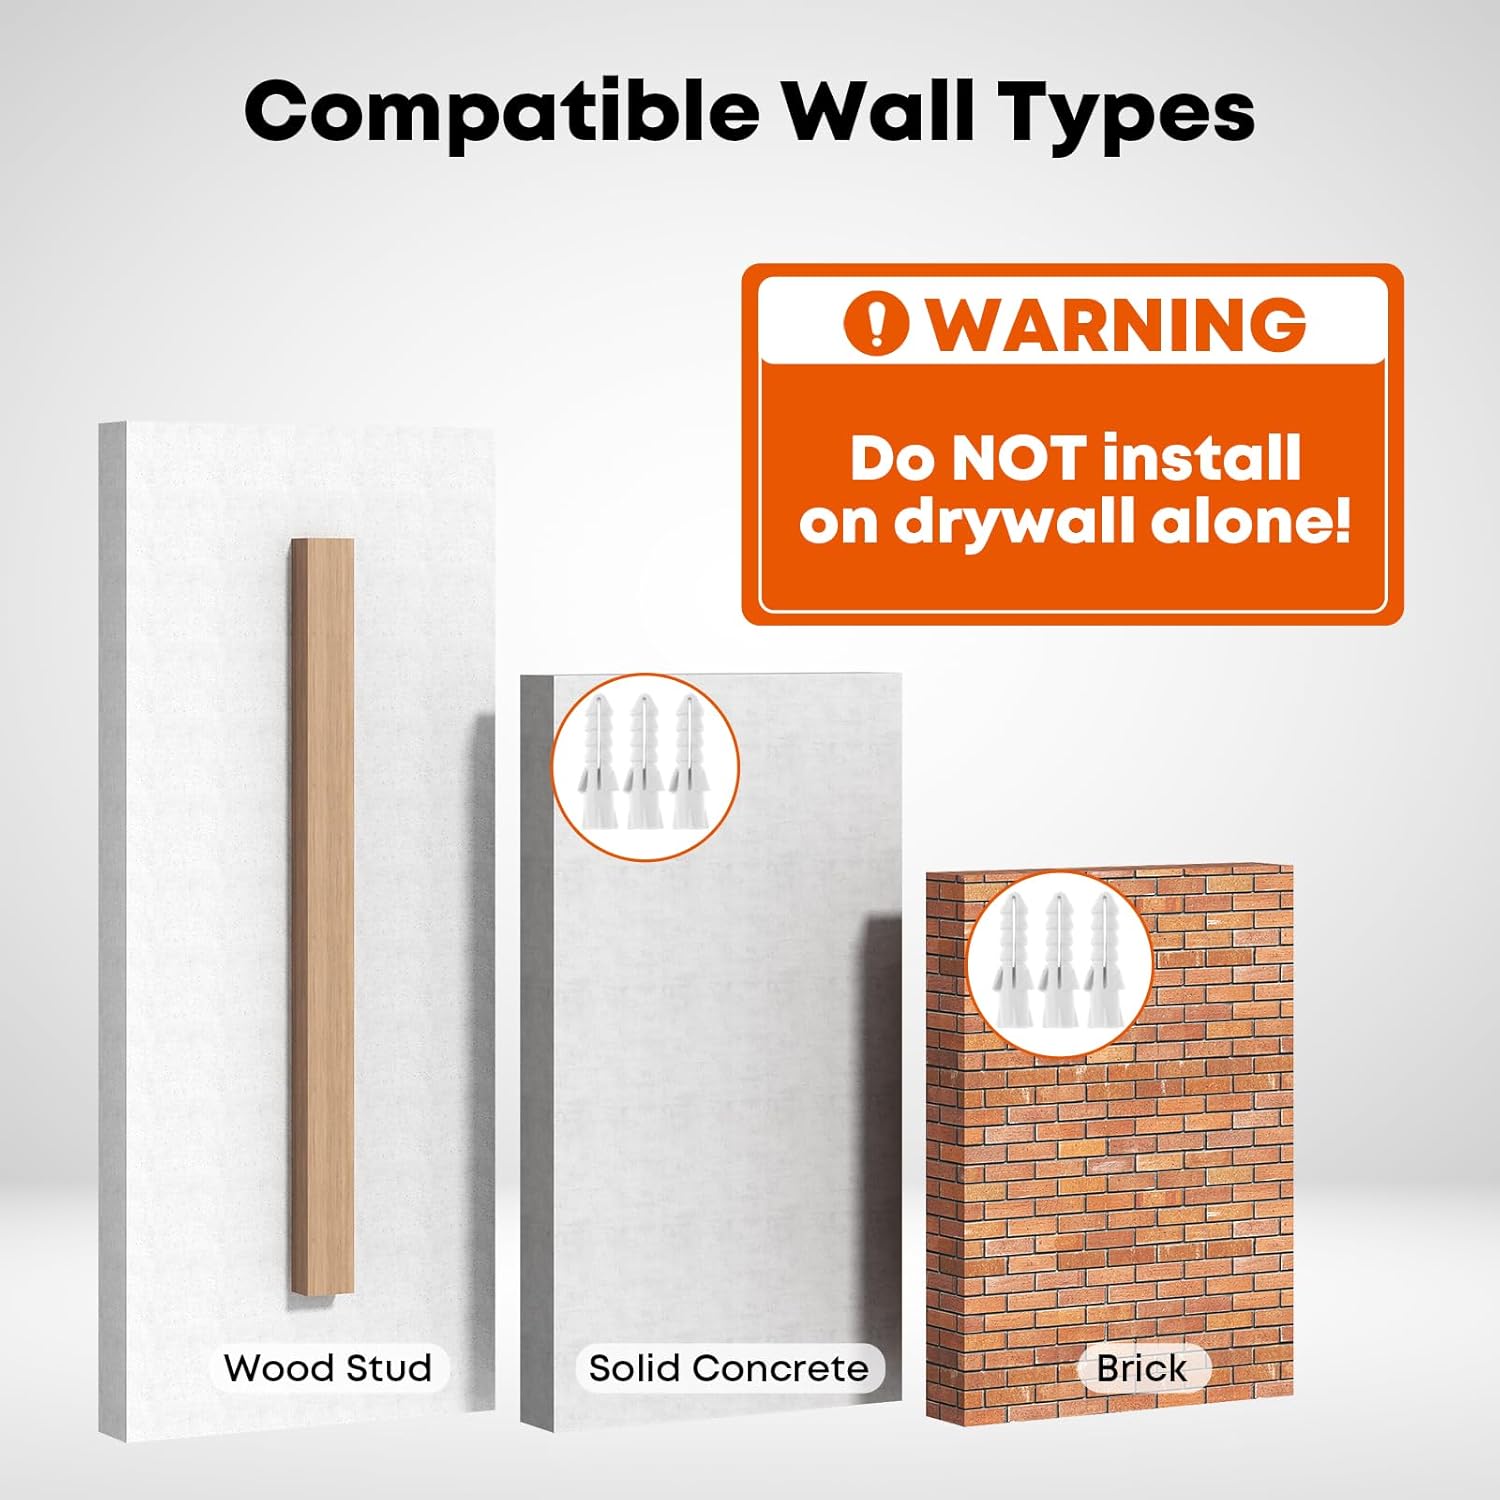
- Vrsta zida: This mount is designed for installation on solid wood studs, concrete walls, or brick walls. NEMOJTE postavljati samo u suhozid. Ensure the wall structure can safely support the combined weight of the mount and your monitor.
- VESA kompatibilnost: Ensure your monitor has a compatible VESA pattern (75x75mm, 100x100mm, 100x200mm, 200x100mm, 200x200mm). Non-VESA monitors or non-standard patterns require an additional adapter (not included).
- Plinska opruga: The gas spring is under tension. Exercise caution during installation and adjustment to prevent injury.
- Alati: Use appropriate tools for installation. If unsure, consult a qualified professional.
3. Sadržaj paketa
Prije početka instalacije provjerite da li su sve komponente prisutne:
- Sklop nosača za zidni nosač monitora
- Zidna ploča
- VESA Plate (pre-attached or separate)
- Komplet montažnog pribora (vijci, tiplovi, podloške)
- Allen Keys for adjustments
- Uputstvo za upotrebu
4. Specifikacije
| Brand | PUTORS |
| Model | 57 |
| Vrsta montaže | Zidni nosač |
| Materijal | legirani čelik |
| Boja | Bijelo |
| Kompatibilnost veličine monitora | 17" - 57" |
| Težina Kapacitet | Do 44 lbs (20 kg) |
| VESA kompatibilnost | 75x75mm, 100x100mm, 100x200mm, 200x100mm, 200x200mm |
| Raspon podešavanja visine | 10.6 inča |
| Extension Range | 4 inča (uvučeno) do 19.1 inča (izvučeno) |
| Ugao nagiba | +60° do -20° |
| Ugao okretanja | +90° do -90° |
| Rotacija | +90° to -90° (Portrait/Landscape) |
5. Postavljanje i instalacija
Follow these steps for secure installation of your PUTORSEN monitor wall mount.
5.1. Prepare Your Workspace
- Clear the area where you plan to install the mount.
- Gather necessary tools: drill, stud finder (for wood studs), level, pencil, measuring tape.
5.2. Wall Plate Installation
- Determine the desired height for your monitor. Mark the position for the wall plate.
- For wood studs, use a stud finder to locate the center of a stud. For concrete/brick, ensure the wall is solid.
- Hold the wall plate against the wall at the marked position and use a level to ensure it is straight. Mark the drill holes.
- Drill pilot holes according to the size specified in the mounting hardware kit.
- Secure the wall plate to the wall using the provided screws and anchors (if applicable for concrete/brick). Ensure it is firmly attached.
5.3. Sklop kraka
Assemble the monitor arm components as shown in the diagram. The gas spring arm connects to the wall plate, and the VESA plate attaches to the end of the arm.

5.4. Monitor Attachment
- Attach the VESA plate to the back of your monitor using the appropriate screws from the hardware kit. Ensure the screws are tightened securely but do not overtighten.
- Carefully lift your monitor and slide the VESA plate (with monitor attached) onto the arm's mounting head. Ensure it clicks into place or is secured with any locking mechanisms.
- For monitors with non-standard VESA patterns or recessed VESA mounts, an additional adapter (not included) may be required. Refer to your monitor's manual for VESA compatibility.


6. Rad i podešavanja
The PUTORSEN monitor arm offers a wide range of motion for ergonomic positioning.
6.1. Podešavanje visine
The gas spring allows for smooth vertical movement. Gently push or pull the monitor up or down to achieve the desired height. The arm provides 10.6 inches of height adjustment.
6.2. Podešavanje nagiba
Tilt the monitor screen up or down to reduce glare and optimize viewing angles. The tilt range is +60° to -20°.
6.3. Podešavanje okretanja
Swivel the monitor left or right up to 90° in either direction to share your screen or adjust your viewing position.
6.4. Rotacija
Okrenite monitor za 90° da biste prelazili između pejzažne i portretne orijentacije.
6.5. Extension and Retraction
Extend the monitor arm up to 19.1 inches from the wall for maximum flexibility or retract it to 4 inches to save space.


6.6. Upravljanje kablovima
Utilize the integrated cable management channels along the arm to route and conceal monitor cables for a tidy workspace.
7. Održavanje
Redovno održavanje osigurava dugotrajnost i optimalne performanse vašeg nosača monitora.
- čišćenje: Wipe the mount surfaces with a soft, damp krpom. Izbjegavajte abrazivna sredstva za čišćenje ili rastvarače.
- Provjerite veze: Povremeno provjeravajte sve vijke i spojeve kako biste bili sigurni da su čvrsto zategnuti i sigurni.
- Podešavanje plinske opruge: If the monitor arm does not hold its position or moves too easily/stiffly, adjust the gas spring tension as described in the Troubleshooting section.
8. Otkrivanje problema
Pogledajte ove uobičajene probleme i rješenja.
8.1. Monitor Arm Sags or Drops
This indicates the gas spring tension is too low for your monitor's weight.
- Rješenje: Use the provided Allen key to turn the tension adjustment screw u smjeru kazaljke na satu. Make small adjustments and test the arm's movement until it holds the monitor securely at any height.
8.2. Monitor Arm is Difficult to Move Upwards
This indicates the gas spring tension is too high for your monitor's weight.
- Rješenje: Use the provided Allen key to turn the tension adjustment screw suprotno od kazaljke na satu. Make small adjustments and test the arm's movement until it moves smoothly.
8.3. Monitor Tilts Downwards or Upwards Unintentionally
The tilt mechanism may need adjustment.
- Rješenje: Locate the tilt adjustment screw on the VESA head. Tighten this screw to increase friction and prevent unwanted tilting.

8.4. Monitor Does Not Fit VESA Plate
Your monitor may have a non-standard VESA pattern or require an adapter.
- Rješenje: Verify your monitor's VESA pattern against the mount's compatibility (75x75mm, 100x100mm, 100x200mm, 200x100mm, 200x200mm). If your monitor has a different pattern or a recessed VESA area, an additional VESA adapter (not included) may be necessary.
9. Garancija i podrška
The PUTORSEN Ultrawide Monitor Wall Mount is backed by a manufacturer's warranty. For specific warranty details, please refer to the product packaging or contact PUTORSEN customer support.
For technical assistance, installation questions, or any concerns regarding your product, please contact our friendly tech support team. Contact information can typically be found on the product packaging or the official PUTORSEN website.


