1. Uvod
This manual provides instructions for the installation, operation, and maintenance of your SOUNDKITS Single Din Touchscreen Radio. This device integrates modern infotainment features such as Apple CarPlay, Android Auto, Bluetooth connectivity, and a 6.5-inch IPS display into a standard single DIN form factor, suitable for upgrading classic vehicles.

Image: The SOUNDKITS Single Din Touchscreen Radio unit, featuring a 6.5-inch IPS display showing the Apple CarPlay interface, accompanied by its infrared remote control.
2. Sigurnosne informacije
Read all instructions carefully before installation and operation. Failure to follow these instructions may result in injury or damage to the device or vehicle.
- Preporučena profesionalna instalacija: Due to the complexity of car audio systems, professional installation is advised.
- Izvor napajanja: Uređaj priključite samo na 12V DC napajanje s negativnim uzemljenjem.
- Ožičenje: Ensure all wiring is correctly connected to prevent short circuits and damage. Insulate all exposed wires.
- Sigurnost u vožnji: Ne rukujte uređajem na način koji vas odvlači od vožnje. Uvijek dajte prioritet sigurnosti u saobraćaju.
- temperatura: Izbjegavajte izlaganje uređaja ekstremnim temperaturama ili direktnoj sunčevoj svjetlosti tokom dužeg perioda.
- Vlaga: Keep the unit dry. Exposure to moisture can cause malfunction or electric shock.
3. Sadržaj paketa
Provjerite da li su sve stavke prisutne u paketu:
- Jednodinski CarPlay stereo uređaj
- kabelskog svežnja
- Montažni kompleti
- IR daljinski upravljač
- Uputstvo za upotrebu (ovaj dokument)
4. Proizvod je gotovview
4.1 Front Panel Controls and Ports
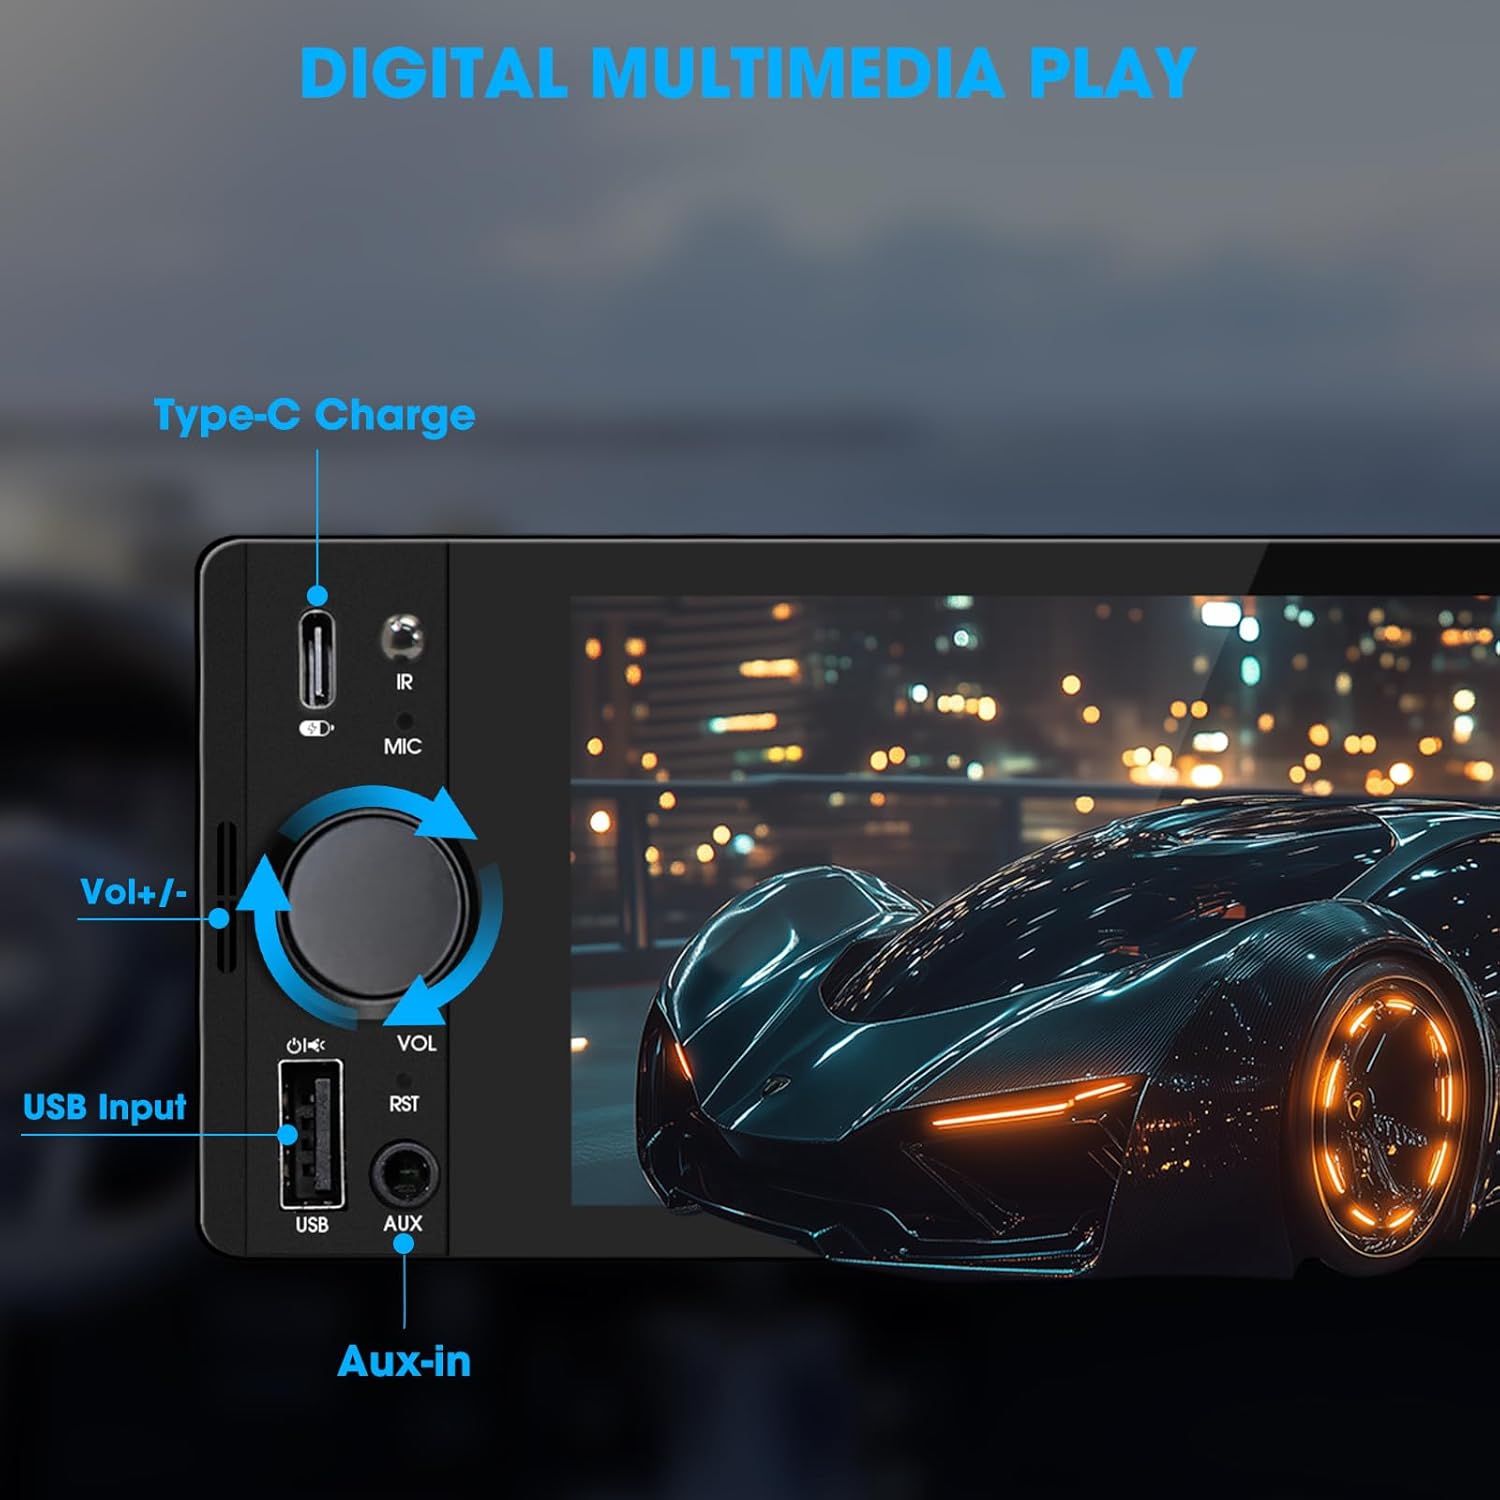
Image: Close-up of the radio's front panel, highlighting the Type-C charging port, IR receiver, microphone, volume knob, USB input, and AUX-in port.
- 6.5-inčni IPS ekran osjetljiv na dodir: Main display for all functions and interfaces.
- Dugme za jačinu zvuka (VOL): Okrenite za podešavanje jačine zvuka. Pritisnite za isključivanje/uključivanje zvuka.
- USB ulaz: For media playback, CarPlay/Android Auto connection, and phone mirroring.
- AUX ulaz: 3.5mm audio input for external audio devices.
- Port za punjenje tipa C: Provides 2.1A quick charging for compatible devices.
- Mikrofon (MIC): Ugrađen mikrofon za hands-free pozive i glasovne komande.
- IC prijemnik: For remote control operation.
- Reset Button (RST): Small button to reset the unit (requires a thin object like a paperclip).
4.2 Priključci stražnje ploče

Image: Diagram showing the rear connections of the radio, including the main wiring harness, RCA outputs, external microphone jack, and radio antenna input.
- Glavni konektor za ožičenje: Connects to the vehicle's power, speaker, and control wires.
- RCA Audio Outputs (L-OUT, R-OUT): Za povezivanje eksternih amplifiers.
- RCA Video Outputs (V-OUT1, V-OUT2): For connecting external monitors (e.g., headrest monitors).
- Pozadiview Camera Input (CAMIN): RCA input for a rearview kamera.
- Utičnica za vanjski mikrofon: For connecting an optional external microphone.
- Radio Antenna Input: Connects to the vehicle's AM/FM antenna.
5. Podešavanje i instalacija
This section outlines the general steps for installing the SOUNDKITS Single Din Touchscreen Radio. Professional installation is recommended.
5.1 Kontrolna lista pred instalaciju
- Prije početka instalacije provjerite je li akumulator vozila isključen.
- Confirm the vehicle has a standard single DIN slot.
- Gather necessary tools (wire strippers, crimpers, electrical tape, screwdriver).

Image: A visual comparison showing older car radios replaced by the modern SOUNDKITS Single Din Touchscreen Radio, demonstrating the aesthetic upgrade.
5.2 Ožičenje
Refer to the provided wiring harness diagram for specific connections. The harness uses universal ISO interface and wire color coding.
| Boja žice | Funkcija |
|---|---|
| Žuta | Konstantno 12V (baterija) |
| Crveni | Accessory 12V (Ignition) |
| Crna | uzemljenje (GND) |
| Plava | antena/AmpDaljinsko uključivanje Liferier-a |
| Narandžasta | Illumination/Dimmer |
| Brown | Kontrola na volanu (SWC) |
| Zeleno/bijelo | Stražnji lijevi zvučnik (+) |
| Zelena/crna | Stražnji lijevi zvučnik (-) |
| Purple / White | Stražnji desni zvučnik (+) |
| Ljubičasta/crna | Stražnji desni zvučnik (-) |
| White / White | Prednji lijevi zvučnik (+) |
| Bijela/Crna | Prednji lijevi zvučnik (-) |
| Siva/bijela | Prednji desni zvučnik (+) |
| Siva/Crna | Prednji desni zvučnik (-) |
| Reverse (often Pink/Brown) | Signal za hod unazad (za zadnjiview kamera) |
Napomena: Always cross-reference with your vehicle's specific wiring diagram and the diagram provided with the product's harness. Incorrect wiring can cause damage.
5.3 Montaža jedinice
- Secure the mounting sleeve into the vehicle's single DIN dash opening.
- Connect all necessary wiring harnesses, antenna, and any external accessories (e.g., rearview camera, external microphone).
- Carefully slide the head unit into the mounting sleeve until it locks into place.
- Ponovo spojite akumulator vozila.
- Test all functions before reassembling the dashboard trim.
6. Uputstvo za upotrebu
6.1 Osnovni rad
- Uključivanje/isključivanje: The unit powers on with the vehicle's ignition. Press and hold the volume knob to turn off/on the display.
- Kontrola jačine zvuka: Rotate the volume knob clockwise to increase volume, counter-clockwise to decrease. Press the knob to mute/unmute.
- Interfejs ekrana na dodir: Navigate menus and select options by tapping or swiping on the 6.5-inch IPS touchscreen.
6.2 Bluetooth povezivost

Image: The radio's display showing a successful Bluetooth 5.3 connection to a smartphone, with music playback information visible.
- Iz glavnog menija izaberite Bluetooth ikona.
- On your smartphone, search for available Bluetooth devices and select "SOUNDKITS" (or similar device name).
- Potvrdite kod za uparivanje na oba uređaja ako se to od vas zatraži.
- Once connected, you can make hands-free calls and stream audio.
6.3 Apple CarPlay i Android Auto
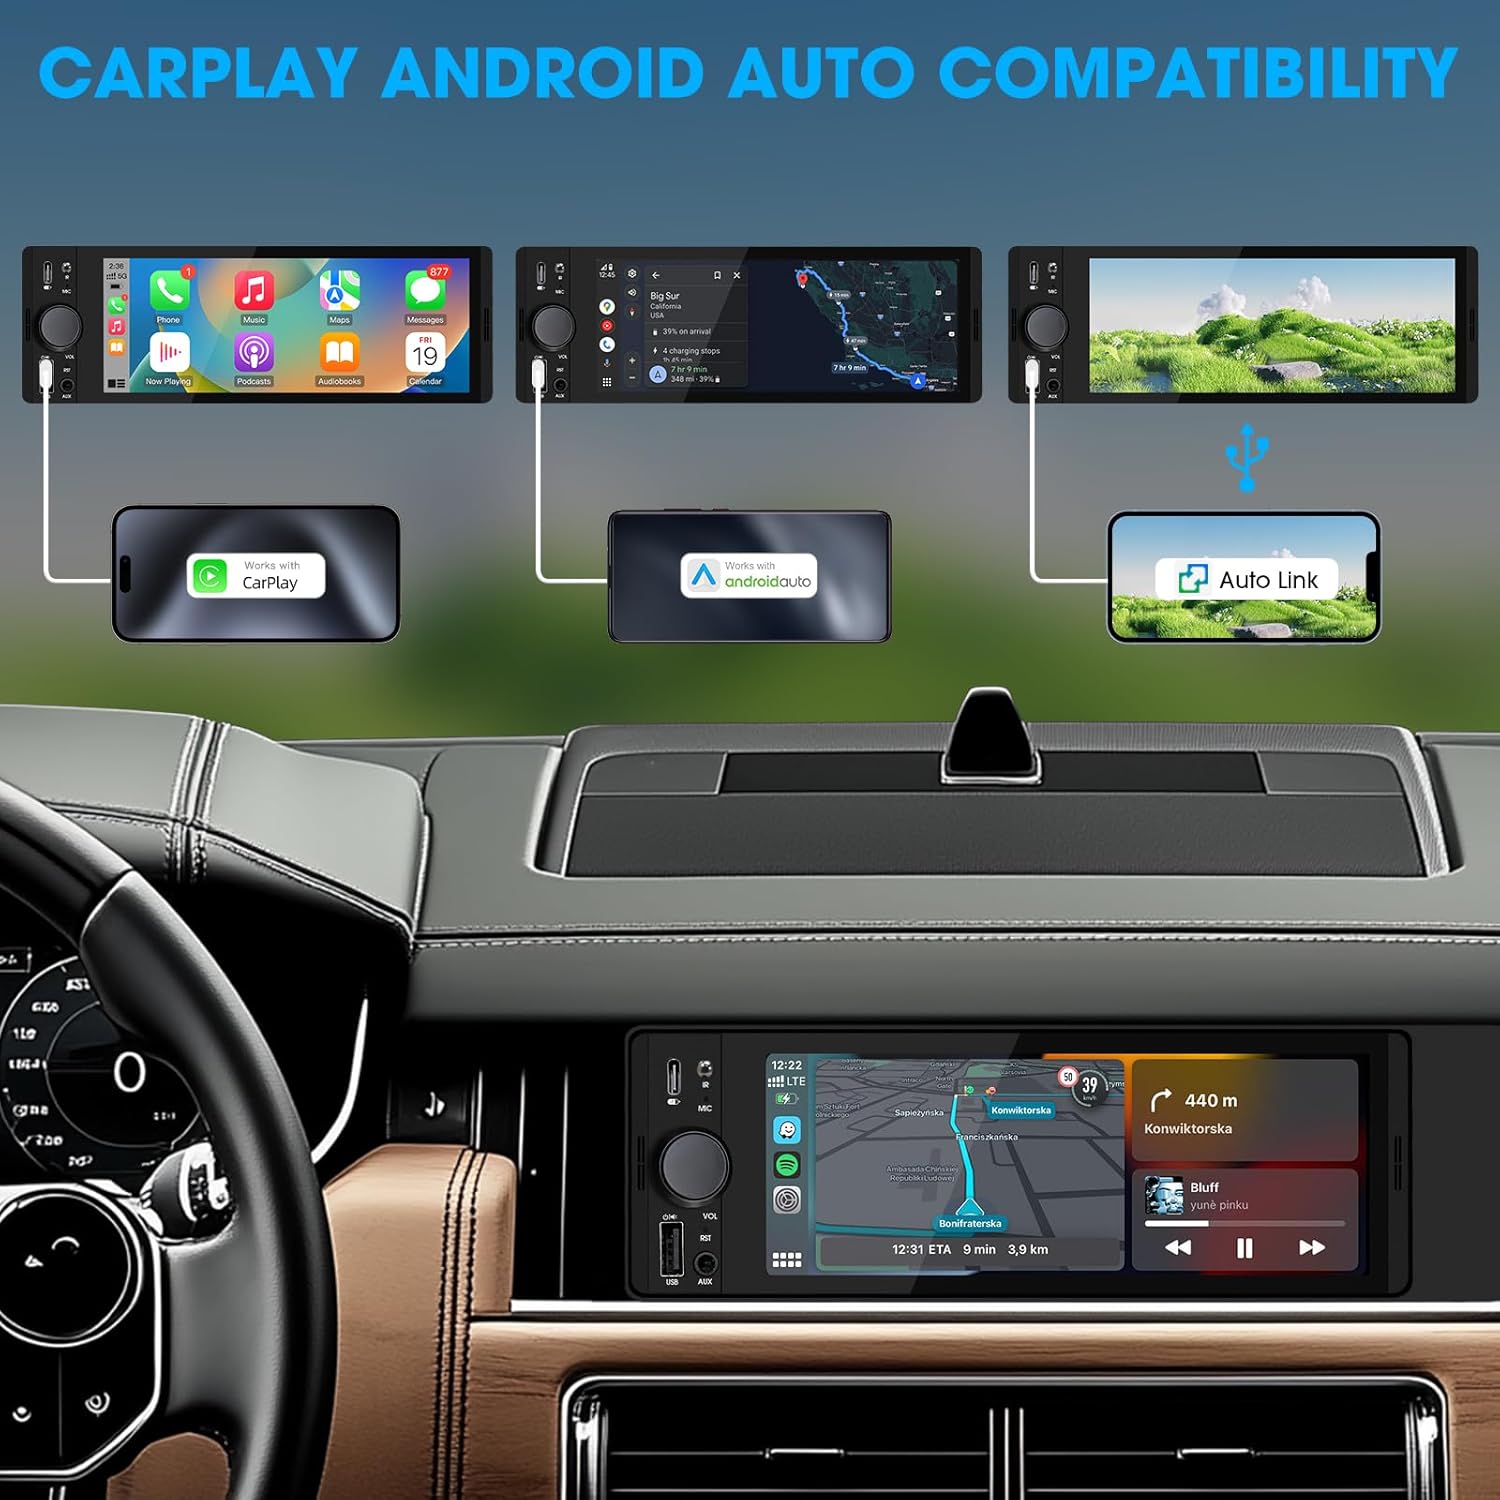
Image: An illustration demonstrating how to connect smartphones via USB for Apple CarPlay, Android Auto, and Auto Link functionality on the car stereo.
- Connect your iPhone (for CarPlay) or Android phone (for Android Auto) to the unit's USB port using a certified USB cable.
- The unit will automatically detect the connection and launch the respective interface.
- Follow any on-screen prompts on your phone or the unit to complete the setup.
- Access navigation, music, calls, and other compatible apps directly from the touchscreen.
6.4 USB Phone Mirroring
This feature allows you to display your smartphone's screen directly on the unit's display.
- Connect your smartphone to the unit's USB port.
- Select the "Phonelink" or "Mirrorlink" option from the main menu.
- Follow the on-screen instructions to establish the connection. This may require installing a specific app on your phone.
6.5 Radio (AM/FM)

Image: The radio interface displaying AM and FM frequency ranges and signal strength, indicating available stations.
- Iz glavnog menija izaberite Radio ikona.
- Dodirnite AM or FM to switch bands.
- Koristite Traži dugmad za automatsko pretraživanje stanica.
- Tap and hold a preset number to save the current station.
6.6 Media Playback (USB, AUX)
- USB: Insert a USB drive into the USB port. The unit will automatically detect and play compatible audio/video files. Navigate files using the on-screen interface.
- AUX: Connect an external audio device to the 3.5mm AUX-in port using an audio cable. Select the AUX source from the main menu.
6.7 Upravljanje glasom

Image: A driver interacting with the car stereo using voice commands for Siri and Google Assistant, demonstrating hands-free operation.
When connected via CarPlay or Android Auto, you can activate your phone's voice assistant (Siri or Google Assistant) by pressing the voice control button on the unit (if available) or by using the voice command phrase (e.g., "Hey Siri" or "Ok Google").
6.8 Upravljanje volanom (SWC)
Image: The steering wheel control configuration screen on the radio, showing options to program various buttons for functions like volume, track skip, and mode.
If your vehicle supports steering wheel controls, connect the SWC wire during installation. Access the Kontrola na volanu settings in the unit's menu to program the buttons to control various functions (e.g., volume, track skip, mode).
6.9 Postavke ekvilajzera

Image: The audio equalizer settings interface, showing adjustable frequency bands and preset options, alongside a diagram of RCA audio and video outputs.
Pristupite Postavke zvuka or EQ menu to adjust audio parameters. The unit features a 10-band equalizer with preset options (e.g., Pop, Rock, Jazz) and custom settings to tailor the sound output to your preference.
6.10 Pozadiview Ulaz kamere
Povežite pozadinuview camera to the CAMIN RCA input. When the vehicle is shifted into reverse, the unit will automatically display the camera feed, enhancing parking safety.
7. Specifikacije
| Feature | Detalj |
|---|---|
| Broj modela | Single Din Touchscreen Radio |
| Display | 6.5 Inch HD IPS Touch Screen (1024x600 resolution) |
| Povezivanje | Bluetooth 5.3, USB, Auxiliary, Type-C (charging) |
| Integracija pametnog telefona | Apple CarPlay (Wired), Android Auto (Wired), Screen Mirroring |
| Audio izlaz | 300W Peak Power, 4-CH RCA Out, 10-band EQ |
| Radio tjuner | AM (530-1710KHz), FM (87.5-107.9MHz) |
| Reprodukcija video zapisa | 1080p Video Playback, H.264, H.265/HEVC encoding |
| Kontrolne metode | Touchscreen, IR Remote Control, Steering Wheel Control, Voice Control |
| Dimenzije | 4.5 x 7.36 x 2.4 cm (Proizvod) |
| Težina | 2.03 funte |
| Napajanje | 12V DC (negativno uzemljenje) |
8. Otkrivanje problema
Pogledajte ovaj odjeljak za uobičajene probleme i njihova rješenja.
8.1 Nema napajanja
- Provjerite ožičenje: Ensure the yellow (constant 12V), red (accessory 12V), and black (ground) wires are correctly connected and have proper voltage.
- Osigurač: Check the fuse on the unit's wiring harness and the vehicle's fuse box. Replace if blown.
- baterija: Ensure the vehicle's battery is charged and connected.
8.2 Nema zvuka
- Nivo glasnoće: Increase the volume. Check if the unit is muted.
- Ožičenje zvučnika: Verify all speaker wires are correctly connected and not short-circuited.
- Izbor izvora: Ensure the correct audio source (e.g., Radio, USB, Bluetooth, AUX) is selected.
- Ampdizalica: Ako eksterno amplifier is used, ensure it is powered on and correctly wired.
8.3 CarPlay/Android Auto Not Connecting
- USB kabel: Use a high-quality, certified USB data cable. Faulty cables can prevent connection.
- USB port: Ensure the phone is connected to the correct USB port on the unit.
- Postavke telefona: Check your phone's settings to ensure CarPlay/Android Auto is enabled and allowed to connect to the unit.
- Ažuriranje softvera: Ensure your phone's operating system and any relevant apps (e.g., Android Auto app) are up to date.
8.4 Ekran osjetljiv na dodir ne reagira
- Reset Unit: Use a thin object to press the RST button on the front panel to perform a soft reset.
- Ciklus napajanja: Turn off the vehicle's ignition, wait a few minutes, then restart.
9. Održavanje
- Čišćenje ekrana: Koristite meku krpu koja ne ostavlja dlačice da nježno obrišete ekran osjetljiv na dodir. Za tvrdokorne mrlje, lagano obrišiteampOperite krpu vodom ili sredstvom za čišćenje ekrana. Izbjegavajte jake hemikalije.
- Generalno čišćenje: Use a dry, soft cloth to wipe the unit's body. Do not use abrasive cleaners or solvents.
- Ažuriranja firmvera: Povremeno provjeravajte proizvođačeve webstranicu za sva dostupna ažuriranja firmvera kako biste osigurali optimalne performanse i kompatibilnost.
10. Jamstvo i podrška
SOUNDKITS provides the following support and warranty information:
- garancija: The product comes with a 12-month responsibility for all products.
- Free Replacement/Refund: A 90-day free replacement or refund policy is available.
- Technical Guidance & Support: Lifetime technical guidance and support are provided.
- Služba za korisnike: Fast response within 24 hours for inquiries.
For further assistance, please contact SOUNDKITS customer support through the platform where the product was purchased or visit the official SOUNDKITS store page.
You can typically find contact information by navigating to the seller's profile on the purchase platform and selecting "Ask a question."

Image: A graphic detailing SOUNDKITS' customer service commitments: 24-hour fast response, 90-day free replacement or refund, 12-month product responsibility, and lifetime technical guidance & support.


