1. Uvod
Thank you for choosing the hygger 20W Mini Submersible Aquarium Heater. This compact and efficient heater is designed to maintain a stable water temperature in small freshwater and saltwater aquariums ranging from 3 to 20 liters. Equipped with an external thermostat and multiple safety features, it ensures a comfortable and safe environment for your aquatic pets. Please read this manual thoroughly before use to ensure proper installation and operation.
2. Sigurnosne mjere
- Full Submersion Required: Always ensure the entire heating rod is fully submerged in water before connecting to power. Operating the heater out of water can cause malfunction, overheating, or fire.
- Siguran plasman: Use the two included suction cups to firmly attach the heater to the aquarium wall, either vertically or horizontally. Ensure it is stable and cannot be dislodged by fish or other tank inhabitants.
- Power Disconnection for Maintenance: Before performing any water changes, cleaning, or maintenance inside the aquarium, always unplug the heater from the power outlet. Allow the heater to cool down for at least 15 minutes before handling to prevent burns.
- Zaštita od pregrijavanja: The heater is equipped with an overheat protection system. If the water temperature exceeds 35°C (95°F), the heater will automatically stop heating and display an "HH" error code. This protects your fish from high temperatures and prevents damage to the heater.
- Low Water Level Protection: If the water level drops too low, exposing the heating element, the heater will automatically shut off and display an "LL" error code. This prevents dry burning and protects the heater unit.
- Detekcija grešaka: The temperature control system detects abnormalities. If an error is detected, an error code will be displayed, and heating will automatically stop to prevent potential damage or accidents. In case of an error, promptly address the issue.
- Napajanje: Osigurajte napajanje voltage matches the specifications of the heater (AC100-110V/50Hz).
- Djeca i kućni ljubimci: Keep the heater and its power cord out of reach of children and pets.
3. Sadržaj paketa
- hygger 20W Mini Submersible Aquarium Heater Unit
- External Temperature Controller with Digital Display
- 2 Suction Cups for Mounting
4. Specifikacije
| Feature | Specifikacija |
|---|---|
| Broj modela proizvoda | HG142 |
| Snaga | 20W |
| Temperaturni opseg | 15-34°C (59-94°F) |
| Voltage | AC100-110V / 50Hz |
| Dužina kabla | 198 cm (otprilike 6.5 stopa) |
| Dimenzije (grijač) | 10.2 cm (Length) × 2.5 cm (Width) × 3 cm (Height) |
| Primjenjiva veličina rezervoara | 3-20 litre |
| Materijal | ABS plastic shell, Quartz tube heating element |
| Boja | Crna |
5. Proizvod je gotovview
The hygger 20W Mini Submersible Aquarium Heater is designed for ease of use and reliability. It features a compact heating unit and an external controller for convenient temperature adjustment and monitoring.

Figure 1: hygger 20W Mini Submersible Aquarium Heater and External Controller.

Figure 2: External Controller Details. The blue light indicates temperature maintenance, and the red light indicates heating in progress. The top red number shows the current water temperature, and the bottom red number shows the set temperature. The 'Set' button is used for temperature adjustment.
The heater unit is protected by an ABS heat-resistant cover with fine holes, preventing small fish from getting stuck and providing insulation. The heating element is a durable quartz tube.

Figure 3: Internal components of the heater, featuring two nickel heating wires and a mica board for efficient and safe heating.
6. Instalacija
- Raspakujte i pregledajte: Carefully remove the heater from its packaging and inspect it for any signs of damage. Do not use if damaged.
- Placement in Aquarium: Place the heater unit completely inside the aquarium water. Ensure it is fully submerged.
- Osigurajte vakuumskim čašicama: Use the two provided suction cups to firmly attach the heater to the inner wall of your aquarium. It can be installed vertically or horizontally, depending on your tank setup and water level. For shallow tanks, horizontal placement is suitable, ensuring the water level is at least 4cm above the heater.
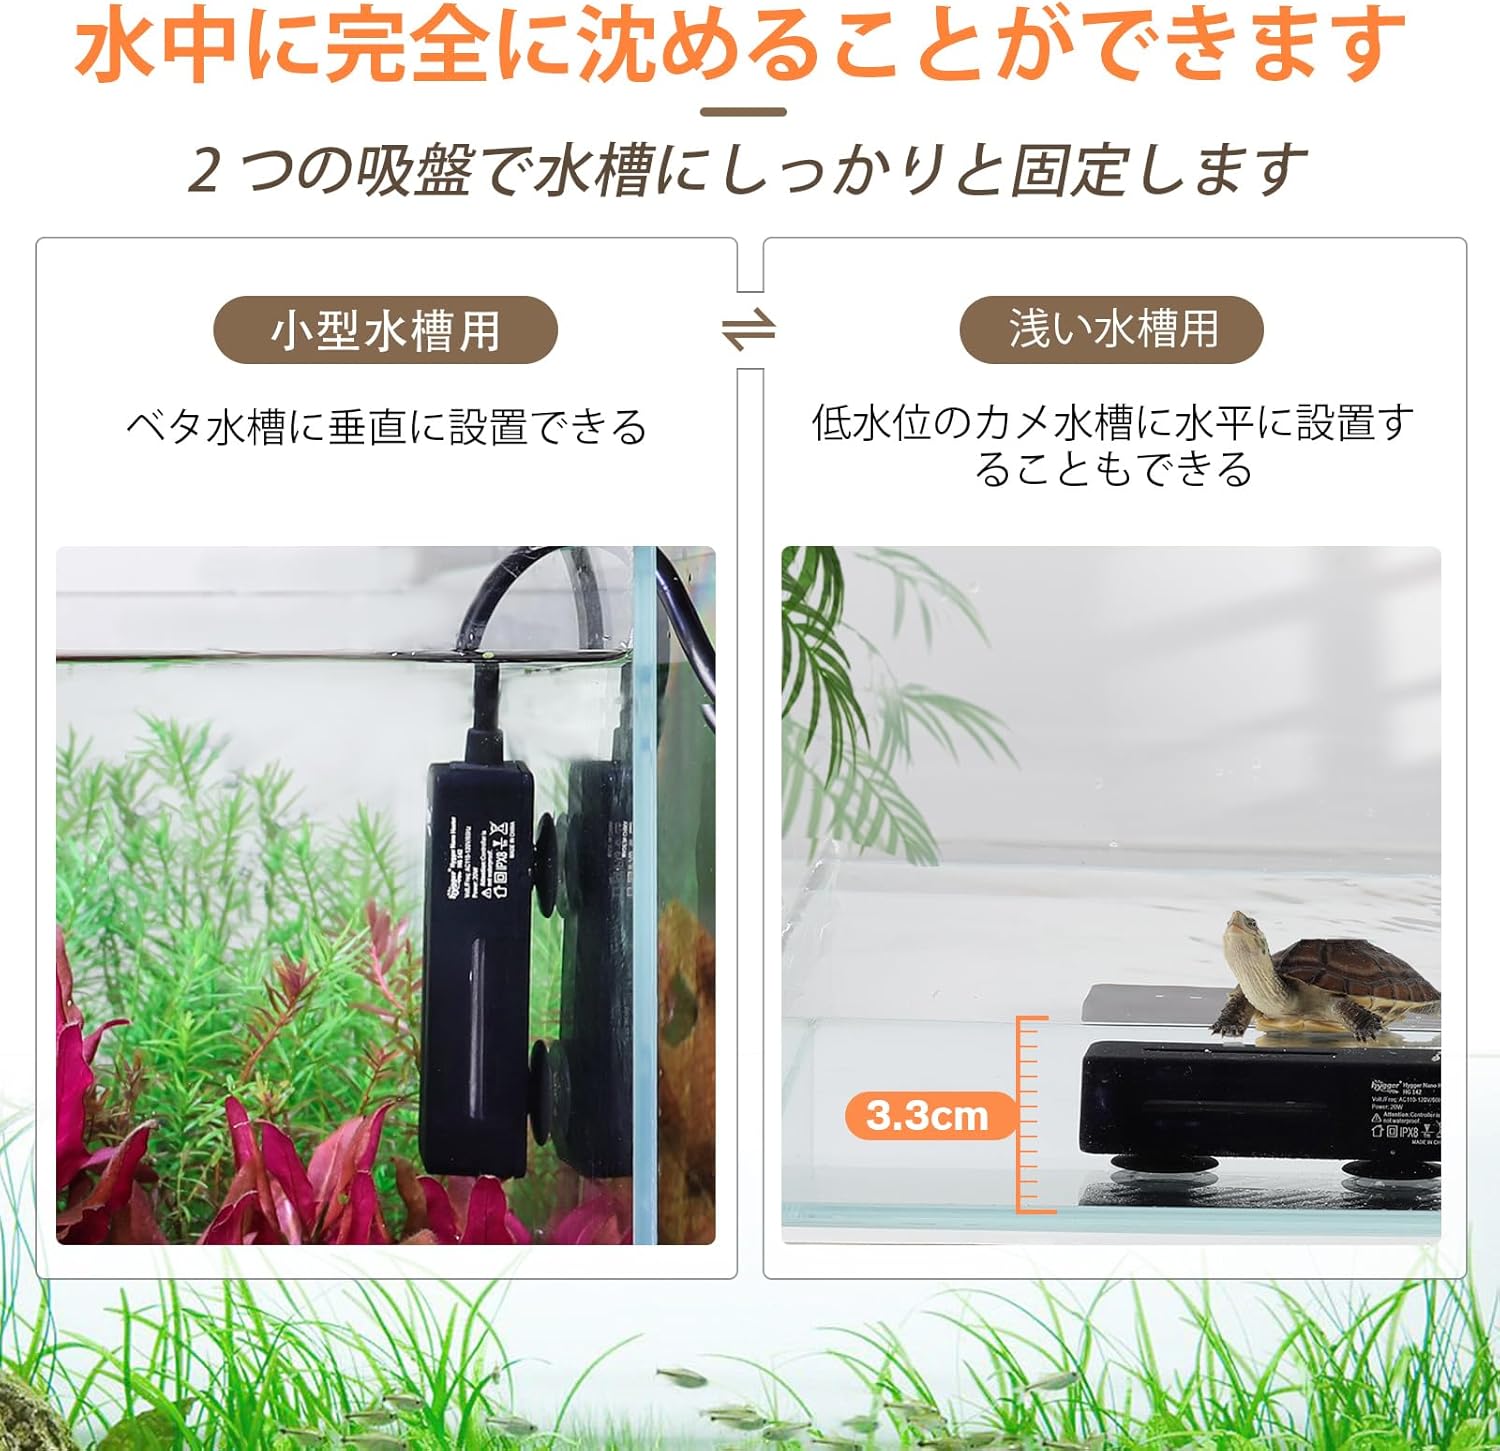
Figure 4: Heater placement options. It can be installed vertically in small aquariums or horizontally in shallow tanks, such as turtle tanks, provided the minimum water level is maintained.
- Povežite se na napajanje: Once the heater is securely placed and fully submerged, connect the power plug to a suitable electrical outlet.
7. Operacija
- Uključeno: After plugging in, the digital display on the external controller will light up, showing the current water temperature and the previously set temperature.
- Postavljena temperatura: Press the 'Set' button on the external controller to adjust the desired temperature. Each press will increase the set temperature by 0.5°C. The temperature can be set between 15°C and 34°C. If no operation is performed for 3 seconds, the setting will be confirmed.
- Indikatorska svjetla:
- Plavo svjetlo: Indicates that the heater is in standby mode or maintaining the set temperature.
- crveno svjetlo: Indicates that the heater is actively heating the water.
- Automatsko grijanje: The heater will automatically begin heating when the water temperature falls below the set value and stop heating once the target temperature is reached. This ensures a consistent and optimal temperature for your aquatic environment.
- Memorijska funkcija: U slučaju napajanjatage, the heater's memory function will automatically restore the previous temperature settings once power is reconnected, eliminating the need for manual re-adjustment.

Figure 5: The heater automatically starts heating when the temperature drops below the set point and stops when the target temperature is reached, maintaining a stable environment.
8. Održavanje
Regular cleaning of your hygger aquarium heater is essential for optimal performance and longevity. Always unplug the heater and allow it to cool for at least 15 minutes before cleaning.
- Rastavljanje: Gently remove the outer protective cover. You may use a thin, non-metallic tool to carefully pry it open if needed.
- čišćenje: Rinse the heater unit and the protective cover under clean water to remove any algae, mineral deposits, or debris. You can use a soft cloth or brush to gently scrub away stubborn buildup. Avoid using harsh chemicals or abrasive materials.
- Ponovno sastavljanje: Once both parts are clean and dry, carefully reassemble the protective cover onto the heater unit.
- Ponovna instalacija: Place the cleaned and reassembled heater back into the aquarium, ensuring it is fully submerged and securely attached with the suction cups before reconnecting power.

Figure 6: The heater can be easily disassembled for thorough cleaning, ensuring proper maintenance and extending its lifespan.
9. Otkrivanje problema
If you encounter any issues with your hygger aquarium heater, refer to the following common problems and solutions:
| Šifra greške / Simptom | Mogući uzrok | Rješenje |
|---|---|---|
| "HH" displayed | Water temperature exceeds 35°C (95°F). Overheat protection activated. | Check the ambient temperature. If too high, consider cooling the room or tank. The heater will resume normal operation once the temperature drops. |
| "LL" displayed | Water level is too low, exposing the heating element. Low water level protection activated. | Unplug the heater, add water to the aquarium to ensure full submersion, then plug it back in. |
| "E1" displayed | Heater is not fully submerged in water. Dry burning protection activated. | Ensure the heater is completely submerged in water. If it was removed from water while powered, unplug it, allow it to cool, then re-submerge and plug back in. |
| Heater not heating / Water not warming up | 1. Heater not plugged in or power outage. 2. Set temperature is lower than current water temperature. 3. Heater is too small for the tank volume or ambient temperature. | 1. Check power connection and outlet. 2. Adjust the set temperature higher than the current water temperature. 3. Ensure the heater wattage is appropriate for your tank size and room conditions. For larger tanks or colder rooms, a higher wattage heater may be needed. |
| Water temperature is too high (above set temp) | External factors (e.g., direct sunlight, high room temperature) are heating the water. | Relocate the tank away from heat sources or direct sunlight. Consider using a chiller if external heat is unavoidable. |

Figure 7: Visual representation of safety features, including overheat protection (HH) and low water level protection (LL) error codes.
10. Garancija i podrška
This hygger product comes with a standard manufacturer's warranty. For specific warranty details, including duration and coverage, please refer to the warranty card included in your product packaging or contact hygger customer support directly.
If you experience any issues or have questions regarding the installation, operation, or maintenance of your hygger aquarium heater, please do not hesitate to contact our customer support team. Our dedicated professionals are available to assist you.
Kontakt korisničke podrške: Please visit the official hygger website or refer to your product packaging for the most up-to-date contact information.


