1. Uvod
Thank you for choosing the Geek Smart L7 Robot Vacuum and Mop. This device is designed to provide efficient and thorough cleaning for your home, combining powerful vacuuming with intelligent mopping capabilities. Featuring advanced LDS navigation, Wi-Fi connectivity, and smart app control, the L7 ensures a customized cleaning experience for various floor types, including carpets and hard floors.
This manual provides essential information for the safe operation, setup, maintenance, and troubleshooting of your robot vacuum. Please read it carefully before use and retain it for future reference.
2. Sigurnosna uputstva
To reduce the risk of injury or damage, read and follow all safety precautions when setting up, using, and maintaining your robot vacuum.
- Ovaj uređaj mogu koristiti djeca starija od 8 godina i osobe sa smanjenim fizičkim, senzornim ili mentalnim sposobnostima ili nedostatkom iskustva i znanja ako su pod nadzorom ili upute o korištenju uređaja na siguran način i razumiju opasnosti koje su uključene. .
- Djeca trebaju biti pod nadzorom kako bi se osiguralo da se ne igraju s uređajem.
- Čišćenje i korisničko održavanje ne smiju obavljati djeca bez nadzora.
- Koristite samo originalni adapter za napajanje koji je isporučio proizvođač.
- Ne koristite robota u okruženjima s otvorenim plamenom ili zapaljivim materijalima.
- Držite kosu, široku odjeću, prste i sve dijelove tijela dalje od otvora i pokretnih dijelova.
- Ne koristite robota u prostorijama u kojima spava beba ili dijete.
- Ne koristite robota za usisavanje krupnog otpada, tekućina ili zapaljenih predmeta.
- Ensure the robot is placed on a stable surface and cannot fall from high places.
- Turn off the robot and unplug the charging dock before cleaning or maintenance.
3. Sadržaj paketa
Prilikom raspakivanja provjerite da li su sve komponente prisutne i u dobrom stanju.
- Geek Smart L7 Robot Vacuum and Mop
- Dock za punjenje
- Adapter za napajanje
- Bočne četke (2 para)
- Glavna četka
- Dust Bin (680ML)
- 2-in-1 Water Tank & Dust Bin (350ML water tank & 260ML dust bin)
- Krpe za brisanje (2)
- High-Efficiency Filter (pre-installed in dust bin)
- Alat za čišćenje
- Uputstvo za upotrebu
4. Proizvod je gotovview
Komponente robotskog usisivača

Image: The Geek Smart L7 Robot Vacuum, showcasinnjegov vrh view with control buttons, LDS sensor, and accompanying accessories like the charging dock and replacement filters.
- LDS navigacijski senzor: Nalazi se na vrhu, za precizno mapiranje i navigaciju.
- Kontrolna dugmad: Power/Clean, Home/Recharge.
- Prednji branik: Detektira prepreke.
- Bočne četke: Pometite otpad u glavnu putanju četke.
- Glavna četka: Sakuplja prljavštinu i ostatke.
- Pogonski kotači: Allow movement across various surfaces.
- Kontakti za punjenje: Connect with the charging dock.
- Dust Bin / Water Tank: Removable compartments for dust collection and water for mopping.
Dock za punjenje
The charging dock provides power to recharge the robot's battery. It should be placed in an open area with sufficient clearance.
5. Podešavanje
5.1 Postavljanje priključne stanice za punjenje
- Place the charging dock against a wall in an open area.
- Osigurajte najmanje 0.5 metara (1.6 stopa) čistog prostora sa obje strane doka i 1.5 metara (4.9 stopa) ispred.
- Spojite adapter za napajanje na stanicu za punjenje i uključite ga u zidnu utičnicu.
- Ensure the power indicator on the charging dock illuminates.
5.2 Početno punjenje
- Place the robot onto the charging dock, ensuring the charging contacts align.
- The robot will automatically begin charging. Allow it to fully charge before its first use (approximately 4-5 hours).
5.3 Povezivanje i mapiranje aplikacija

Image: The Geek Smart L7 Robot Vacuum actively scanning its environment using LDS navigation to create a detailed map, with digital map representations floating above it.
- Download the Geek Smart app from your mobile device's app store (available for iOS and Android).
- Registrirajte račun i prijavite se.
- Follow the in-app instructions to add your L7 robot vacuum. This typically involves connecting to the robot's Wi-Fi hotspot and then connecting the robot to your home Wi-Fi network.
- Once connected, initiate a full cleaning cycle. The robot will use its LDS navigation to create an accurate map of your home. This map will be saved in the app for future use, allowing for features like selective room cleaning and setting no-go zones. The robot can save up to 5 different maps.
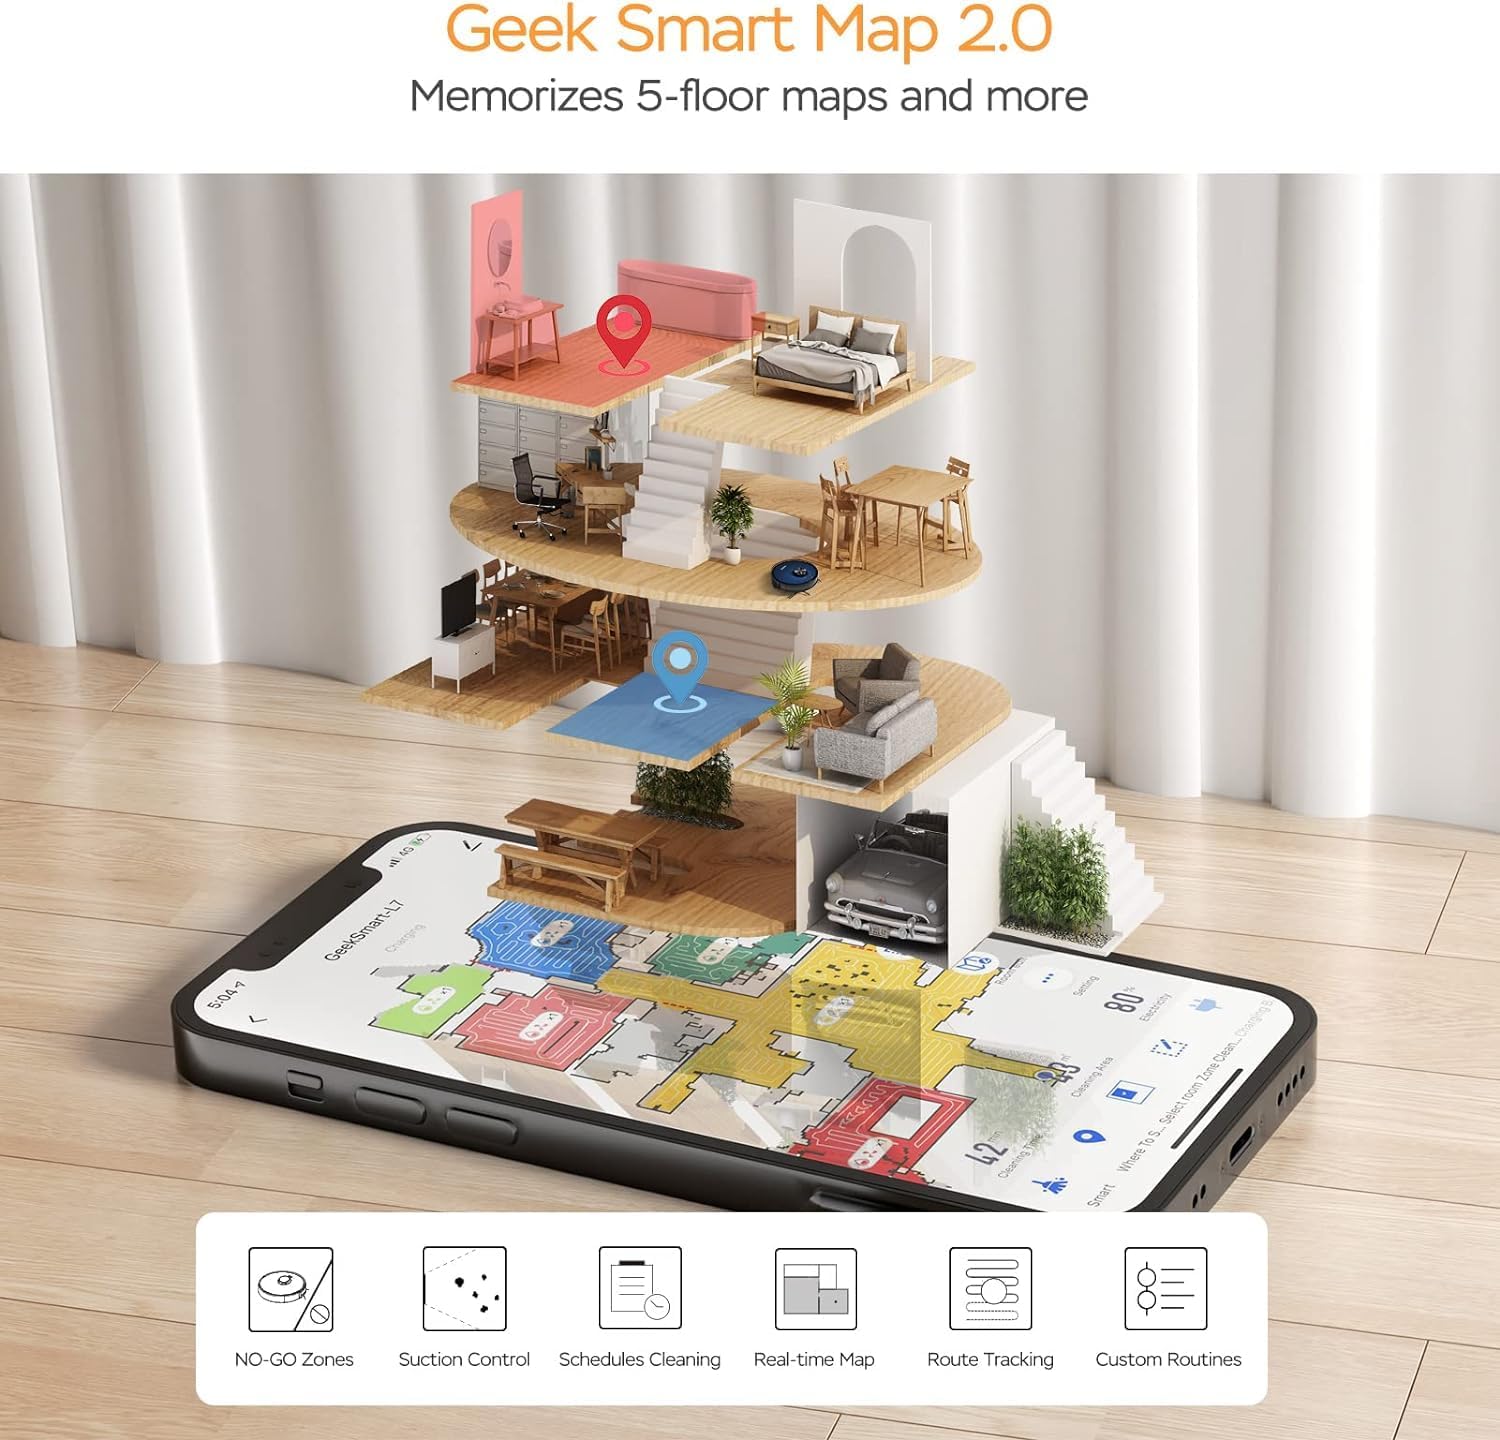
Image: A smartphone screen displaying the Geek Smart app interface, showing a color-coded floor plan map with various cleaning zones and controls.
6. Uputstvo za upotrebu
6.1 Pokretanje i zaustavljanje čišćenja
- Započni čišćenje: Press the Power/Clean button on the robot or tap "Start Cleaning" in the app. The robot will begin a full cleaning cycle.
- Pauziraj čišćenje: Press the Power/Clean button during operation or tap "Pause" in the app.
- Nastavite čišćenje: Press the Power/Clean button again or tap "Resume" in the app.
- Povratak na dok: Press the Home/Recharge button on the robot or tap "Recharge" in the app. The robot will return to its charging dock.
6.2 Režimi čišćenja
The L7 offers various cleaning modes to suit different needs.

Image: The Geek Smart L7 Robot Vacuum demonstrating its 2-in-1 sweeping and mopping capabilities on a hard floor, with debris being swept and a damp mop trail visible.
- Automatsko čišćenje: The robot intelligently plans its cleaning path using LDS navigation.
- Usisavanje: Utilizes up to 2700Pa suction power to clean dirt and debris from various surfaces.
- brisanje: Attach the mop cloth and fill the 2-in-1 water tank. The electronic water tank allows for adjustable water output.
- Usisivač i brisanje podova (istovremeno): The robot can vacuum and mop simultaneously when the 2-in-1 tank is installed.
- Režim pojačanja tepiha: The robot automatically increases suction power when it detects carpeted areas for deeper cleaning.

Image: The Geek Smart L7 Robot Vacuum actively cleaning a hard floor, with a visual representation of its powerful 2700Pa suction lifting debris.

Image: The Geek Smart L7 Robot Vacuum transitioning from a hard floor to a carpet, illustrating its Carpet Boost Mode with enhanced suction indicated by glowing lines.

Image: The Geek Smart L7 Robot Vacuum positioned on a floor split between marble and wood, illustrating its integrated mopping system and adjustable water output for different surfaces.
6.3 Funkcije kontrole aplikacija
The Geek Smart app unlocks advanced cleaning customization.
- Selektivno čišćenje soba: Choose specific rooms or areas on the map for cleaning.
- No-Go Zones / No-Mop Zones: Draw virtual boundaries on the map to prevent the robot from entering certain areas or mopping carpets.
- Invisible Walls: Create virtual walls to restrict the robot's movement.
- Zakazivanje: Set cleaning schedules for automatic operation at desired times.
- Podešavanje snage usisavanja: Manually adjust the suction level.
- Water Output Adjustment: Control the water flow for mopping.

Image: The Geek Smart L7 Robot Vacuum operating quietly (65dB) in a living room, demonstrating its low noise level suitable for homes with sleeping individuals or pets.
7. Održavanje
Regular maintenance ensures optimal performance and extends the lifespan of your robot vacuum. Always turn off the robot and unplug the charging dock before performing any maintenance.
7.1 Pražnjenje posude za prašinu
- Pritisnite dugme za otpuštanje posude za prašinu i izvucite posudu za prašinu.
- Open the dust bin cover and empty the contents into a trash can.
- Očistite filter i posudu za prašinu priloženim alatom za čišćenje ili mekom četkom.
- Vratite kantu za prašinu.
7.2 Cleaning the 2-in-1 Water Tank & Dust Bin
- Remove the 2-in-1 tank from the robot.
- Empty any remaining water from the water tank compartment.
- Ispraznite pretinac za prašinu i očistite filter.
- Rinse the water tank compartment with clean water. Do not immerse the entire tank in water, especially the electronic components.
- Allow all parts to air dry completely before reassembling and reinstalling.
7.3 Čišćenje glavne četke
- Okrenite robota i pritisnite jezičke za otpuštanje kako biste uklonili poklopac glavne četke.
- Podignite glavnu četku.
- Use the cleaning tool to remove hair and debris tangled around the brush and its bearings.
- Vratite glavnu četku i poklopac.
7.4 Čišćenje bočnih četki
- Lagano povucite bočne četke prema gore da biste ih uklonili.
- Remove any hair or debris. If brushes are bent, soak them in warm water for a few minutes to reshape.
- Press the brushes back into place until they click.
7.5 Čišćenje senzora i kontakata za punjenje
- Use a clean, dry cloth to wipe the cliff sensors (located on the bottom of the robot), wall sensors (on the side), and the charging contacts on both the robot and the charging dock.
- Ensure the LDS sensor on top is also clean and free of obstructions.
8. Otkrivanje problema
Ako naiđete na probleme s robotskim usisivačem, pogledajte sljedeću tabelu za uobičajene probleme i rješenja.
| Problem | Mogući uzrok | Rješenje |
|---|---|---|
| Robot se ne uključuje | Slaba baterija; Isključeno napajanje | Place robot on charging dock; Ensure power switch is on. |
| Robot se ne može puniti | Kontakti za punjenje prljavi; Punjač nije uključen | Clean charging contacts on robot and dock; Ensure dock is plugged in. |
| Robot se često zaglavi | Prepreke na podu; Prljavi senzori za pad na litici | Clear cables and small objects; Clean cliff sensors. |
| Loše performanse čišćenja | Posuda za prašinu puna; Četke zapetljane; Filter začepljen | Ispraznite posudu za prašinu; Očistite glavnu i bočne četke; Očistite ili zamijenite filter. |
| Funkcija brisanja ne radi | Water tank empty; Mop cloth dry; Water outlet clogged | Fill water tank; Moisten mop cloth; Clean water outlet. |
| Problemi sa vezom aplikacije | Netačna lozinka za Wi-Fi; Ruter je previše udaljen; Robot je van mreže | Verify Wi-Fi credentials; Move robot closer to router; Restart robot and router. |
9. Specifikacije
| Feature | Specifikacija |
|---|---|
| Brand | Geek Smart |
| Naziv modela | L7 |
| Vrsta navigacije | 360° LiDAR |
| Max usisna snaga | 2700 Pa |
| Kapacitet baterije | 2600 mAh |
| Max Runtime | 130 minuta |
| Kapacitet kante za prašinu | 680 ML |
| Water Tank Capacity (2-in-1) | 350 ML |
| Nivo buke | Sub-65 dB |
| Dimenzije proizvoda | 12.59 cm D x 12.59 cm Š x 3.74 cm V |
| Težina artikla | 13.39 funte |
| Kompatibilni uređaji | Amazon Echo |
| UPC | 764773837187 |
10. Garancija i podrška
Geek Smart products are manufactured to the highest quality standards. For warranty information, technical support, or customer service inquiries, please refer to the contact information provided on the product packaging or visit the official Geek Smart website.
Molimo sačuvajte svoj dokaz o kupovini za zahtjeve u vezi s garancijom.


