1. Uvod
The GVDA GD128PLUS Smart Rechargeable Digital Multimeter is an advanced, versatile tool designed for accurate and reliable electrical measurements. Featuring a 10000-count display, auto-ranging capabilities, and True RMS functionality, it is suitable for professionals and electronics enthusiasts alike. This manual provides essential information for safe and effective operation, setup, maintenance, and troubleshooting of your multimeter.
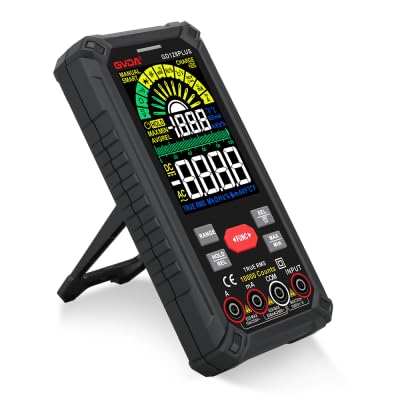
Figure 1.1: GVDA GD128PLUS Digital Multimeter with its integrated kickstand.
2. Sigurnosne informacije
Uvijek se pridržavajte sljedećih sigurnosnih mjera opreza kako biste spriječili tjelesne ozljede ili oštećenje multimetra:
- Do not exceed the maximum input limits for any measurement range.
- Budite izuzetno oprezni kada radite sa voltagiznad 30V AC RMS, 42V peak ili 60V DC. Ovi volumenitagpredstavljaju opasnost od strujnog udara.
- Uvijek isključite napajanje strujnog kola i ispraznite sve visokonaponsketagkondenzatore prije izvođenja testova otpora, kontinuiteta ili dioda.
- Provjerite da li su mjerni kablovi u dobrom stanju, bez oštećene izolacije.
- Ne koristite multimetar ako izgleda oštećeno ili ako je kućište otvoreno.
- Koristite ispravnu funkciju i raspon za svako mjerenje.
- Tokom mjerenja držite prste iza štitnika za prste na mjernim sondama.
- Ne koristite multimetar u vlažnim okruženjima ili u prisustvu eksplozivnih gasova ili prašine.
- The Non-Contact Voltage (NCV) function is for indication only; always verify voltage presence with direct measurement.
3. Sadržaj paketa
Prilikom raspakivanja, provjerite da li su sve dolje navedene stavke prisutne i u dobrom stanju:
- 1 x GVDA GD128PLUS Digital Multimeter
- 1 x Par mjernih kabela (crveni i crni)
- 1 x USB kabl za punjenje
- 1 x K-type Thermocouple Probe
- 1 x Platnena torba za nošenje
- 1 x Korisnički priručnik (ovaj dokument)
- 1 x Gift Box (packaging)
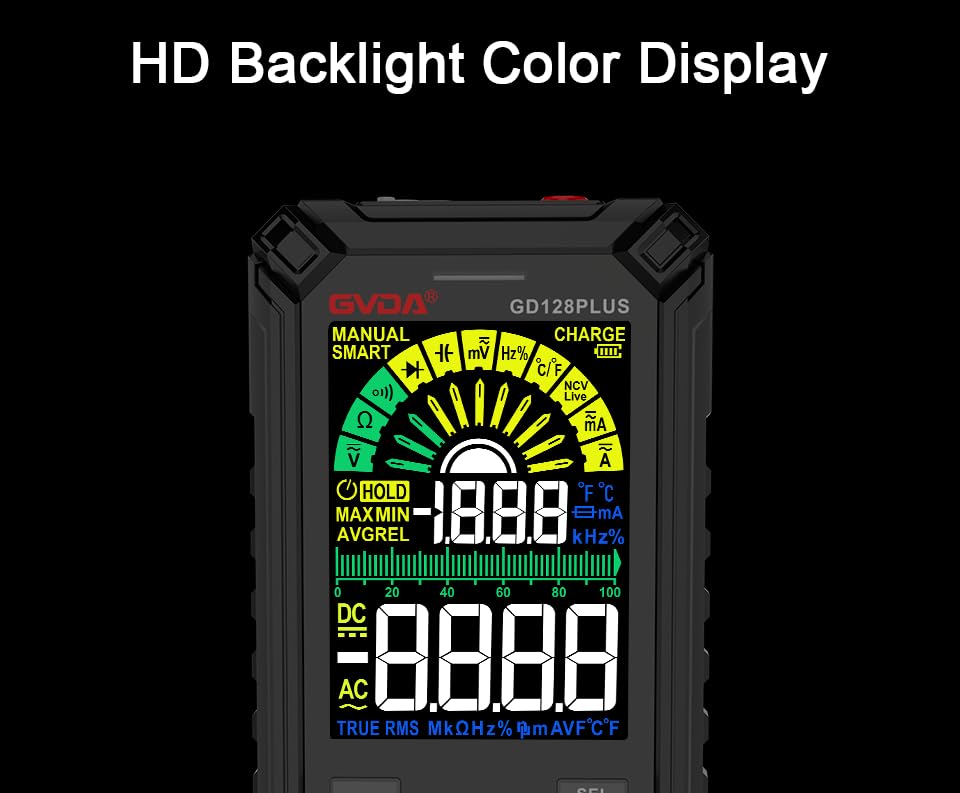
Figure 3.1: All components included in the GVDA GD128PLUS Multimeter package.
4. Karakteristike i komponente proizvoda
The GD128PLUS multimeter is equipped with a range of features for comprehensive electrical testing:
- 10000 Counts Display: Pruža visoku rezoluciju za precizna mjerenja.
- Automatski domet: Automatski odabire odgovarajući raspon mjerenja, pojednostavljujući rad.
- Pravi RMS: Osigurava tačna očitavanja za nesinusoidne AC talasne oblike.
- Punjiva litijumska baterija: Built-in 3.7V battery for convenience and portability.
- HD Backlight Color Display: Clear and easy-to-read display in various lighting conditions.
- Non-Contact VoltagDetekcija e (NCV): Sigurno detektuje prisustvo volumna naizmjenične strujetage bez direktnog kontakta.
- LED bljeskalica: Integrisano svjetlo za osvjetljavanje tamnih radnih područja.
- Zadržavanje podataka (HOLD): Zamrzava trenutno očitavanje na ekranu.
- Relativno mjerenje (REL): Displays the difference between a stored reference value and the current reading.
- MAX/MIN Measurement: Records the maximum and minimum values during a measurement session.
- Input Jack LED Indication: Guides correct test lead connection for selected function.
- Zaštita od preopterećenja: Protects the device from damage due to excessive input.
4.1. Multimeter Layout

Figure 4.1: Key components and input jacks of the GVDA GD128PLUS Multimeter.
Pogledajte sliku 4.1 za lokaciju sljedećih komponenti:
- Prikaz: HD Backlight Color LCD for readings and indicators.
- Funkcijska dugmad: RANGE, HOLD/REL, FUNC, SEL, MAX/MIN.
- Ulazne utičnice:
- COM Jack: Zajednički (negativni) ulaz za sva mjerenja.
- VΩHzCap°C/°F Jack: Pozitivan ulaz za Voltage, Resistance, Frequency, Capacitance, and Temperature measurements.
- mA utičnica: Pozitivan ulaz za miliampovdje i mikroamptrenutna mjerenja.
- 10A utičnica: Pozitivan unos za 10 Amptrenutna mjerenja.
- Dugme za uključivanje / isključivanje: Smješten na gornjem rubu.
- Naplati Jack: USB-C port for recharging the internal battery.
- Ključ za baterijsku lampu: Button to activate the integrated LED flashlight.
- Indikator upozorenja: LED light for safety alerts.
- zagrada: Integrated kickstand on the back for hands-free viewing.
5. Podešavanje
5.1. Početno punjenje
Before first use, it is recommended to fully charge the multimeter's internal lithium battery. Connect the provided USB charging cable to the multimeter's charge jack and to a standard USB power adapter (not included) or a computer USB port. The display will indicate charging status. A full charge typically takes a few hours.

Figure 5.1: The multimeter's rechargeable lithium battery can be charged directly using a USB cable.
5.2. Pričvršćivanje mjernih kablova
For most measurements, connect the black test lead to the COM jack and the red test lead to the appropriate positive input jack (VΩHzCap°C/°F, mAμA, or 10A) depending on the desired measurement function. The input jack LED indicators will illuminate to guide correct connection.
6. Uputstvo za upotrebu
6.1. Uključivanje/isključivanje
Pritisnite i držite Uključivanje/isključivanje button (located on the top edge) to turn the multimeter on or off. The device features an auto-power-off function to conserve battery life after a period of inactivity.
6.2. Načini mjerenja
The GD128PLUS offers various measurement modes, accessible via the rotary dial and function buttons:
6.2.1. svtagMjerenje (AC/DC)
- Okrenite okretni točkić na V position. The multimeter will automatically detect AC or DC voltage.
- Spojite crni ispitni vod na COM utičnicu i crveni ispitni kabel do VΩHzCap°C/°F Jack.
- Spojite ispitne sonde paralelno na strujno kolo ili komponentu koja se testira.
- Pročitajte voltage vrijednost na ekranu.
6.2.2. Mjerenje struje (AC/DC)
- Okrenite okretni točkić na mA/μA or 10A position depending on the expected current.
- Spojite crni ispitni vod na COM priključak. Spojite crveni mjerni kabel na mAμA priključak za male struje ili 10A jack for larger currents.
- Spojite multimetar serijski s strujnim kolom. Prije spajanja provjerite je li strujno kolo bez napona.
- Priključite napajanje na strujno kolo i očitajte vrijednost struje.
- Oprez: Never connect the multimeter in parallel for current measurement, as this can damage the device and the circuit.
6.2.3. Mjerenje otpora (Ω)
- Okrenite okretni točkić na Ω pozicija.
- Spojite crni ispitni vod na COM utičnicu i crveni ispitni kabel do VΩHzCap°C/°F Jack.
- Prije mjerenja otpora provjerite je li strujno kolo bez napona i da su svi kondenzatori ispražnjeni.
- Spojite mjerne sonde preko komponente koju treba mjeriti.
- Očitajte vrijednost otpora.
6.2.4. Mjerenje kapacitivnosti (F)
- Okrenite okretni točkić na Cap pozicija.
- Spojite crni ispitni vod na COM utičnicu i crveni ispitni kabel do VΩHzCap°C/°F Jack.
- Prije spajanja sondi provjerite je li kondenzator potpuno ispražnjen.
- Povežite ispitne sonde preko kondenzatora.
- Očitajte vrijednost kapacitivnosti.
6.2.5. Mjerenje frekvencije (Hz)
- Okrenite okretni točkić na Hz pozicija.
- Spojite crni ispitni vod na COM utičnicu i crveni ispitni kabel do VΩHzCap°C/°F Jack.
- Spojite mjerne sonde paralelno s izvorom signala.
- Očitajte vrijednost frekvencije.
6.2.6. Ispitivanje dioda i ispitivanje kontinuiteta
- Okrenite okretni točkić na Dioda/Kontinuitet pozicija. Koristiti SEL dugme za prebacivanje između testa diode i testa kontinuiteta.
- Spojite crni ispitni vod na COM utičnicu i crveni ispitni kabel do VΩHzCap°C/°F Jack.
- Diodni test: Spojite crvenu sondu na anodu, a crnu sondu na katodu diode. Naprijed volt...tagPrikazat će se pad napona. Zamijenite mjesta sondama; trebao bi se prikazati otvoreni krug (OL).
- Test kontinuiteta: Connect the probes across the circuit or component. A continuous beep indicates a low resistance (continuity).
6.2.7. Non-Contact Voltage (NCV) Detekcija
- Okrenite okretni točkić na NCV pozicija.
- Move the top end of the multimeter near the conductor suspected of having AC voltage.
- The multimeter will emit an audible beep and the warning indicator will flash, with the display showing signal strength, if AC voltage je otkriven.
- Napomena: This function is for preliminary detection only. Always use direct contact measurement for precise voltage verifikacija.
6.2.8. Mjerenje temperature (°C/°F)
- Okrenite okretni točkić na ° C / ° F pozicija.
- Connect the K-type thermocouple probe to the COM i VΩHzCap°C/°F utičnice, poštujući polaritet.
- Postavite vrh termoelementa na ili blizu predmeta čija se temperatura mjeri.
- Read the temperature on the display. Use the SEL dugme za prebacivanje između Celzijusa i Farenhajta.
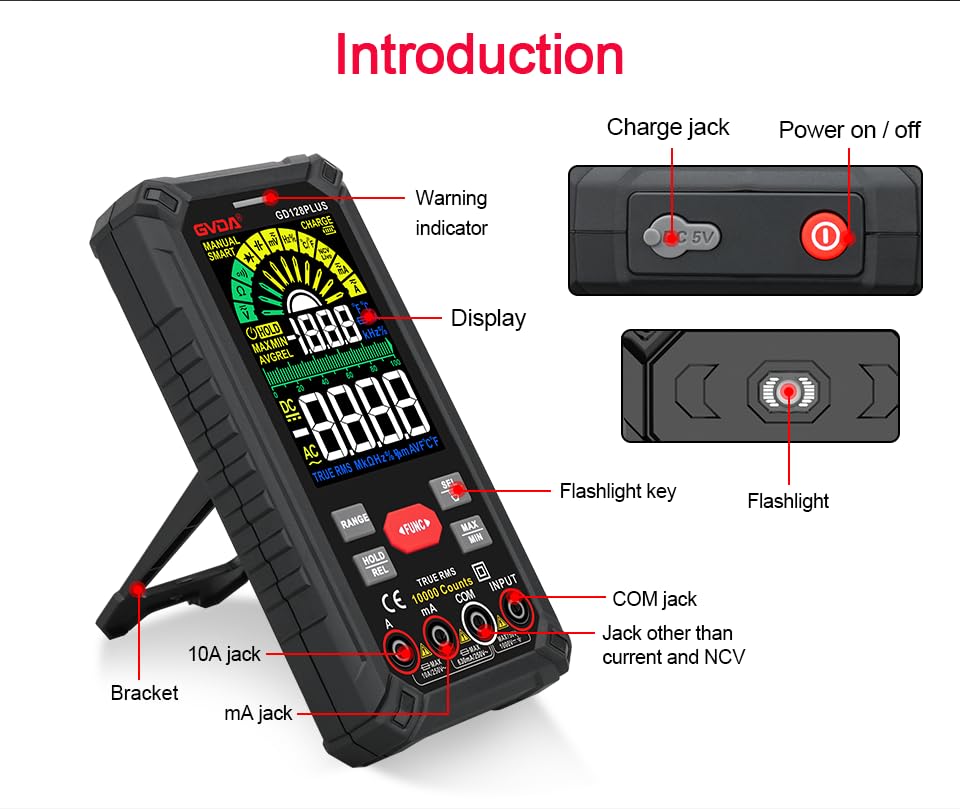
Figure 6.1: The multimeter can perform temperature tests using the included K-type thermocouple probe.
6.3. Posebne funkcije
- Dugme RANGE: In manual range mode, press to cycle through available ranges. In auto range mode, press to switch to manual range.
- Dugme HOLD/REL:
- Short press: Activates Data Hold, freezing the current reading. Press again to release.
- Long press: Activates Relative Measurement (REL). The current reading becomes the reference, and subsequent readings show the difference from this reference. Long press again to exit.
- Dugme MAX/MIN: Press to enter MAX/MIN recording mode. The display will show the maximum, minimum, and average values detected since activation. Press again to cycle through MAX, MIN, AVG. Long press to exit.
- Dugme FUNC: Used to switch between different functions within the same rotary dial position (e.g., AC/DC voltage, Dioda/Kontinuitet).
- svjetiljka: Press the dedicated flashlight key on the side to turn the LED flashlight on or off.

Figure 6.2: The multimeter features a convenient LED flashlight for illuminating work areas.
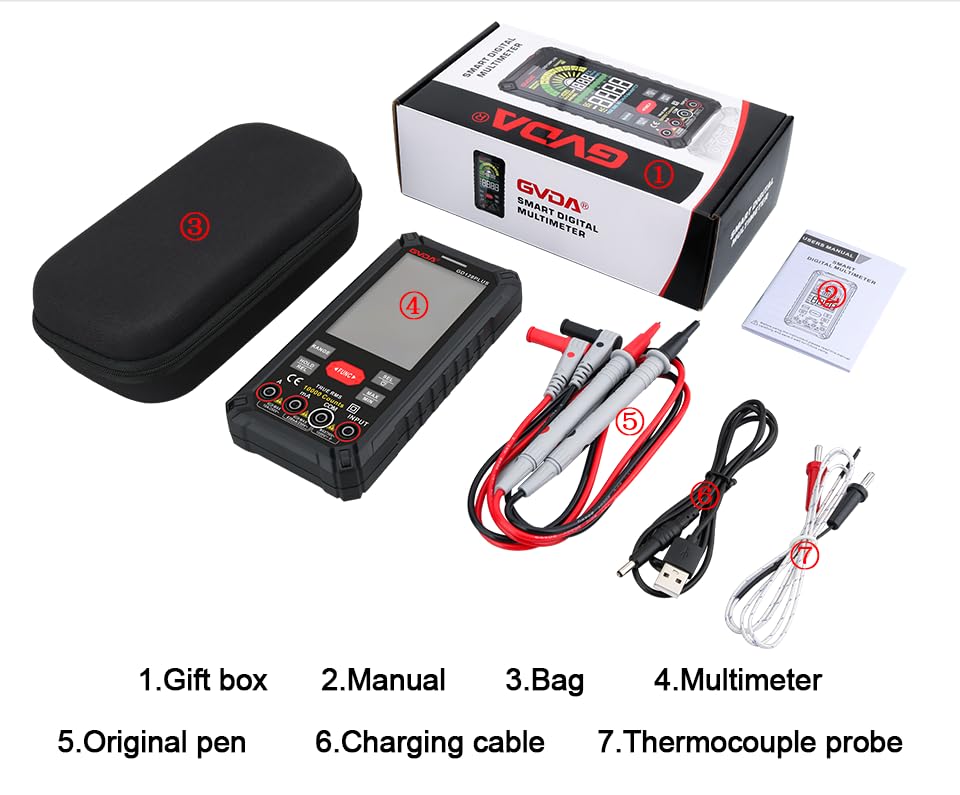
Figure 6.3: The HD Backlight Color Display provides clear and comprehensive measurement information.
7. Održavanje
7.1. Čišćenje
Obrišite kućište oglasomamp cloth and mild detergent. Do not use abrasives or solvents. Ensure the multimeter is off and disconnected from any circuits before cleaning.
7.2. Punjenje baterije
The multimeter is equipped with a rechargeable lithium battery. When the low battery indicator appears on the display, connect the multimeter to a USB power source using the provided charging cable. Avoid fully discharging the battery frequently to prolong its lifespan.
7.3. Skladištenje
When not in use for extended periods, store the multimeter in a cool, dry place, away from direct sunlight and extreme temperatures. It is advisable to charge the battery periodically (e.g., every 3-6 months) to maintain its health.
8. Otkrivanje problema
| Problem | Mogući uzrok | Rješenje |
|---|---|---|
| Multimetar se ne uključuje. | Slaba ili prazna baterija. | Napunite multimetar pomoću USB kabla. |
| Prikazuje se "OL" (preopterećenje). | Mjerenje prelazi odabrani raspon ili maksimalni kapacitet mjerača. | Switch to a higher range (if in manual range) or ensure the measurement is within the meter's specifications. |
| Netačna očitavanja. | Incorrect function/range selected; poor test lead connection; external interference. | Verify function and range; ensure test leads are securely connected; move away from strong electromagnetic fields. |
| Nema zvučnog signala za kontinuitet. | Circuit is open; multimeter not in continuity mode. | Check the circuit for breaks; ensure the multimeter is set to continuity mode (use SEL button if necessary). |
9. Specifikacije
| Parametar | Vrijednost |
|---|---|
| Display | 10000 Counts, HD Backlight Color LCD |
| Ranging | Automatski / ručni opseg |
| True RMS | Da |
| DC Voltage domet | Do 1000V |
| AC Voltage domet | Do 750V |
| Raspon istosmjerne struje | Do 10A |
| Raspon izmjenične struje | Do 10A |
| Opseg otpora | Yes (Ohm) |
| Capacitance Range | Yes (Farad) |
| Frekvencijski opseg | Yes (Hz) |
| Temperaturni opseg | -40°C do 1000°C / -40°F do 1832°F |
| Diodni test | Da |
| Test kontinuiteta | Da (sa zujalicom) |
| NCV (Non-Contact Voltage) | Da |
| Napajanje | 3.7V punjiva litijumska baterija |
| Sampling Rate | Pribl. 3 puta u sekundi |
| Dimenzije | 166 mm x 83 mm x 29 mm (približno 6.5 x 3.3 x 1.1 inča) |
| Težina | Otprilike 0.57 kg (1.26 funta) |
| Operativno okruženje | 0-40°C, relative humidity <80% |
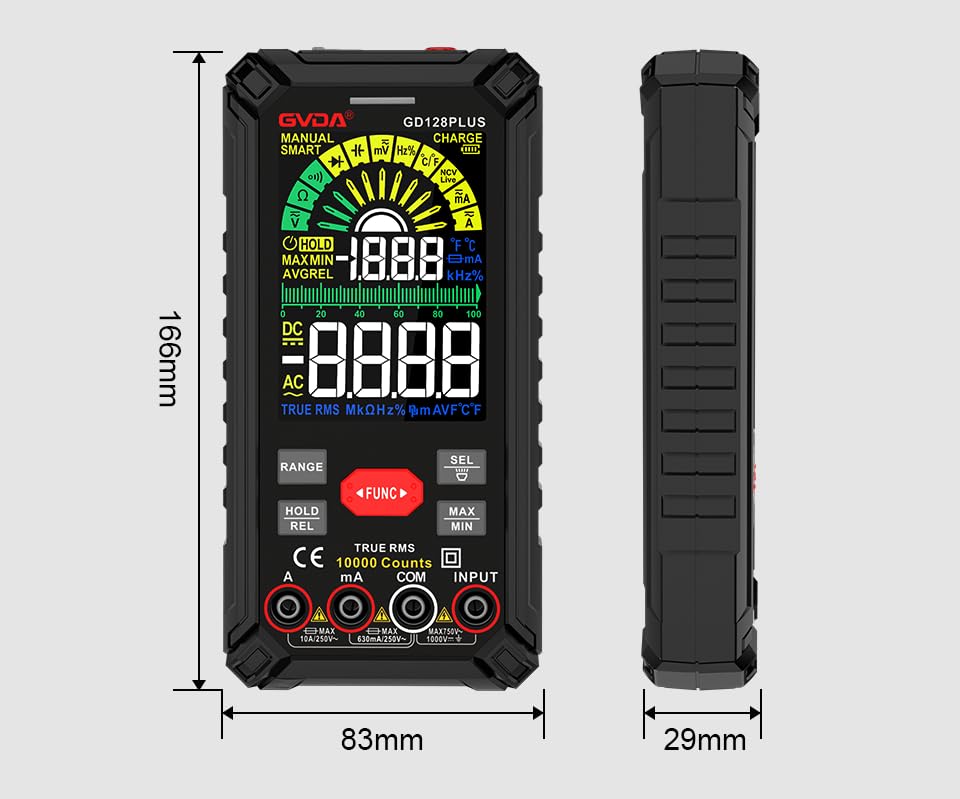
Figure 9.1: Physical dimensions of the GVDA GD128PLUS Multimeter.
10. Garancija i podrška
This GVDA GD128PLUS Digital Multimeter is designed for reliability and performance. For warranty information, technical support, or service inquiries, please refer to the contact details provided by your retailer or visit the official GVDA webMolimo sačuvajte dokaz o kupovini za potrebe reklamacije.


