1. Proizvod je gotovview
The Otovoda B-T50 Dash Cam is a comprehensive front and rear camera system designed to enhance driving safety and provide reliable evidence in case of incidents. It features high-resolution recording, Wi-Fi connectivity for easy access, advanced night vision, and a 24-hour parking monitor.

Figure 1: Otovoda B-T50 Dash Cam components and features.

Figure 2: Key features of the Otovoda B-T50 Dash Cam.
2. Sadržaj paketa
Provjerite da li se sve stavke nalaze u vašem paketu:
- Otovoda B-T50 Dash Cam (Main Unit)
- Zadnja kamera
- Nosač usisne čaše
- Car Charger (Type-C)
- Kabel stražnje kamere
- USB kabel
- SD kartica od 64 GB
- Uputstvo za upotrebu
- Cable Clips / 3M Tape
- SIM Ejector Tool (for SD card removal)

Slika 3: Uključeni pribor i komponente.
3. Postavljanje i instalacija
3.1 Umetanje SD kartice
The dash cam supports Micro SD cards up to 256GB (a 64GB card is included). Ensure the card is Class 10, U3 or higher for optimal performance.
- Locate the SD card slot on the side of the main dash cam unit.
- Umetnite Micro SD karticu sa zlatnim kontaktima okrenutim prema stražnjoj strani kamere dok ne klikne na svoje mjesto.
- Da biste uklonili, lagano gurnite karticu prema unutra dok ne izađe.

Figure 4: SD card insertion.
3.2 Montiranje kamere za automobil
Mount the main unit on your car's windshield using the provided suction cup mount. Choose a location that does not obstruct your view na putu.
- Očistite površinu vjetrobranskog stakla na koju namjeravate montirati kameru.
- Pričvrstite nosač vakuumske čašice na jedinicu kamere za automobil.
- Čvrsto pritisnite vakuumsku čašicu na vjetrobransko staklo i povucite polugu da biste je pričvrstili.
- Podesite ugao kamere kako biste osigurali jasan view puta ispred nas.

Figure 5: Dash cam mounted on windshield.

Figure 6: Suction cup mounting steps.
3.3 Povezivanje zadnje kamere
The rear camera provides a 1080P recording of the rear view. It can be mounted inside the rear window or externally near the license plate.
- Connect the rear camera cable to the rear camera unit.
- Route the cable neatly along the vehicle's interior trim to the main dash cam unit.
- Plug the other end of the rear camera cable into the designated port on the main dash cam.
- Secure the rear camera in your desired location using the provided 3M tape or screws.

Figure 7: Dual channel recording setup.

Figure 8: Rear camera design.
3.4 Priključak za napajanje
Spojite kameru za automobil na napajanje vašeg vozila pomoću priloženog punjača za automobil.
- Plug the Type-C end of the car charger into the dash cam's power port.
- Drugi kraj auto punjača priključite na utičnicu za upaljač u vozilu.
- Kamera za automobil će se automatski uključiti i početi snimati kada se uključi kontakt vozila.

Figure 9: Type-C power port.
4. Uputstvo za upotrebu
4.1 Osnovno snimanje
Once powered on, the dash cam will automatically start recording. The 3-inch screen will display the live view from the front and rear cameras.

Figure 10: Dash cam 3-inch display.
4.2 Wi-Fi i upravljanje putem aplikacija
The built-in Wi-Fi allows you to connect your smartphone to the dash cam via the free Viidure APP (available for Android and iOS). This enables real-time viewing, video playback, downloading, and sharing.
- Download and install the "Viidure" app from your device's app store.
- Turn on Wi-Fi on your dash cam (refer to the camera's menu settings).
- On your smartphone, connect to the dash cam's Wi-Fi network (SSID and password usually displayed on the dash cam screen).
- Open the Viidure app to access live view, recorded videos, and settings.
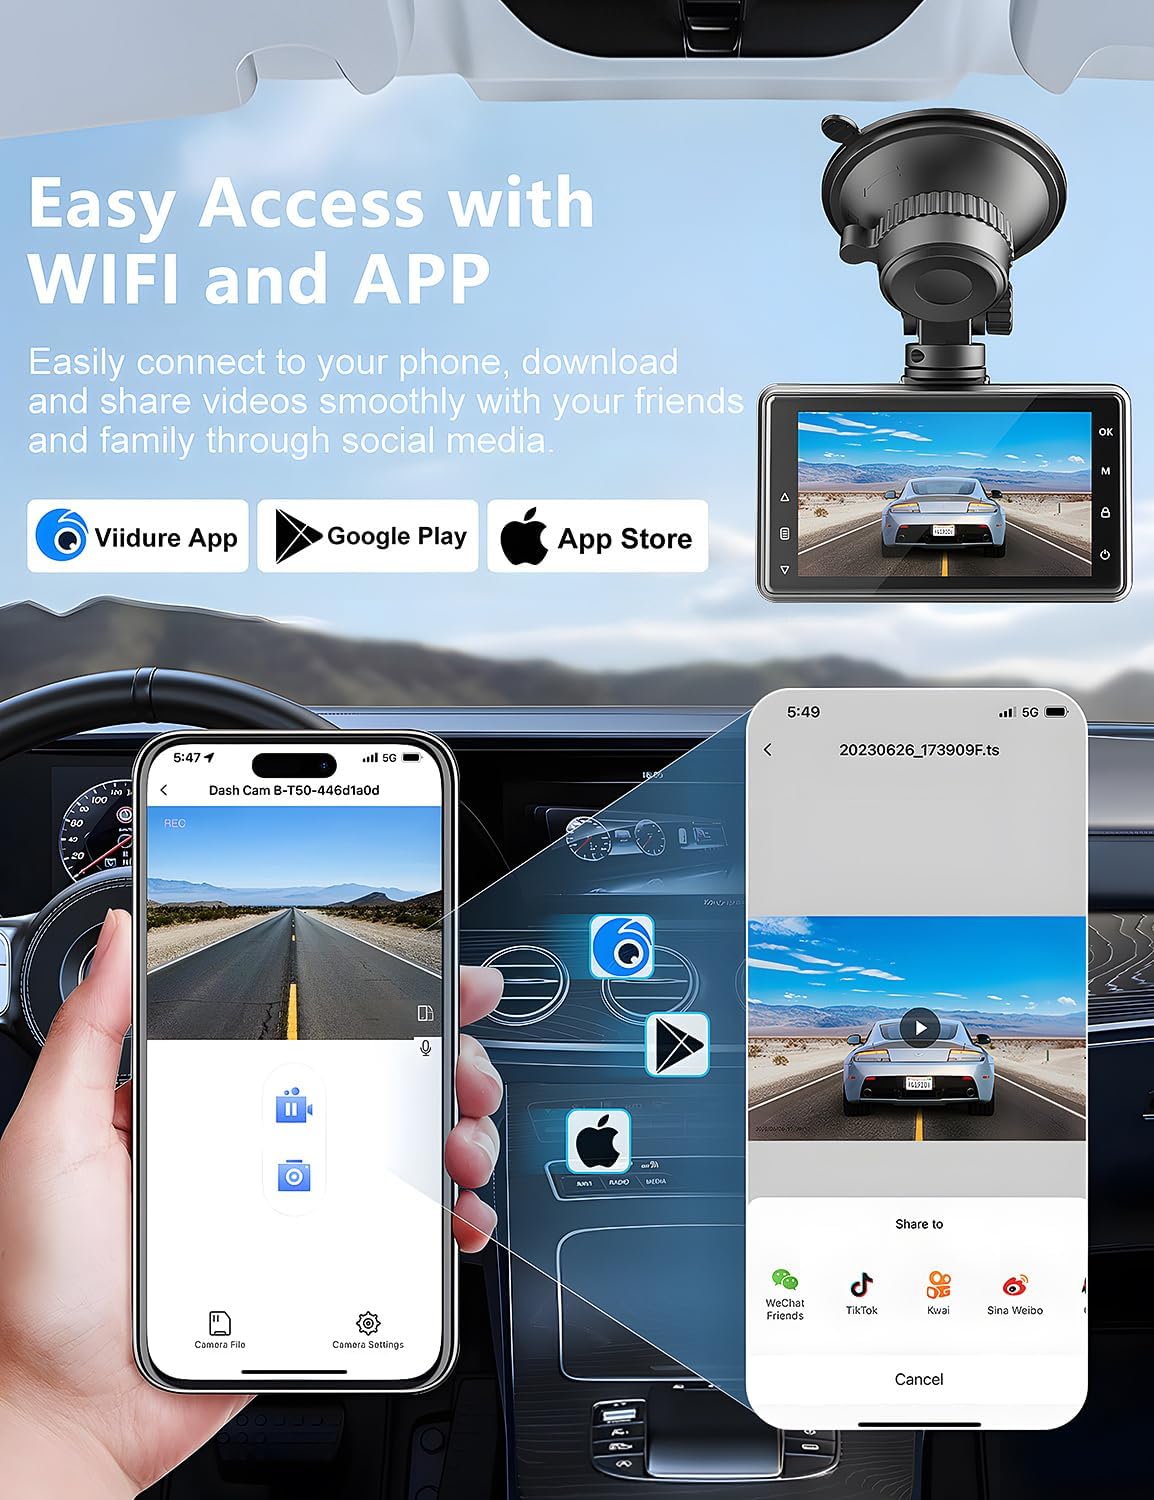
Slika 11: Wi-Fi povezivost i upravljanje putem aplikacije.

Figure 12: Sharing videos via Wi-Fi.
4.3 G-senzor (zaključavanje u slučaju nužde)
The built-in G-Sensor automatically detects sudden shakes or collisions. When triggered, it locks the current video footage to prevent it from being overwritten by loop recording, ensuring critical evidence is preserved.

Figure 13: G-Sensor feature.

Figure 14: G-Sensor icon.
4.4 Snimanje u petlji
The dash cam continuously records video in a loop. When the memory card is full, the oldest unlocked video files are automatically overwritten to make space for new recordings. This ensures uninterrupted recording.

Figure 15: Loop Recording icon.
4.5 Parking Monitor & Motion Detection
When enabled, the parking monitor function detects collisions or motion around your parked vehicle. If an event is detected, the dash cam will automatically turn on and record a short video, providing 24/7 surveillance. For continuous 24-hour monitoring, a hardwire kit (not included) is required to connect the dash cam directly to the car's battery.

Figure 16: 24-hour parking monitor.

Figure 17: Parking monitor icon.
Figure 18: Motion detection in parking mode.
4.6 Super noćni vid
The dash cam is equipped with an F1.8 aperture lens and WDR (Wide Dynamic Range) technology, enhancing its ability to capture clear and detailed footage in low-light conditions, including license plates at night.

Figure 19: Super Night Vision capabilities.

Figure 20: Night vision clarity for license plates.
5. Održavanje
5.1 Upravljanje SD karticom
Regularly format the SD card to ensure optimal performance and prevent data corruption. Formatting can be done through the dash cam's menu settings or via the Viidure app.
- It is recommended to format the SD card once a month.
- Always back up important videos before formatting.
5.2 Čišćenje
Keep the camera lenses and screen clean for clear recordings and display.
- Use a soft, lint-free cloth to wipe the lenses and screen.
- Izbjegavajte korištenje abrazivnih sredstava za čišćenje ili otapala.
5.3 Razmatranja životne sredine
The dash cam is designed for automotive use but extreme temperatures can affect its performance and longevity.
- Avoid prolonged exposure to direct sunlight in extremely hot climates when the vehicle is parked.
- If the camera is exposed to extreme heat, allow it to cool down before operation.
6. Otkrivanje problema
If you encounter issues with your Otovoda B-T50 Dash Cam, refer to the following common problems and solutions:
| Problem | Mogući uzrok | Rješenje |
|---|---|---|
| Dash cam turns on and off repeatedly. | Unstable power connection; faulty power cable; internal issue. |
|
| Rear camera is not recognized or not working. | Loose connection; damaged cable; faulty rear camera. |
|
| Suction cup mount does not stay attached to the windshield. | Dirty windshield; improper application; worn suction cup. |
|
| Viidure app is slow or unresponsive. | App cache; outdated app version; phone's Wi-Fi interference. |
|
| Slow video download to phone. | Veliki file size; Wi-Fi interference; phone processing speed. |
|

Figure 21: Settings and troubleshooting.
7. Specifikacije
| Feature | Detalj |
|---|---|
| Naziv modela | B-T50 |
| Dimenzije proizvoda | 0.59 x 3.15 x 1.77 inča |
| Težina artikla | 1.1 funte |
| Rezolucija video snimanja | Front: 2.5K (1440P), Rear: 1080P |
| Ugao prednje kamere | 170° širokokutni |
| Ugao zadnje kamere | 140° širokokutni |
| Display | 3-inčni ekran |
| Tehnologija povezivanja | bežični (Wi-Fi) |
| Posebne karakteristike | Built-In WiFi/Smart APP Control, Parking Monitor, Super Night Vision, G-Sensor, Loop Recording, WDR |
| Podrška za memorijsku karticu | Do 256 GB (64 GB uključeno) |
| Napajanje | Tip-C |
| Vrsta montaže | Windshield Mount, License Plate Mount |
| Vrsta usluge vozila | Minivan, autobus, auto, kamion |
8. Garancija i podrška
Otovoda is committed to providing high-quality products and excellent customer service.
- garancija: The Otovoda B-T50 Dash Cam comes with an extendable 2-year repair warranty.
- Povratak: Full refunds are available within 30 days of purchase.
- tehnička podrška: For any questions, missing accessories, or technical assistance, please contact our support team. We aim to respond within 24 hours.
- Email za kontakt: dashcam@bestservices.vip

Figure 22: Otovoda Brand Logo.