1. Uvod
This manual provides instructions for the installation, operation, and maintenance of the ShockFlo S1 Level 2 EV Charger. This device is designed to provide efficient electric vehicle charging for home use. Please read this manual thoroughly before using the product to ensure proper function and safety.
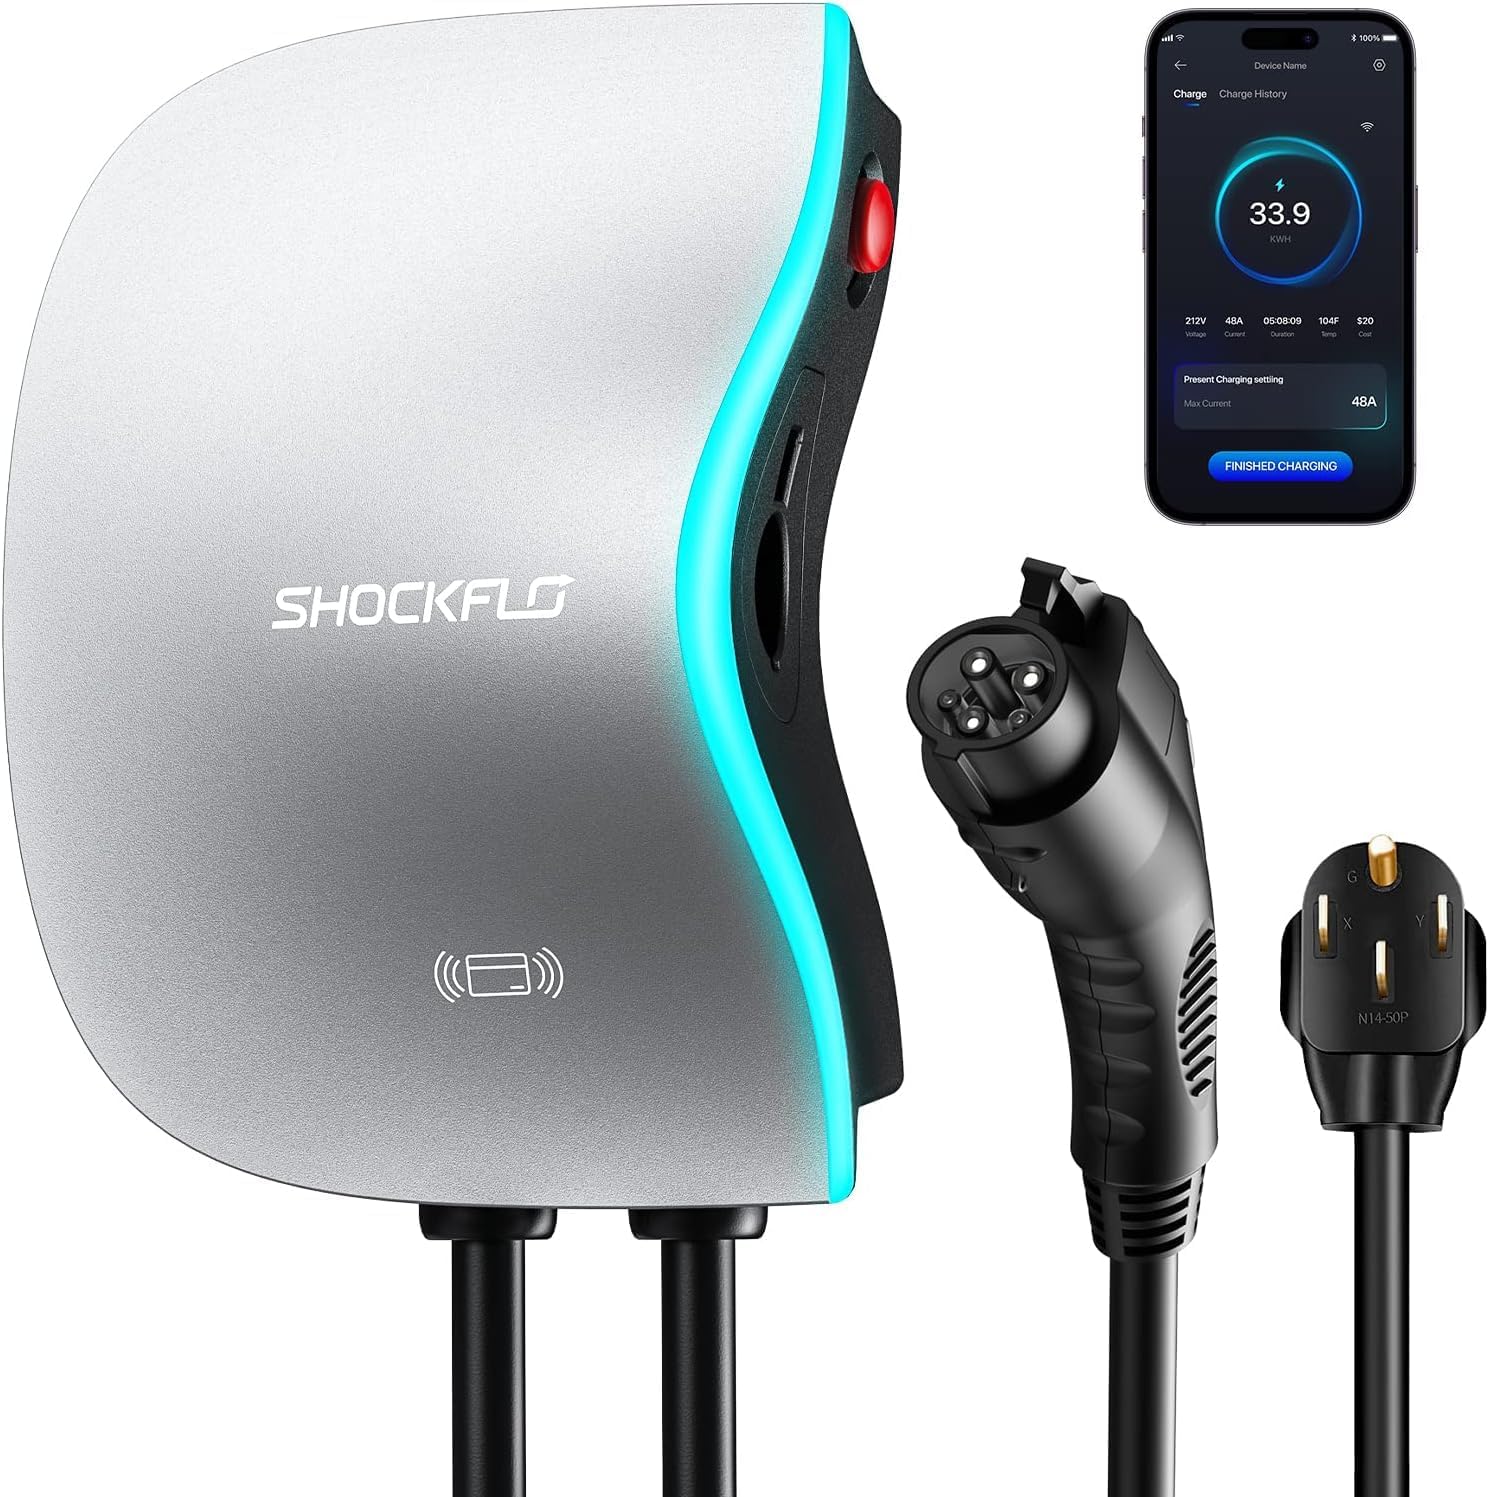
Figure 1: ShockFlo S1 Level 2 EV Charger overview.
2. Sigurnosne informacije
The ShockFlo S1 EV Charger is designed with safety features and is UL certified. Adherence to the following safety guidelines is crucial for preventing injury and damage:
- Instalaciju mora izvršiti kvalificirani električar u skladu sa svim lokalnim i nacionalnim električnim propisima.
- Ne pokušavajte otvarati, rastavljati ili modificirati punjač.
- Prije svake upotrebe provjerite da kabel za punjenje nije oštećen. Ne koristite ako je kabel ili konektor izlizan, slomljen ili izložen.
- Držite djecu i kućne ljubimce dalje od područja punjenja tokom rada.
- The charger is rated IP65 for water and dust resistance, suitable for indoor or outdoor use. However, avoid submerging the unit in water.
- The charger incorporates multiple protection mechanisms including lightning, current leakage, grounding, low-voltage, prekomjernotage, over-charge, over-heat, and over-current protection.

Figure 2: Integrated safety protection features.
3. Sadržaj paketa
Provjerite da li su sve stavke prisutne u paketu:
- ShockFlo S1 Level 2 EV Charger Unit (40A)
- Montažni nosač
- Montažni vijci i ankeri
- NEMA 14-50 Plug (pre-attached or separate, depending on model)
- RFID Cards (2x)
- Uputstvo za upotrebu
- Vodič za brzu instalaciju

Figure 3: Package contents and certifications.
4. Podešavanje i instalacija
The ShockFlo S1 EV Charger offers two installation options: NEMA 14-50 plug or hardwired. Professional installation by a certified electrician is recommended for both options to ensure compliance with electrical codes and safety standards.
4.1 Montiranje punjača
- Odaberite lokaciju: Choose a suitable indoor or outdoor location near your parking area, ensuring the 17ft charging cable can reach your vehicle's charging port.
- Pričvrstite nosač za montažu: Securely attach the mounting bracket to a sturdy wall surface using the provided screws and anchors. For drywall, appropriate anchors (not included) may be required.
- Mount Charger Unit: Carefully align and mount the EV charger unit onto the installed bracket.

Figure 4: Installation steps for the EV charger.
4.2 Električni priključak
NEMA 14-50 Plug Option:
- Ensure a dedicated 240V NEMA 14-50 outlet is available and properly installed on a circuit rated for at least 50A.
- Plug the charger's NEMA 14-50 connector into the wall outlet.
Hardwired Installation Option:
- For hardwired installation, consult a qualified electrician. The charger must be connected to a dedicated 240V circuit with appropriate overcurrent protection.
- Follow the wiring diagrams provided in the full PDF user manual for correct hardwiring procedures.
5. Operacija
5.1 načina punjenja
The ShockFlo S1 EV Charger supports three primary charging modes:
- Daljinski upravljač za aplikaciju: Use the ShockFlo mobile application to manage charging sessions.
- RFID Card Charging: Tap an authorized RFID card to start or stop charging.
- Uključite i napunite: Simply plug the connector into your EV to initiate charging (this setting can be enabled/disabled in the app).
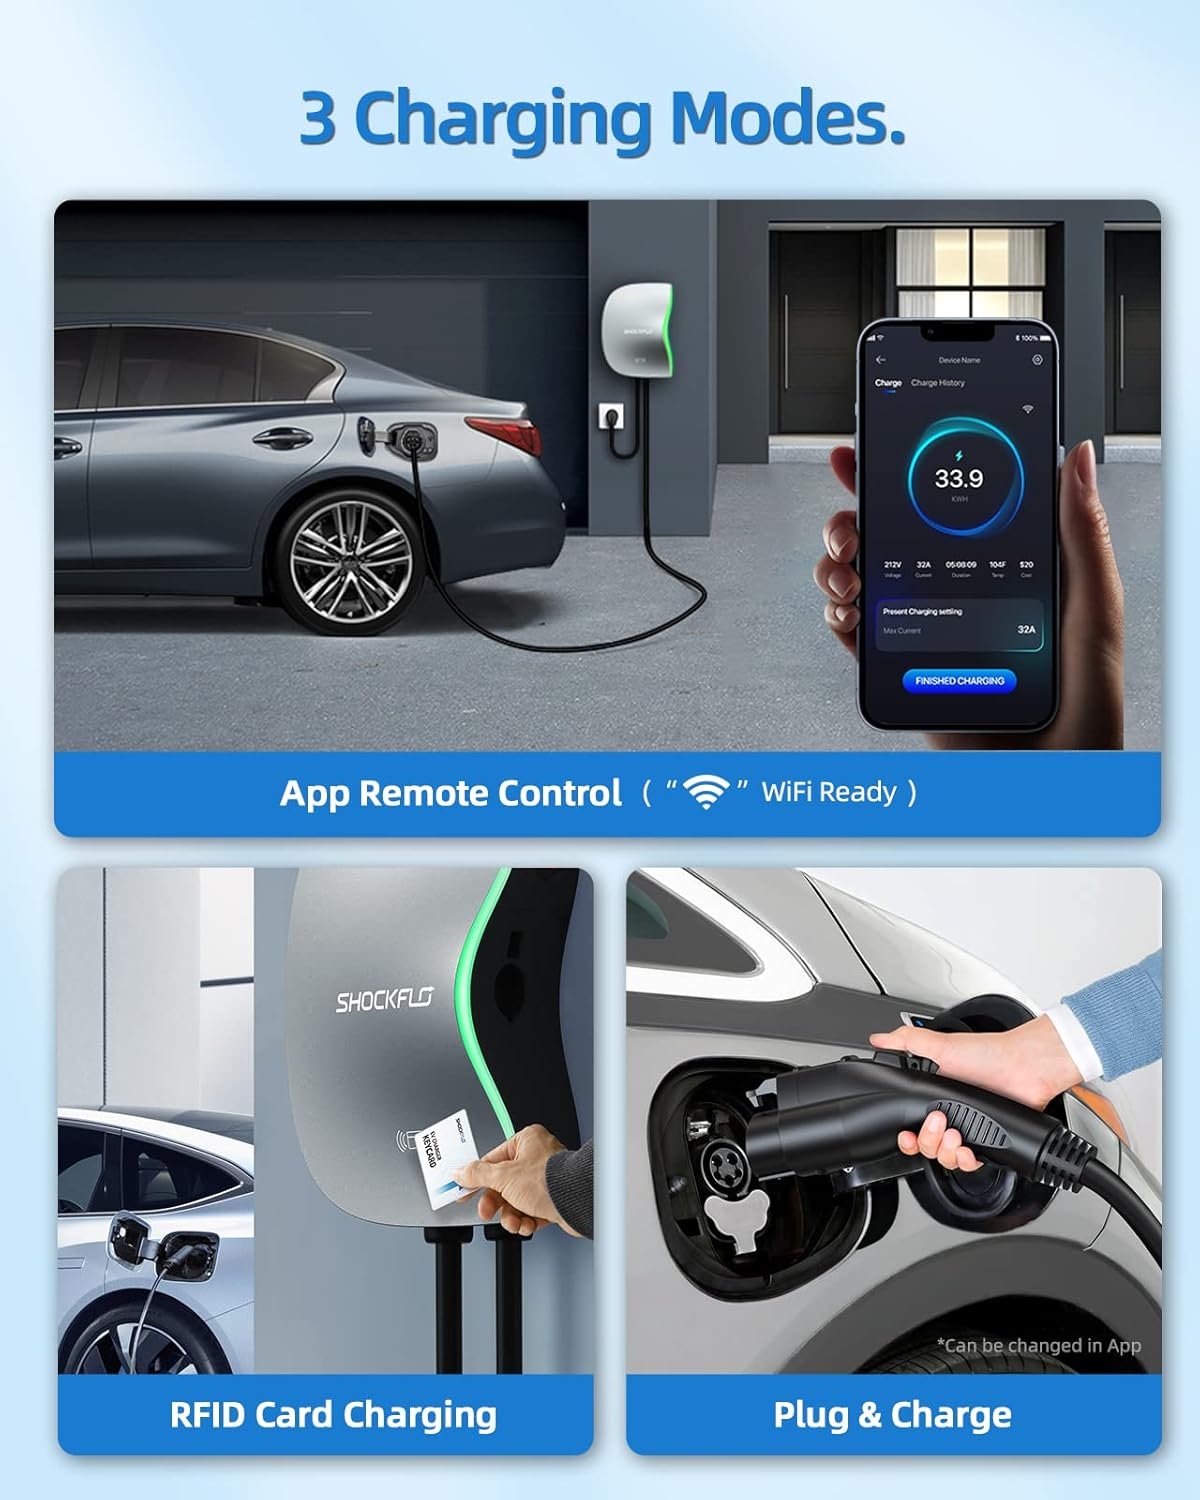
Figure 5: Available charging modes.
5.2 Using the ShockFlo App
The ShockFlo app provides advanced control and monitoring features:
- daljinski upravljač: Start and stop charging sessions from your smartphone.
- Trenutna prilagodba: Adjust the charging current (e.g., 16A, 32A, 40A) to suit your vehicle's needs or household electrical capacity.
- Planirano punjenje: Set specific times for charging, useful for utilizing off-peak electricity rates.
- Punjenje monitora: View real-time charging status, energy consumption, and charging history.
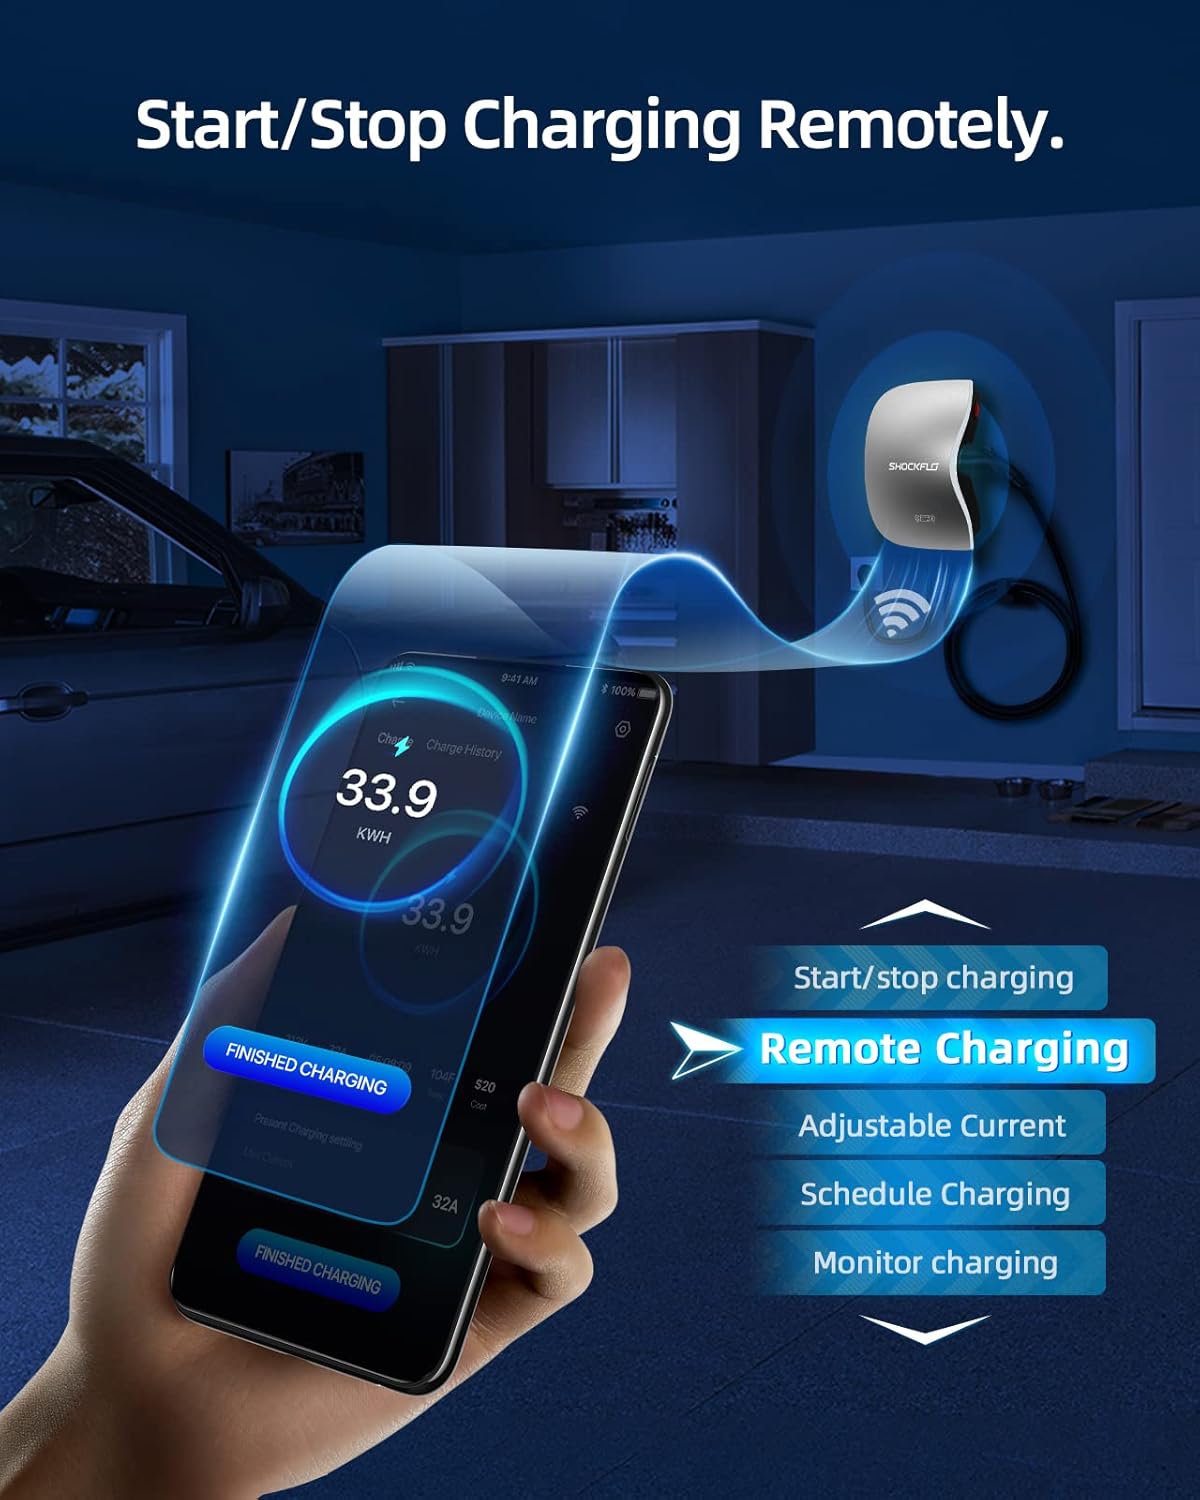
Figure 6: ShockFlo app features for remote control and scheduling.

Figure 7: Scheduling charging for off-peak hours via the app.
5.3 Connecting to Your EV
The charger uses an SAE J1772 connector, compatible with most electric vehicles in North America. For Tesla vehicles, an adapter (sold separately) is required.
- Provjerite je li punjač uključen.
- Open your EV's charging port.
- Firmly insert the SAE J1772 connector into your EV's charging port until it clicks into place.
- Charging will begin according to your selected mode (App, RFID, or Plug & Charge).
- To stop charging, use the app, tap the RFID card, or unlock your vehicle's charging port and press the release button on the connector before pulling it out.

Figure 8: Correct method for inserting the charging connector.
5.4 Status LED indikatora
The LED light on the charger indicates its current status:
- Plava (puna): No connector inserted.
- Plava (Pulsirajuća): Connector inserted, awaiting app connection.
- Green (Pulsing): Punjenje je u toku.
- Zelena (puna): Potpuno napunjen.
- Crvena (puna): Fault detected.
- Yellow (Pulsing): OTA (Over-The-Air) update in progress.

Figure 9: LED indicator status guide.
6. Održavanje
The ShockFlo S1 EV Charger requires minimal maintenance. Follow these guidelines to ensure longevity and optimal performance:
- čišćenje: Obrišite vanjski dio punjača mekom,amp krpom. Ne koristite abrazivna sredstva za čišćenje ili rastvarače. Prije čišćenja provjerite je li uređaj isključen iz struje.
- Inspekcija kablova: Regularly inspect the charging cable and connector for any signs of wear, damage, or corrosion. Replace if damage is found.
- Skladištenje: When not in use, ensure the charging cable is neatly coiled and the connector is stored in its designated holder (if applicable) to prevent damage.
- Ažuriranja softvera: Keep the ShockFlo app updated to the latest version to ensure access to new features and performance improvements. The charger may also receive OTA updates.
7. Otkrivanje problema
If you encounter issues with your ShockFlo S1 EV Charger, refer to the following common problems and solutions:
| Problem | Mogući uzrok | Rješenje |
|---|---|---|
| Punjač se ne uključuje. | No power from outlet/circuit breaker tripped. | Check the circuit breaker. Ensure the NEMA 14-50 plug is fully inserted or hardwired connection is secure. |
| Punjenje ne počinje. | Connector not fully inserted; vehicle not ready to charge; app/RFID issue; charger fault. | Ensure the connector is firmly inserted. Check your EV's dashboard for charging status. Try using the app or RFID card. Check LED indicator for fault codes. |
| Crveni LED indikator. | Otkrivena je interna greška. | Unplug the charger (or turn off circuit breaker), wait 5 minutes, then reconnect. If the fault persists, contact customer support. |
| App not connecting to charger. | Bluetooth/Wi-Fi issues; app outdated. | Ensure Bluetooth and Wi-Fi are enabled on your phone. Restart the app and charger. Check for app updates. Ensure charger is within Wi-Fi range. |
For further assistance, refer to the full user manual or contact ShockFlo customer support.
8. Specifikacije
| Feature | Detalj |
|---|---|
| Broj modela | CS01 |
| Nivo punjenja | Nivo 2 |
| Maksimalna struja | 40A |
| Izlazna snaga | 9.6 kW |
| Ulazni voltage | 240 V AC |
| Tip konektora | SAE J1772 |
| Dužina kabla | 17 stopa |
| Povezivanje | Wi-Fi, Bluetooth, RFID |
| Opcije instalacije | NEMA 14-50 Plug or Hardwired |
| Environmental Rating | IP65 (Indoor/Outdoor Use) |
| Certifikati | UL, FCC, Energy Star |
| Dimenzije proizvoda (D x Š x V) | 3.35" x 9.25" x 15.7" |
| Težina artikla | 18.5 funte |

Slika 10: Dimenzije proizvoda.

Figure 11: Environmental and durability testing.
9. Jamstvo i podrška
ShockFlo provides a 3 godine garancije for the S1 Level 2 EV Charger, covering defects in materials and workmanship under normal use. For warranty claims or technical assistance, please contact ShockFlo customer support.
Korisnička podrška: 24/7 customer support is available to assist with any questions or issues you may encounter. Refer to the contact information provided in your product packaging or on the official ShockFlo website.


