1. Uvod
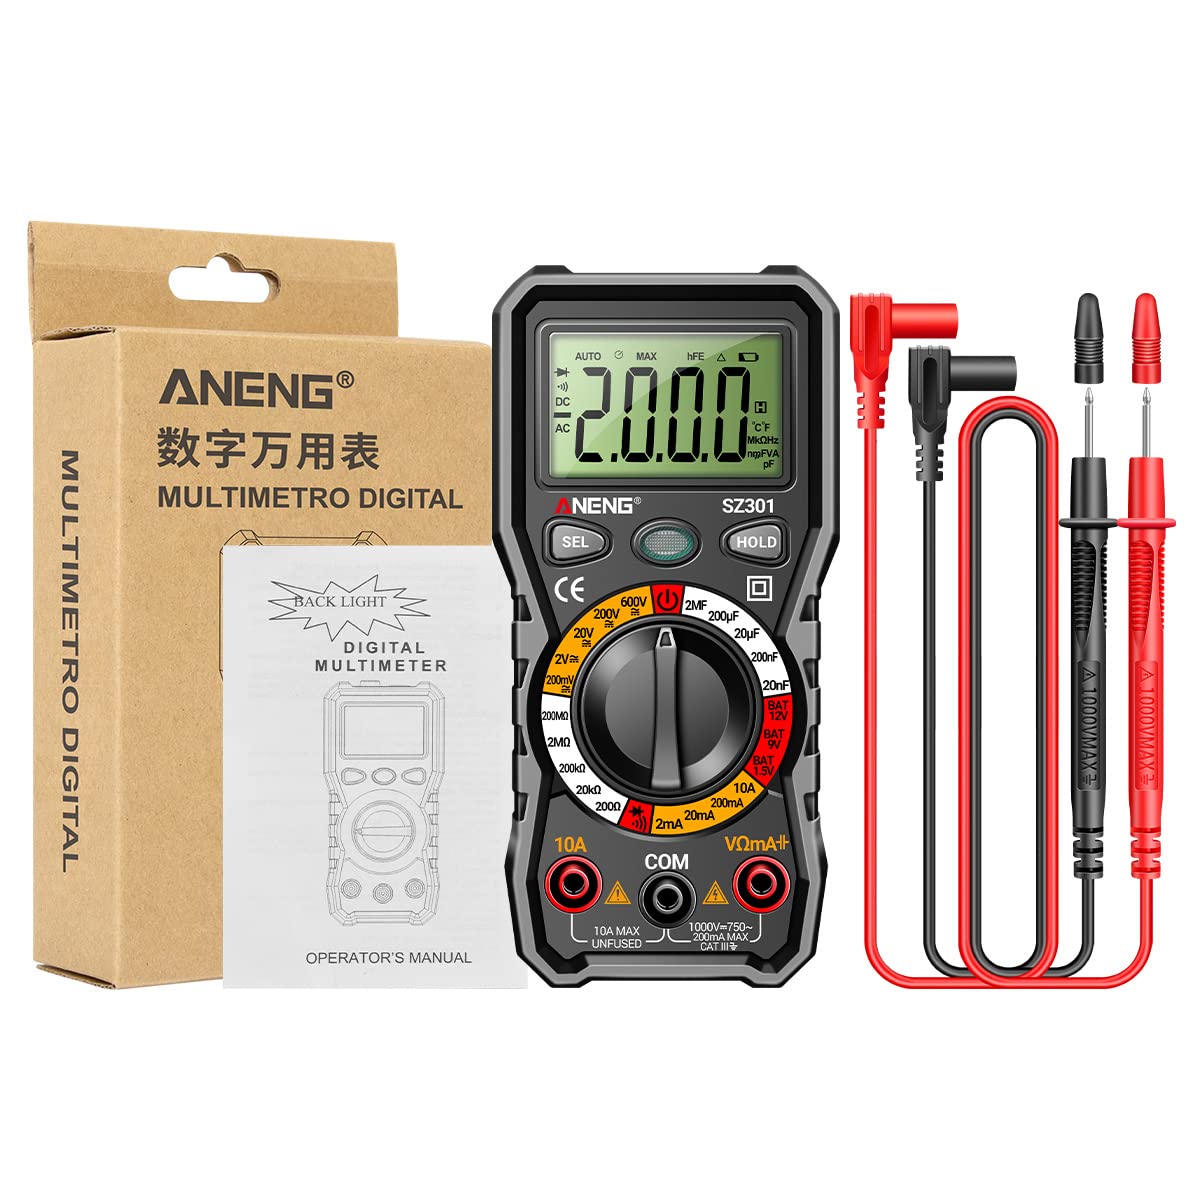
This manual provides detailed instructions for the safe and effective use of your ANENG SZ301 Digital Multimeter. The SZ301 is a versatile, automatic range digital multimeter designed for measuring DC voltage, AC voltage, DC current, AC current, resistance, capacitance, diode, and continuity. It features a digital display with a maximum count of 2000, an automatic shutdown function, and a built-in NCV sensor for non-contact voltage detection. Please read this manual thoroughly before operation and retain it for future reference.
2. Sigurnosne informacije
Da biste osigurali siguran rad i servisiranje brojila, pridržavajte se ovih sigurnosnih mjera opreza:
- Uvijek se pridržavajte lokalnih i nacionalnih sigurnosnih propisa.
- Ne koristite mjerač ako izgleda oštećeno ili ako je izolacija na mjernim kabelima oštećena.
- Nikad ne primjenjivati voltage ili struja koja prelazi specificirane maksimalne granice.
- Budite izuzetno oprezni kada radite sa voltagiznad 30V AC RMS, 42V peak ili 60V DC. Ovi volumenitagpredstavljaju opasnost od strujnog udara.
- Uvijek isključite mjerne kablove iz strujnog kola prije promjene funkcija ili raspona.
- Prije upotrebe mjerača provjerite je li poklopac baterije sigurno zatvoren.
- Odmah zamijenite baterije kada se pojavi indikator slabe baterije kako biste osigurali tačna očitavanja.
- The built-in NCV sensor detects AC voltage. An LED flash and buzzer sound indicate detection, helping prevent electric shock.
3. Proizvod je gotovview
The ANENG SZ301 Digital Multimeter is designed for ease of use and durability. It features a robust silicone case for protection and a convenient pen holder/card slot.

Ključne komponente:
- Digitalni prikaz: Prikazuje očitanja mjerenja, jedinice i indikatore.
- Function Switch Key (SEL): Used to select different measurement modes within a range (e.g., AC/DC voltage, Dioda/Zujalica).
- Tipka za zadržavanje podataka (HOLD): Freezes the current reading on the display. Long press for shutdown.
- Rotary Dial: Selects the primary measurement function (Voltage, Resistance, Capacitance, Current, Battery Test, Diode/Continuity).
- Ulazne utičnice:
- COM Jack: Zajednički (negativni) ulaz za sva mjerenja.
- VΩmA+ Jack: Pozitivan ulaz za volumentage, resistance, capacitance, diode, and small current measurements.
- 10A utičnica: Pozitivan ulaz za mjerenja visoke struje (do 10A).
- NCV senzor: Non-Contact Voltagpodručje detekcije.
- LED svjetlo: Za osvjetljavanje tamnih radnih područja.
- Indikator slabe baterije: Icon on the display indicating low battery power.


4. Ključne karakteristike
- višenamjenski: A fully functional multipurpose machine capable of measuring various electrical parameters.
- Built-in NCV Sensor: Non-Contact Voltage (NCV) measurement detects voltage in the air. An LED flashes and an alarm buzzer sounds when nearby AC voltage is detected, enhancing safety.
- Support Frame & Pen Holder: Features a built-in pen slot for easy carrying and an anti-drop, shock-proof storage slot. The 90-degree design of the rear bracket allows for convenient hands-free measurement.
- Automatsko isključivanje: If the multimeter is not used within 15 minutes, it will automatically shut down to conserve battery power.
- LED Light & Backlight: Long press the appropriate button to turn on the LCD bright screen backlight, allowing clear visibility of values in dark environments. A flashlight function illuminates the front for night work assistance.

5. Podešavanje
5.1 Instalacija baterije
- Provjerite je li multimetar isključen i da li su mjerni kablovi odvojene.
- Pronađite odeljak za baterije na poleđini uređaja.
- Odvrnite poklopac odeljka za baterije.
- Insert two (2) AA batteries, observing the correct polarity (+/-) as indicated inside the compartment.
- Vratite poklopac odeljka za baterije i pričvrstite ga vijkom.
5.2 Početno uključivanje
Turn the rotary dial from the 'OFF' position to any desired measurement function. The display will light up, indicating the meter is ready for use.
6. Uputstvo za upotrebu
Before making any measurements, ensure the test leads are correctly inserted into the appropriate input jacks.
6.1 DC VoltagMjerenje (V–)
- Turn the rotary dial to the 'V–' range (e.g., 200mV, 2V, 20V, 200V, 600V). The meter may automatically select the range.
- Insert the red test lead into the 'VΩmA+' jack and the black test lead into the 'COM' jack.
- Spojite mjerne kablove paralelno na DC voltagizvor ili komponentu koju želite izmjeriti.
- Pročitajte voltage vrijednost na ekranu.
6.2 AC VoltagMjerenje e (V∼)
- Turn the rotary dial to the 'V∼' range (e.g., 2V, 20V, 200V, 600V). The meter may automatically select the range.
- Insert the red test lead into the 'VΩmA+' jack and the black test lead into the 'COM' jack.
- Spojite mjerne kablove paralelno na AC volttagizvor ili komponenta.
- Pročitajte voltage vrijednost na ekranu.

6.3 Mjerenje otpora (Ω)
- Turn the rotary dial to the 'Ω' range (e.g., 200Ω, 2kΩ, 20kΩ, 200kΩ, 2MΩ, 20MΩ).
- Insert the red test lead into the 'VΩmA+' jack and the black test lead into the 'COM' jack.
- Prije mjerenja otpora provjerite je li strujno kolo ili komponenta bez napona.
- Spojite mjerne kablove preko komponente čiji otpor želite izmjeriti.
- Očitajte vrijednost otpora na zaslonu.
6.4 Test diode (→|)
- Turn the rotary dial to the 'Diode/Buzzer' position. Press the 'SEL' button if necessary to select Diode mode.
- Insert the red test lead into the 'VΩmA+' jack and the black test lead into the 'COM' jack.
- Spojite crveni mjerni kabel na anodu, a crni mjerni kabel na katodu diode.
- Na ekranu će se prikazati jačina zvuka naprijedtagPad e. Zamijenite mjesta vodova; na ekranu bi trebalo biti prikazano 'OL' (otvorena petlja) za ispravnu diodu.

6.5 Mjerenje kapacitivnosti (F)
- Turn the rotary dial to the 'F' (Capacitance) range (e.g., 2nF, 20nF, 200nF, 2µF, 20µF, 200µF).
- Insert the red test lead into the 'VΩmA+' jack and the black test lead into the 'COM' jack.
- Prije mjerenja provjerite je li kondenzator potpuno ispražnjen kako biste spriječili oštećenje mjerača.
- Spojite mjerne kablove preko kondenzatora.
- Očitajte vrijednost kapacitivnosti na ekranu.
6.6 Current Measurement (A)
- For small currents (mA): Turn the rotary dial to the 'mA' range (e.g., 2mA, 20mA, 200mA). Insert the red test lead into the 'VΩmA+' jack and the black test lead into the 'COM' jack.
- For high currents (10A): Turn the rotary dial to the '10A' range. Insert the red test lead into the '10A' jack and the black test lead into the 'COM' jack.
- Ensure the circuit is de-energized. Open the circuit where you want to measure current.
- Connect the meter in series with the circuit. The current must flow through the meter.
- Ponovo uključite strujni krug i očitajte trenutnu vrijednost na displeju.
6.7 Test kontinuiteta (♫)
- Turn the rotary dial to the 'Diode/Buzzer' position. Press the 'SEL' button if necessary to select Continuity mode.
- Insert the red test lead into the 'VΩmA+' jack and the black test lead into the 'COM' jack.
- Osigurajte da je strujni krug ili komponenta bez napona.
- Spojite mjerne kabele preko komponente ili žice.
- Ako postoji kontinuitet (otpor ispod određenog praga), oglasit će se zujalica.
6.8 Battery Test (BAT)
- Turn the rotary dial to the 'BAT' position (1.5V, 9V, 12V).
- Insert the red test lead into the 'VΩmA+' jack and the black test lead into the 'COM' jack.
- Connect the red test lead to the positive terminal and the black test lead to the negative terminal of the battery.
- Pročitajte zapreminu baterijetage na ekranu.
6.9 NCV (Beskontaktni volumentage) Otkrivanje
- Okrenite rotacijski brojčanik u položaj 'NCV'.
- Move the top part of the multimeter (where the NCV sensor is located) close to the AC voltage source (e.g., an electrical outlet or live wire).
- Ako je AC voltage is detected, the LED indicator will flash, and the buzzer will sound, with the frequency increasing kako se mjerač približava volumenutage izvor.
7. Održavanje
7.1 Čišćenje
Obrišite kućište oglasomamp krpu i blagi deterdžent. Ne koristite abrazivna sredstva ili rastvarače. Prije upotrebe provjerite je li mjerač potpuno suh.
7.2 Zamjena baterije
When the low battery indicator appears on the display, replace the batteries as described in the 'Battery Installation' section (5.1). Always use two new AA batteries.
7.3 Skladištenje
Ako se mjerač neće koristiti duži period, izvadite baterije kako biste spriječili curenje i oštećenje. Čuvajte mjerač na hladnom i suhom mjestu, dalje od direktne sunčeve svjetlosti i ekstremnih temperatura.
8. Otkrivanje problema
- Mjerač se ne uključuje: Provjerite instalaciju baterija i uvjerite se da baterije nisu ispražnjene.
- Nema očitanja ili se prikazuje 'OL': Ensure test leads are properly connected to the circuit and the correct function/range is selected. 'OL' often indicates an open circuit or a value exceeding the selected range.
- Netačna očitanja: Check battery level. Ensure test leads are making good contact. Verify the correct function and range are selected for the measurement.
- Automatsko isključivanje: This is a normal power-saving feature. Turn the rotary dial to 'OFF' and then back to the desired function to restart.
9. Specifikacije
| Parametar | Vrijednost |
|---|---|
| Display Type | Digitalni displej |
| Broj modela | SZ301 |
| DC Voltage domet | 200mV - 600V |
| AC Voltage domet | 0V - 600V |
| Maksimalni broj | 2000 |
| Izvor napajanja | 2 x AA baterija (nije uključena) |
| Materijal školjke | ABS |
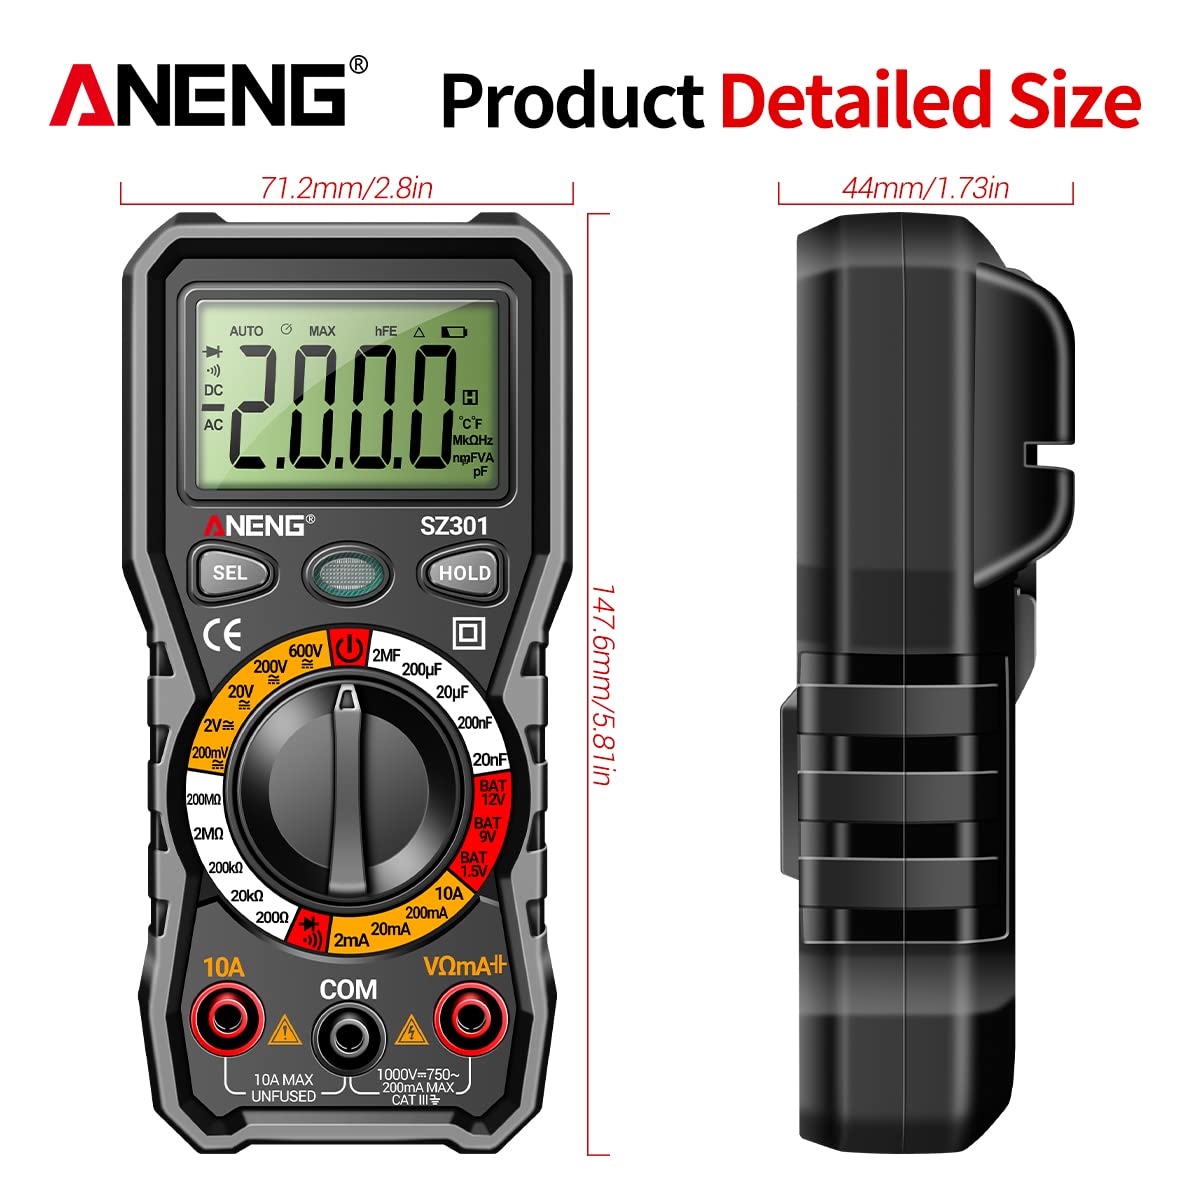
| Veličina | Approx. 147.7 x 70.3 x 42.5mm (5.81 x 2.77 x 1.67in) |
| Boja | Crna |
| Measurement Type | Ammeter, Multimeter |
| Proizvođač | GOLDEN BLUE |
| Datum prve dostupnosti | 14. aprila 2023 |
10. Garancija i podrška
Za informacije o garanciji ili tehničku podršku, molimo pogledajte dokumentaciju koju ste dobili uz kupovinu ili se direktno obratite prodavaču/proizvođaču. Sačuvajte dokaz o kupovini za bilo kakve reklamacije u vezi s garancijom.


