Uvod
The Thermaltake CT120 ARGB Sync PC Cooling Fan is a new generation PWM fan designed for optimal PC cooling and customizable lighting. This manual provides instructions for installation, operation, maintenance, and troubleshooting to ensure proper use and longevity of your fans.
Sadržaj paketa
- 2 x Thermaltake CT120 ARGB Sync PC Cooling Fans
- Montažni vijci
- PWM Cables (for fan power)
- ARGB Cables (for lighting control)
- Obujmice za upravljanje kablovima
Podešavanje i instalacija
Follow these steps to properly install your Thermaltake CT120 ARGB Sync PC Cooling Fans:
- Pripremite kućište vašeg računara: Ensure your PC case has available 120mm fan mounting points. For optimal access to motherboard headers, it may be necessary to temporarily remove components such as the graphics card.
- Montirajte ventilatore: Position the fans in your desired location (e.g., front intake, rear exhaust, top exhaust). Use the provided mounting screws to secure each fan firmly to the case. The fans feature integrated anti-vibration mounting pads to reduce noise.
- Connect PWM Cables: Each fan has a PWM cable for power and speed control. Connect the PWM cable from the first fan to an available 4-pin fan header on your motherboard. Utilize the daisy-chain design by connecting the PWM cable from the second fan to the first fan's daisy-chain connector. This minimizes cable clutter and port usage.
- Connect ARGB Cables: Each fan also has an ARGB cable for lighting control. Connect the ARGB cable from the first fan to an available 5V addressable RGB header on your motherboard. Daisy-chain the ARGB cable from the second fan to the first fan's ARGB daisy-chain connector. Ensure correct polarity (+5V, Data, Ground) to prevent damage.
- Upravljanje kablovima: Use the included cable management clips to neatly route and secure all cables, improving airflow and aesthetics within your PC case.

Image: Thermaltake CT120 ARGB Sync PC Cooling Fan showcasing njegovo prilagodljivo osvjetljenje.
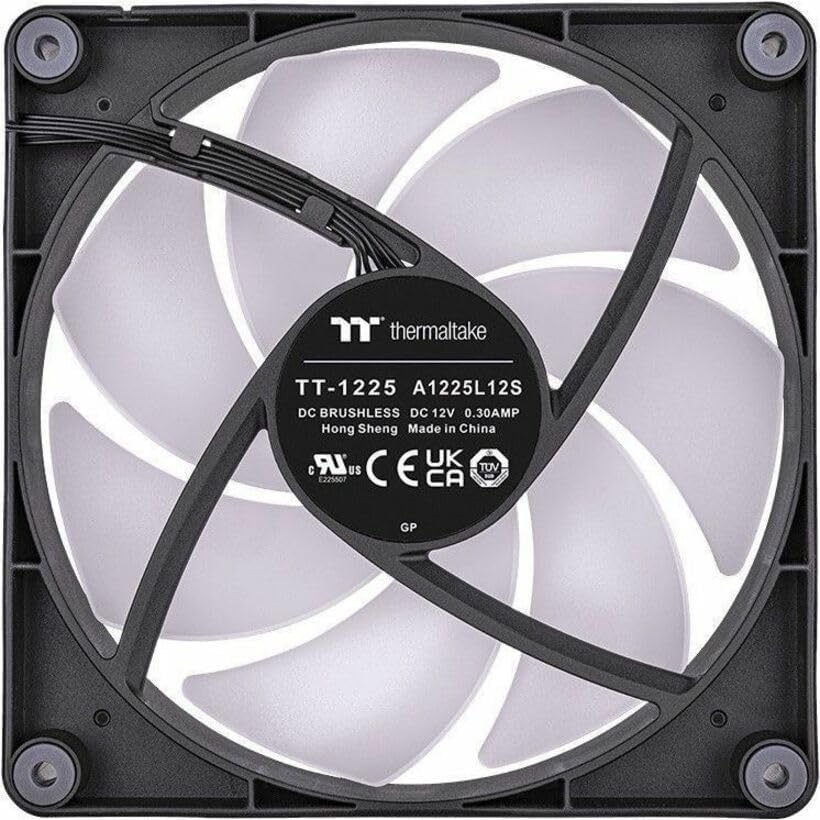
Slika: Stražnja strana view of the CT120 fan, highlighting the power and ARGB connectors for installation.

Image: Illustration of the daisy-chain cabling system for simplified fan connections.

Image: Detail of the integrated anti-vibration mounting pads designed to reduce operational noise.
Uputstvo za upotrebu
The Thermaltake CT120 ARGB Sync PC Cooling Fans offer both speed and lighting control:
- Fan Speed Control (PWM): The fans utilize Pulse Width Modulation (PWM) technology, allowing your motherboard to dynamically adjust fan speeds (500-2000 RPM) based on system temperature. This ensures efficient cooling when needed and quieter operation during lighter loads.
- ARGB kontrola osvjetljenja: The 9 addressable LEDs on each fan can be controlled via compatible 5V motherboard sync software (e.g., ASUS Aura Sync, MSI Mystic Light Sync, GIGABYTE RGB Fusion, ASRock Polychrome Sync). This software allows you to customize lighting effects, colors (16.8 million options), and synchronization with other ARGB components in your system.
- Početno pokretanje: Upon initial system boot, the fans will power on. If connected correctly, the motherboard software should detect and synchronize the ARGB lighting. Allow a moment for the software to recognize and apply your preferred lighting profiles.

Image: Multiple CT120 ARGB fans installed in a PC case, demonstrating synchronized lighting effects.
Održavanje
Regular maintenance helps ensure optimal performance and longevity of your cooling fans:
- Čišćenje prašine: Periodically inspect the fan blades and frame for dust accumulation. Use compressed air or a soft brush to gently remove dust. Ensure the PC is powered off and unplugged before cleaning.
- Provjera veze: Occasionally verify that all PWM and ARGB cables are securely connected to the motherboard headers and to each other, especially after moving or servicing your PC.
Rješavanje problema
If you encounter issues with your Thermaltake CT120 fans, consider the following:
- Ventilatori se ne okreću:
- Check if the 4-pin PWM power cables are securely connected to the motherboard fan headers.
- Ensure the motherboard fan headers are enabled in the BIOS/UEFI settings.
- Verify that your power supply is providing adequate power to the motherboard and fans.
- ARGB Lighting Not Working/Synchronizing:
- Confirm that the 5V ARGB cables are correctly connected to the motherboard's 5V addressable RGB headers (not 12V RGB headers).
- Check the motherboard's ARGB sync software to ensure the fans are detected and the desired lighting effects are applied.
- Ensure the ARGB cables are properly daisy-chained between fans.
- Restart your PC to allow the software to re-detect the fans.
- Pretjerana buka:
- Verify that the fans are securely mounted and the anti-vibration pads are correctly positioned.
- Provjerite ima li kablova ili prepreka koje dodiruju lopatice ventilatora.
- Očistite svu nakupljenu prašinu na lopaticama ventilatora.
- Adjust fan speed settings in your motherboard's BIOS/UEFI or software to a lower RPM if noise is a concern and temperatures allow.
Specifikacije
| Feature | Specifikacija |
|---|---|
| Broj modela | CL-F149-PL12SW-A |
| Dimenzije ventilatora | 120 x 120 x 25 mm (4.72 cm D x 0.98 cm Š x 4.72 cm V) |
| Brzina ventilatora | PWM 500 ~ 2000 R.P.M |
| Max. Pritisak vazduha | 2.23 mm-H2O |
| Max Air Flow | 57.05 CFM |
| Nivo buke | 25.8 dB-A |
| Bearing Type | Hidraulični ležaj |
| Life Expectation | 40,000 sati, 25℃ |
| Rated Voltage (ventilator) | 12 V |
| Rated Voltage (LED) | 5 V |
| Power Input (one fan) | 1.32 W (Fan) & 1.55 W (LED) |
| Konektor | 4-pinski PWM (ventilator), 3-pinski ARGB (LED) |
| LED diode | 9 Addressable LEDs, 16.8 Million Colors |
| Karakteristike | Cable-Integrated Daisy-Chain Design, Anti-vibration Mounting System |
Garancija i podrška
Thermaltake products are manufactured to high quality standards. For specific warranty information, terms, and conditions, please refer to the warranty card included with your product or visit the official Thermaltake website. For technical support, product registration, or further assistance, please visit the Thermaltake support page or contact their customer service directly.
Visit the Thermaltake Store: Thermaltake Official Store