1. Uvod
This manual provides essential information for the safe and efficient use of your AOC U34V5C/BK 34-inch WQHD LED Monitor. Please read this manual thoroughly before operating the device and retain it for future reference. The AOC U34V5C/BK is designed to deliver a high-quality visual experience with its 3440 x 1440 WQHD resolution and 21:9 aspect ratio, suitable for various applications from professional work to entertainment.
2. Sigurnosne informacije
Pridržavajte se sljedećih sigurnosnih mjera opreza kako biste spriječili oštećenje monitora i osigurali ličnu sigurnost:
- Ne izlažite monitor kiši ili vlazi kako biste izbjegli opasnost od požara ili strujnog udara.
- Ne otvarajte monitor casing. Unutra nema dijelova koje korisnik može sam servisirati. Za sve servisne radove obratite se kvalifikovanom servisnom osoblju.
- Postavite monitor na stabilnu, ravnu površinu kako biste spriječili njegov pad.
- Osigurajte odgovarajuću ventilaciju oko monitora. Ne blokirajte ventilacijske otvore.
- Koristite samo kabel za napajanje i adapter koji se isporučuje s monitorom.
- Isključite monitor iz strujne utičnice tokom oluja sa grmljavinom ili kada ga ne koristite duži period.
3. Sadržaj paketa
Provjerite da li su sve stavke prisutne u paketu:
- AOC U34V5C/BK Monitor
- Stalak za monitor (baza i vrat)
- Power Cable
- HDMI kabl
- DisplayPort kabel
- USB-C kabl
- Korisnički priručnik (ovaj dokument)
4. Proizvod je gotovview
The AOC U34V5C/BK monitor features a 34-inch VA panel with WQHD resolution, USB-C connectivity with 65W Power Delivery, and a 100Hz refresh rate with AMD FreeSync support.
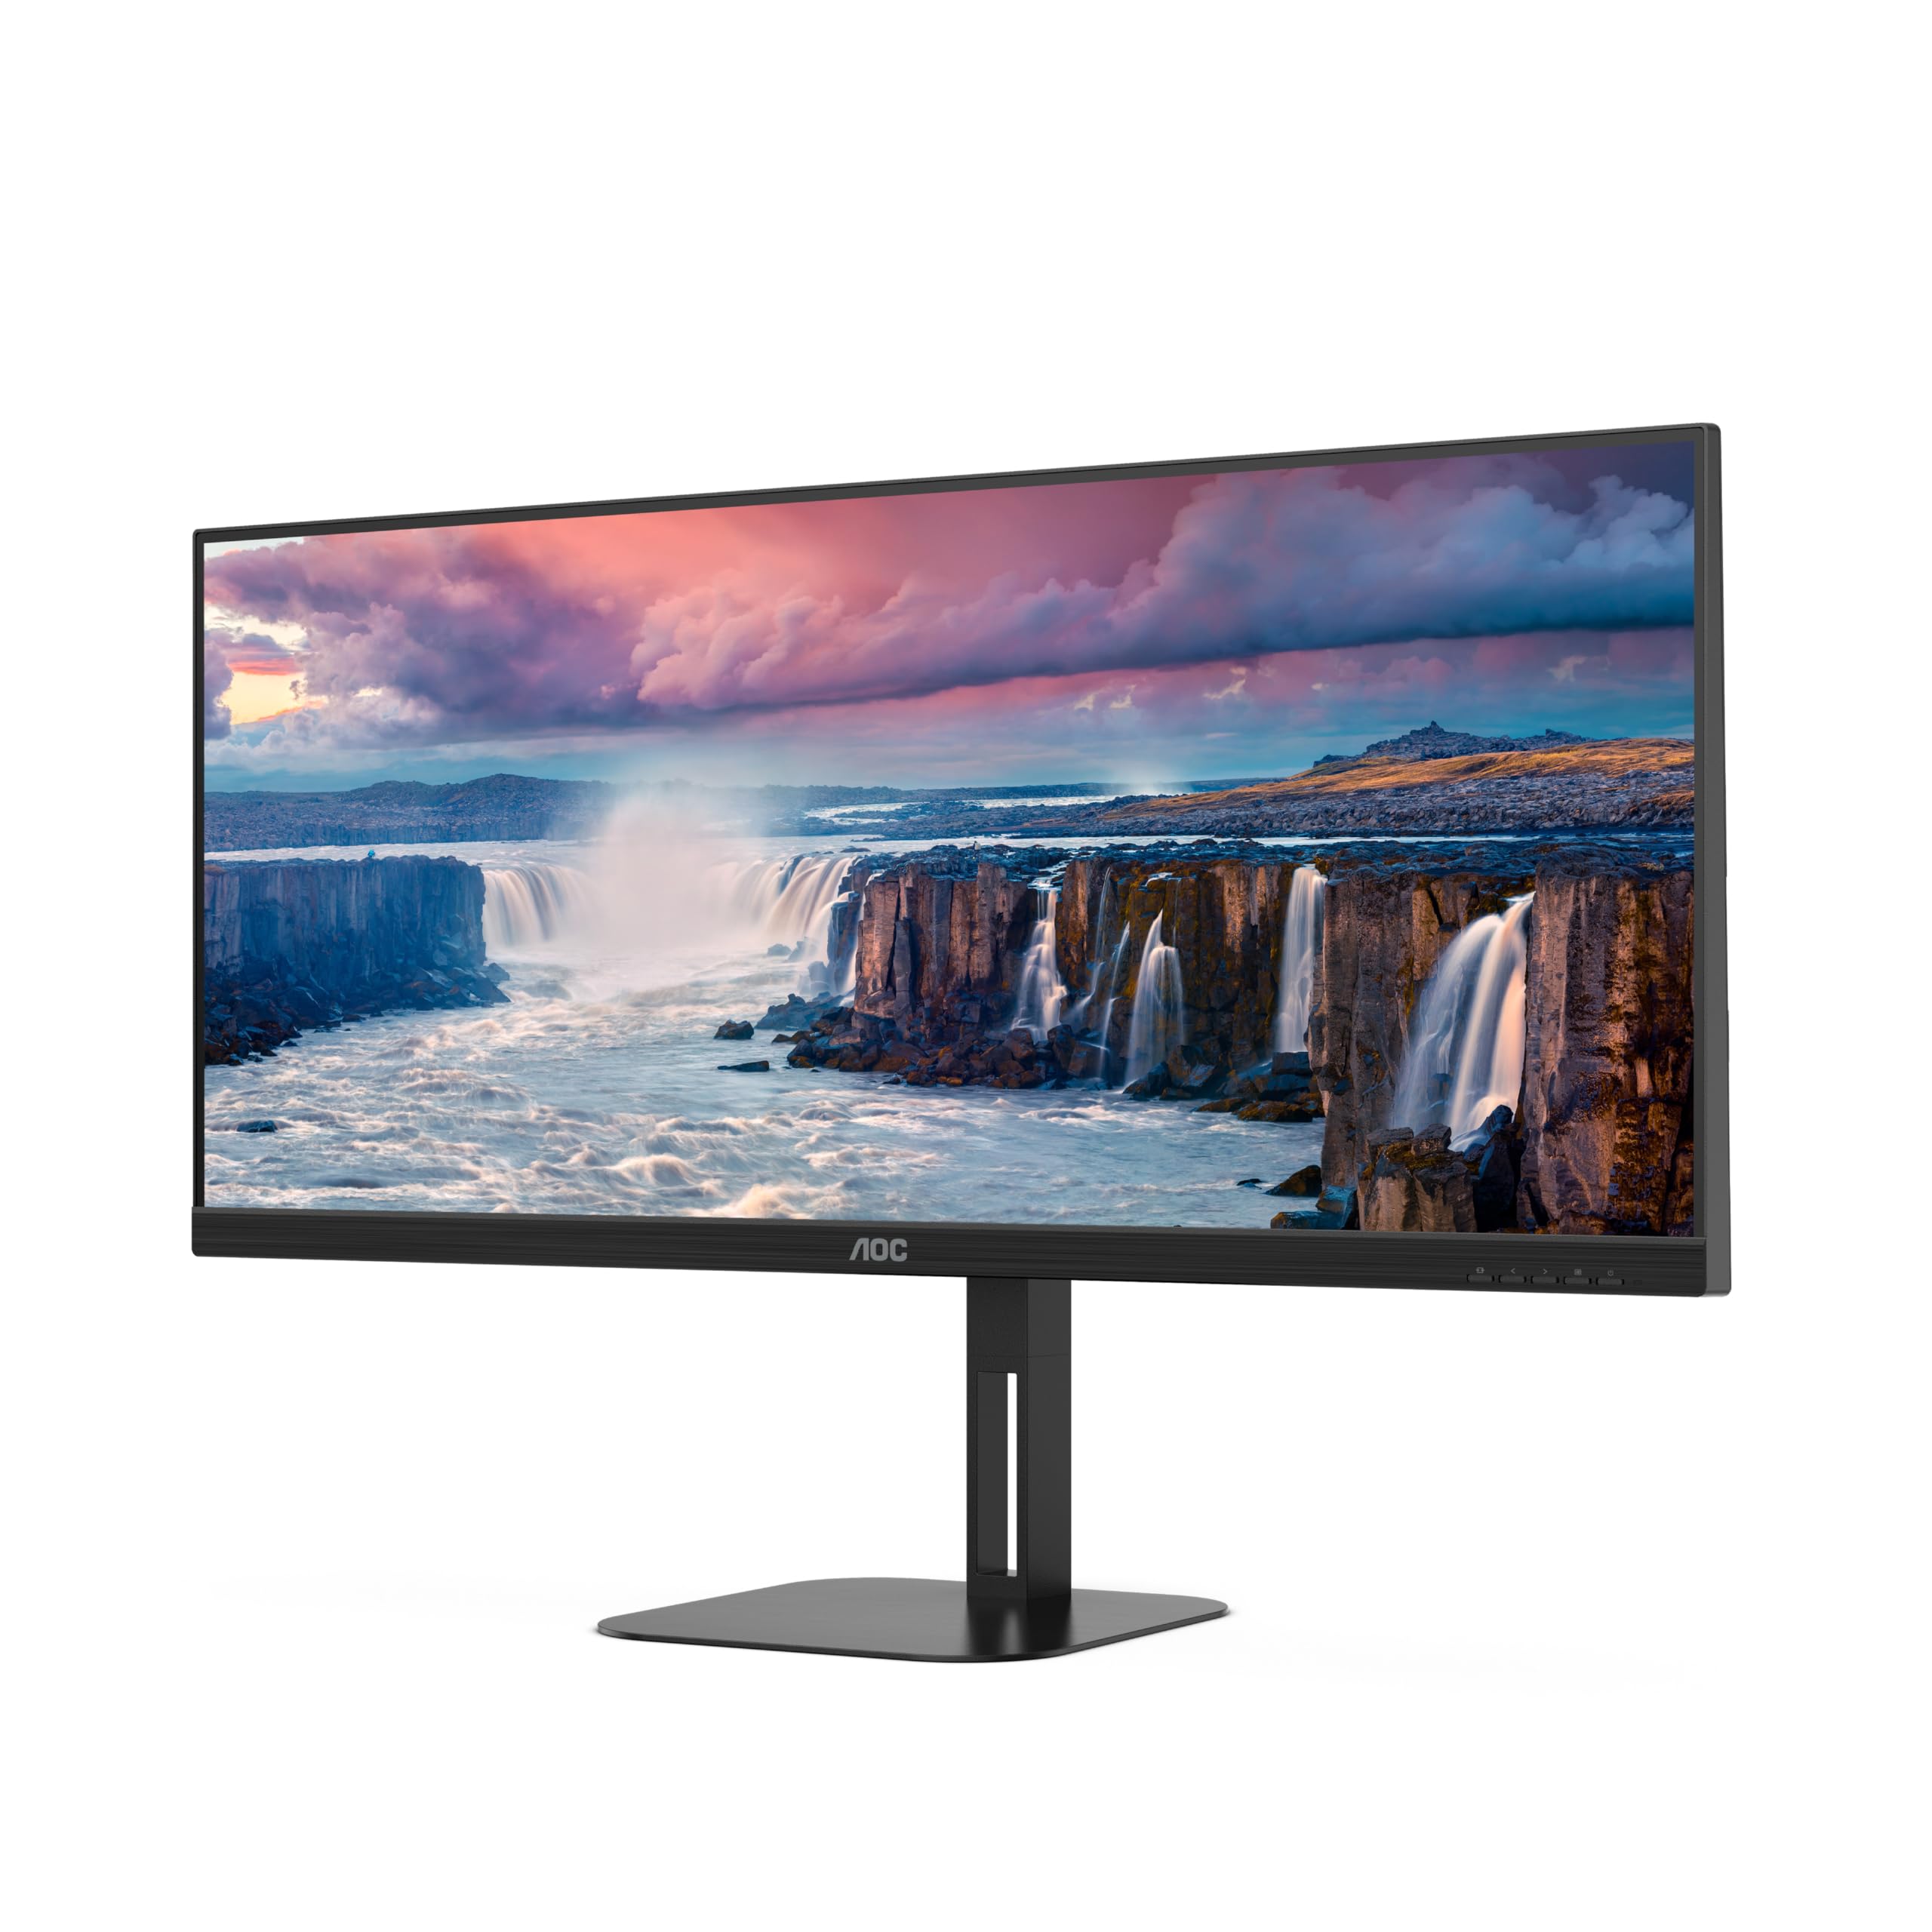
Slika 4.1: Prednja strana view of the AOC U34V5C/BK monitor highlighting its 34-inch VA panel, USB-C port with 65W Power Delivery, 100Hz refresh rate, and AMD FreeSync technology.
4.1 Komponente monitora
Familiarize yourself with the various parts of your monitor:
- Prednja ploča: Display screen, OSD control buttons (usually located on the bottom right bezel).
- Zadnji panel: Power input, video input ports (HDMI, DisplayPort, USB-C), USB hub ports, security lock slot.
- stalak: Provides stable support and allows for height, tilt, and swivel adjustments.

Slika 4.2: Pozadi view of the AOC U34V5C/BK monitor, showing the VESA mount compatibility and the stand attachment point.

Slika 4.3: Dno view of the AOC U34V5C/BK monitor, detailing the power input, DisplayPort, HDMI, USB-C, and USB-A hub ports.
5. Podešavanje
5.1 Sastavljanje postolja
- Pažljivo postavite monitor licem prema dolje na meku, čistu krpu kako biste spriječili ogrebotine.
- Pričvrstite vrat postolja na stražnju stranu monitora dok ne klikne na svoje mjesto ili dok se ne pričvrsti vijcima (ako je primjenjivo).
- Pričvrstite bazu postolja na vrat postolja i zategnite pričvrsni vijak na dnu baze.
- Carefully lift the monitor and place it on a stable desk.
5.2 Povezivanje monitora
Prije bilo kakvog povezivanja provjerite da li su računar i monitor isključeni.
- Priključak za napajanje: Spojite kabel za napajanje na ulaz za napajanje monitora, a zatim na uzemljenu električnu utičnicu.
- Video veza: Odaberite jednu od sljedećih opcija:
- HDMI: Connect one end of the HDMI cable to your computer's HDMI output and the other end to an HDMI input on the monitor.
- DisplayPort: Connect one end of the DisplayPort cable to your computer's DisplayPort output and the other end to the DisplayPort input on the monitor.
- USB-C: Connect one end of the USB-C cable to your computer's USB-C port (which supports video output) and the other end to the USB-C input on the monitor. This connection can also provide power delivery and USB data transfer.
- Priključak na USB čvorište (opciono): If using the monitor's USB hub, connect a USB upstream cable (USB-C to USB-A or USB-C to USB-C, depending on your computer) from your computer to the monitor's USB upstream port. This enables the monitor's USB-A ports for peripherals.
6. Rukovanje monitorom
6.1 Uključivanje/isključivanje napajanja
Press the power button, usually located on the bottom right bezel, to turn the monitor on or off. The power indicator light will illuminate when the monitor is on.
6.2 On-Screen Display (OSD) meni
The OSD menu allows you to adjust various monitor settings. Use the control buttons (joystick or individual buttons) on the monitor's bezel to navigate the menu.
- Press the Menu button (or push the joystick) to open the OSD menu.
- Use the navigation buttons (or joystick) to move through the menu options.
- Press the Select button (or push the joystick) to enter a sub-menu or confirm a selection.
- Use the Exit button (or move the joystick left) to go back to the previous menu or exit the OSD.
6.3 Uobičajene postavke OSD-a
- Osvetljenje: Adjust brightness, contrast, and gamma.
- Podešavanje slike: Fine-tune image quality, sharpness, and pixel clock.
- Podešavanje boja: Odaberite temperaturu boje, sRGB način rada ili korisnički definirane postavke boje.
- Picture Boost: Enhance specific areas of the screen.
- OSD podešavanje: Adjust OSD language, position, and transparency.
- Postavka igre: Enable/disable FreeSync, adjust overdrive, and game modes.
- ekstra: Select input source, reset settings, view informacije.
7. Održavanje
7.1 Čišćenje monitora
- Uvijek isključite monitor prije čišćenja.
- Lagano koristite meku krpu koja ne ostavlja dlačice dampvodom ili blagim, neabrazivnim sredstvom za čišćenje ekrana.
- Do not use alcohol, ammonia, or abrasive cleaners, as they may damage the screen or casing.
- Wipe the screen gently. Do not apply excessive pressure.
7.2 Opšta njega
- Izbjegavajte stavljanje teških predmeta na monitor ili njegove kablove.
- Držite monitor dalje od direktne sunčeve svjetlosti, izvora toplote i ekstremnih temperatura.
- Do not expose the monitor to strong vibrations or impacts.
8. Otkrivanje problema
Ako imate problema s monitorom, pogledajte sljedeće uobičajene probleme i rješenja:
| Problem | Mogući uzrok | Rješenje |
|---|---|---|
| Nema slike na ekranu | Monitor not powered on; Incorrect input source; Loose video cable | Press power button; Select correct input via OSD; Reconnect video cable securely |
| Slika je previše tamna/svijetla | Netačne postavke svjetline/kontrasta | Adjust Brightness and Contrast in OSD menu |
| Trepereća slika | Incorrect refresh rate; Faulty cable | Set refresh rate to 100Hz in display settings; Try a different video cable |
| USB portovi ne rade | USB uzvodni kabel nije povezan | Connect the USB-C upstream cable from the monitor to your computer |
If the problem persists after trying these solutions, contact AOC customer support.
9. Specifikacije
Below are the technical specifications for the AOC U34V5C/BK monitor:

Figure 9.1: Product Information Sheet for AOC U34V5C/BK, detailing energy efficiency and technical parameters.
| Parametar | Vrijednost |
|---|---|
| Brand | AOC |
| Model | U34V5C/BK |
| Veličina ekrana | 34 inča (86.4 cm) |
| Rezolucija | 3440 x 1440 WQHD |
| Aspect Ratio | 21:9 |
| Vrijeme odgovora | 4 milisekundi |
| Refresh Rate | 100 Hz (default 60 Hz) |
| Panel tehnologija | VA Panel, LED LCD |
| Viewing Angle | 178 Degrees (Horizontal/Vertical) |
| Hardversko sučelje | DisplayPort, HDMI, USB-C |
| Ukupni USB portovi | 4 (USB čvorište) |
| Isporuka energije (USB-C) | 65W |
| Voltage | 5 Volts (Internal Power Supply) |
| Dimenzije proizvoda | 50 x 25 x 40 cm; 7 kg |
| Klasa energetske efikasnosti (SDR) | G |
| Potrošnja energije (SDR) | 34.0 W |
| Klasa energetske efikasnosti (HDR) | G |
| Potrošnja energije (HDR) | 35.0 W |
| Standby Power | 0.5 W |
| Minimum guaranteed software/firmware updates | 8 godina |
| Minimum guaranteed spare parts availability | 7 godina |
| Minimalna zagarantovana podrška za proizvod | 8 godina |
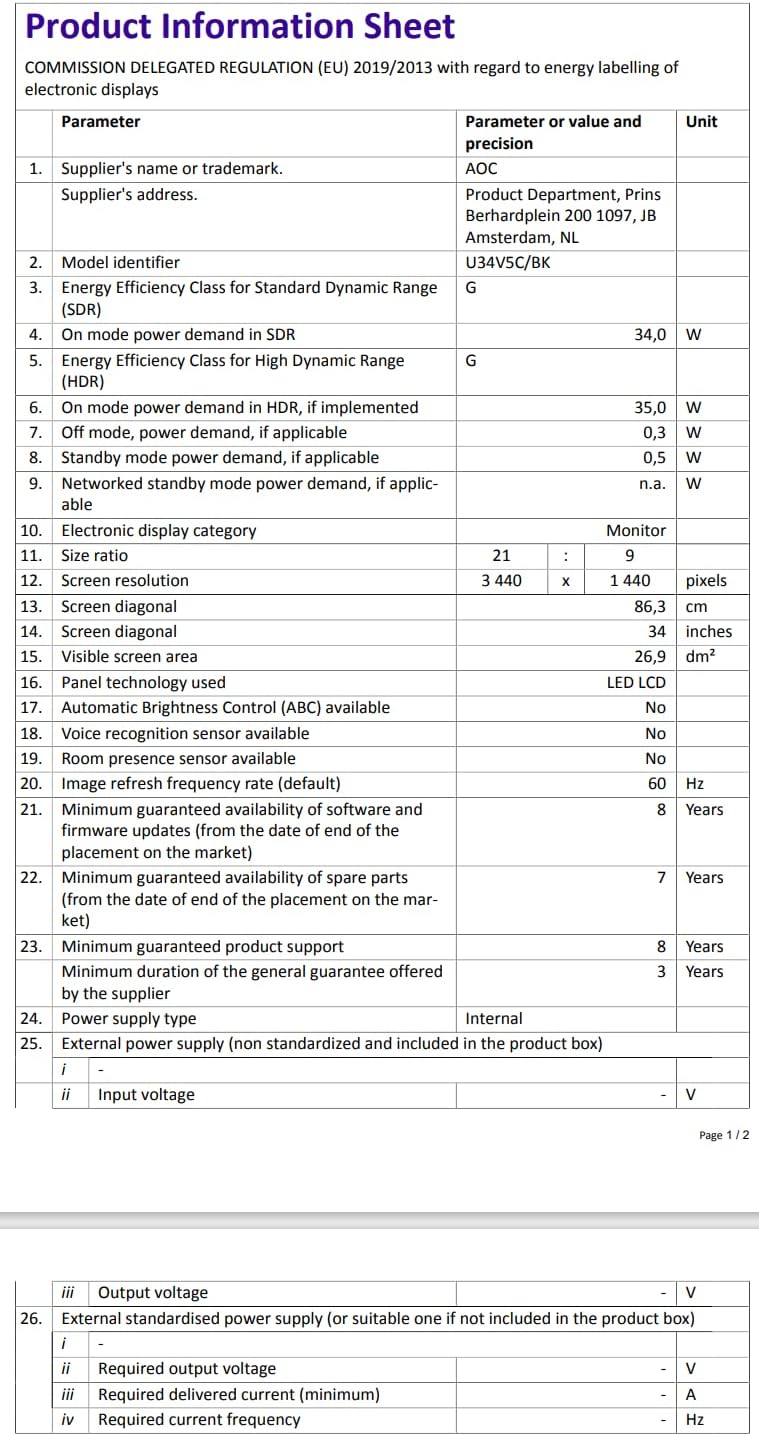
Figure 9.2: Energy Label for AOC U34V5C/BK. For more details, visit the EPREL baza podataka.
10. Garancija i podrška
The AOC U34V5C/BK monitor comes with a minimum guaranteed general warranty of 3 godine obezbedio dobavljač.
For technical support, warranty claims, or service inquiries, please visit the official AOC website or contact your local AOC customer service center. Ensure you have your monitor's model number (U34V5C/BK) and serial number ready when contacting support.


