1. Uvod
This manual provides essential instructions for the safe and efficient operation, assembly, and maintenance of your Koblenz WD-353L Portable Wet-Dry Vacuum Cleaner. This 3-gallon, 2.0 Peak HP unit is designed for versatile cleaning tasks, handling both wet and dry messes in various environments.

Image 1.1: The Koblenz WD-353L Portable Wet-Dry Vacuum Cleaner.
2. Sigurnosne informacije
Always follow basic safety precautions when using electrical appliances to reduce the risk of fire, electric shock, or injury. Read all instructions before using this appliance.
- Ne ostavljajte uređaj bez nadzora kada je uključen. Isključite utikač iz utičnice kada ga ne koristite i prije servisiranja.
- Nemojte koristiti na otvorenom ili na mokrim površinama.
- Ne dozvoliti da se koristi kao igračka. Posebna pažnja je neophodna kada se koristi od strane dece ili u blizini.
- Koristite samo onako kako je opisano u ovom priručniku. Koristite samo dodatke koje preporučuje proizvođač.
- Ne koristite sa oštećenim kablom ili utikačem. Ako uređaj ne radi kako bi trebao, ako je pao, oštećen, ostavljen na otvorenom ili pao u vodu, vratite ga u servisni centar.
- Nemojte vući niti nositi za kabl, koristiti kabl kao ručku, zatvarati vrata na kablu ili vući kabl oko oštrih ivica ili uglova. Ne prebacujete uređaj preko kabla. Držite kabl dalje od zagrejanih površina.
- Ne isključujte utikač povlačenjem za kabl. Za isključivanje, uhvatite utikač, a ne kabl.
- Nemojte rukovati utikačem ili uređajem mokrim rukama.
- Ne stavljajte nikakve predmete u otvore. Ne koristite sa blokiranim otvorom; čistite od prašine, dlačica, dlačica i svega što može smanjiti protok zraka.
- Držite kosu, široku odjeću, prste i sve dijelove tijela dalje od otvora i pokretnih dijelova.
- Ne uzimajte ništa što gori ili dimi, kao što su cigarete, šibice ili vrući pepeo.
- Nemojte koristiti za usisavanje zapaljivih ili zapaljivih tečnosti, kao što je benzin, niti koristiti u područjima gdje bi mogle biti prisutne.
- Ne koristite bez filtarske vrećice i/ili filtera.
- Isključite sve kontrole prije isključivanja.
- Budite posebno oprezni kada čistite na stepenicama.
3. Sadržaj paketa
Provjerite da li se u vašem paketu nalaze sve dolje navedene komponente:
- Koblenz WD-353L Wet/Dry Vac Unit
- 1-1/4 inch x 4 feet TWIST-N-LOCK Hose
- Pokupite alat
- Pukotina mlaznica
- Filter Bag (Cloth Filter)

Image 3.1: Included accessories: Crevice Tool, Pick Up Tool, TWIST-N-LOCK Hose, and Filter Bag.
4. Montaža
Slijedite ove korake da sastavite svoj usisivač:
- Raspakujte komponente: Pažljivo uklonite sve dijelove iz ambalaže.
- Attach Wheels (if separate): If the wheels are not pre-attached, firmly press them into the designated slots on the base of the tank until they click into place.
- Ugradnja filter vrećice: For dry vacuuming, ensure the cloth filter bag is securely installed over the filter cage inside the tank. Refer to Image 4.1 for visual guidance on internal components.
- Osigurajte glavu motora: Place the motor head onto the tank, ensuring it is properly aligned. Secure the latches on both sides of the tank to firmly lock the motor head in place.
- Spojite crijevo: Insert the TWIST-N-LOCK hose into the intake port on the front of the motor head. Turn the hose 1/4 turn clockwise to lock it securely. (See Image 4.2 for hose connection).
- Pričvrstite dodatnu opremu: Connect the desired cleaning tool (Pick Up Tool or Crevice Nozzle) to the end of the hose or to the extension tubes if extra reach is needed.
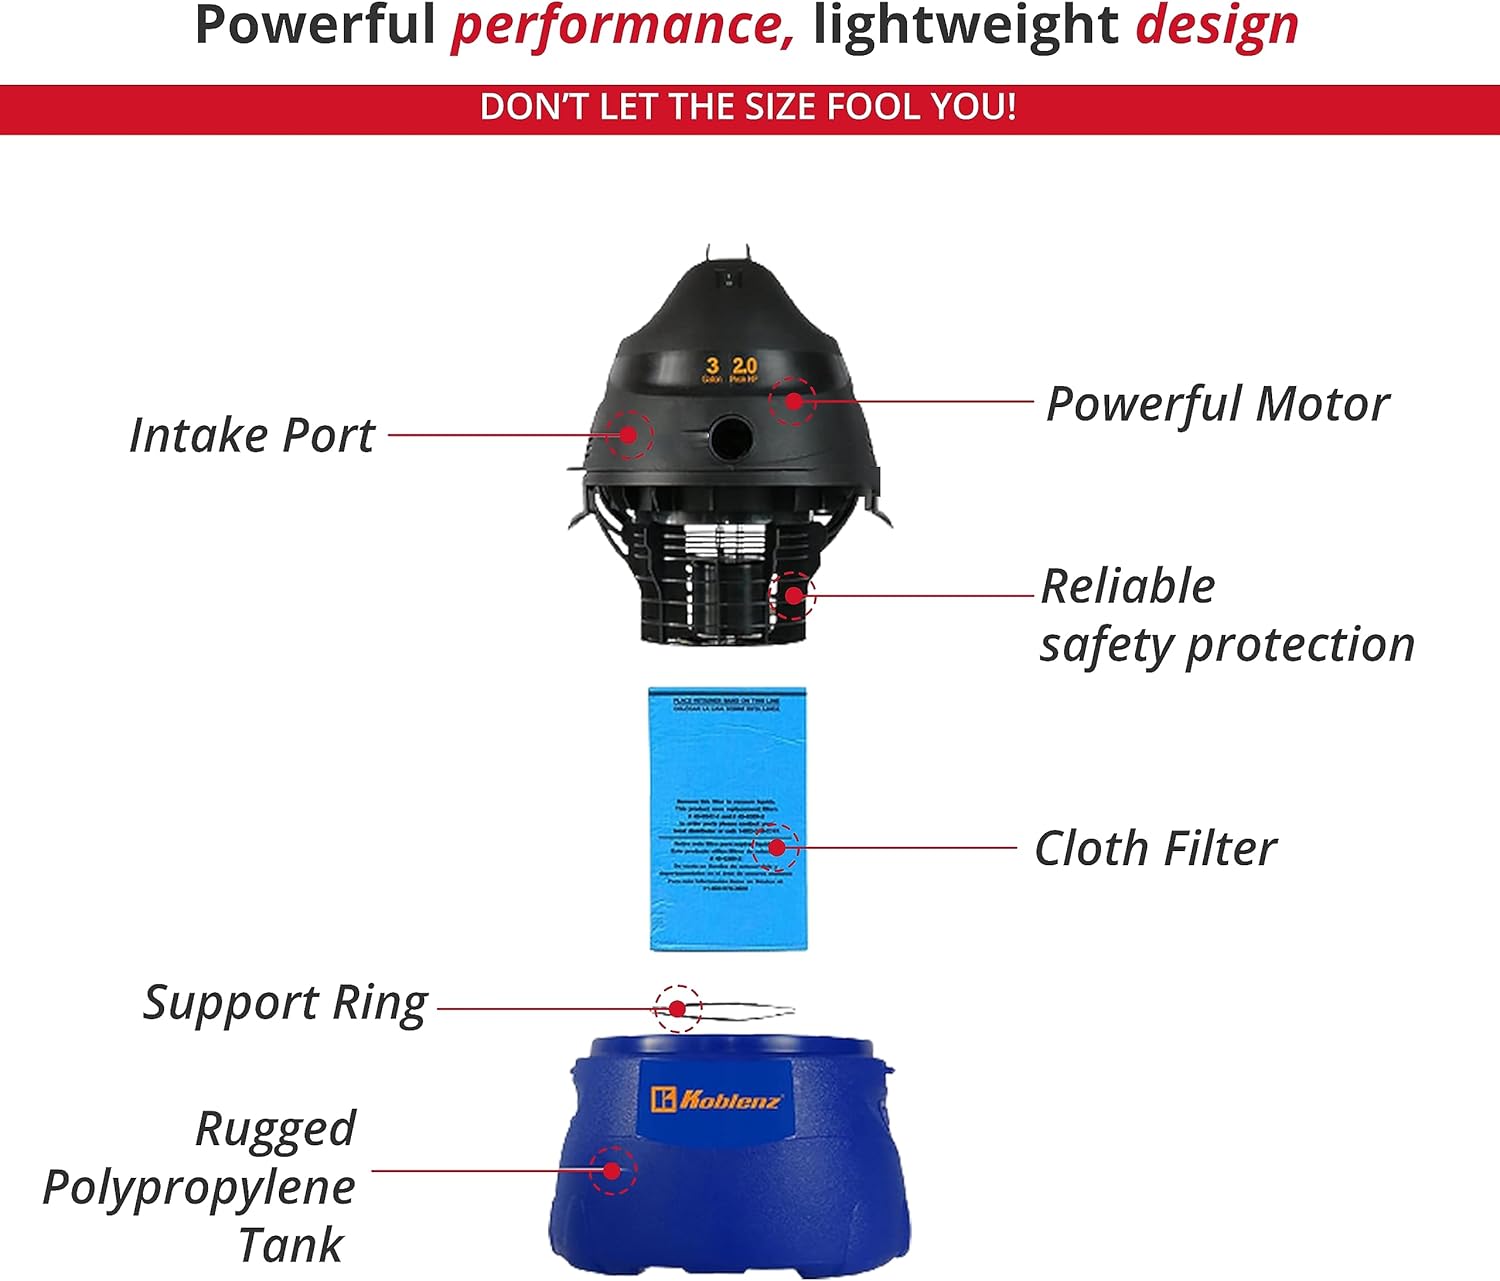
Slika 4.1: Rastavljeno view showing the Powerful Motor, Intake Port, Cloth Filter, Support Ring, and Rugged Polypropylene Tank.

Image 4.2: Detail of the TWIST-N-LOCK Hose Connection.
5. Uputstvo za upotrebu
Your Koblenz WD-353L offers 3-in-1 functionality: wet vacuuming, dry vacuuming, and blowing.
5.1 Suvo usisavanje
- Ensure the cloth filter bag is properly installed.
- Connect the hose and desired dry cleaning accessory (e.g., Pick Up Tool for general debris, Crevice Nozzle for tight spaces).
- Uključite kabl za napajanje u odgovarajuću električnu utičnicu.
- Press the power switch located on the motor head to the 'ON' position.
- Počnite usisavati suhi otpad.
- Kada završite, okrenite prekidač za napajanje na 'ISKLJUČENO' i isključite uređaj iz struje.
5.2 Mokro usisavanje
Važno: Remove the cloth filter bag before wet vacuuming. Using the cloth filter for wet pickup will damage the filter and reduce suction.
- Unlatch the motor head and remove it from the tank.
- Remove the cloth filter bag. Reattach the motor head and secure the latches.
- Connect the hose and desired wet cleaning accessory.
- Uključite kabl za napajanje u odgovarajuću električnu utičnicu.
- Pritisnite prekidač za napajanje u položaj 'UKLJUČENO'.
- Begin vacuuming liquids. The vacuum will automatically shut off when the tank is full.
- When finished, turn the power switch to 'OFF' and unplug the unit. Empty the tank immediately after wet vacuuming.
5.3 Funkcija ventilatora
The vacuum can be converted into a powerful blower for clearing debris from surfaces.
- Uvjerite se da je jedinica isključena.
- Remove the hose from the intake port.
- Insert the hose into the blower port located on the rear of the motor head (see Image 5.1). Turn 1/4 turn clockwise to lock.
- Plug the power cord into an outlet and turn the unit 'ON'.
- Usmjerite protok zraka da uklonite nečistoće.
- Kada završite, okrenite prekidač za napajanje na 'ISKLJUČENO' i isključite uređaj iz struje.

Slika 5.1: Gotovoview of the vacuum showing Accessory Storage, Oversize Handle, TWIST-N-LOCK Hose Connection, Pick Up Tool, Crevice Tool, and Blower Port.
6. Održavanje
Redovno održavanje osigurava optimalne performanse i produžava vijek trajanja vašeg usisivača.
6.1 Održavanje filtera
- Cloth Filter: For dry vacuuming, regularly blow dust off the cloth filter to maintain suction power. Change the filter after multiple cleanings or when suction noticeably decreases.
- Mokro usisavanje: Always remove the cloth filter before wet vacuuming. Allow the filter to dry completely before reinstalling for dry use.
6.2 Pražnjenje rezervoara
- Always unplug the vacuum before emptying.
- Unlatch the motor head and carefully lift it off the tank.
- Dispose of collected debris or liquids responsibly.
- Clean the inside of the tank with water and mild detergent if necessary. Rinse thoroughly and allow to dry before reassembly.
6.3 Skladištenje kablova
Wrap the 10 ft power cord around the designated cord wraps on the motor head for tidy storage (see Image 6.1).

Slika 6.1: Pozadi view showing the power cord wrapped for storage.
7. Otkrivanje problema
If your vacuum cleaner is not operating correctly, consult the table below for common issues and solutions.
| Problem | Mogući uzrok | Rješenje |
|---|---|---|
| Vakuum se ne uključuje | No power to outlet; Power switch is OFF; Faulty cord/plug | Check power outlet; Turn switch ON; Inspect cord/plug for damage, contact service if damaged. |
| Mala usisna snaga | Clogged hose/accessories; Full tank; Dirty filter; Motor head not sealed properly | Clear obstructions; Empty tank; Clean/replace filter; Ensure motor head latches are secure. |
| Voda curi iz rezervoara | Tank is overfilled; Motor head not sealed properly; Damaged tank | Empty tank; Ensure motor head latches are secure; Inspect tank for cracks, contact service if damaged. |
| Hose disconnects during use | Hose not properly locked into port | Ensure hose is inserted and twisted 1/4 turn clockwise to lock. |
8. Specifikacije
Key technical specifications for the Koblenz WD-353L:
- Naziv modela: WD-353L
- Brand: Koblenz
- Kapacitet: 3 galona
- konjske snage motora: 2.0 Peak HP
- Wattage: 540 vati
- Amperage: 4.5 Amps
- Maksimalno usisavanje: 43 inča
- Dužina crijeva: 4 stopa (prečnik 1-1/4 inča)
- Dužina kabla za napajanje: 10 stopa
- Vrsta filtera: Cloth
- Posebna karakteristika: Compact, Lightweight, Portable, Wet/Dry, Blower Function
- Dimenzije proizvoda: 13.78 cm D x 11.42 cm Š x 15.35 cm V
- Težina artikla: 7.1 funte
- Nivo buke: 75 decibela
- Boja: Plava, crna
- Izvor napajanja: Corded Electric
- Sigurnosna lista: cETLus

Image 8.1: Koblenz WD-353L with key dimensions.
9. Jamstvo i podrška
Your Koblenz WD-353L Portable Wet-Dry Vacuum Cleaner comes with a Trogodišnja ograničena garancija proizvođačaOva garancija pokriva nedostatke u materijalu i izradi pri normalnoj upotrebi.
For warranty claims, technical support, or to purchase replacement parts, please contact Koblenz customer service. Refer to the contact information provided with your product packaging or visit the official Koblenz website.
Upute za njegu: To maintain product longevity, blow dust off the filter to maintain suction, change the filter after multiple cleanings, empty the tank regularly, and ensure the hose is properly locked and unlocked with a 1/4 turn.


