XDeer Biometric Safe Box CS100-42 User Manual
Model: CS100-42
1. Uvod
Thank you for choosing the XDeer Biometric Safe Box. This manual provides essential information for the proper setup, operation, and maintenance of your safe. Please read these instructions carefully before use to ensure optimal security and functionality.

Image: The XDeer Biometric Safe Box, open to reveal its interior with a shelf, money, and handgun storage. The safe features a biometric fingerprint scanner and keypad.
2. Sigurnosne informacije
- Always keep emergency keys in a secure location away from the safe and out of reach of children.
- Do not store emergency keys inside the safe.
- Osigurajte da je sef sigurno montiran kako biste spriječili neovlašteno uklanjanje.
- Regularly check battery levels to avoid lockout situations.
- Keep the fingerprint sensor clean for reliable operation.
- This safe is not water resistant. Protect it from moisture.
3. Sadržaj paketa
- XDeer Biometric Safe Box (1)
- Ključevi za hitne slučajeve (2)
- Removable Pistol Bracket (1)
- Mounting Hardware (Bolts and Anchors)
- Korisnički priručnik (ovaj dokument)
- Fireproof Bag (Optional, if included with your model)
4. Značajke proizvoda
- Quick-Access Biometric Fingerprint Sensor: Provides rapid access in approximately 0.5 seconds.
- digitalna tastatura: Program a personal code for secure entry.
- Pristup ključem za hitne slučajeve: Backup key entry for manual override.
- Čvrsta čelična konstrukcija: Reinforced 8-gauge steel housing and pry-resistant 1/8" thick solid door.
- Unutrašnje LED svjetlo: Illuminates the safe's interior for visibility.
- Tihi način rada: Option to disable sound for discreet operation.
- Power Display: Indicates current battery level.
- Emergency USB-C Port: Allows external power for temporary access if batteries are depleted.
- Removable Pistol Bracket: Adapted gun rack for organized storage of up to 4 handguns.
- Unaprijed izbušene rupe za montažu: For secure installation to a wall or floor.

Image: Visual representation of key features including fingerprint access, USB interface, gun rack, and interior LED light.
5. Podešavanje
5.1 Raspakivanje i početni pregled
- Pažljivo izvadite sef iz ambalaže.
- Inspect the safe for any signs of damage. If damaged, contact customer support immediately.
- Locate the emergency keys, typically found in a small box within the packaging foam. Keep these keys in a safe, separate location.
5.2 Instalacija baterije
- Open the safe using one of the emergency keys. Insert the key into the hidden keyhole (usually behind the keypad cover or a removable panel) and turn.
- Pronađite odjeljak za baterije na unutrašnjoj strani vrata sefa.
- Insert four (4) AA batteries, ensuring correct polarity.
- Close the battery compartment. The safe should emit a beep, indicating successful battery installation.

Image: Detail of the hidden keyhole for emergency key access, located on the control panel.
5.3 Montiranje sefa
The safe features pre-drilled holes for secure mounting to a wall or floor. This is highly recommended to prevent unauthorized removal of the entire safe.
- Odaberite odgovarajuću lokaciju za sef.
- Označite tačke bušenja kroz prethodno izbušene rupe na zadnjoj ili donjoj strani sefa.
- Izbušite pilot rupe u zidu ili podu koristeći odgovarajuću svrdlo.
- Insert the expansion anchors into the drilled holes.
- Align the safe with the holes and secure it using the provided mounting bolts.

Image: A diagram illustrating the process of securely mounting the safe to a wall or floor using pre-drilled holes and anchors.
6. Uputstvo za upotrebu
6.1 Kontrolna tabla prekoview
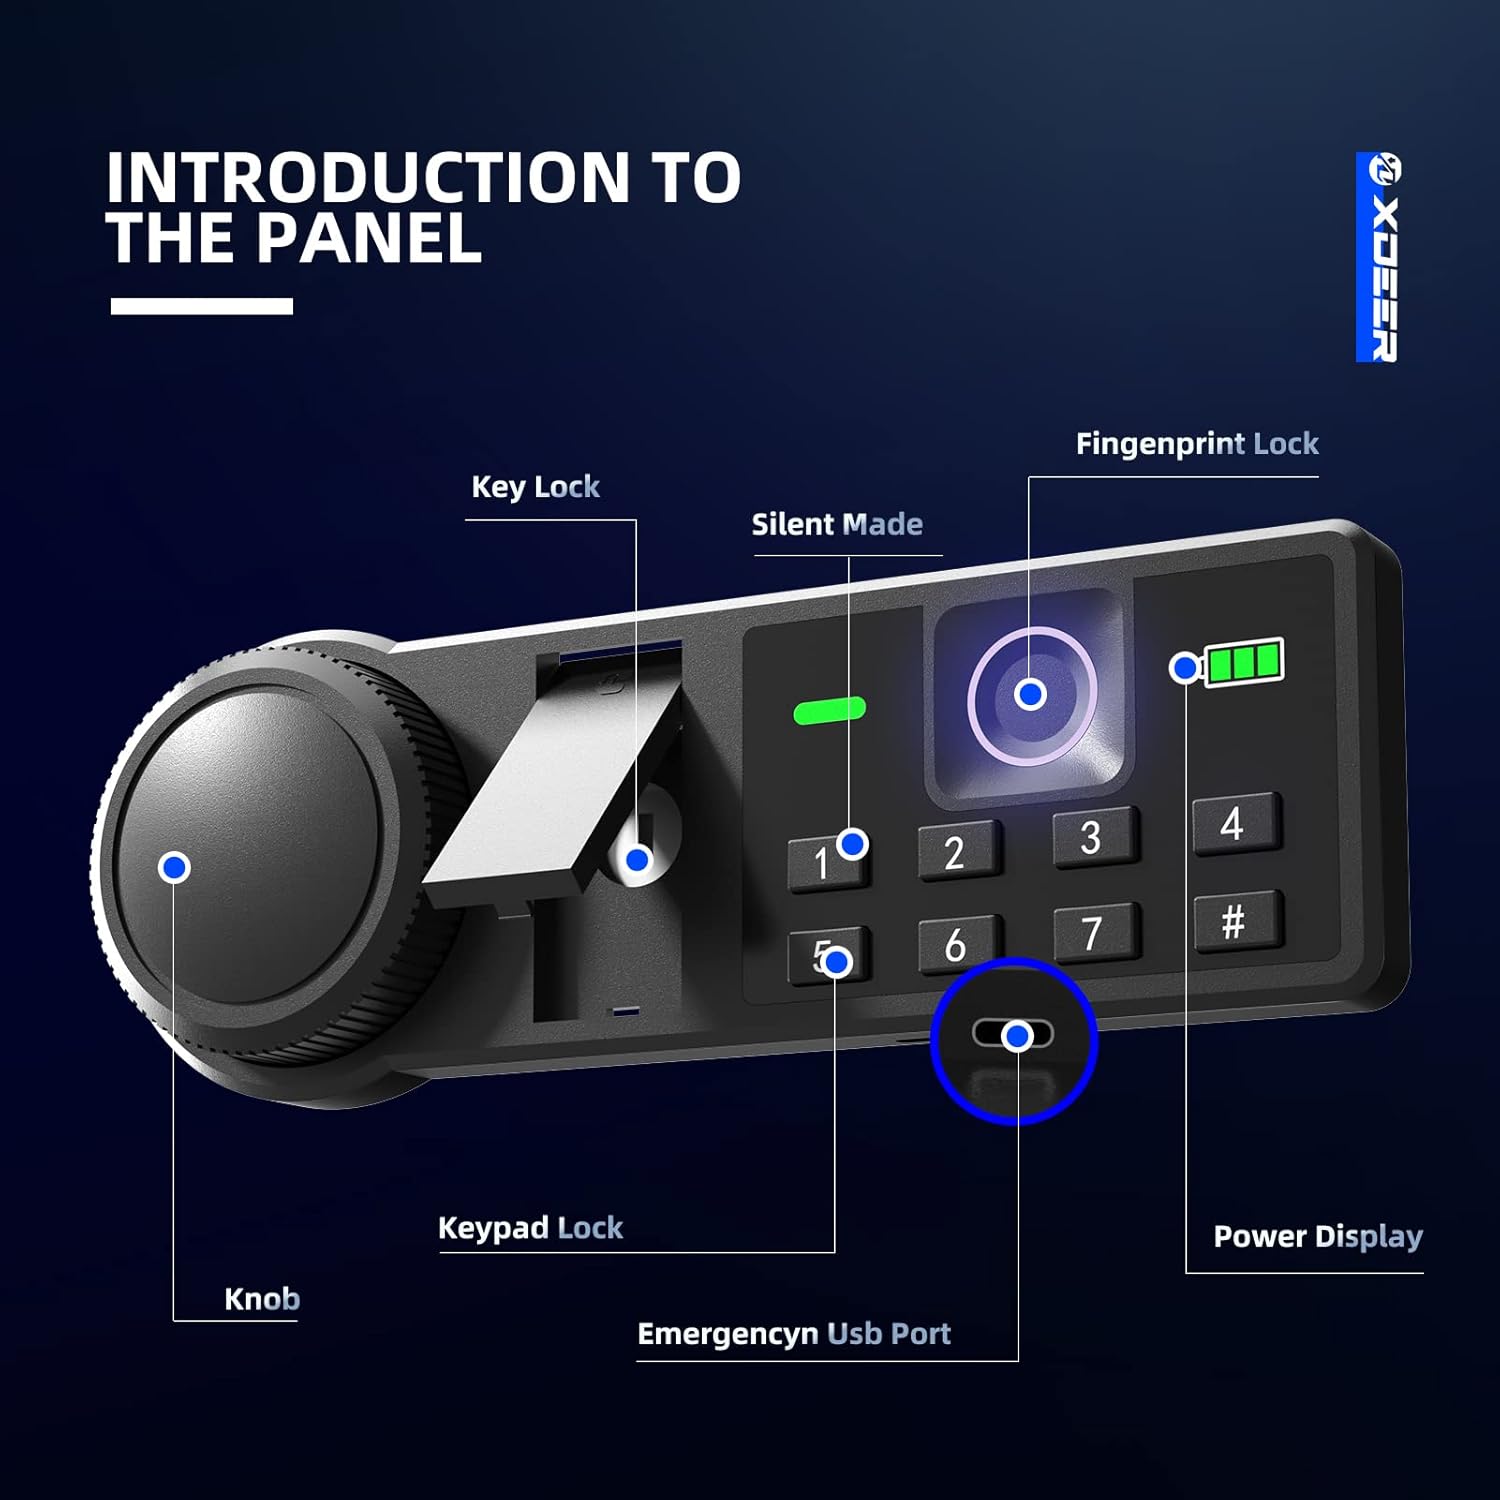
Image: A detailed diagram of the safe's control panel, highlighting the key lock, silent mode button, fingerprint sensor, numeric keypad, emergency USB port, and battery power display.
6.2 Otvaranje ključem za slučaj nužde
- Locate the hidden keyhole on the control panel (refer to Control Panel Overview).
- Umetnite ključ za hitne slučajeve i okrenite ga u smjeru kazaljke na satu.
- Rotate the knob on the safe door counter-clockwise to open the door.
6.3 Setting and Using the Digital Keypad Code
- With the safe door open, press the internal reset button (usually a small red button on the inside of the door). The keypad will light up.
- Enter your desired 3-8 digit code (using numbers 1-7 only, as 8, 9, 0 are not available on this keypad).
- Press the '#' button to confirm. The safe will beep to confirm the new code.
- To open: Enter your code, then press '#'. The safe will unlock. Rotate the knob counter-clockwise to open.
6.4 Setting and Using the Biometric Fingerprint
- With the safe door open, press the internal reset button. The fingerprint sensor will light up.
- Place your finger on the sensor. The light will flash. Lift and repeat placing your finger on the sensor multiple times (usually 5-8 times) from different angles until the safe confirms successful registration with a long beep.
- You can register multiple fingerprints by repeating the process.
- To open: Place your registered finger on the sensor. The safe will unlock. Rotate the knob counter-clockwise to open.

Image: The illuminated fingerprint sensor and battery level indicator on the safe's control panel.
6.5 Tihi način rada
To enable or disable silent mode (mute keypad and unlock sounds), press and hold the '1' key on the keypad. The safe will indicate the change with a visual cue on the display.

Image: A visual representation of the silent mode feature, indicating that audible feedback can be turned off.
6.6 Power Display
Press any key on the keypad to view the current battery level on the display. A low battery indicator will alert you when batteries need replacement.
6.7 Emergency USB-C Port
If the batteries are completely depleted, you can power the safe externally using a USB-C cable and a power bank. Locate the USB-C port on the underside of the control panel. Connect a power bank to temporarily power the safe and gain access using your code or fingerprint.

Slika: Krupni plan view of the emergency USB-C port, used for external power in case of battery depletion.
6.8 Unutrašnje LED svjetlo
The safe is equipped with an interior LED light that automatically illuminates when the door is opened, providing clear visibility of contents.

Image: The interior LED light providing illumination inside the safe.
6.9 Removable Pistol Bracket
The safe includes a removable pistol bracket designed to securely store up to 4 handguns. This bracket can be installed or removed based on your storage needs.

Image: A diagram illustrating how to install the removable pistol bracket for handgun storage.
7. Održavanje
7.1 Zamjena baterije
Replace batteries when the low battery indicator appears on the display. Use four (4) new AA batteries. Ensure the safe is open during replacement to avoid accidental lockout.
7.2 Čišćenje
Očistite vanjski dio sefa mekom,amp cloth. Avoid abrasive cleaners or solvents. Keep the fingerprint sensor and keypad free from dust and debris for optimal performance.
8. Otkrivanje problema
- Sef se ne otvara kodom/otiskom prsta: Check battery levels. If low, replace batteries or use the emergency USB-C port. Ensure correct code entry or proper finger placement on the sensor. Try using the emergency key.
- Tastatura ne reaguje: Batteries may be dead. Use the emergency USB-C port or emergency key to open the safe and replace batteries.
- Senzor otiska prsta ne prepoznaje: Ensure your finger is clean and dry. Try re-registering your fingerprint. Ensure proper placement covering the entire sensor.
- Vrata se ne zatvaraju pravilno: Check for any obstructions inside the safe or around the door frame. Ensure the locking bolts retract fully when the safe is open.
9. Specifikacije
| Feature | Detalj |
|---|---|
| Brand | XDeer |
| Broj modela | CS100-42 |
| Dimenzije proizvoda | 12.99"D x 13.62"Š x 16.54"H |
| Kapacitet | 1.69 kubnih stopa |
| Tip brave | Electronic Combination Lock, Biometric Fingerprint, Key |
| Materijal | legirani čelik |
| Težina artikla | 33.4 funte |
| Vrsta montaže | Under Counter Mount, Wall Mount, Floor Mount |
| Nivo vodootpornosti | Nije vodootporan |

Image: A diagram illustrating the external and internal dimensions of the safe box.
10. Garancija i podrška
XDeer provides a 1-year warranty service for all safe box series. If you have any questions or require assistance, please contact XDeer customer support. We are committed to providing satisfactory replies as soon as possible.
Za dodatnu podršku, posjetite XDeer Store on Amazon.
11. Videozapisi proizvoda
XDeer Biometric Safe Box Overview
Video: Prekorview of the XDeer Biometric Safe Box, demonstrating its features and functionality. This video is provided by USA Safe Direct.
Quick-Access Security Safe Features
Video: A demonstration of the quick-access security features of the XDeer safe, including biometric and keypad entry. This video is provided by Homesteadhow.


