1. Uvod
This manual provides detailed instructions for the safe and effective use of your GOOLOO GP2000 Jump Starter and GOOLOO S4 4Amp Car Battery Charger. Please read this manual thoroughly before operation to ensure proper usage and to prevent damage to the devices or injury.
The GOOLOO GP2000 is a powerful portable jump starter designed to start vehicles with up to 9.0L gas or 7.0L diesel engines. The GOOLOO S4 is an all-weather battery charger, maintainer, and desulfator compatible with various 6V and 12V lead-acid batteries, as well as 12V LiFePO4 batteries.
2. Važne informacije o sigurnosti
Always observe the following safety precautions to avoid electric shock, explosion, fire, or injury.
- Prije upotrebe proizvoda pročitajte sva uputstva.
- Ne izlažite uređaje kiši ili vlažnim uslovima.
- Do not operate the devices if they have been dropped or damaged.
- Čuvati van domašaja djece.
- Osigurajte odgovarajuću ventilaciju tokom rada.
- Nosite zaštitu za oči pri radu s baterijama.
- The GP2000 is for jump-starting vehicles only; do not use it as a battery charger.
- The S4 is a battery charger/maintainer; it is not a jump starter.
3. Sadržaj paketa
Provjerite da li se sve stavke nalaze u vašem paketu:
- GOOLOO GP2000 Jump Starter
- GOOLOO S4 4Amp Punjač za auto akumulatore
- Heavy-duty Jumper Clamps (for GP2000)
- AC Power Cord (for S4)
- Korisnički priručnik (ovaj dokument)
- USB Charging Cable (for GP2000)

Image: The GOOLOO GP2000 Jump Starter and GOOLOO S4 Battery Charger, showing both units side-by-side. The GP2000 is on the right, a black and red rectangular device with power indicator lights. The S4 is on the left, a black and red unit with a digital display and attached power cord.
4. Podešavanje i početno punjenje
4.1. GOOLOO GP2000 Jump Starter
Before first use, fully charge the GP2000. Connect the provided USB charging cable to the Type-C input port on the jump starter and plug the other end into a USB power adapter (not included). The LED indicator lights will show the charging progress.

Slika: Detaljna view of the GOOLOO GP2000 Jump Starter, highlighting its various ports and features. Labels indicate the 12V Car Jump Start port, LED indicator, power button, In/Out Type-C port, USB outputs (5V/2.1A, 5V/9V/12V), LED light, and 15V/10A output.
4.2. GOOLOO S4 Battery Charger
The S4 charger does not require initial charging. Simply connect it to a power outlet using the AC power cord. Ensure the battery to be charged is clean and free of corrosion.

Image: The GOOLOO S4 Battery Charger displayed with its included accessories: the AC power plug, battery clamps (red and black), and a ring terminal connector. The S4 unit itself features a digital display and a robust red and black casing.
5. Uputstvo za upotrebu
5.1. Using the GOOLOO GP2000 Jump Starter
- Ensure the GP2000 is sufficiently charged (at least 3 LED indicators).
- Connect the blue end of the jumper cable to the 12V jump start port on the GP2000.
- Spojite crveni clamp na pozitivni (+) pol akumulatora vozila i crni clamp na negativni (-) terminal.
- Pokrenite vozilo.
- Čim se vozilo pokrene, odmah uklonite klapnuamps from the battery, then disconnect the jumper cable from the GP2000.

Image: The GOOLOO GP2000 Jump Starter with its heavy-duty jumper clamps attached. The black and red unit is shown with the red and black clamps connected to its side port, ready for use.

Image: A visual representation of the GOOLOO GP2000 Jump Starter being used to start a vehicle. The device is shown connected to a car battery under the hood, emphasizing its role as an emergency jump starter for various vehicle types.

Image: A person holding the GOOLOO GP2000 Jump Starter, demonstrating its built-in LED flashlight feature. The flashlight illuminates an engine bay, showing its utility in low-light conditions with stable, strobe, and SOS modes.
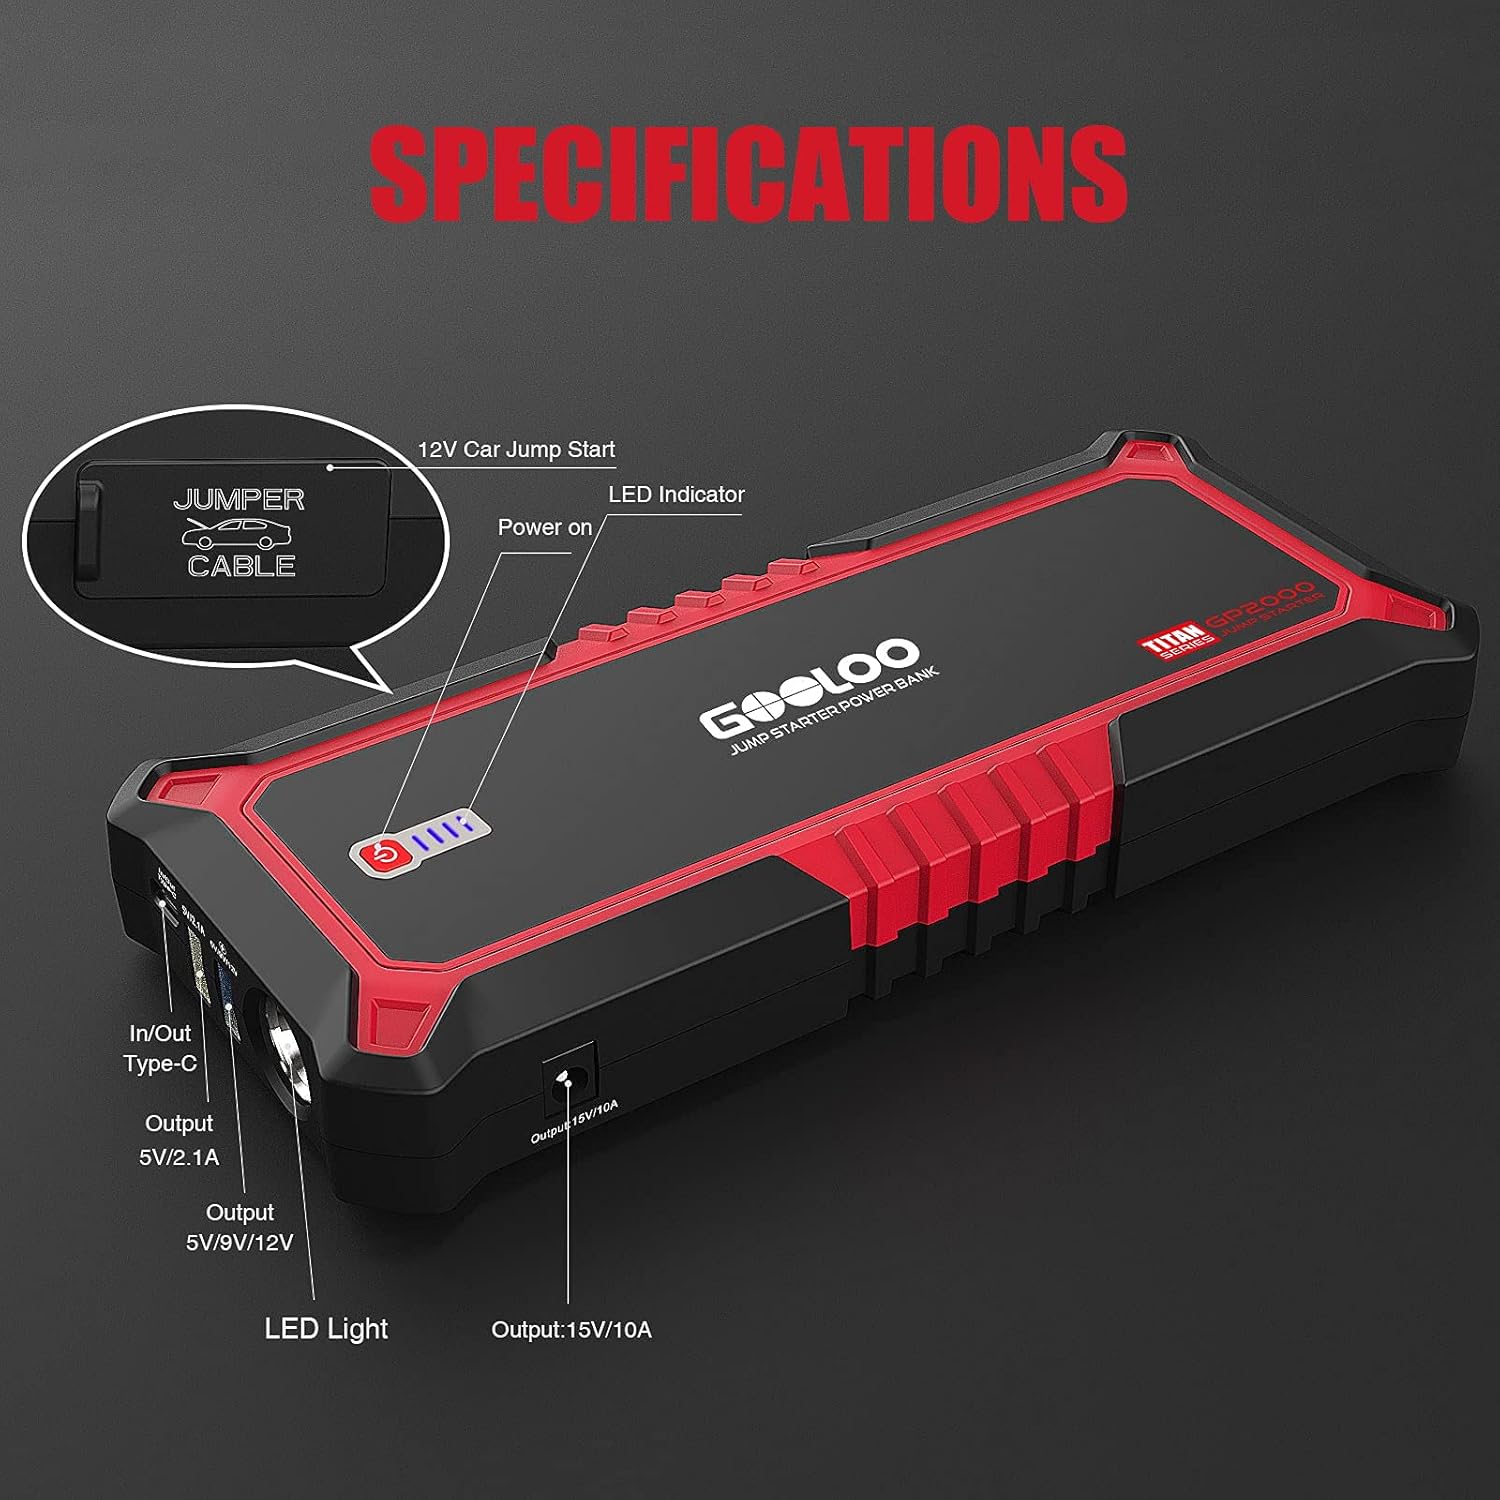
Image: The GOOLOO GP2000 Jump Starter functioning as a portable power supply, charging a smartphone and a tablet simultaneously. This image highlights its versatility beyond jump-starting, providing power for various portable devices.
5.2. Using the GOOLOO S4 Battery Charger
- Connect the S4's battery clamps to the battery terminals: red to positive (+), black to negative (-).
- Plug the S4 into a standard 100-120VAC 50-60Hz power outlet.
- The S4 will automatically detect the battery type and voltage (6V ili 12V) i započnite proces punjenja.
- Use the "MODE" button to select specific charging modes if needed (e.g., 12V STD, 12V AGM/C, 12V GEL, 12V LFP, 6V STD).
- The display will show charging status and battery voltage.
- Once charging is complete, the S4 will switch to maintenance mode. Disconnect the power, then the clamps iz baterije.

Image: The GOOLOO S4 Battery Charger actively charging a car battery. The charger's display shows charging information, and its clamps are securely connected to the battery terminals, illustrating the charging process.

Image: An illustration highlighting the GOOLOO S4 Battery Charger's intelligent features: automatic detection of sulfation and acid stratification, automatic repair of battery damage, and simple plug-and-play auto-charge functionality. The S4 is shown connected to a battery.
6. Održavanje
- čišćenje: Obrišite uređaje suhom, mekom krpom. Ne koristite abrazivna sredstva za čišćenje ili rastvarače.
- Skladištenje: Store the GP2000 and S4 in a cool, dry place when not in use.
- GP2000 Battery Maintenance: Recharge the GP2000 every 3-6 months, even if not used, to maintain battery health.
- S4 Cable Inspection: Regularly inspect the S4's cables and clampna bilo kakve znakove oštećenja ili habanja.
7. Otkrivanje problema
| Problem | Mogući uzrok | Rješenje |
|---|---|---|
| GP2000 not turning on/charging. | Slaba baterija; neispravan kabel/adapter za punjenje. | Charge the unit; try a different USB cable or adapter. |
| GP2000 not jump-starting vehicle. | Insufficient charge; incorrect clamp connection; battery too dead. | Ensure full charge; check polarity (+ to +, - to -); vehicle battery may be beyond jump-start capability. |
| S4 not charging battery. | Incorrect connection; battery severely discharged/damaged; power outlet issue. | Provjerite ispravan clamp polarity; battery may be unrecoverable; check power outlet. |
| S4 display shows error code. | Pogledajte specifične kodove grešaka u kompletnom priručniku (ako je dostupan). | Consult GOOLOO support or the detailed product manual for specific error code meanings and solutions. |
8. Specifikacije
GOOLOO GP2000 Jump Starter
- Vršna struja: 2000A
- Kompatibilnost motora: Do 9.0L benzina, 7.0L dizela
- USB Output 1 (Type-C): 5V/2.1A (In/Out)
- USB Output 2 (Quick Charge): 5V/9V/12V
- USB izlaz 3: 5V/2.4A
- DC izlaz: 15V/10A
- Ugrađene karakteristike: LED Flashlight (Stable, Strobe, SOS)
GOOLOO S4 4Amp Punjač za auto akumulatore
- Unos: 100-120VAC 50-60Hz
- Izlaz: 12V/4A, 6V/2A
- Vrste baterija: 6V & 12V Lead-Acid (WET, SLA, GEL, AGM, FLOODED, VRLA), 12V LiFePO4
- Charging Program: 10-stage automatsko punjenje
- Funkcije: Charger, Maintainer, Desulfator
9. Garancija i podrška
GOOLOO products come with a standard manufacturer's warranty. For specific warranty terms and conditions, please refer to the warranty card included with your product or visit the official GOOLOO website.
For technical support, troubleshooting assistance, or warranty claims, please contact GOOLOO customer service:
- Webstranica: www.gooloo.com
- Email: Pogledajte ambalažu vašeg proizvoda ili webstranica za podršku putem e-pošte.
- Amazon prodavnica: GOOLOO Official Amazon Store


