1. Proizvod je gotovview
The Cycleinn Magnetic Bike Trainer Stand CI-MT001 provides a stable and adjustable platform for indoor bicycle training. It features 8 levels of magnetic resistance and is designed for noise reduction, allowing for effective workouts in various environments. This trainer is compatible with most road and mountain bikes with 26-28 inch or 700C wheels.

Image 1.1: The Cycleinn Magnetic Bike Trainer Stand, including the main unit, front wheel riser block, and quick release skewer.
Ključne karakteristike:
- 8 nivoa otpora: Adjustable via a handlebar-mounted controller to simulate various cycling conditions.
- Dizajn za smanjenje buke: Features a magnetic flywheel and resistance wheel engineered to minimize operational noise.
- Stabilna struktura: Dual-support frame with a wide base and anti-slip rubber feet for enhanced stability.
- Sistem brzog otpuštanja: Allows for easy mounting and dismounting of the bicycle.
- Sklopivi dizajn: Compact for convenient storage and portability.
2. Sigurnosne informacije
Please read all safety instructions before using the bike trainer. Failure to follow these instructions may result in injury or damage to the product.
- Ensure the trainer is placed on a flat, stable, and non-slip surface.
- Uvijek provjerite da li je vaš bicikl sigurno pričvršćen na trenažer prije početka treninga.
- Ne prekoračujte maksimalnu nosivost 265 lbs (120 kg).
- Držite djecu i kućne ljubimce dalje od trenažera tokom rada.
- Wear appropriate cycling attire, including a helmet if desired, and ensure shoelaces are tied to prevent entanglement.
- Regularly inspect the trainer for any loose parts, damage, or wear. Do not use if damaged.
- Maintain a safe distance from walls, furniture, and other objects during use.
- Stop exercising immediately if you feel dizzy, nauseous, or experience any pain. Consult a physician.
3. Sadržaj paketa
Prije montaže provjerite da li su sve komponente prisutne:
- Magnetic Bike Trainer Stand (Main Unit)
- Front Wheel Riser Block
- Ražnja sa brzim otpuštanjem stražnjeg kotača
- Handlebar-Mounted Resistance Controller
- Assembly Tools (Wrenches, Allen keys)
- Product Instruction Manual (This document)

Slika 3.1: Rastavljeno view of the Cycleinn Bike Trainer Stand components.
4. Upute za sastavljanje
Follow these steps to assemble your Cycleinn Magnetic Bike Trainer Stand:
- Rasklopite okvir trenažera: Carefully unfold the main frame of the trainer until it locks into its open position. Ensure all locking mechanisms are engaged for stability.
- Podesite jastučiće za stopala: The trainer features adjustable foot pads. Rotate these pads to ensure the trainer sits level on your floor, preventing wobbling during use. This is crucial for stability.
- Install Quick Release Skewer: Replace your bike's existing rear wheel skewer with the provided quick release skewer. This skewer is designed for secure attachment to the trainer.
- Montirajte bicikl:
- Position your bicycle with the rear wheel between the two clamping mechanisms of the trainer.
- Align the ends of the quick release skewer with the trainer's axle clamps.
- Engage the quick release lever on one side and tighten the knob on the opposite side until the bike is firmly secured. Ensure the bike is centered and stable.
- Utilize the dual locking system by tightening the smaller safety rings inside the larger knobs for added security.

Image 4.2: Securing the bike with the quick release lever.
- Postavite blok podizača prednjeg kotača: Place the front wheel riser block under your bike's front wheel. This elevates the front wheel to match the height of the rear wheel, providing a level and natural riding position.
- Install Resistance Controller: Attach the handlebar-mounted resistance controller to your bicycle's handlebars using the provided clamp. Route the cable neatly to the magnetic resistance unit on the trainer.
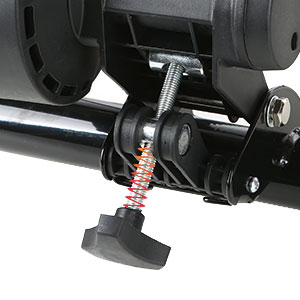
Image 4.1: Adjusting the foot pads for level placement.

Image 4.3: A bicycle correctly mounted on the trainer with the front wheel riser block in place.
5. Uputstvo za upotrebu
5.1 Adjusting Resistance Levels
The Cycleinn trainer offers 8 levels of magnetic resistance. To adjust the resistance:
- Locate the handlebar-mounted controller.
- Rotate the dial on the controller to select your desired resistance level from 1 (lowest) to 8 (highest).
- Lower resistance levels are suitable for warm-ups or easy rides, while higher levels simulate steep climbs and intense workouts.

Image 5.1: Handlebar-mounted resistance controller.
5.2 Noise Reduction Technology
The trainer is designed with a noise reduction resistance wheel and magnetic flywheel for quiet operation. To optimize noise reduction:
- Ensure the pressure regulating device on the resistance unit is properly adjusted against the tire.
- For best results, use a road bike tire. Mountain bike tires with aggressive treads can generate more noise due to their design.
- Maintain proper tire inflation.

Image 5.2: Detail of the noise reduction wheel and magnetic resistance unit.

Image 5.3: The trainer's low noise design allows for quiet indoor workouts.
6. Kompatibilnost
The Cycleinn Magnetic Bike Trainer Stand is compatible with the following:
- Bike Types: Most Road Bikes and Mountain Bikes.
- Veličine kotača: 26-inch, 27.5-inch, 28-inch, and 700C wheels.
- Rear Wheel Axle Width: 4.92-7.87 inches (12.5-20 cm).
- Maksimalno opterećenje: 265 lbs (120 kg).
- Note: Mountain bikes with thru-axles are generally not suitable for this trainer.

Image 6.1: Compatibility details for the bike trainer.
7. Održavanje
Proper maintenance ensures the longevity and optimal performance of your bike trainer.
- čišćenje: Obrišite trenerku oglasomamp krpom nakon svake upotrebe kako biste uklonili znoj i prašinu. Izbjegavajte abrazivna sredstva za čišćenje.
- inspekcija: Periodically check all bolts, nuts, and quick release mechanisms for tightness. Tighten as necessary.
- podmazivanje: The magnetic resistance unit is generally maintenance-free. Do not attempt to lubricate internal components.
- Skladištenje: When not in use, fold the trainer for compact storage. Store in a dry, cool place away from direct sunlight and extreme temperatures.

Image 7.1: The foldable design allows for convenient storage.
8. Otkrivanje problema
8.1 Excessive Noise During Operation
- Tip gume: Mountain bike tires with knobby treads will naturally produce more noise than smooth road bike tires. Consider using a dedicated trainer tire or a road bike for quieter operation.
- Pritisak u gumama: Ensure your tire is inflated to the recommended pressure. Under-inflated tires can increase noise and wear.
- Resistance Unit Contact: Verify that the resistance roller is making firm, even contact with the tire. Adjust the pressure regulating device if necessary.
- Trainer Stability: Check that the trainer is level and stable on the floor. Adjust the foot pads to eliminate any wobbling.
- Labave komponente: Inspect all bolts and connections on the trainer and your bicycle for any looseness. Tighten as needed.
8.2 Bike Not Securely Mounted
- Quick Release Skewer: Ensure you are using the provided quick release skewer and that it is properly installed.
- ClampMehanizam: Zategnite clamping knob sufficiently and engage the quick release lever firmly. The bike should not move side-to-side when secured.
- Safety Rings: Confirm that the internal safety rings are tightened against the main clampdugmad.
8.3 Resistance Not Changing
- Controller Cable: Check the cable connecting the handlebar controller to the resistance unit for any kinks, damage, or disconnections.
- Funkcija kontrolera: Ensure the dial on the handlebar controller rotates freely and engages the resistance mechanism.
9. Specifikacije
| Feature | Specifikacija |
|---|---|
| Broj modela | CI-MT001 |
| Brand | Cycleinn |
| Materijal | nerđajući čelik |
| Mehanizam otpora | Magnetic |
| Broj postavki otpora | 8 |
| Kompatibilne veličine kotača | 26-28 inches, 700C |
| Max nosivost | 265 lbs (120 kg) |
| Dimenzije proizvoda (D x Š x V) | 54.86 x 45.01 x 50.98 cm (21.6 x 17.7 x 20.1 inča) |
| Težina proizvoda | 8.19 kg (18.05 lbs) |
| Boja | Crna |
10. Garancija i podrška
For warranty information or technical support, please refer to the purchase documentation or contact Cycleinn customer service through the retailer where the product was purchased. Keep your proof of purchase for any warranty claims.


