1. Proizvod je gotovview
The Waveshare CM4-IO-BASE-B is a versatile carrier board designed for the Raspberry Pi Compute Module 4 (CM4). It expands the CM4's capabilities by providing a wide array of connectivity options, making it suitable for various embedded applications and development projects. This bundle includes a USB HDMI Adapter to further enhance connectivity.
Ključne karakteristike uključuju:
- Standard CM4 socket, compatible with all variants of Compute Module 4 (Lite/eMMC series).
- Multiple USB and HDMI connectors via FFC for extended peripheral support.
- Gigabit Ethernet RJ45 port for reliable network connectivity.
- Color-coded Raspberry Pi 40PIN GPIO header for easy expansion.
- Support for MIPI DSI display and MIPI CSI-2 camera interfaces.
- M.2 slot for NVME SSDs or communication modules.

Figure 1: Waveshare CM4-IO-BASE-B carrier board with the USB HDMI Adapter connected via FFC cable.
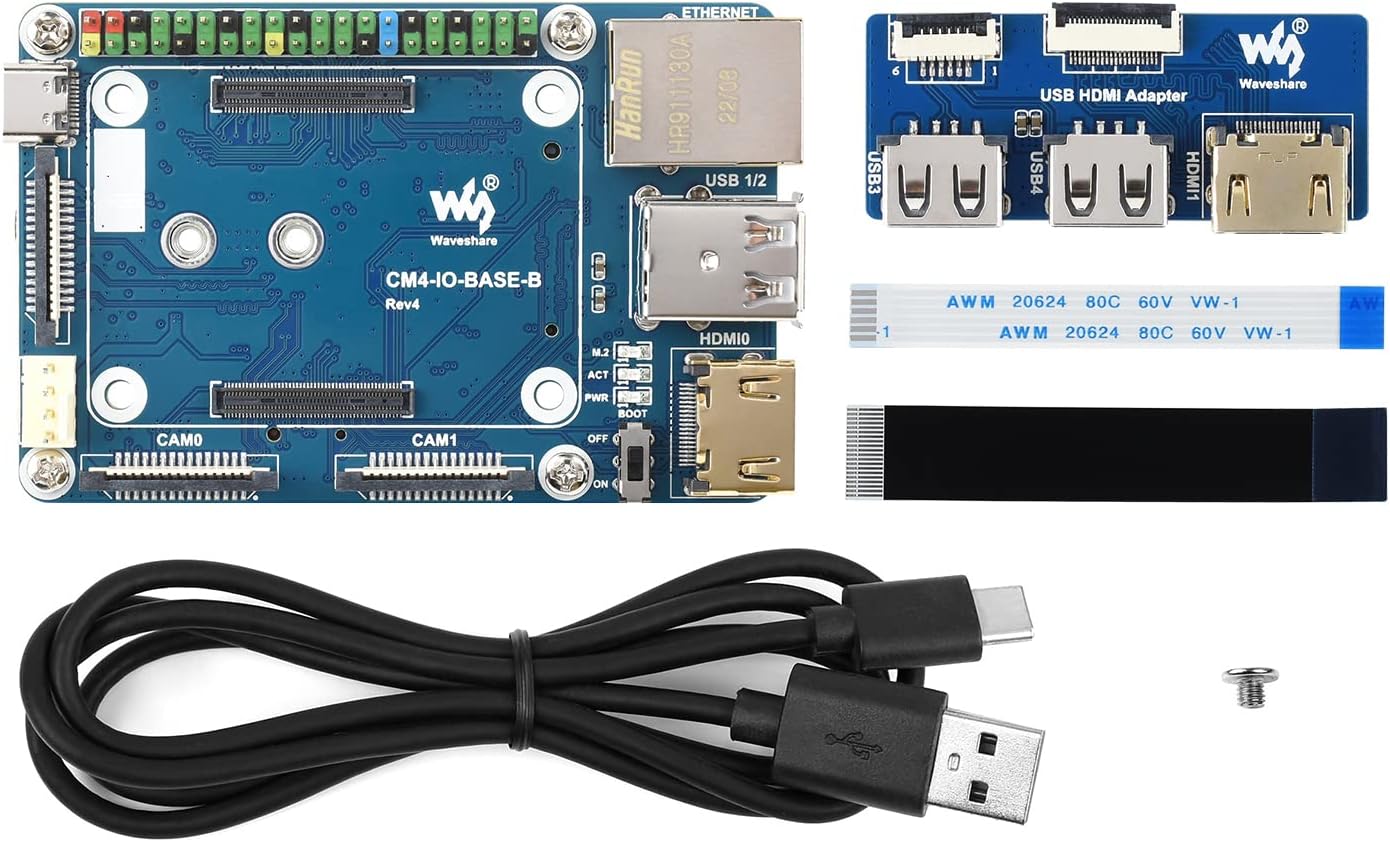
Figure 2: Included components: CM4-IO-BASE-B board, USB HDMI Adapter, FFC cables, USB-C power cable, and mounting screw.
2. Postavljanje i instalacija
2.1 Attaching the Compute Module 4
- Carefully align your Raspberry Pi Compute Module 4 (CM4) with the CM4 socket on the CM4-IO-BASE-B board. Ensure the connectors are correctly oriented.
- Gently press the CM4 into the socket until it is securely seated. Do not force it.
- If using a metal case, install the CM4 and IO board into the case following the case manufacturer's instructions.

Figure 3: Raspberry Pi CM4 installed on the CM4-IO-BASE-B board within an optional metal case, highlighting the 40PIN GPIO header.
2.2 Connecting the USB HDMI Adapter
- Locate the FFC (Flat Flexible Cable) connectors on both the CM4-IO-BASE-B board and the USB HDMI Adapter.
- Gently open the latches on the FFC connectors.
- Insert the FFC cables into the corresponding connectors, ensuring they are fully seated and correctly oriented.
- Close the latches to secure the FFC cables.
2.3 Initial Power-Up and OS Installation
- Connect a 5V/2.5A power supply to the USB-C power input port on the CM4-IO-BASE-B.
- Connect a display to one of the HDMI ports (either directly on the CM4-IO-BASE-B or via the USB HDMI Adapter).
- Connect a USB keyboard and mouse to the USB 2.0 ports.
- If your CM4 is a Lite variant (without eMMC), insert a microSD card with a pre-installed Raspberry Pi OS image into the microSD card slot.
- Set the BOOT selection switch to the appropriate position (ON for USB-C boot/programming, OFF for eMMC/microSD boot).
- Power on the device. Follow the standard Raspberry Pi OS setup procedures.
3. Operacija
3.1 Port Functionality
The CM4-IO-BASE-B provides extensive connectivity:
- USB 2.0 portovi: For connecting peripherals like keyboards, mice, and USB storage devices.
- HDMI portovi: Supports up to 4K 30fps output for displays.
- Gigabitni Ethernet: Za žičane mrežne veze.
- 40-pinski GPIO konektor: For connecting various sensors, actuators, and expansion boards. Refer to Raspberry Pi documentation for pinout details.
- MIPI DSI Display Port: For connecting compatible DSI displays.
- MIPI CSI-2 Camera Ports: For connecting compatible CSI cameras.
- M.2 utor: Supports NVME SSDs or communication modules with PCIe KEY-M interface.

Figure 4: Demonstration of the CM4-IO-BASE-B with the USB HDMI Adapter connected to an external display.

Figure 5: Detailed diagram illustrating the various ports and components on the CM4-IO-BASE-B board, including CM4 socket, GPIO header, USB ports, HDMI ports, Ethernet, and M.2 slot.
3.2 Boot Selection
The BOOT switch on the board controls the boot mode of the Compute Module 4:
- ON: The CM4 will boot from the USB-C interface. This mode is typically used for flashing the eMMC memory or for console access.
- ISKLJUČENO: The CM4 will boot from the eMMC (if present) or the microSD card (for Lite variants).
Always ensure the CM4 is powered off before changing the BOOT switch position.
4. Održavanje
To ensure the longevity and optimal performance of your Waveshare CM4-IO-BASE-B, follow these general maintenance guidelines:
- Održavajte čistoću: Regularly clean the board with a soft, dry brush or compressed air to remove dust and debris. Avoid using liquids.
- Pravilno gašenje: Always perform a proper software shutdown of the Raspberry Pi OS before disconnecting power to prevent data corruption.
- Uslovi okoline: Operate the board within its specified temperature and humidity ranges. Avoid extreme conditions.
- Pažljivo rukujte: Avoid touching the electronic components directly. Use anti-static precautions when handling the board.
5. Otkrivanje problema
If you encounter issues with your CM4-IO-BASE-B, consider the following troubleshooting steps:
- Nema napajanja/LED diode isključene: Ensure the 5V/2.5A USB-C power supply is correctly connected and functional. Check the PWR indicator LED on the board.
- Nema izlaza za prikaz: Verify that the HDMI cables are securely connected to both the board/adapter and the monitor. Ensure the monitor is set to the correct input source. Check the BOOT switch position.
- USB uređaji ne rade: Confirm that USB devices are properly plugged into the USB 2.0 ports. Try different USB devices or ports.
- Problemi s mrežnom vezom: Check the Ethernet cable connection. Verify network settings within the Raspberry Pi OS.
- CM4 Not Booting: Ensure the CM4 is correctly seated in its socket. If using a Lite variant, verify the microSD card has a valid OS image and is inserted correctly. Check the BOOT switch position.
- Problemi sa softverom: Many issues can be resolved by ensuring your Raspberry Pi OS is up-to-date. Refer to the official Raspberry Pi documentation for OS-specific troubleshooting.
6. Specifikacije
The following table details the technical specifications of the Waveshare CM4-IO-BASE-B:
| Feature | Specifikacija |
|---|---|
| Naziv modela | CM4-IO-BASE-B |
| CM4 Socket | Suitable for all variants of Compute Module 4 |
| Umrežavanje | Gigabit Ethernet RJ45 connector |
| Konektor | Raspberry Pi 40PIN GPIO header |
| USB | USB 2.0 Type A × 2, USB 2.0 via FFC connector × 2 |
| Display | MIPI DSI display port (15pin 1.0mm FPC connector) |
| Kamera | MIPI CSI-2 camera port × 2 (15pin 1.0mm FPC connector) |
| Video izlaz | HDMI port × 2 (including one port via FFC connector), supports 4K 30fps output |
| RTC | Real-time clock with battery socket and ability to wake Compute Module 4 |
| Skladištenje | TF card socket for Compute Module 4 Lite (without eMMC) variants |
| Fan Header | Allows speed adjustment and measurement, 5V |
| Power Input | 5V |
| Dimenzije | 85 × 56 mm |
| Težina artikla | 4.8 unce |
| Dimenzije paketa | 5.3 x 3.8 x 1.6 inča |

Figure 6: Part 1 of the detailed specifications for the CM4-IO-BASE-B, including CM4 socket, networking, and USB.
Figure 7: Part 2 of the detailed specifications for the CM4-IO-BASE-B, including display, camera, power input, and dimensions.
7. Podrška i garancija
For further technical support, documentation, and resources, please visit the official Waveshare website or their product wiki. Waveshare provides comprehensive guides and examples for their products.
Information regarding product warranty can typically be found on the Waveshare official webili putem vašeg mjesta kupovine. Molimo sačuvajte dokaz o kupovini za reklamacije u slučaju reklamacije.
Za dodatnu pomoć, molimo vas da posjetite Waveshare CM4-IO-BASE-B Wiki Page.


