1. Uvod
This manual provides detailed instructions for the proper installation, operation, and maintenance of your Gravity G3-12D4 12-inch car audio subwoofer and Gravity WZ3000.1D Class D amplifier, along with the included 4-gauge amplifier installation kit. Please read this manual thoroughly before beginning installation to ensure correct setup and optimal performance.
2. Sigurnosne informacije
Uvijek se pridržavajte sljedećih sigurnosnih mjera opreza tokom instalacije i rada:
- Disconnect the vehicle's negative battery terminal before any wiring to prevent electrical shorts.
- Osigurajte da su sve žice pravilno usmjerene i osigurane kako biste spriječili oštećenja od oštrih rubova ili pokretnih dijelova.
- Use appropriate gauge wiring as specified in this manual to handle current loads and prevent overheating.
- Install fuses at the battery and near the amplifier as instructed to protect against power surges.
- Avoid mounting components in locations that obstruct vehicle operation or safety features.
- Do not expose components to excessive moisture or extreme temperatures.
- Potražite stručnu pomoć ako niste sigurni u vezi s bilo kojim koracima instalacije.
3. Sadržaj paketa
Provjerite da li se sve stavke nalaze u vašem paketu:
- Gravity G3-12D4 12-inch Car Audio Subwoofer
- Gravity WZ3000.1D Class D Amplifier
- 4 mjerač Amplifier Installation Kit, including:
- 17 ft. 4 Gauge Power Cable
- 3 ft. 4 Gauge Ground Cable
- Inline AGU Fuse Holder with 80A + 100A Fuses
- 17 ft. Double Shielded RCA Cable
- 17 ft. 18 Gauge Turn-On Cable
- 20 ft. 16 Gauge Speaker Wire
- All necessary accessories and terminals
- Remote Bass Control Knob
4. Značajke proizvoda
Gravity G3-12D4 Subwoofer
- Dual 4 Ohm Voice Coil Configuration
- Competition Grade Pressed Paper Cone
- Visoki rolani pjenasti oklop
- Advanced Air Flow Cooling System
Gravity WZ3000.1D Amplifier
- Class D MOSFET Power Amplifier
- Stable at 1 Ohm, 2 Ohm, and 4 Ohm loads
- High and Low Level Inputs
- Variable Low Pass Crossover (LPF)
- Varijabilno pojačanje basa
- Subsonic Filter
4 mjerač AmpLifier instalacioni komplet
- High Quality Thick 4 Gauge Power and Ground Cables
- Inline AGU Fuse Holder with multiple fuses for protection
- True Sound Double Shielded RCA Cable for clear signal transmission
- Complete set of accessories and terminals for a professional installation
5. Postavljanje i instalacija
Proper installation is crucial for performance and safety. If you are not confident in your ability to install this system, please consult a professional installer.
5.1. Montiranje subwoofera
The G3-12D4 subwoofer requires a suitable enclosure (not included) for optimal performance. Ensure the enclosure is properly sealed and sized according to subwoofer specifications. Mount the subwoofer securely to the enclosure using appropriate screws, ensuring a tight seal around the mounting flange.

Slika: Front view of the Gravity G3-12D4 12-inch subwoofer, showing the black cone with a red Gravity logo and red stitching on the foam surround.

Slika: Stražnja strana view of the Gravity G3-12D4 12-inch subwoofer, displaying the magnet structure and speaker terminals.
5.2. Montiranje Amplifier
Select a mounting location for the WZ3000.1D amplifier that is dry, well-ventilated, and protected from physical damage. Common locations include under a seat, in the trunk, or mounted to a custom amplifier rack. Ensure there is sufficient airflow around the amplifier for cooling. Secure the amplifier firmly using screws.

Slika: Sa strane view of the Gravity WZ3000.1D amplifier, showing the heat sink fins for cooling.
5.3. Ožičenje sistema
Follow these steps carefully for wiring the amplifier and subwoofer:
- Power Cable (Red 4 Gauge): Run the 17 ft. 4 gauge power cable from the vehicle's positive battery terminal to the amplifier location. Install the inline AGU fuse holder within 18 inches (45 cm) of the battery. Do not insert the fuse until all wiring is complete.
- Ground Cable (Black 4 Gauge): Connect the 3 ft. 4 gauge ground cable from the amplifier's ground terminal to a clean, unpainted metal surface on the vehicle chassis. Ensure a solid, low-resistance connection. The ground point should be as short as possible.
- Remote Turn-On Cable (Blue 18 Gauge): Connect the 17 ft. 18 gauge turn-on cable from the amplifier's REM terminal to the remote turn-on output of your head unit. This cable signals the ampuređaj za uključivanje i isključivanje pomoću glavne jedinice.
- RCA Signal Cables: Connect the 17 ft. double shielded RCA cable from the RCA outputs of your head unit to the RCA INPUTs on the WZ3000.1D amplifier.
- Speaker Wiring (16 Gauge): Connect the 20 ft. 16 gauge speaker wire from the amplifier's speaker output terminals to the G3-12D4 subwoofer. Ensure correct polarity (+ to + and - to -). For a single G3-12D4 (dual 4-ohm voice coils), you can wire the voice coils in parallel for a 2-ohm load or in series for an 8-ohm load. The WZ3000.1D amplifier is stable down to 1 ohm, so a 2-ohm parallel configuration is recommended for maximum power output.
- Daljinska kontrola basa: Connect the remote bass control knob to the dedicated REMOTE port on the amplifier. Mount the knob in an accessible location for easy adjustment.
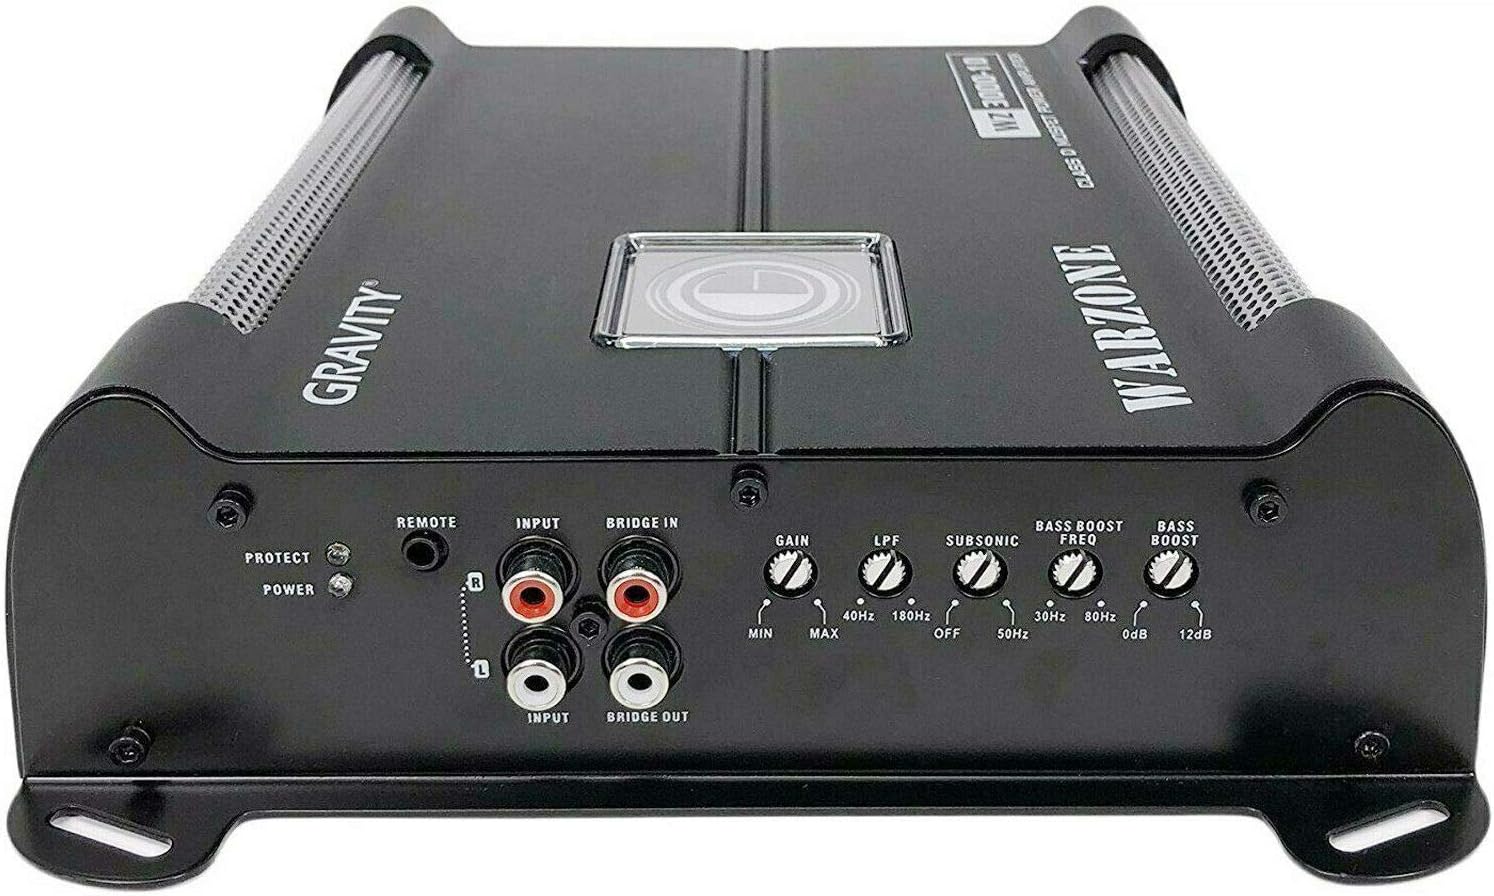
Image: Front panel of the Gravity WZ3000.1D amplifier, displaying RCA inputs, remote control port, and various adjustment knobs.

Image: Rear panel of the Gravity WZ3000.1D amplifier, showing the power input terminals (+12V, GND, REM) and speaker output terminals.

Image: The remote bass control knob, used for adjusting subwoofer output level from the driver's seat.
5.4. Završna veza
Once all wiring is securely connected and checked for shorts, insert the appropriate fuse (80A or 100A, depending on your system's power draw) into the inline AGU fuse holder near the battery. Reconnect the vehicle's negative battery terminal.
6. Uputstvo za upotrebu
After installation, power on your head unit. The amplifier should turn on automatically (indicated by a power LED). Adjust the amplifier settings as follows:
- POJAČANJE (Ulazni nivo): Start with the GAIN control at minimum. Play a familiar track with strong bass at about 75% of your head unit's maximum volume. Slowly increase the GAIN until you hear distortion, then back off slightly. This sets the ampPodesite ulaznu osjetljivost lifiera tako da odgovara izlazu vaše glavne jedinice.
- LPF (niskopropusni filter): This control filters out high frequencies, allowing only low frequencies to pass to the subwoofer. Set the LPF between 40 Hz and 180 Hz. A common starting point is 80 Hz, but adjust to blend smoothly with your main speakers.
- SUBSONIC Filter: This filter removes extremely low frequencies below the audible range that can cause damage to the subwoofer. Set it between 0 Hz and 50 Hz. A setting around 25-30 Hz is often suitable for ported enclosures, while sealed enclosures may not require it as much.
- BASS BOOST FREQ: This selects the frequency at which the bass boost will be applied. Adjust this to enhance a specific bass frequency range.
- BASS BOOST: This control increases the output level at the selected bass boost frequency (0-12 dB). Use sparingly to avoid distortion and potential speaker damage.
- Daljinska kontrola basa: This knob allows you to adjust the subwoofer's output level conveniently from your listening position without affecting other amppostavke lifiera.
7. Održavanje
To ensure longevity and optimal performance of your car audio system:
- Redovno provjeravajte sve spojeve ožičenja na čvrstoću i prisustvo korozije.
- Zadrži amplifier and subwoofer free from dust and debris. Use a soft, dry cloth for cleaning.
- Osigurajte amplifier's cooling fins are not obstructed to prevent overheating.
- Avoid exposing the subwoofer cone to direct sunlight for extended periods, as UV rays can degrade materials.
8. Otkrivanje problema
Ako naiđete na probleme, pogledajte sljedeće uobičajene probleme i rješenja:
| Problem | Mogući uzrok | Rješenje |
|---|---|---|
| Nema napajanja / AmpLifier se ne uključuje | Pregoreo osigurač Loša strujna ili uzemljena veza Nema signala za daljinsko uključivanje | Check and replace fuse in fuse holder Verify all power and ground connections are secure Provjerite vezu daljinske žice s glavnom jedinicom i amplifier |
| Nema zvuka iz subwoofera | RCA kablovi isključeni ili neispravni Žice zvučnika isključene ili kratko spojene Amppojačanje životnog vijeka prenisko Jačina zvuka glavne jedinice je preniska | Provjerite RCA veze Verify speaker wire connections and check for shorts Podesite amplifier gain Increase head unit volume |
| Distorted Sound | Pojačanje postavljeno previsoko Oštećeni zvučnik ili amplifier Incorrect LPF or Bass Boost settings | Smanji amplifier gain Inspect speaker and amplifier for damage Adjust LPF and Bass Boost settings |
| AmpPregrijavanje | Nedovoljna ventilacija Nepravilno impedantno opterećenje Pojačanje postavljeno previsoko | Osigurajte odgovarajući protok zraka okolo amplifier Provjerite podudaranja impedanse zvučnika amplifier's stable load Smanji amplifier gain |
9. Specifikacije
Gravity G3-12D4 Subwoofer
- Speaker Size: 12 Inches
- Voice Coil Configuration: Dual 4 Ohm
- Peak Power: 2000 Watts (each)
- RMS Power: 1000 Watts (each)
- Frequency Response: 30 - 500 Hz
- Osetljivost: 87 dB
Gravity WZ3000.1D Amplifier
- Max Power: 3000W @ 1 Ohm
- Klasa: D
- Stable Impedance: 1 Ohm, 2 Ohm, 4 Ohm
- Signal-to-Noise Ratio (S/N): 70 dB
- Frekvencijski odziv: 8 Hz ~ 180 Hz
- Ukupna harmonijska distorzija (THD): 0.2%
- Bass Boost Level: 0 ~ 12 dB
- Low Pass Filter (LPF): 40 Hz ~ 180 Hz
- Subsonic Filter: 0 ~ 50 Hz
- Dimensions (L×W×H): 223.5mm (8.8 in) × 211mm (8.3 in) × 64.5 mm (2.5 in)
4 mjerač AmpLifier instalacioni komplet
- Power Cable: 17 ft. 4 Gauge
- Ground Cable: 3 ft. 4 Gauge
- Fuse Holder: Inline AGU with 80A + 100A Fuses
- RCA Cable: 17 ft. Double Shielded
- Turn-On Cable: 17 ft. 18 Gauge
- Speaker Wire: 20 ft. 16 Gauge
10. Garancija i podrška
Gravity products are designed for reliability and performance. For specific warranty terms and conditions, please refer to the warranty card included with your product or contact Gravity customer support. Keep your purchase receipt as proof of purchase for any warranty claims.
For technical support or inquiries, please visit the official Gravity webstranice ili kontaktirajte njihov odjel za korisničku podršku.


