1. Uvod
Thank you for choosing the Rebel RB-0005 Weather Station. This device provides accurate indoor and outdoor temperature readings, indoor humidity, and features a clock, calendar, and alarm function. This manual will guide you through the setup, operation, and maintenance of your new weather station to ensure optimal performance.
2. Sigurnosne informacije
- Ne izlažite uređaj ekstremnim temperaturama, direktnoj sunčevoj svjetlosti ili visokoj vlažnosti.
- Izbjegavajte ispuštanje ili izlaganje uređaja jakim udarima.
- Držite uređaj dalje od vode i drugih tečnosti.
- Istrošene baterije odlažite odgovorno u skladu sa lokalnim propisima.
- Ne pokušavajte sami rastavljati ili popravljati uređaj. Za servis se obratite kvalifikovanom osoblju.
- The outdoor sensor cable should be handled with care to prevent damage.
3. Sadržaj paketa
Molimo Vas da provjerite sadržaj paketa prilikom raspakivanja:
- 1x Rebel RB-0005 Weather Station Main Unit
- 1x Wired Outdoor Temperature Sensor
- 1x Korisnički priručnik (ovaj dokument)
Note: 1x AAA battery is required for operation and is not included in the package.
4. Značajke proizvoda
- Indoor and Outdoor Temperature Measurement
- Indoor Humidity Measurement
- Funkcija kalendara
- Funkcija alarma
- Prikaz sata 12/24 sata
- Memory Function for Highest and Lowest Temperature Readings
- Clear and Easy-to-Read LCD Display
- Radi prenosivosti na baterije
5. Proizvod je gotovview
Familiarize yourself with the main components of your Rebel RB-0005 Weather Station.
5.1 Prednji ekran
The large LCD screen displays various information simultaneously:
- IN Temperature: Trenutna unutrašnja temperatura.
- OUT Temperature: Current outdoor temperature from the wired sensor.
- vrijeme: Current time in 12-hour (AM/PM) or 24-hour format.
- RH%: Current indoor relative humidity.
- Kalendar: Date display (day, month).
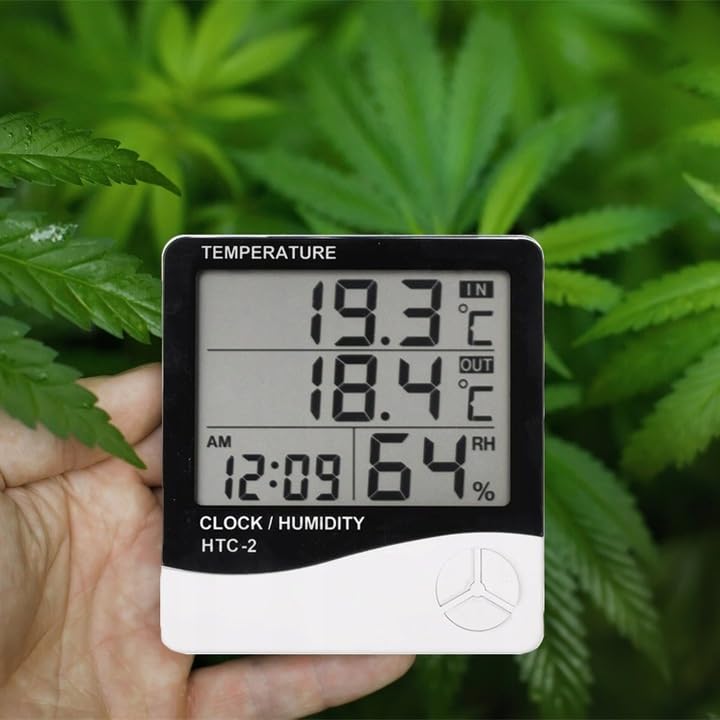
Figure 1: Front display of the weather station showing temperature, time, and humidity readings.

Slika 2: Detaljno view of the display and control buttons.
5.2 kontrolna dugmeta
The device features three control buttons located on the front, below the display:
- UPUTE: Used to switch between display modes (e.g., time, alarm, calendar) and to enter/exit setting modes.
- ADJ (Adjust): Used to adjust values (e.g., hours, minutes, date) when in setting mode.
- SJEĆANJE: Navikli view the highest and lowest recorded temperature and humidity values.
5.3 Pozadi View i Senzor
The back of the unit houses the battery compartment, a foldable stand, and the input for the wired outdoor temperature sensor.

Slika 3: Pozadi view of the weather station with battery compartment and wired sensor.
6. Podešavanje
6.1 Instalacija baterije
- Otvorite poklopac pretinca za baterije na stražnjoj strani glavne jedinice.
- Insert one (1) AAA battery, ensuring the correct polarity (+/-).
- Close the battery compartment cover securely. The device should power on automatically.
6.2 Postavljanje vanjskog senzora
- Connect the wired outdoor temperature sensor to the designated port on the back of the main unit.
- Carefully route the sensor cable to the desired outdoor location. Ensure the cable is not pinched or damaged.
- Place the sensor in a shaded area, protected from direct sunlight and precipitation, to ensure accurate readings. Avoid placing it near heat sources or vents.

Slika 4: Prample placement of the weather station for indoor temperature monitoring.
7. Uputstvo za upotrebu
7.1 Podešavanje vremena i datuma
- Pritisnite i držite MODE dugme otprilike 3 sekunde dok prikaz vremena ne počne treptati.
- Koristite ADJ dugme za podešavanje trepćuće vrijednosti (npr. sati, minute).
- Pritisnite MODE button again to confirm the setting and move to the next value (e.g., minutes, 12/24 hour format, year, month, day).
- Repeat step 2 and 3 until all time and date settings are configured.
- Pritisnite MODE još jednom da biste izašli iz načina podešavanja.
7.2 Postavljanje alarma
- Iz normalnog prikaza vremena, pritisnite MODE button once to enter alarm display mode (usually indicated by an alarm icon).
- Pritisnite i držite MODE button for approximately 3 seconds until the alarm time starts flashing.
- Koristite ADJ dugme da biste podesili željeni sat alarma.
- Pritisnite MODE button to confirm the hour and move to set the minutes.
- Koristite ADJ dugme za podešavanje željene minute alarma.
- Pritisnite MODE button to confirm and exit alarm setting mode.
- Da biste aktivirali/deaktivirali alarm, pritisnite dugme ADJ button once while in alarm display mode. An alarm icon will appear/disappear on the display.
7.3 Viewing Min/Max Temperature and Humidity
- From the normal display, press the MEMORY button once to show the maximum recorded indoor/outdoor temperature and indoor humidity.
- Pritisnite MEMORY button again to show the minimum recorded indoor/outdoor temperature and indoor humidity.
- Pritisnite MEMORY pritisnite dugme treći put da biste se vratili na trenutna očitavanja.
- To clear the min/max memory, press and hold the MEMORY dugme na otprilike 3 sekunde viewing the min/max values.
7.4 Prebacivanje temperaturnih jedinica (°C/°F)
While in normal display mode, press the ADJ button once to toggle between Celsius (°C) and Fahrenheit (°F) temperature units.
8. Održavanje
- čišćenje: Obrišite uređaj mekom, suhom krpom. Ne koristite abrazivna sredstva za čišćenje ili rastvarače.
- Zamjena baterije: Replace the AAA battery when the display becomes dim or the device stops functioning. Follow the battery installation steps in Section 6.1.
- Održavanje senzora: Ensure the outdoor sensor cable is not damaged. Periodically check the sensor's placement to ensure it remains protected from elements for accurate readings.
9. Otkrivanje problema
| Problem | Mogući uzrok | Rješenje |
|---|---|---|
| Nema ekrana ili je ekran taman. | Low or depleted battery. Incorrect battery polarity. | Replace the AAA battery with a new one, ensuring correct polarity. |
| Outdoor temperature reading is incorrect or "---". | Outdoor sensor cable is disconnected or damaged. Sensor is exposed to direct sunlight or heat source. | Check if the sensor cable is securely connected. Ensure the sensor is placed in a shaded, protected area. Inspect the cable for damage. |
| Vrijeme/datum je netačan. | Time/Date not set correctly after battery installation. | Refer to Section 7.1 "Setting Time and Date" to adjust. |
| Alarm se ne oglašava. | Alarm is not activated. Alarm volume is too low (if adjustable, though this model likely isn't). | Ensure the alarm icon is displayed, indicating it is active (refer to Section 7.2). |
10. Specifikacije
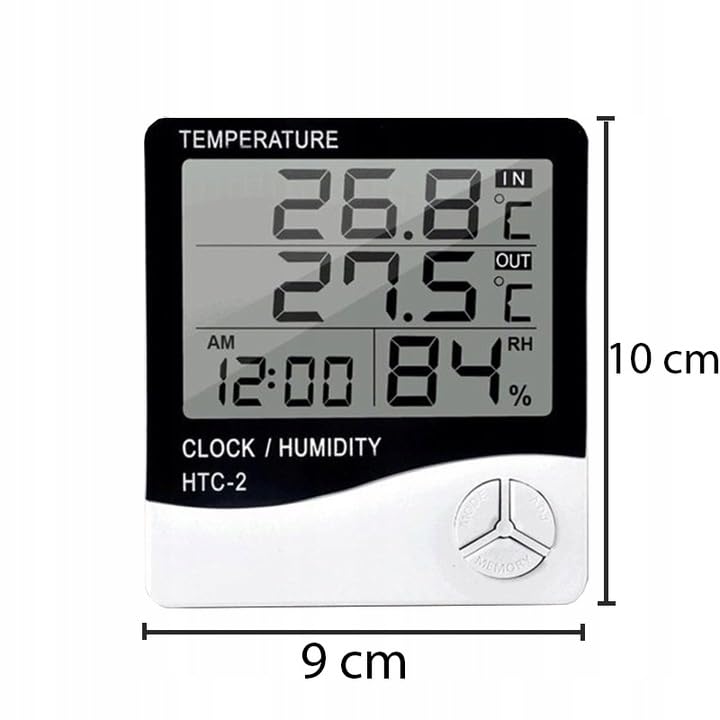
Figure 5: Approximate dimensions of the weather station.
- Model: RB-0005
- Brand: Buntovnik
- Izvor napajanja: 1x AAA baterija (nije uključena)
- Materijal: Plastika
- Posebne karakteristike: Alarm, Calendar, Min/Max Memory
- Dimenzije paketa: 18 x 12 x 10 cm
- Dimenzije proizvoda (približno): 9 cm (širina) x 10 cm (visina)
- Prvi dostupan datum: 23. novembra 2020
11. Garancija i podrška
Ovaj proizvod je pokriven standardnom garancijom proizvođača. Za specifične uslove garancije, molimo pogledajte dokumentaciju koja je dostavljena prilikom kupovine ili kontaktirajte prodavača.
For technical support or inquiries, please contact the Rebel customer service department through their official webweb-mjesto ili kontakt informacije koje vam je dao vaš prodavač.