1. Uvod
This manual provides comprehensive instructions for the installation, operation, and maintenance of your AZZA CSAZ-340F CELESTA ATX Mid Tower Gaming Case. Please read this manual thoroughly before beginning installation to ensure proper setup and to maximize the performance and longevity of your system components.

Slika 1: The AZZA CSAZ-340F CELESTA Mid Tower ATX Case, showcasinnjegov dizajn i faktor oblika.
2. Sigurnosne informacije
- Always disconnect the power supply from the wall outlet before installing or removing any components inside the case.
- Handle all components with care to prevent damage from electrostatic discharge (ESD). Consider using an anti-static wrist strap.
- Kućište i komponente držite dalje od tekućina i prekomjerne vlage.
- Osigurajte odgovarajuću ventilaciju oko kućišta kako biste spriječili pregrijavanje.
- Do not attempt to modify the case structure or components, as this may void your warranty and pose safety risks.
- Držite male dijelove i materijale za pakovanje van dohvata djece.
3. Sadržaj paketa
Provjerite da li se u vašem paketu nalaze sve dolje navedene stavke:
- AZZA CSAZ-340F CELESTA ATX Mid Tower Gaming Case
- Kutija s priborom (sadrži vijke, odstojnike, vezice za kablove itd.)
- Korisnički priručnik (ovaj dokument)
4. Specifikacije
The following table details the technical specifications of the AZZA CSAZ-340F CELESTA case:
| Feature | Specifikacija |
|---|---|
| Brand | AZZA |
| Naziv modela | CSAZ-340F CELESTA |
| Tip slučaja | Mid Tower |
| Kompatibilnost matične ploče | ATX, Micro ATX, Mini ITX |
| Boja | Crna |
| Materijal | Metal |
| Vrsta montaže napajanja | Bottom Mount |
| Metoda hlađenja | Vazduh |
| Fan Size (Included/Supported) | 120mm (Rear included), Supports 120mm/140mm |
| Maksimalna dužina GPU-a | 320mm |
| Maksimalna visina CPU hladnjaka | 165mm |
| Max PSU Length | 160mm |
| 3.5" HDD Support | 2 |
| 2.5" SSD Support | 4/6 (depending on configuration) |
| Podrška prednjeg ventilatora | 3 x 120 mm ili 3 x 140 mm |
| Top Fan Support | 2 x 120 mm ili 2 x 140 mm |
| Rear Fan Support | 1 x 120 mm |
| Prednji nosač hladnjaka | Up to 280mm/360mm |
| Vrhunska podrška za radijatore | 2 x 120mm (from image) |
| Podrška stražnjeg hladnjaka | 1 x 120mm (from image) |
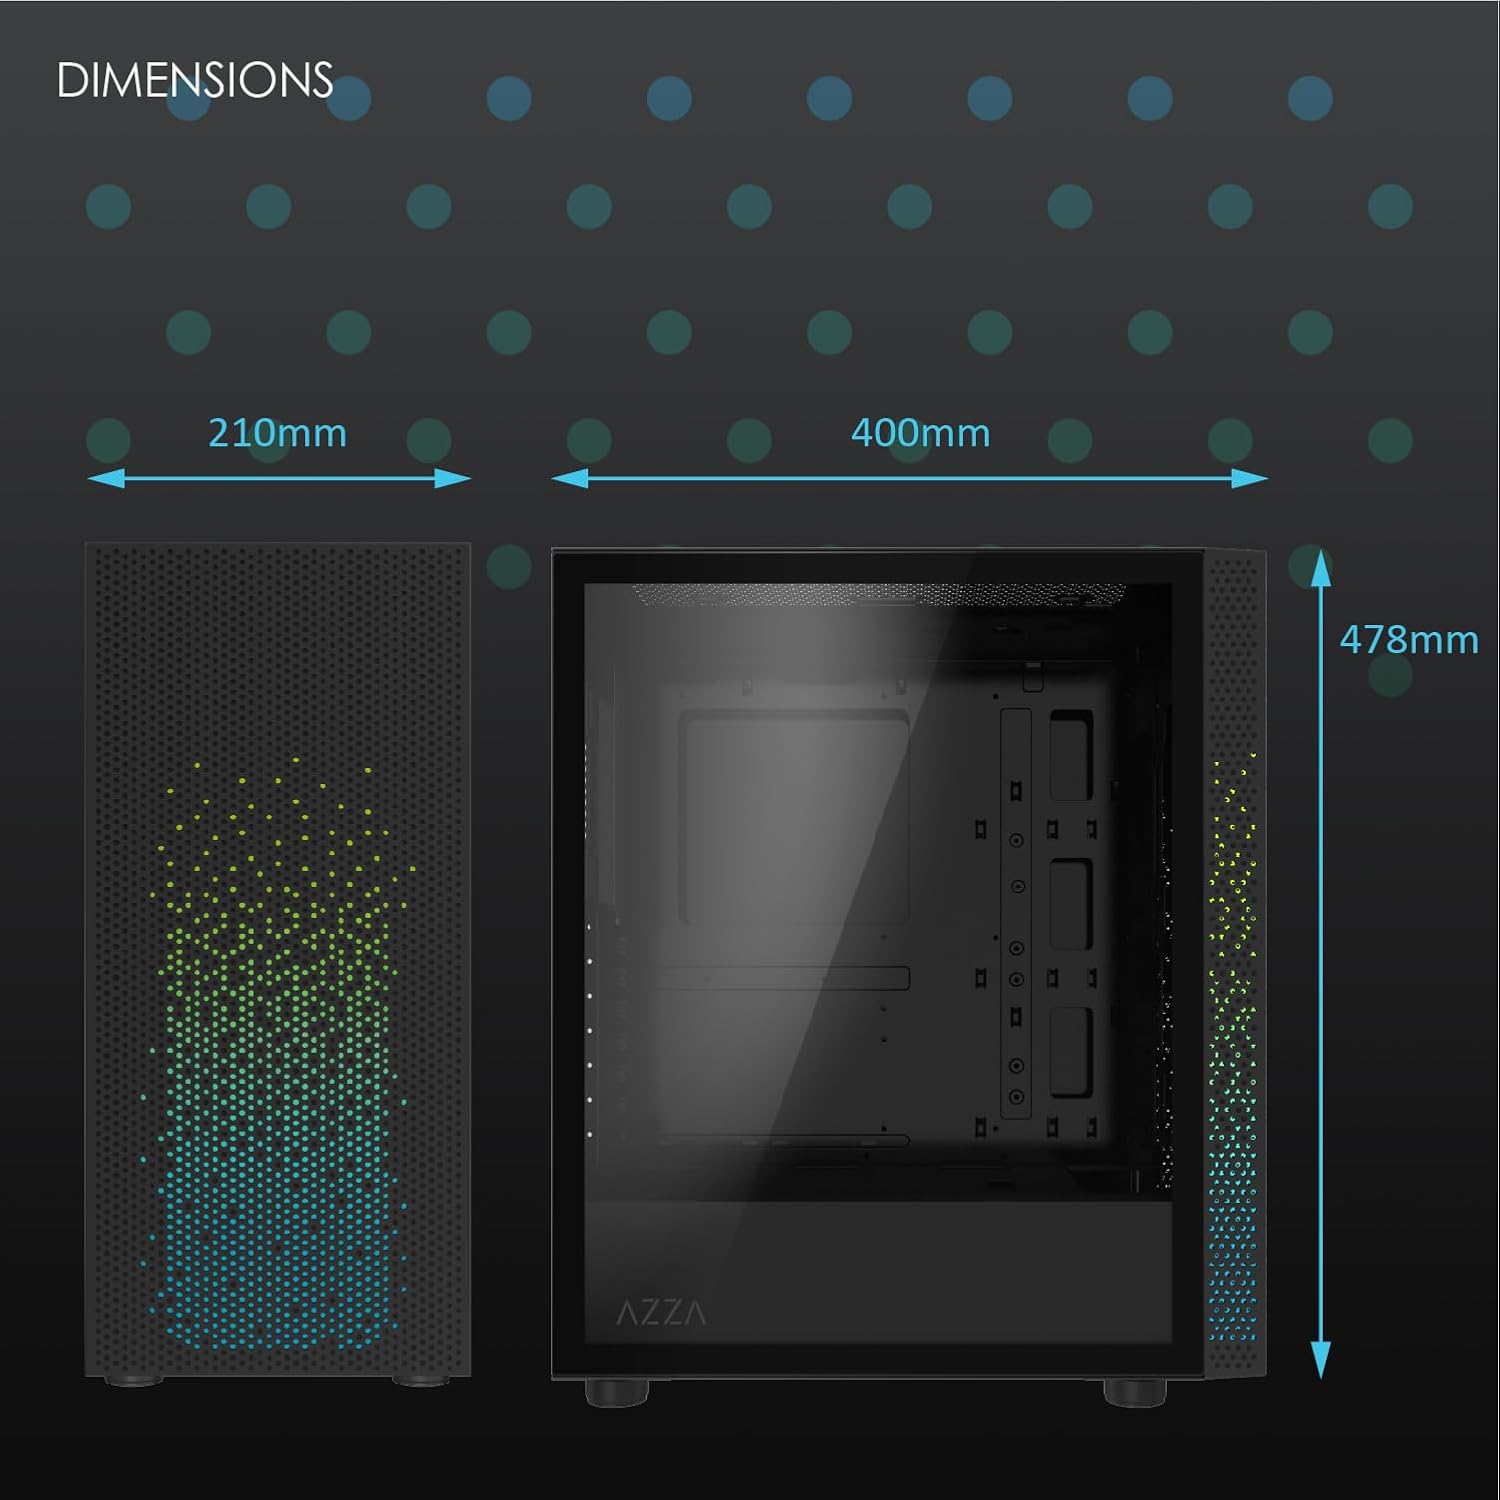
Slika 2: Physical dimensions of the AZZA CSAZ-340F CELESTA case: 210mm (width), 400mm (depth), 478mm (height).

Slika 3: Diagram illustrating fan and radiator mounting options for the AZZA CSAZ-340F CELESTA case, including front, top, and rear configurations.

Slika 4: Internal component support diagram for the AZZA CSAZ-340F CELESTA, showing maximum dimensions for CPU cooler, GPU, and PSU, along with drive bay locations.
5. Postavljanje i instalacija
Follow these steps to install your components into the AZZA CSAZ-340F CELESTA case.
5.1 Priprema slučaja
- Postavite kućište na ravnu, stabilnu površinu.
- Remove the side panels. Typically, these are secured with thumbscrews at the rear of the case.
5.2 Instalacija matične ploče
- Install the I/O shield (if not pre-installed) into the rear opening of the case.
- Ensure the correct standoffs are installed for your ATX, Micro-ATX, or Mini-ITX motherboard. Adjust or add standoffs as needed using the provided tools.
- Pažljivo postavite matičnu ploču na odstojnike, poravnavajući rupe za vijke.
- Secure the motherboard with the appropriate screws from the accessory box. Do not overtighten.
5.3 Instalacija jedinice za napajanje (PSU).
- Position the PSU in the bottom rear compartment of the case, ensuring the fan faces downwards (if there's a filtered vent) or upwards.
- Secure the PSU to the case with the provided screws from the rear.
- Route the necessary power cables through the cable management cutouts.
5.4 Instalacija diska za pohranu podataka (HDD/SSD)
- 3.5" tvrdi diskovi: Locate the drive cage. Slide the 3.5" HDDs into the drive trays and secure them, often tool-less or with screws.
- 2.5" SSD diskovi: Mount 2.5" SSDs to the dedicated mounting points on the motherboard tray or drive cage using screws.
- Connect SATA data and power cables to the installed drives.
5.5 Instalacija grafičke kartice (GPU)
- Uklonite potrebne poklopce PCIe utora sa stražnje strane kućišta.
- Carefully insert your graphics card into the appropriate PCIe slot on the motherboard until it clicks into place.
- Pričvrstite grafičku karticu na kućište vijcima.
- Connect any required PCIe power cables from the PSU to the graphics card.
5.6 Instalacija hladnjaka procesora
Install your CPU cooler according to its specific manufacturer instructions. Ensure it does not exceed the maximum height of 165mm.
5.7 Ugradnja ventilatora i radijatora
Kućište podržava različite konfiguracije ventilatora i radijatora:
- Prednji dio: Up to 3 x 120mm or 3 x 140mm fans, or radiators up to 280mm/360mm.
- Vrh: Up to 2 x 120mm or 2 x 140mm fans, or 2 x 120mm radiators.
- pozadi: 1 x 120mm fan (pre-installed) or 1 x 120mm radiator.
Mount fans and radiators using the appropriate screws and ensure proper airflow direction.
5.8 Upravljanje kablovima
Koristite izreze za upravljanje kablovima i tačke za vezivanje iza ležišta matične ploče za usmjeravanje i pričvršćivanje kablova. Ovo poboljšava protok vazduha i estetiku.
5.9 Završna skupština
- Double-check all connections and ensure no cables are obstructing fans.
- Reattach the side panels.
- Connect external peripherals (monitor, keyboard, mouse, etc.) and the power cable.
6. Upravljanje vašim sistemom
Once all components are installed and connected, you can power on your system. The front panel features power and reset buttons, along with USB and audio ports for convenient access.

Slika 5: Close-up of the AZZA CSAZ-340F CELESTA's front panel, highlighting the integrated lighting effects.
7. Održavanje
- Filteri za prašinu: Regularly clean the dust filters (if present) to maintain optimal airflow and cooling performance.
- Čišćenje unutrašnjosti: Periodically open the case and use compressed air to remove dust from components and fans. Ensure the system is powered off and unplugged before cleaning.
- Eksterijerno čišćenje: Obrišite vanjske površine mekom krpom, damp tkanina. Izbjegavajte jake hemikalije.
8. Otkrivanje problema
Ako naiđete na probleme, razmotrite sljedeće uobičajene korake za rješavanje problema:
- Sistem se ne uključuje:
- Provjerite je li kabel za napajanje sigurno spojen i na PSU i na zidnu utičnicu.
- Check that the PSU switch is in the "ON" position.
- Verify all internal power connections (24-pin ATX, 8-pin CPU, PCIe power) are seated correctly.
- Confirm front panel power button cables are correctly connected to the motherboard.
- Nema izlaza za prikaz:
- Provjerite je li vaš monitor povezan s grafičkom karticom (ne s integriranim grafičkim portovima matične ploče, osim ako ne koristite integriranu grafiku).
- Ponovo umetnite grafičku karticu u njen PCIe slot.
- Provjerite odabir ulaza monitora.
- pregrijavanje:
- Verify all case fans are spinning and oriented correctly for airflow.
- Očistite sve filtere za prašinu i unutrašnje komponente.
- Ensure CPU cooler is properly seated and making good contact with the CPU.
9. Garancija i podrška
For warranty information and technical support, please refer to the official AZZA website or contact AZZA customer service directly. Keep your proof of purchase for warranty claims.
AZZA Official Webstranica: www.azza.com