1. Uvod
This manual provides detailed instructions for the installation, operation, and maintenance of your VIISAN VF3240 Large Format Flatbed Scanner. Please read this manual thoroughly before using the device to ensure proper functionality and to prevent damage.
The VIISAN VF3240 is an A3 large format flatbed scanner designed for high-quality scanning of various documents and media, including photos, books, magazines, newspapers, and CAD drawings. It supports scanning items up to 12'' x 17'' (297 x 420 mm).
2. Proizvod je gotovview
2.1 Ključne karakteristike
- Large Format Scanning: A3 size (297 x 420 mm / 11.7" x 16.7") for various documents and media.
- visoka rezolucija: Maximum optical resolution of 2400 x 2400 dpi with 48-bit color depth.
- Velika brzina skeniranja: Scans an A3-sized color document in approximately 4 seconds at 200 dpi.
- Dizajn prilagođen korisniku: Frameless and narrow boundary design, with four-panel buttons for quick functions (Scan, Email, Print, PDF).
- Funkcija automatskog skeniranja: Automatically initiates scanning when the scanner lid is closed, enhancing continuous scanning efficiency.
- LED izvor svjetla: Energy-efficient with no warm-up time required.
- Adjustable Lid: Designed to accommodate scanning of thick books and bound materials.
- CIS Sensor: Utilizes a Contact Image Sensor, suitable for scanning flat paper images. Not recommended for three-dimensional objects.
2.2 Package Contents (In The Box)
Provjerite da li su sve stavke prisutne u paketu:
- VIISAN VF3240 Flatbed Scanner
- Adapter za napajanje
- USB kabel
- Installation Disc (containing drivers and software)

Image: Contents of the VIISAN VF3240 package, including the scanner, power adapter, USB cable, and installation disc.
3. Podešavanje
3.1 Instalacija hardvera
- Raspakujte skener: Pažljivo izvadite skener i svu dodatnu opremu iz ambalaže.
- Postavite skener: Position the scanner on a stable, flat surface near your computer. Ensure adequate space for opening the scanner lid.
- Priključite napajanje: Connect the power adapter to the scanner's power input port, then plug the adapter into an electrical outlet.
- Povežite se na računar: Connect one end of the provided USB cable to the scanner's USB port and the other end to an available USB port on your computer.

Image: The VIISAN VF3240 scanner with a document being scanned, illustrating its large format capability.
3.2 Instalacija softvera
The VIISAN VF3240 requires driver and software installation for full functionality. Use the provided installation disc or download the latest software from the official VIISAN website.
- Insert Installation Disc: If using the disc, insert it into your computer's CD/DVD drive. The installer should launch automatically. If not, navigate to the disc drive and run the setup file.
- Preuzimanje softvera (alternativa): If your computer lacks a disc drive or for the latest versions, visit the official VIISAN website. Navigate to the support or download section for the VF3240 model.
- Slijedite uputstva na ekranu: Proceed with the installation wizard, accepting license agreements and choosing installation locations as prompted.
- Ponovo pokrenite računar: After installation is complete, it is recommended to restart your computer to ensure all drivers are properly loaded.

Image: Guide for downloading VIISAN OfficeCam software from the official website, illustrating product and software selection.
Kompatibilnost drajvera:
- Windows: Supports TWAIN and WIA drivers. Compatible with Windows 7/8.1/10/11. For 2400 dpi scanning, use the supplied ViiScan software. Note that WIA currently supports up to 600 dpi due to Microsoft limitations.
- macOS: Supports ICA (Image Capture) driver. Compatible with macOS 10.15 or later. The VF3240 scanner software can achieve 2400 dpi for full-size A3 documents on macOS.

Image: Driver and software compatibility table for Windows and macOS, detailing supported versions and software.

Image: The VIISAN VF3240 scanner interface within the macOS Image Capture application, demonstrating M1/M2 Mac compatibility.
4. Uputstvo za upotrebu
4.1 Osnovni postupak skeniranja
- Uključeno: Press the Power button on the scanner. The indicator light will illuminate.
- Mjesto dokumenta: Lift the scanner lid and place the document face down on the scanner glass. Align the document with the corner guide. For thick items like books, the lid can be slightly raised to accommodate.
- Zatvori poklopac: Lagano zatvorite poklopac skenera.
- Pokreni skeniranje:
- Using Scanner Buttons: Press one of the four function buttons on the scanner (Scan, Email, Print, PDF) to perform a quick action.
- Korištenje softvera: Open the ViiScan software (Windows) or Image Capture (macOS) on your computer and select the desired scanning options (resolution, color mode, file format, destination). Click the "Scan" button within the software.
- Funkcija automatskog skeniranja: If enabled in the software, the scanner can automatically begin scanning when the lid is closed, facilitating continuous scanning.
- Retrieve Scan: Once scanning is complete, the image will be saved to the specified location on your computer.

Image: The VIISAN VF3240 scanner with an A3 document on the flatbed, highlighting its large scanning area and frameless design.

Image: The scanner's one-touch buttons for various functions (Power, Print, Email, PDF, Scan) and supported output file formats like BMP, PNG, JPEG, PDF, TIF, GIF, and multi-page PDF/TIF.
4.2 Scanning Thick Materials
The VIISAN VF3240 features an adjustable lid design, allowing it to scan thick items such as books or magazines without damaging the binding or the scanner. Simply lift the lid to the desired height and place the item on the glass. The lid will rest gently on the item, ensuring even pressure during scanning.

Image: The adjustable lid of the VIISAN VF3240 scanner, demonstrating its ability to scan thick books up to 2.4 cm.
4.3 Resolution and Quality Settings
The scanner offers various resolution settings to suit different scanning needs. Higher DPI (dots per inch) results in more detailed images but also larger file sizes and longer scanning times.
| DPI | Tipična upotreba | Scan Speed (A3 Color) |
|---|---|---|
| 100-300 dpi | Simple papers, cards, documents for quick digital archiving. | ~4-6 seconds |
| 600 dpi | Documents with photos, detailed text, general purpose high-quality scans. | ~21 sekundi |
| 1200-2400 dpi | Artwork, publications, photos for professional use or high-detail preservation. | ~100-400 seconds (depending on area and OS) |
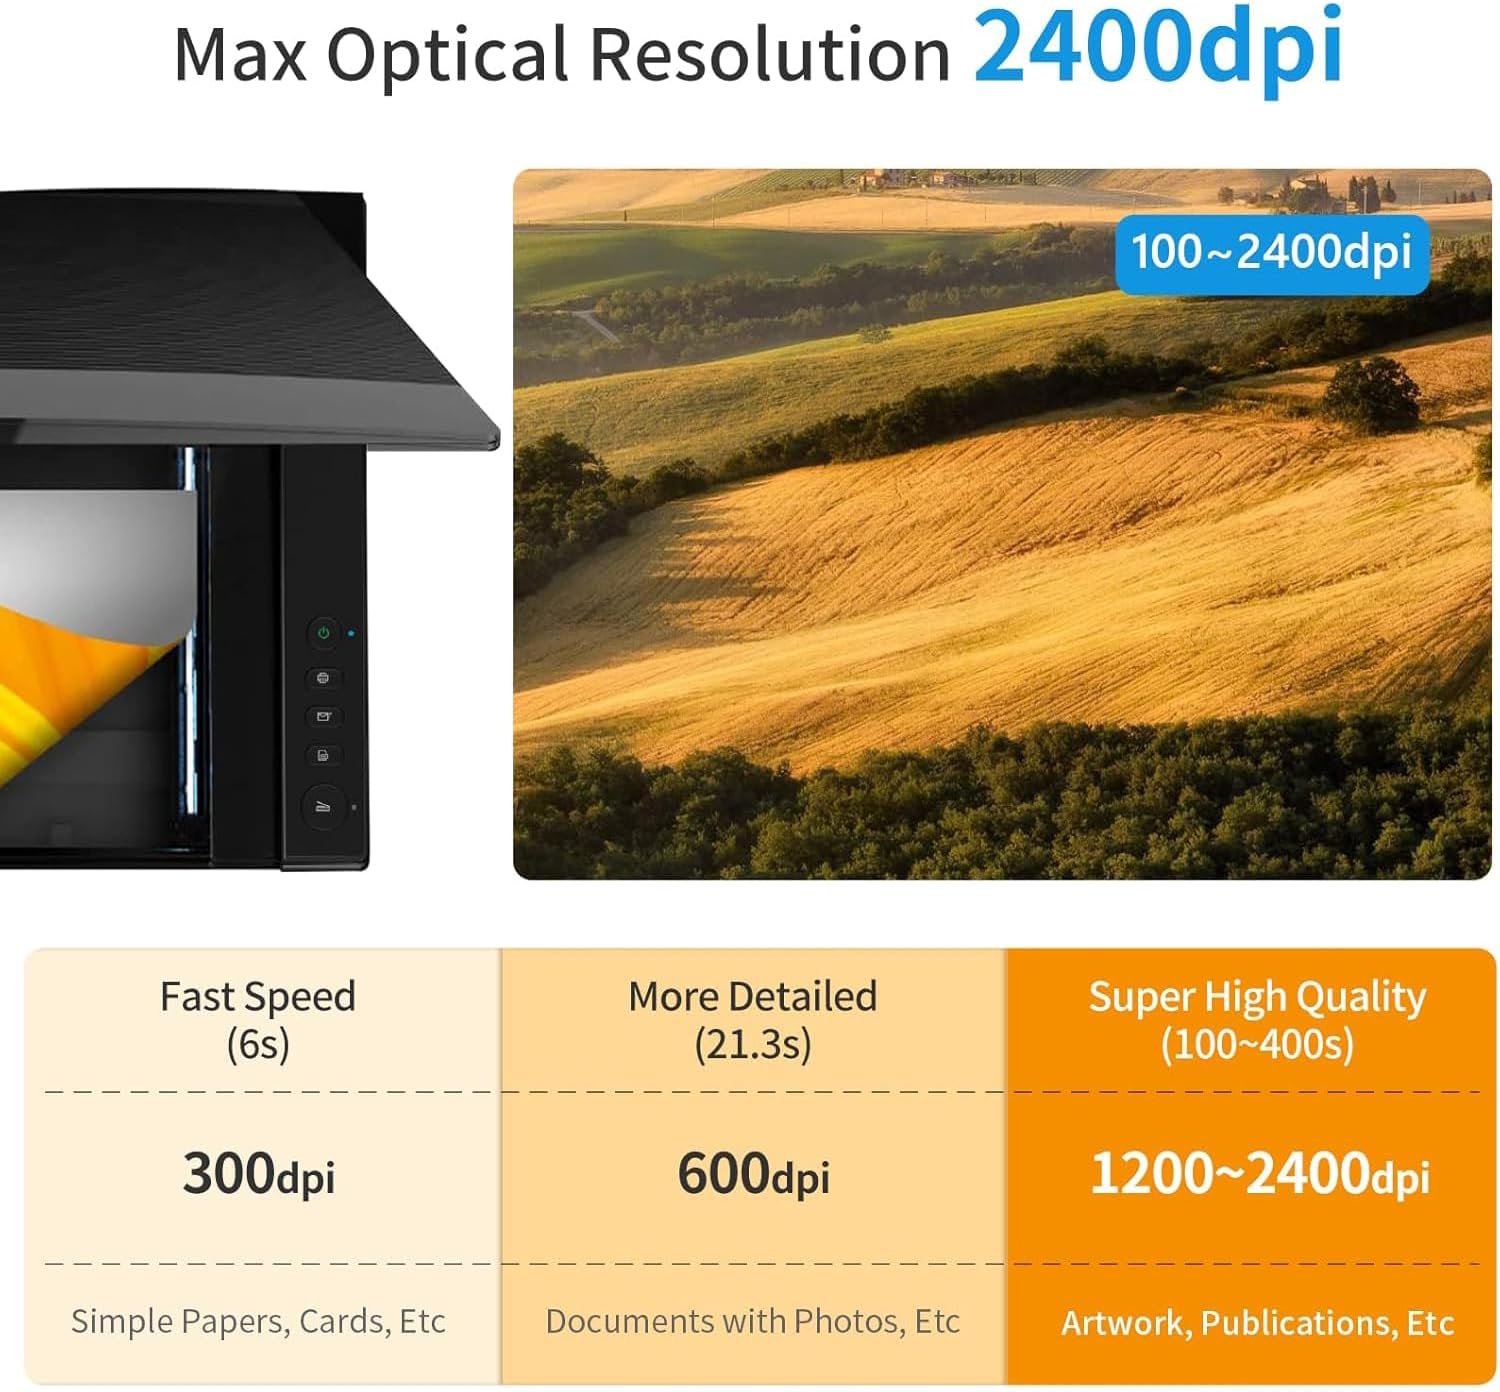
Image: Visual representation of scan quality and speed at various DPI settings, from 300dpi to 2400dpi.

Image: Detailed comparison of scan quality at 600 dpi and 2400 dpi, illustrating the enhanced detail captured at higher resolutions.
5. Održavanje
5.1 Čišćenje skenera
Regular cleaning helps maintain optimal scan quality. Dust or debris on the scanner glass can cause lines or spots on scanned images.
- Iskljuciti: Ensure the scanner is powered off and unplugged from the electrical outlet before cleaning.
- Čista staklena površina: Lagano koristite meku krpu koja ne ostavlja dlačice dampened with a mild, non-abrasive glass cleaner. Wipe the scanner glass gently. Avoid spraying cleaner directly onto the glass.
- Čista spoljašnjost: Obrišite vanjski dio skenera mekom, suhom krpom.
- Ostavite da se osuši: Ensure all surfaces are completely dry before plugging the scanner back in and powering it on.
Važna napomena: If white lines appear during scanning, it often indicates that the scanner glass needs cleaning. Refer to the troubleshooting section or contact customer service for guidance on proper cleaning procedures if the issue persists.
6. Otkrivanje problema
6.1 Uobičajeni problemi i rješenja
- Skener se ne uključuje:
- Check if the power adapter is securely connected to both the scanner and a working electrical outlet.
- Ensure the power button on the scanner is pressed.
- Scanner Not Detected by Computer:
- Verify the USB cable is securely connected to both the scanner and the computer. Try a different USB port.
- Ensure the scanner drivers are correctly installed. Reinstall drivers if necessary.
- Ponovo pokrenite računar.
- White Lines or Spots on Scanned Images:
- This typically indicates dust or smudges on the scanner glass. Refer to Section 5.1 for cleaning instructions.
- If the issue persists after cleaning, contact customer support.
- Blurred Areas in Scans:
- Ensure the document is laid perfectly flat on the scanner glass. Folds or uneven surfaces can cause blurriness, especially with CIS sensors.
- Verify the scanner lid is fully closed or resting evenly on the document.
- Spora brzina skeniranja:
- Check the selected DPI setting. Higher resolutions (e.g., 2400 dpi) will naturally take longer.
- Ensure your computer meets the minimum system requirements and has sufficient free RAM and processor power.
7. Specifikacije
| Feature | Detalj |
|---|---|
| Naziv modela | VIISAN VF3240 |
| Tip skenera | Flatbed, Photo, Document, Book |
| Max Scan Size | A3 (297 x 420 mm / 11.7" x 16.7") |
| Optička rezolucija | 2400 x 2400 dpi |
| Dubina boje | 48-bitni |
| Tip senzora | CIS (senzor slike za kontakt) |
| Brzina skeniranja | ~4 seconds (A3 color, 200 dpi) |
| Povezivanje | USB |
| Dimenzije proizvoda | 15.51"D x 22.24"Š x 2.4"V (39.4 x 56.5 x 6.1 cm) |
| Težina artikla | 14.65 funte (6.65 kg) |
| Wattage | 9 vati |
| Podržani OS | Windows 7/8.1/10/11, macOS 10.15 or later |
8. Garancija i podrška
8.1 Ograničena garancija
The VIISAN VF3240 scanner comes with a 1 godine ograničene garancije covering non-man-made damage from the date of purchase. Please retain your proof of purchase for warranty claims.
This warranty does not cover damage resulting from misuse, accidents, unauthorized modifications, or failure to follow the instructions in this manual.
8.2 Korisnička podrška
For technical assistance, usage guidance, software updates, or warranty inquiries, please contact VIISAN customer service:
- Email: info@viisan.com
- Importer Support Email: support@spedaltech.com
When contacting support, please provide your product model (VF3240) and a detailed description of the issue.


Image: VIISAN warranty and customer support details, including contact information.


