1. Uvod
Thank you for choosing the PETLIBRO Automatic Pet Feeder PLAF001. This device is designed to provide scheduled and portion-controlled meals for your cat or small to medium-sized dog, ensuring a healthy and consistent feeding routine. This manual will guide you through the setup, operation, and maintenance of your new pet feeder.
Opis videa: Ovaj video pruža opći pregledview of the PETLIBRO Automatic Pet Feeder, showcasing its features and benefits in a home environment with pets.
2. Proizvod je gotovview
The PETLIBRO Automatic Pet Feeder PLAF001 offers several key features to enhance your pet's feeding experience:
- Timed and Measured Feeding: Schedule 1-4 meals per day with 1-9 portions per meal, promoting healthy eating habits and preventing overfeeding.
- 4L Visible Food Tank: A large, semi-transparent tank allows for easy monitoring of food levels without opening the lid.
- 10-Second Voice Recording: Record a personalized message to call your pet at meal times, providing comfort and familiarity.
- Freshness Preservation: The top lid features a lock function and a built-in desiccant bag holder to keep food fresh and secure from pets.
- Easy-to-Clean Stainless Steel Bowl: The removable stainless steel bowl is durable and easy to clean, promoting hygiene.
- 2-Way Power Supply: Operates via a 5V AC adapter or 3 D-cell alkaline batteries (sold separately) for uninterrupted feeding, even during power outages.

Opis slike: The PETLIBRO Automatic Pet Feeder PLAF001, a white unit with a digital display and a stainless steel food bowl filled with kibble.

Opis slike: A cat eating from the PETLIBRO feeder, illustrating the timed and measured feeding feature with icons for meal frequency and portion size.

Opis slike: A cat eating from the feeder, highlighting the 10-second voice recording feature that plays during meal times.

Opis slike: Krupni plan view of the feeder's lid, showing the compartment for the desiccant bag to keep pet food fresh.
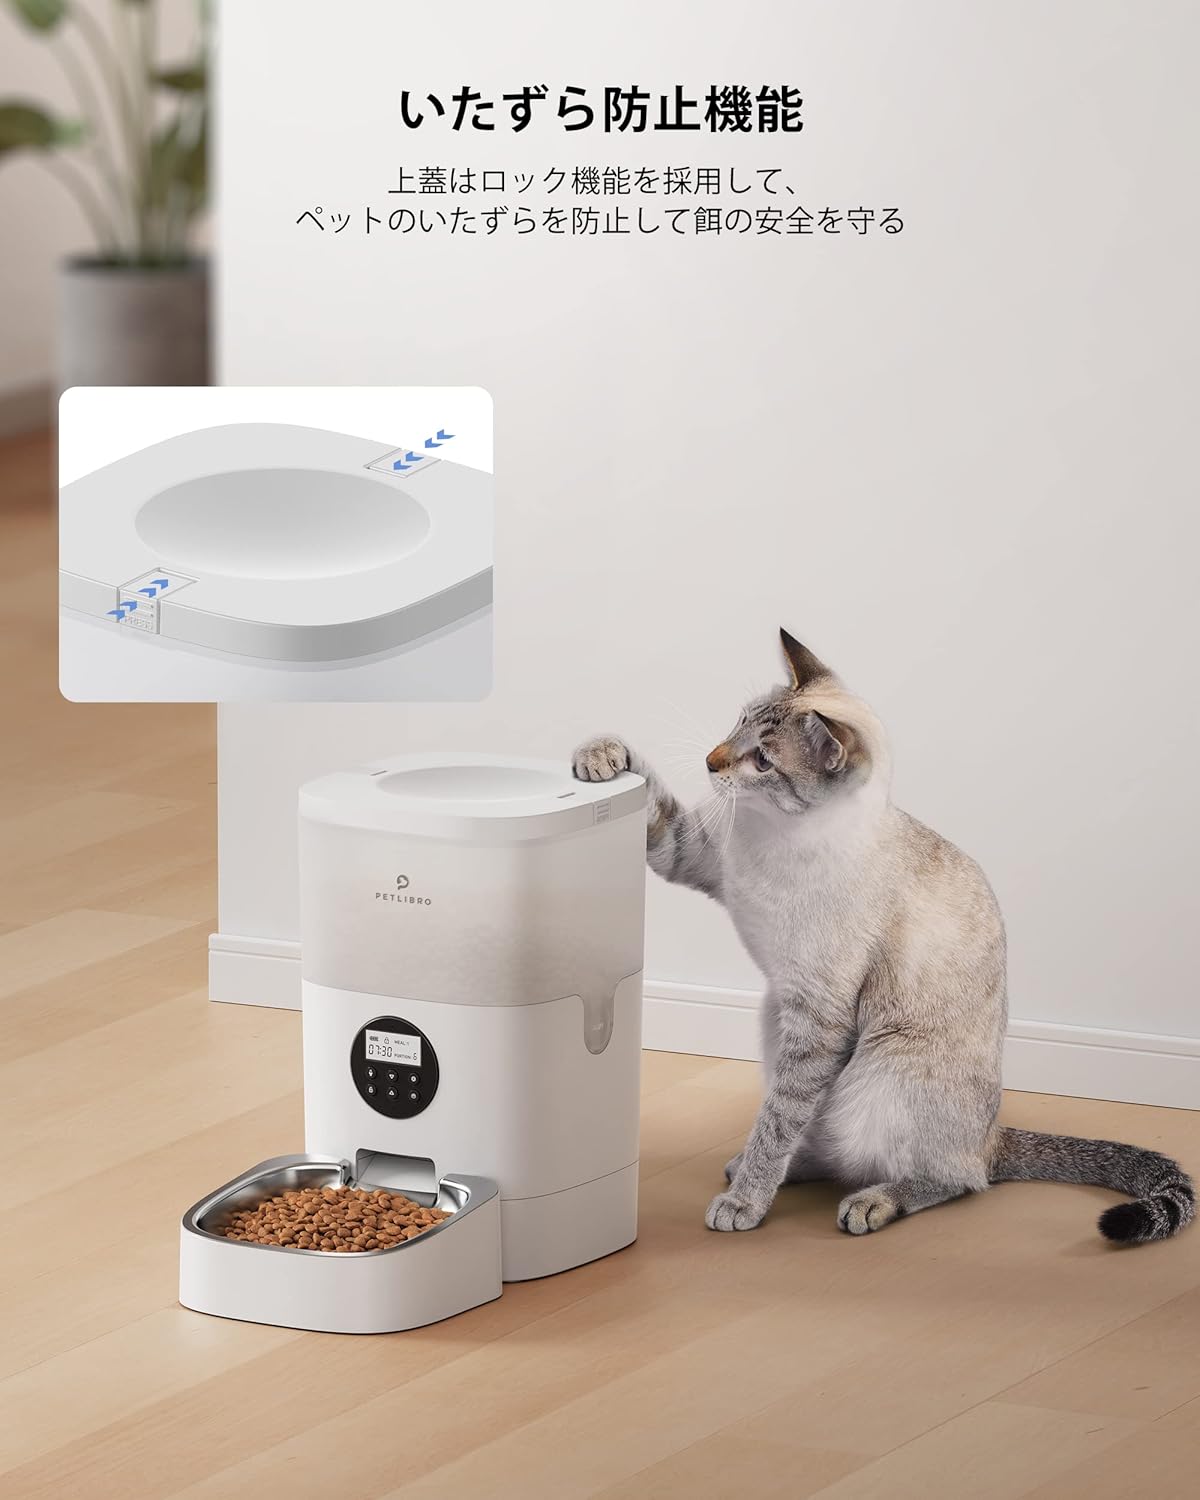
Opis slike: A cat attempting to open the feeder's lid, demonstrating the tamper-proof lock mechanism.

Opis slike: A cat eating from the feeder's stainless steel bowl, which is designed with an 8-degree tilt for ergonomic feeding.

Opis slike: The PETLIBRO feeder with an overlay indicating its 4-liter food capacity.
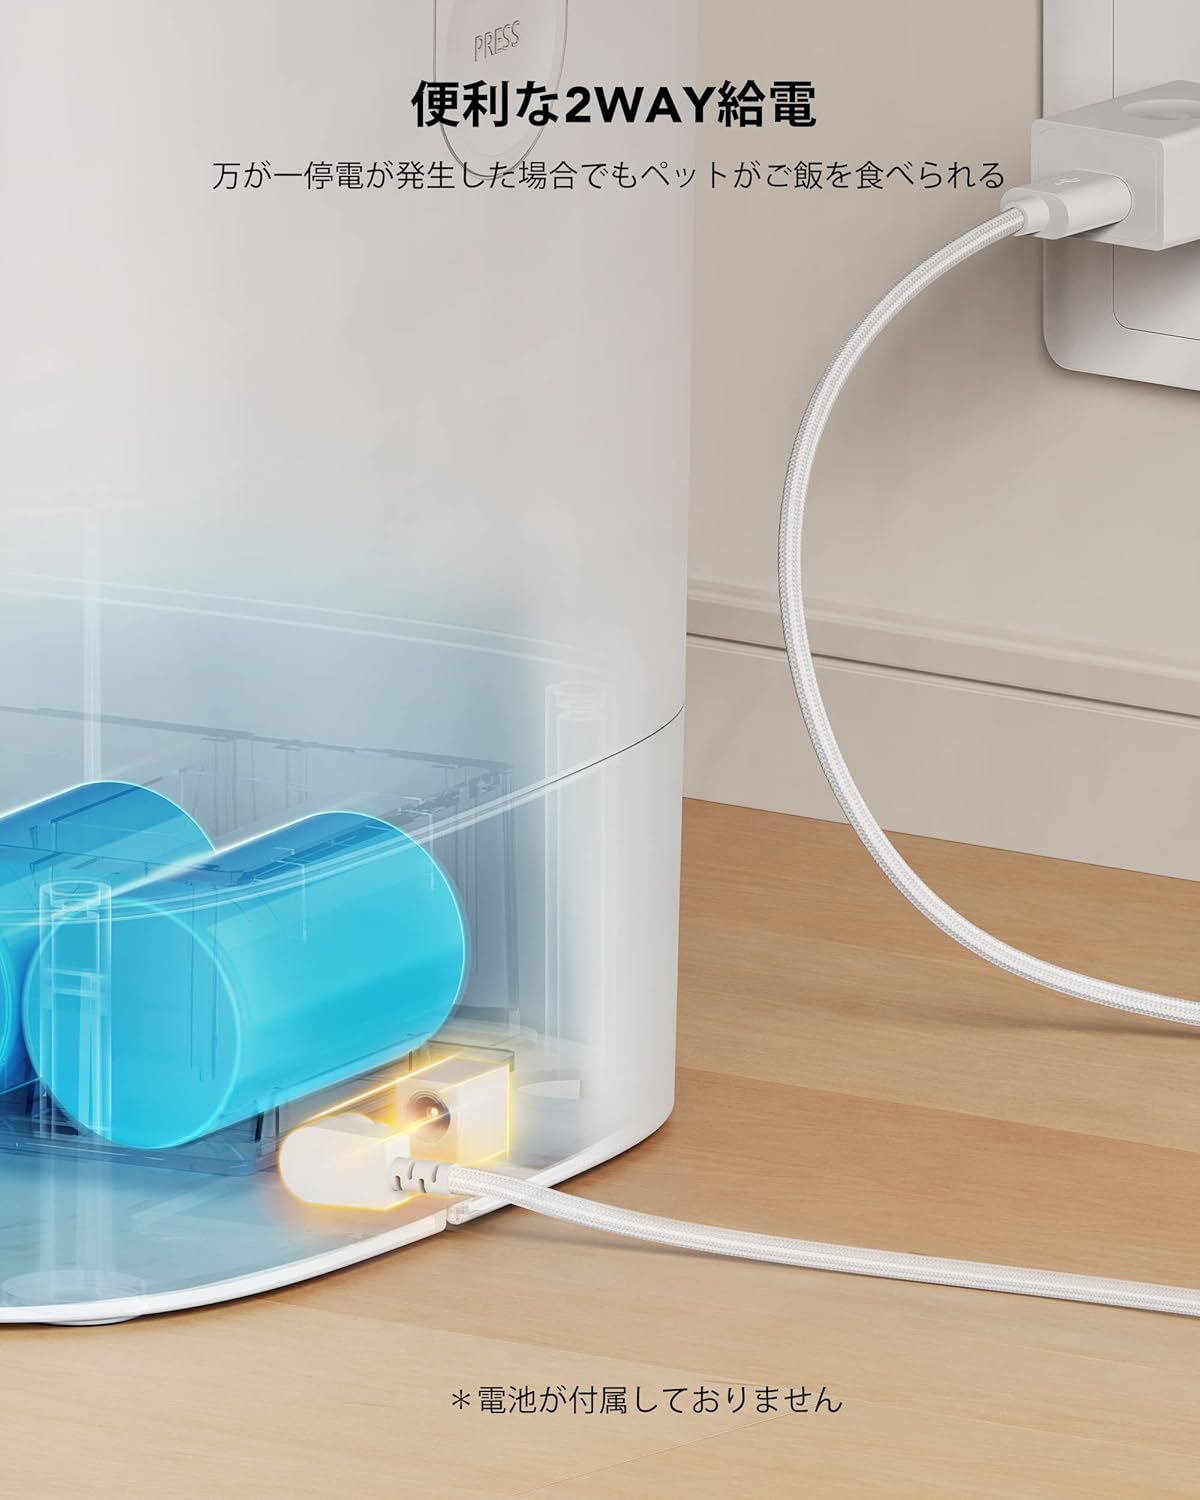
Opis slike: An image illustrating the two-way power supply options for the feeder: AC adapter and battery backup.
3. Vodič za postavljanje
3.1 Raspakivanje i početna montaža
Carefully remove all components from the packaging. Ensure you have the main feeder unit, food tray, power adapter, and desiccant bag.
Opis videa: This video demonstrates the assembly and program setup for the PETLIBRO Automatic Feeder, including unboxing, power connection, and basic settings.
3.2 Napajanje dodavača
Dodavač se može napajati na dva načina:
- AC adapter: Connect the 5V AC adapter to the power port on the back of the feeder and plug it into a wall outlet.
- Rezervna kopija baterije: Za snagu outage protection, install three D-cell alkaline batteries (not included) into the battery compartment on the bottom of the feeder. The feeder will automatically switch to battery power if AC power is lost.
3.3 Food Tray Installation
Attach the stainless steel food bowl to the main unit. Ensure it clicks securely into place.
3.4 Adding Pet Food and Desiccant
- Otvorite gornji poklopac hranilice.
- Pour dry pet food into the food tank. Ensure the kibble size is between 2-10mm (0.07-0.4 inches).
- Place a desiccant bag into the designated holder under the lid to maintain food freshness.
- Close the lid securely until it locks.
4. Uputstvo za upotrebu
4.1 Podešavanje trenutnog vremena
To set the current time on your feeder:
- Pritisnite i držite dugme za zaključavanje (🔒) for 3 seconds to unlock the control panel.
- Press the settings button (⚙️). The hour display will flash.
- Iskoristite gore (△) i dolje (▽) buttons to adjust the hour.
- Press the settings button (⚙️) again to move to the minute display, then adjust with the up/down buttons.
- Press the settings button (⚙️) one more time to save the current time.
4.2 Setting Number of Meals
To set the number of meals per day:
- Proverite da li je kontrolna tabla otključana.
- Press the settings button (⚙️) until "MEAL" flashes on the display.
- Iskoristite gore (△) i dolje (▽) buttons to select the desired number of meals (1-4).
- Press the settings button (⚙️) da sačuvate.
4.3 Setting Meal Schedule (Time & Portion)
To set the time and portion size for each meal:
- Proverite da li je kontrolna tabla otključana.
- Press the settings button (⚙️) until "MEAL 1" flashes.
- Iskoristite gore (△) i dolje (▽) buttons to set the hour for Meal 1. Press settings to confirm.
- Adjust the minutes for Meal 1 using the up/down buttons. Press settings to confirm.
- Adjust the portion size (1-9) for Meal 1 using the up/down buttons. Press settings to confirm.
- Repeat steps 2-5 for MEAL 2, MEAL 3, and MEAL 4 as needed.
- Press the settings button (⚙️) to exit the settings menu and save all changes.
4.4 Recording a Meal Call
You can record a 10-second voice message to play during meal times:
- Proverite da li je kontrolna tabla otključana.
- Press and hold the microphone button (🎤) for 3 seconds. The microphone icon will flash, indicating recording has started.
- Izgovorite svoju poruku u mikrofon.
- Release the microphone button to stop recording. A "DiDi" sound confirms the recording is saved.
- Press the microphone button once to play back your recording.
4.5 Ručno hranjenje
To dispense food manually:
- Proverite da li je kontrolna tabla otključana.
- Press the manual feed button (🍽️) once to dispense one portion of food.
- You can press the button multiple times for additional portions.
5. Održavanje
5.1 Čišćenje ulagača
Regular cleaning ensures hygiene and proper function. All parts that come into direct contact with food can be washed, except for the base unit.
- Ensure the food tank is empty before disassembling.
- Remove the food tank by pressing the tabs and lifting upwards.
- Remove the stainless steel bowl and its holder.
- Wash the food tank, lid, food bowl, and bowl holder with mild soap and water. Rinse thoroughly and dry completely before reassembly.
- Do not wash the main base unit, as it contains electronic components. Wipe it with a damp krpom ako je potrebno.

Opis slike: A visual guide demonstrating the four steps to disassemble the PETLIBRO feeder for thorough cleaning, excluding the base.
5.2 Rotor and Paddle Replacement
If the food dispensing rotor or paddle needs replacement, follow these steps:
Opis videa: This video provides a detailed guide on how to replace the paddle and rotor components of the PETLIBRO Automatic Feeder.
- Remove the food tank from the base unit.
- Using a screwdriver, loosen the four screws on the rotor cover.
- Remove the rotor cover.
- Carefully remove the old rotor and paddle.
- Place the new paddle and rotor into position, ensuring they are correctly aligned.
- Secure the new components by tightening the screws on the rotor cover.
- Reattach the food tank to the base unit.
6. Specifikacije
| Feature | Detalj |
|---|---|
| Broj modela proizvoda | PLAF001 |
| Pet Type | Medium-sized breeds (Dogs, Cats) |
| Život kućnih ljubimaca Stage | Cijeli život stages |
| Boja | White (Transparent Tank) |
| Veličina | AF001-12W |
| Posebne karakteristike | Voice Recording, Timer Function, 4L Large Capacity, 10-second Voice Recording, 2-Way Power Supply, Built-in Desiccant |
| Upotreba baterije | No (Batteries sold separately for backup) |
| Materijal | Body: Food-grade ABS resin, Bowl: Stainless steel |
7. Otkrivanje problema
If you encounter any issues with your PETLIBRO Automatic Pet Feeder, please refer to the following common problems and solutions:
- Hranilica ne daje hranu: Check if the food tank is empty, if the kibble size is appropriate (2-10mm), or if there's a jam in the dispenser. Ensure the power supply is connected and working.
- Ekran ne radi: Verify the power connection. If using batteries, check if they are installed correctly and have sufficient charge.
- Settings not saving: Ensure you press the settings button (⚙️) to confirm and save changes after adjusting each setting.
- Glasovni snimak se ne reproducira: Check if the recording was saved successfully (indicated by a "DiDi" sound). Ensure the volume is not set to zero.
- Food getting stale: Replace the desiccant bag regularly (every 2-4 weeks) and ensure the lid is securely closed.
Ako problem i dalje postoji, obratite se korisničkoj podršci.
8. Garancija i podrška
Your PETLIBRO Automatic Pet Feeder PLAF001 comes with a manufacturer's warranty. Please refer to the warranty card included in your packaging for specific terms and conditions.
For technical support, troubleshooting assistance, or warranty claims, please contact PETLIBRO customer service through their official webweb-mjesto ili kontakt informacije navedene u dokumentaciji vašeg proizvoda.