1. Uvod
The COMICA BoomX-D2 is a 2.4G digital RF wireless microphone system designed for high-quality audio recording. It features two transmitters and one receiver, offering stable transmission up to 650 feet (200 meters). This system is ideal for various applications including YouTube video recording, live streaming, interviews, and more, providing clear and reliable audio performance.
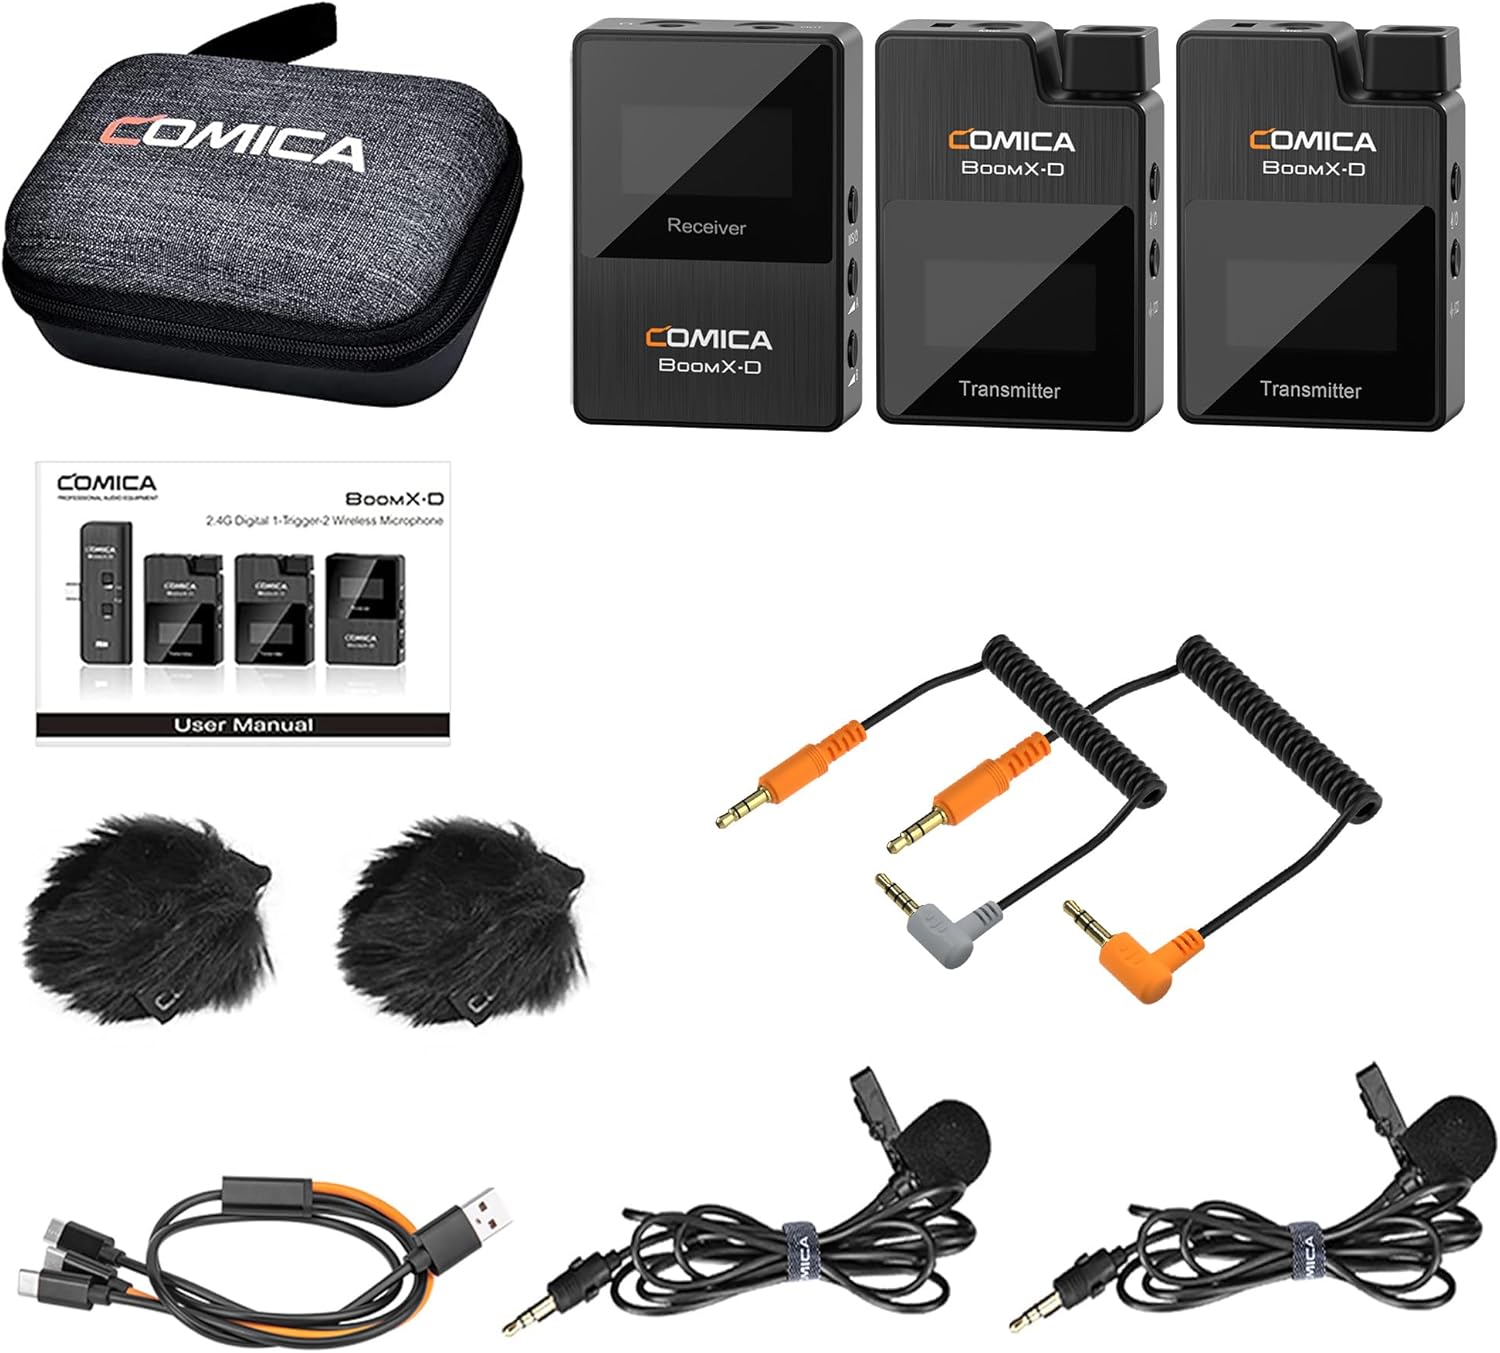
2. Sadržaj paketa
Molimo Vas da provjerite da li se u Vašem paketu nalaze sve dolje navedene stavke:
- 2 x predajnika (TX)
- 1 x prijemnik (RX)
- 1 x 3-in-1 USB A to USB C Charging Cable
- 2 x 3.5mm Lavalier Microphones
- 1 x 3.5mm TRS-TRRS Audio Cable (for smartphones)
- 1 x 3.5mm TRS-TRS Audio Cable (for cameras)
- 1 x torbica za nošenje
- 2 x Wind Muffs (for built-in microphones)
- 1 x Korisnički priručnik (fizička kopija)
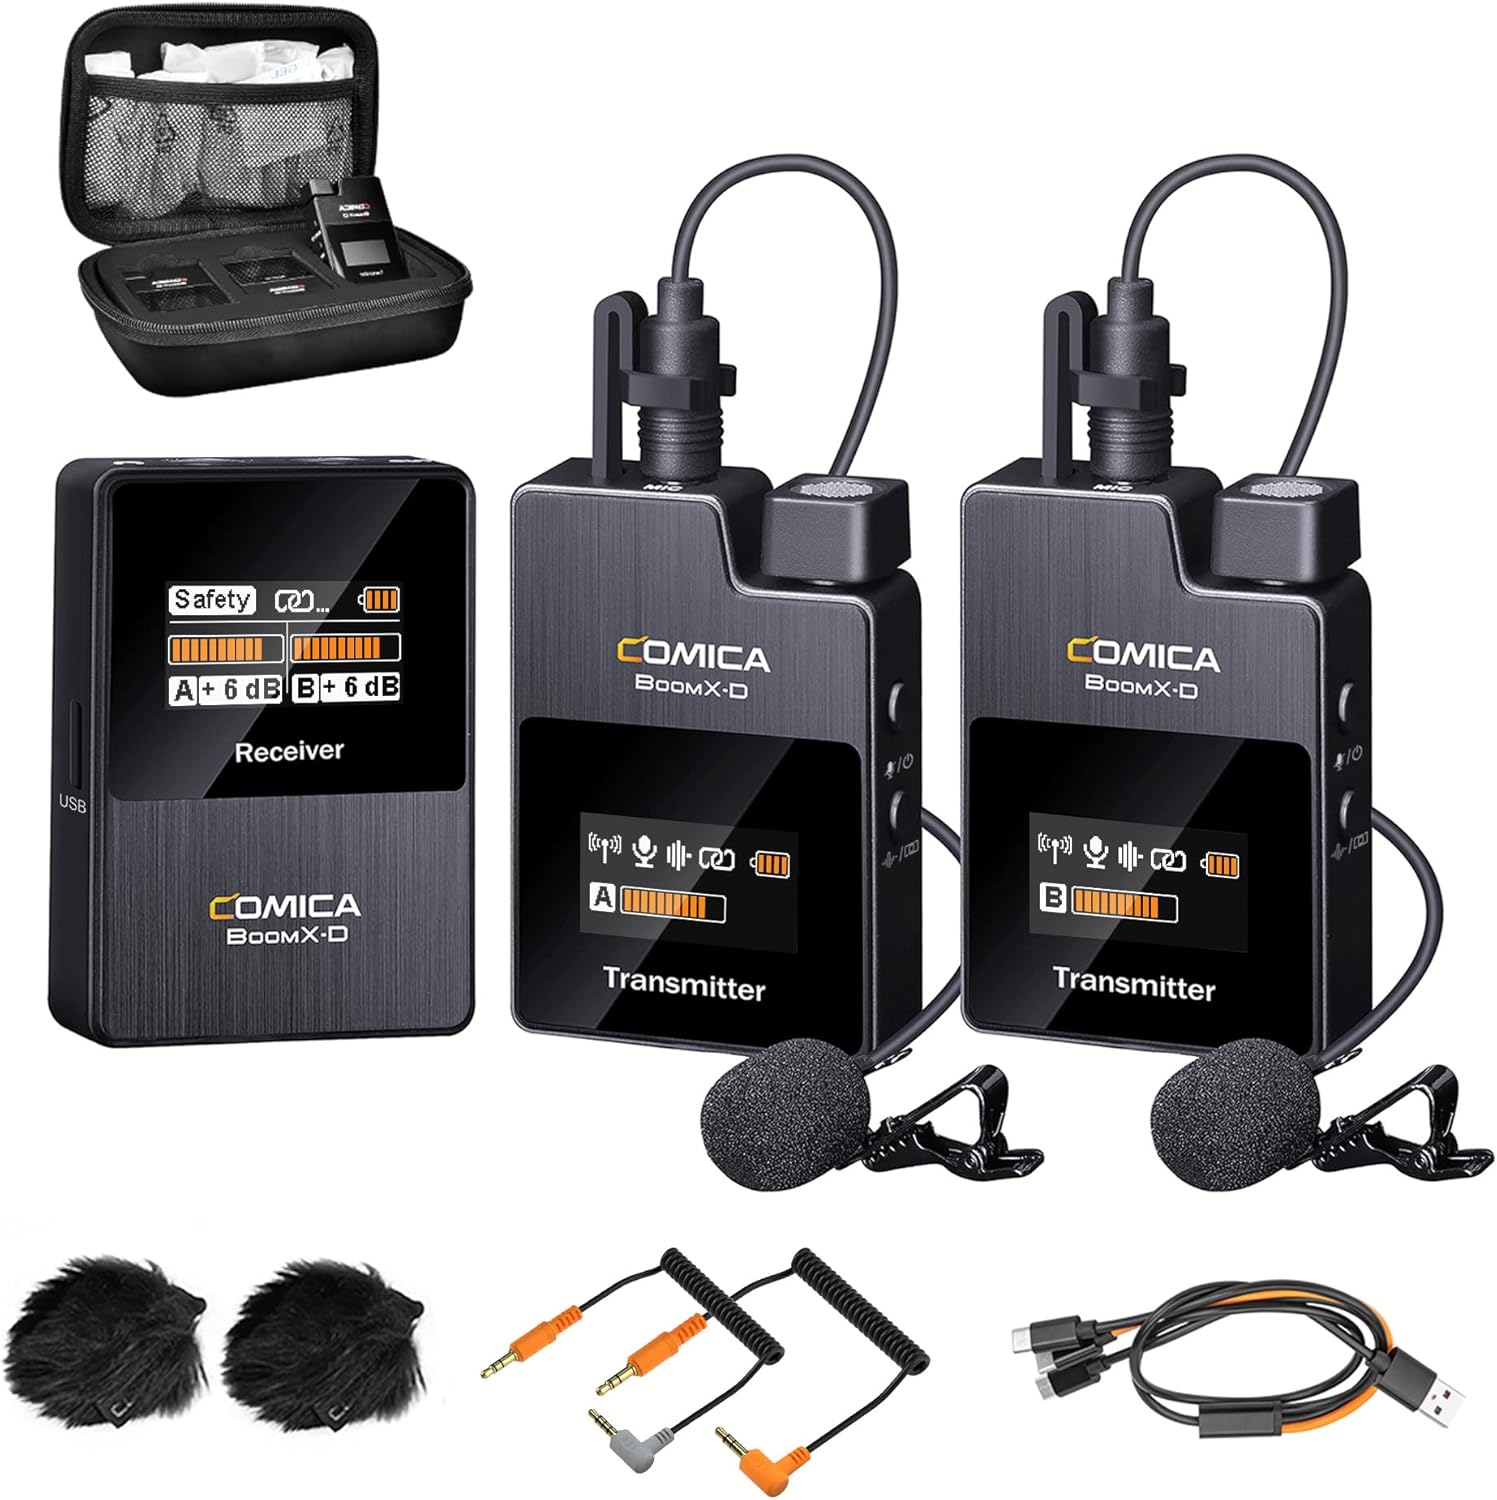
Figure 2.1: Complete package contents of the COMICA BoomX-D2 system.
3. Proizvod je gotovview
3.1. Odašiljač (TX)
- Ugrađeni mikrofon: For direct audio capture.
- 3.5 mm TRS ulaz: For connecting the external lavalier microphone.
- Dugme za uključivanje/isključivanje zvuka: Kratki pritisak za isključivanje/uključivanje zvuka, dugi pritisak za uključivanje/isključivanje.
- Pair/Denoise Button: Short press for noise cancellation, long press for pairing.
- TFT zaslon: Shows battery status, signal strength, audio levels, and mode.
- USB-C priključak: Za punjenje.
- kopča za pojas: Za pričvršćivanje na odjeću.
3.2. Prijemnik (RX)
- TFT zaslon: Displays battery status, signal strength for both transmitters, audio levels, and output mode (Mono/Stereo/Safety).
- Power/M/S Button: Short press to switch between Mono/Stereo/Safety modes, long press to power on/off.
- A/B Adjustment Buttons: Adjust gain levels for Transmitter A and Transmitter B independently.
- 3.5 mm TRS izlaz: Connects to cameras, camcorders, or PCs.
- 3.5 mm priključak za slušalice: Za praćenje zvuka u realnom vremenu.
- USB-C priključak: For charging and audio output.
- Kopča za kaiš/montaža za hladni papuč: For attaching to clothing or camera hot/cold shoe.
Slika 3.1: Detaljno view of the BoomX-D2 system components.
4. Podešavanje
4.1. Punjenje uređaja
Before first use, fully charge the transmitters and receiver. Use the provided 3-in-1 USB C charging cable. The orange cable supports both charging and data transmission, while the black cables are for charging only.
- Connect the USB-C end of the cable to the charging port on each transmitter and the receiver.
- Spojite USB-A kraj na USB adapter za napajanje (nije uključen) ili USB priključak računara.
- The battery icon on the TFT display will indicate charging status. A full charge provides up to 12 hours of runtime.

Figure 4.1: Charging the BoomX-D2 system components.
4.2. Uključivanje/isključivanje i uparivanje
The BoomX-D2 system features automatic pairing for convenience.
- Uključeno: Long press the Power button on both transmitters and the receiver.
- Automatsko uparivanje: The transmitters and receiver will automatically pair upon powering on. The signal strength indicator on the display will show a stable connection.
- Ručno uparivanje: If pairing fails, long press the "Pair/Denoise" button on the transmitter and the "Power/M/S" button on the receiver simultaneously to initiate manual pairing.
- Iskljuciti: Long press the Power button on each device to turn them off.
4.3. Povezivanje na Vaš uređaj
The BoomX-D2 offers wide compatibility with various recording devices.
- Za fotoaparate (DSLR, kamkordere): Use the provided 3.5mm TRS-TRS audio cable. Connect one end to the receiver's 3.5mm audio output and the other end to your camera's microphone input.
- For Smartphones (Android, iPhone): Use the provided 3.5mm TRS-TRRS audio cable. Connect the TRS end to the receiver's 3.5mm audio output and the TRRS end to your smartphone's headphone/microphone jack. Note: For smartphones without a 3.5mm jack (e.g., newer iPhones, USB-C Android phones), a separate 3.5mm to Lightning or 3.5mm to USB-C adapter cable (not included) is required.
- Za računare: Use the 3.5mm TRS-TRS audio cable or the 3-in-1 USB C charging cable (orange one) for direct digital audio output.
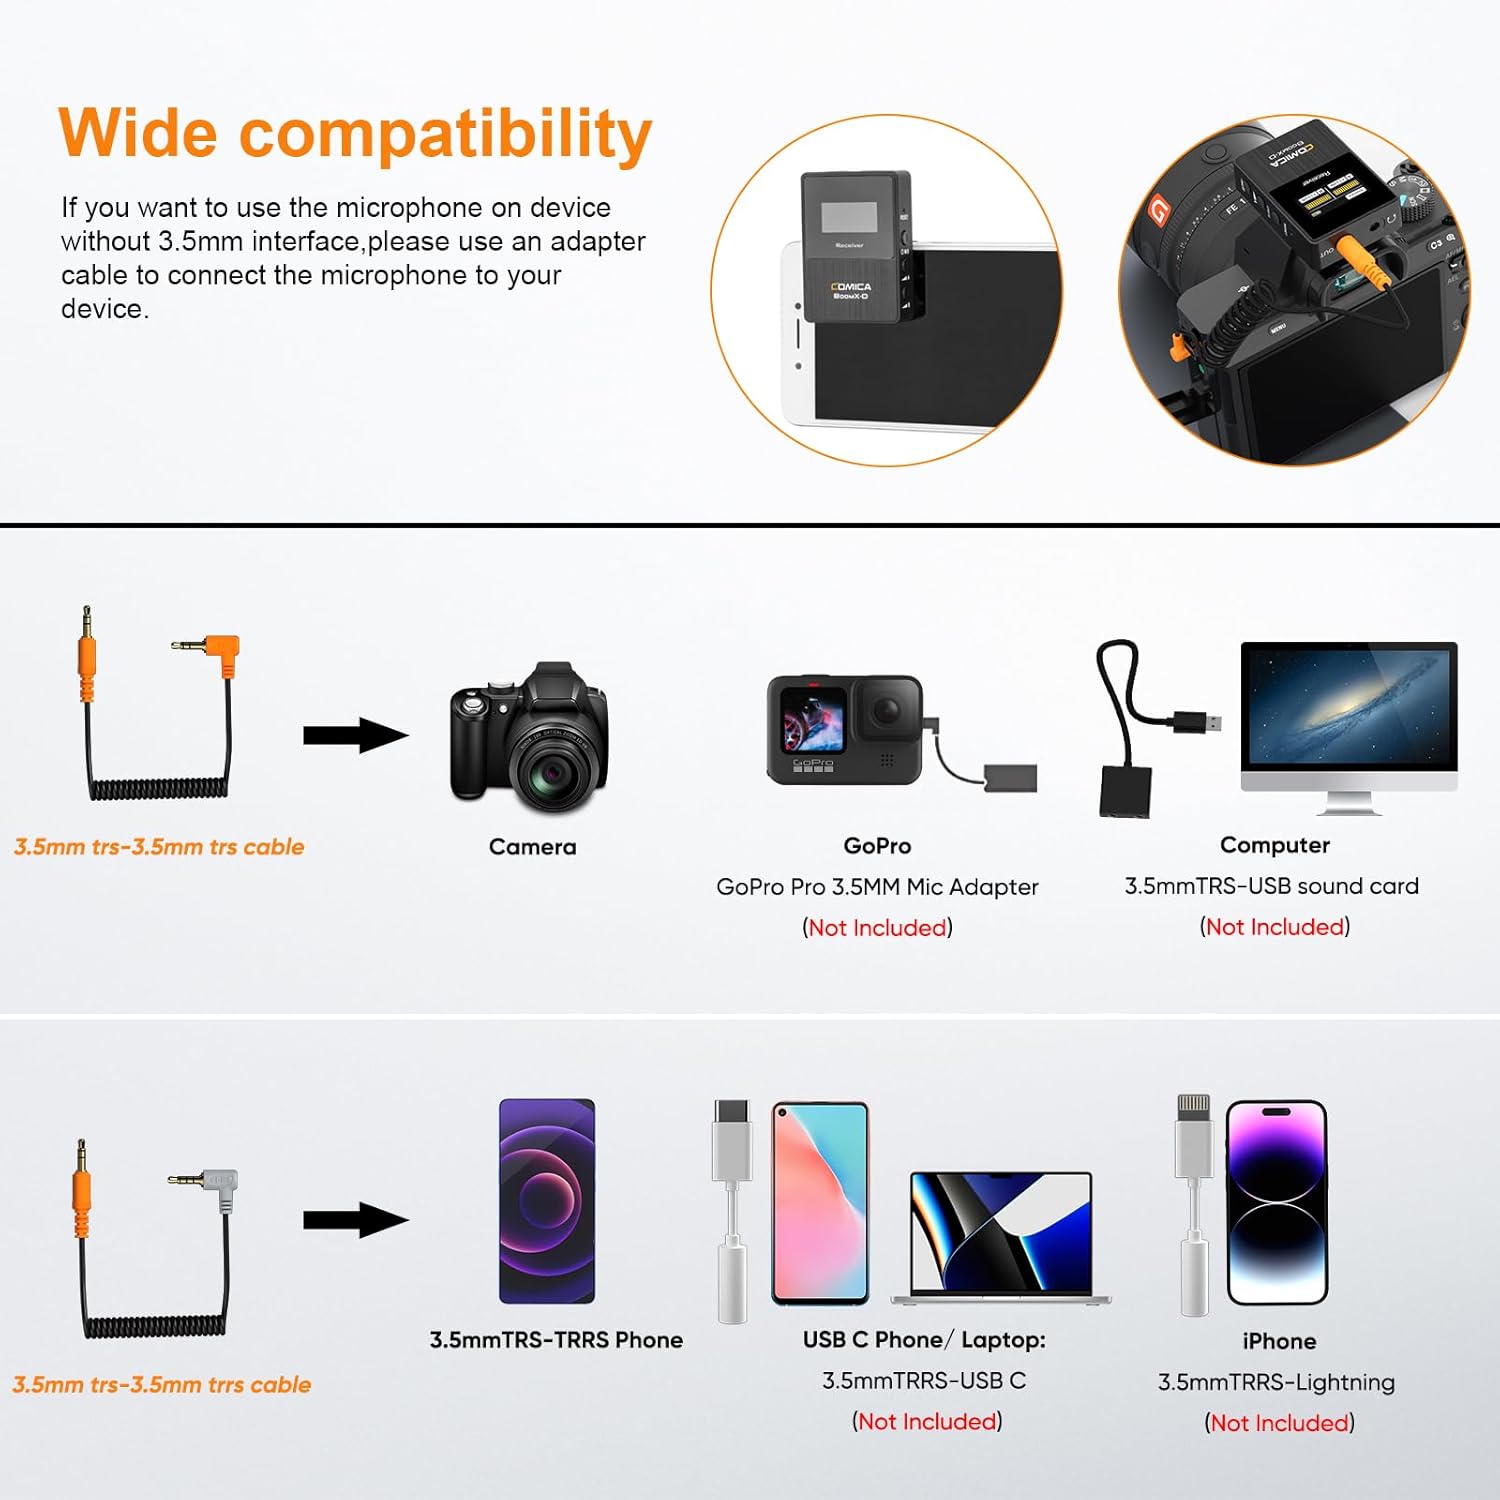
Figure 4.2: Compatibility and connection options for the BoomX-D2 system.
4.4. Attaching the Microphones
Each transmitter has a built-in microphone and a 3.5mm input for an external lavalier microphone.
- Using Built-in Mic: Simply clip the transmitter directly onto your clothing, ensuring the built-in microphone faces the sound source.
- Using Lavalier Mic: Plug the provided 3.5mm lavalier microphone into the TRS input on the transmitter. Clip the lavalier mic to your clothing, typically near the collar, and secure the transmitter using its belt clip.
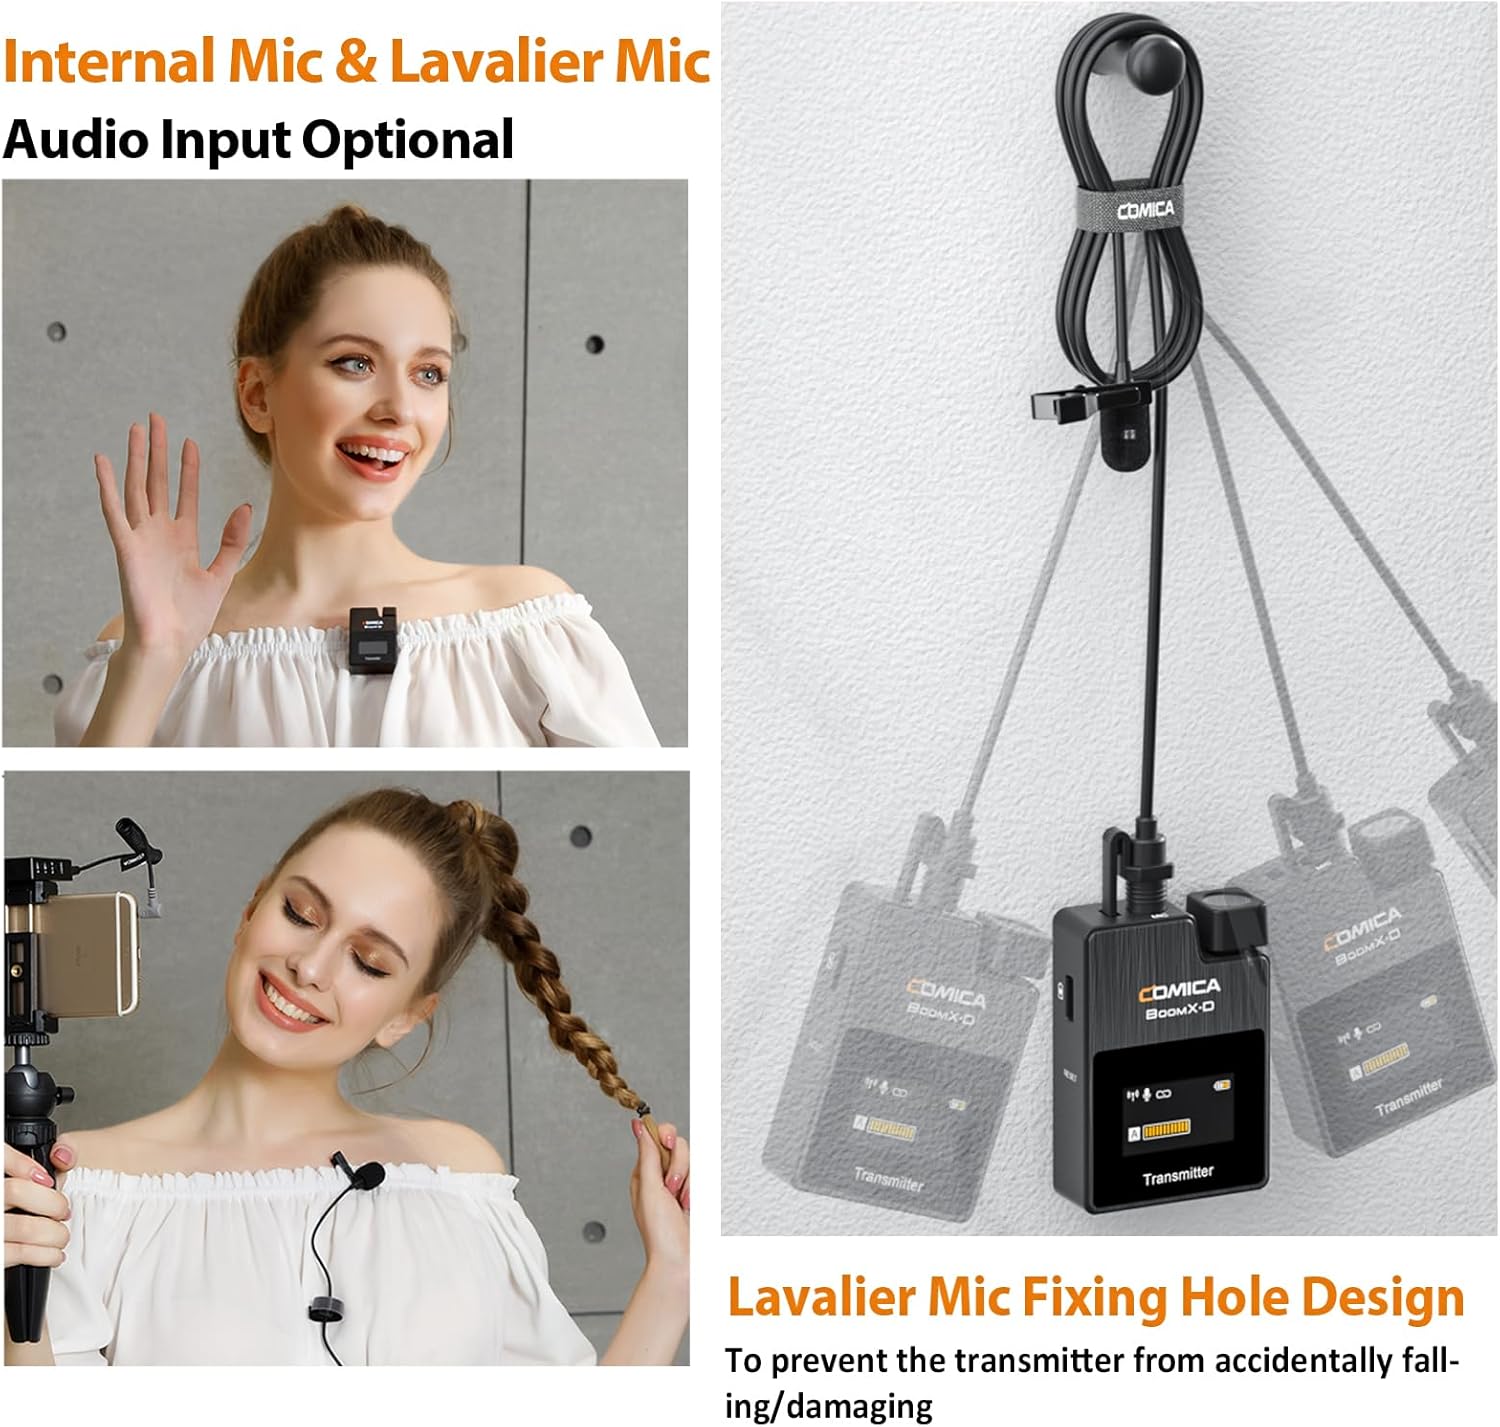
Figure 4.3: Internal vs. External Lavalier Microphone input options.
5. Uputstvo za upotrebu
5.1. Muting Function
To temporarily stop audio transmission from a transmitter, short press its Power/Mute button. The display will indicate the mute status. Short press again to unmute.
5.2. Praćenje u realnom vremenu
Connect headphones to the 3.5mm headphone jack on the receiver to monitor your audio in real-time during recording. This allows you to ensure optimal sound quality and detect any issues immediately.
5.3. Podešavanje pojačanja
Use the A and B adjustment buttons on the receiver to independently control the output gain (volume) of each transmitter. This helps in optimizing audio levels for your recording device and environment.
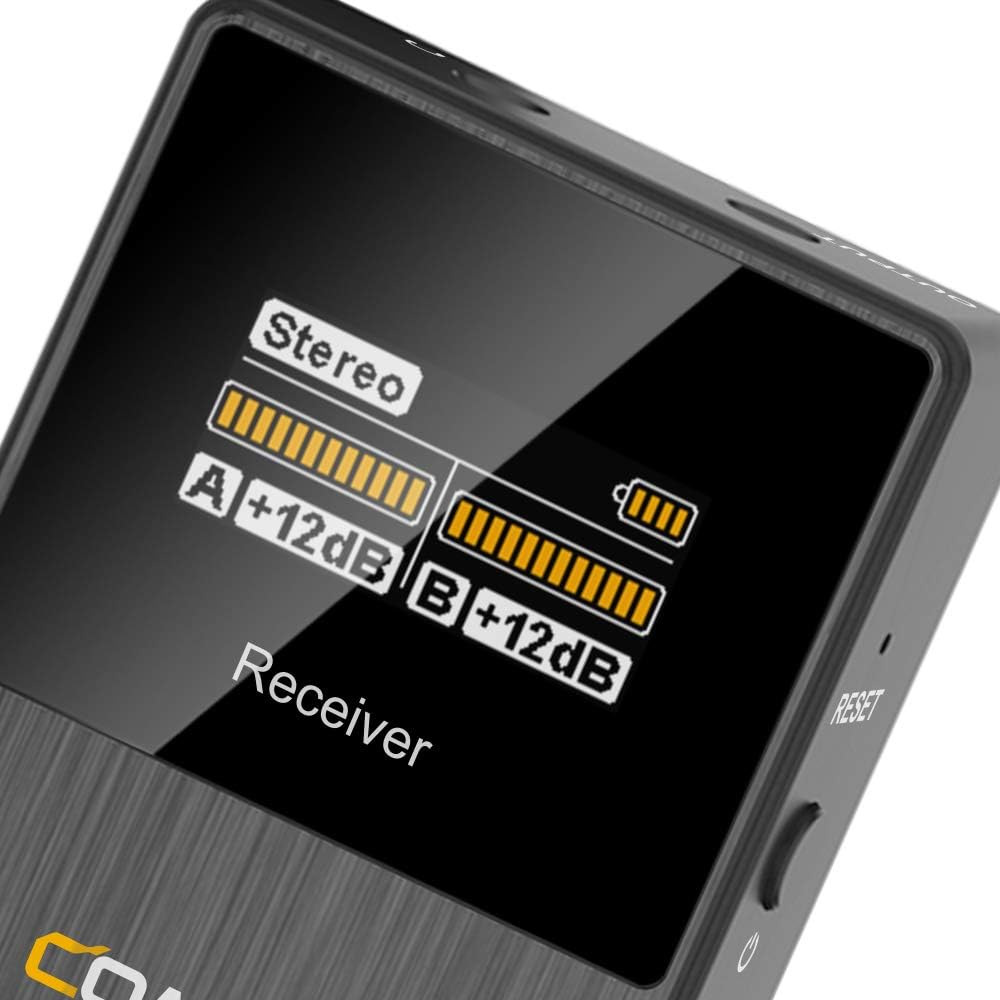
Figure 5.1: Receiver display showing audio levels and mode.
6. Napredne funkcije
6.1. Smanjenje buke
The BoomX-D2 features a built-in DPS chip for intelligent noise filtering. To activate or deactivate noise cancellation, short press the "Pair/Denoise" button on the transmitter. This helps in achieving clear and clean audio, especially in environments with background noise.

Figure 6.1: Intelligent Noise Reduction functionality.
6.2. MONO/STEREO/Safety Mode Switch
The receiver allows you to switch between different output modes to suit your recording needs:
- Mono način rada: Kombinuje audio sa oba predajnika u jedan mono kanal.
- Stereo način rada: Separates audio from each transmitter into left and right stereo channels.
- Sigurnosni način rada: Records a primary audio track and a secondary -6dB safety track. This provides a backup in case the main track clips, offering greater flexibility in post-production.
To switch modes, short press the "Power/M/S" button on the receiver. The display will show the currently selected mode.

Figure 6.2: MONO/STEREO/Safety Mode options.
7. Specifikacije
| Feature | Detalj |
|---|---|
| Brand | COMICA |
| Naziv modela | BoomX-D2 |
| Tehnologija povezivanja | 2.4GHz |
| Mikrofon Form Faktor | Lavalier |
| Bežične komunikacijske tehnologije | RF |
| Broj kanala | 2 |
| Operativni opseg | Do 200 metara (650 stopa) |
| Latencija | < 20ms |
| Frekvencijski odziv | 80 Hz - 20 kHz |
| Odnos signala i šuma | 10 dB |
| Nivo buke | 10 dB |
| Izvor napajanja | Napajanje na baterije (3 litijum-polimerske baterije uključene) |
| Battery Runtime | Do 12 sati |
| Materijal | Metal, Plastika |
| Boja | Crna |
| Težina predmeta (odašiljač) | 29 grama (otprilike 1.02 unci) |
| Dimenzije proizvoda (D x Š x V) | 2.44 x 5.71 x 6.5 inča |
| Kompatibilni uređaji | Camcorder, Camera, Personal Computer, Smartphone, Tablet |
| Posebne karakteristike | Clip, Mute Function, Noise Reduction, Volume Control |
8. Otkrivanje problema
- Nema zvuka/Tiho zvuka:
- Ensure all devices (transmitters, receiver, recording device) are powered on.
- Check if transmitters are muted. Unmute by short pressing the Power/Mute button.
- Verify proper cable connection between the receiver and your recording device. Use the correct TRS-TRS or TRS-TRRS cable.
- Adjust the gain levels on the receiver using the A/B adjustment buttons.
- Check the volume settings on your recording device.
- Ensure the lavalier microphone is securely plugged into the transmitter, or that the built-in mic is not obstructed.
- Smetnje/Loš kvalitet zvuka:
- Perform manual pairing to re-establish a stable connection.
- Activate the noise reduction feature on the transmitter by short pressing the Pair/Denoise button.
- Ensure there are no major obstructions or strong 2.4Ghz interference sources between the transmitters and receiver.
- Stay within the optimal operating range (up to 650ft/200M).
- Check if the wind muffs are properly installed when using the built-in mic outdoors.
- Uređaj se ne puni:
- Ensure the charging cable is fully inserted into the USB-C port.
- Try a different USB power source or USB-A port.
- Confirm you are using the correct 3-in-1 USB C charging cable (orange cable for data/charging, black for charging only).
9. Održavanje
- čišćenje: Za čišćenje uređaja koristite meku, suhu krpu. Ne koristite jake hemikalije ili abrazivne materijale.
- Skladištenje: Store the system in the provided carry case in a cool, dry place away from direct sunlight and extreme temperatures.
- Održavanje baterije: For long-term storage, charge the devices to approximately 50% every three months to preserve battery health.
- Rukovanje: Avoid dropping the devices or exposing them to water or excessive moisture.
10. Jamstvo i podrška
For warranty information, technical support, or service inquiries, please refer to the official COMICA webstranicu ili kontaktirajte lokalnog distributera. Sačuvajte račun kao dokaz o kupovini za reklamacije u slučaju garancije.
Za dodatnu pomoć, možete posjetiti COMICA trgovina na Amazonu.


