1. Uvod
This manual provides detailed instructions for the installation, operation, and maintenance of your Suuwer S701 Non-Programmable Thermostat. This thermostat is designed for use with 1 Heat/1 Cool conventional single-stage heating and cooling systems. Please read this manual thoroughly before installation and operation to ensure proper function and safety.

Slika 1.1: Prednja strana view of the Suuwer S701 Non-Programmable Thermostat, displaying room temperature and set temperature on a blue backlit screen.
2. Sigurnosne informacije
- Uvijek isključite napajanje sistema za grijanje/hlađenje na glavnoj razvodnoj ploči s osiguračima ili prekidačima prije instalacije ili servisiranja termostata.
- This thermostat operates on 24VAC power or 2 AAA batteries. Do not connect to line voltage (120-240V) systems.
- If you are inexperienced with electrical wiring, it is recommended to seek professional assistance for installation.
- Ensure all wiring connections are secure to prevent short circuits or damage to the system.
3. Sadržaj paketa
Provjerite da li se sve stavke nalaze u vašem paketu:
- Suuwer S701 Thermostat Unit
- Uputstvo za instalaciju
- Cable Labels
- Vijci za montažu (2)
- Zidna sidra (2)

Image 3.1: Illustration of the Suuwer S701 thermostat and its included accessories.
4. Kompatibilnost sistema
Suuwer S701 termostat je dizajniran za specifične HVAC sisteme. Molimo vas da se ponovoview Prije instalacije pažljivo pročitajte informacije o kompatibilnosti.
4.1 Kompatibilni sistemi
- Konvencionalni Single-Stage Heating & Cooling (with C-wire or without C-wire)
- Plinski kamin (24 volta)
- Gas / Oil / Electric Furnace (Heating only)
- Samo grijanje na podnožje bojlera
- Samo grijanje peći prisilnim protokom zraka
- Cooling Only (with C-wire or without C-wire)
Napomena: Verify your existing thermostat base is wired with 2 to 5 wires. Systems with 6 to 8 wires are generally not supported by this model.
4.2 Nekompatibilni sistemi
- Multistage Heating & Cooling (e.g., 1H/2C, 2H/2C)
- HVAC Heat Pump Systems (e.g., 2H/1C, 4H/2C)
- PTACs (Packaged Terminal Air Conditioners)
- 3-wire Hydronic (Hot Water) Systems
- Dual Fuel/Hybrid Heating Systems
- Line Voltage Systems (120-240V electric baseboards heat)
- Mini Split Heat Pump Air Conditioners
- RV Air Conditioners (Mach and Roughneck series)
- Konvektori
- Zračno stropno grijanje
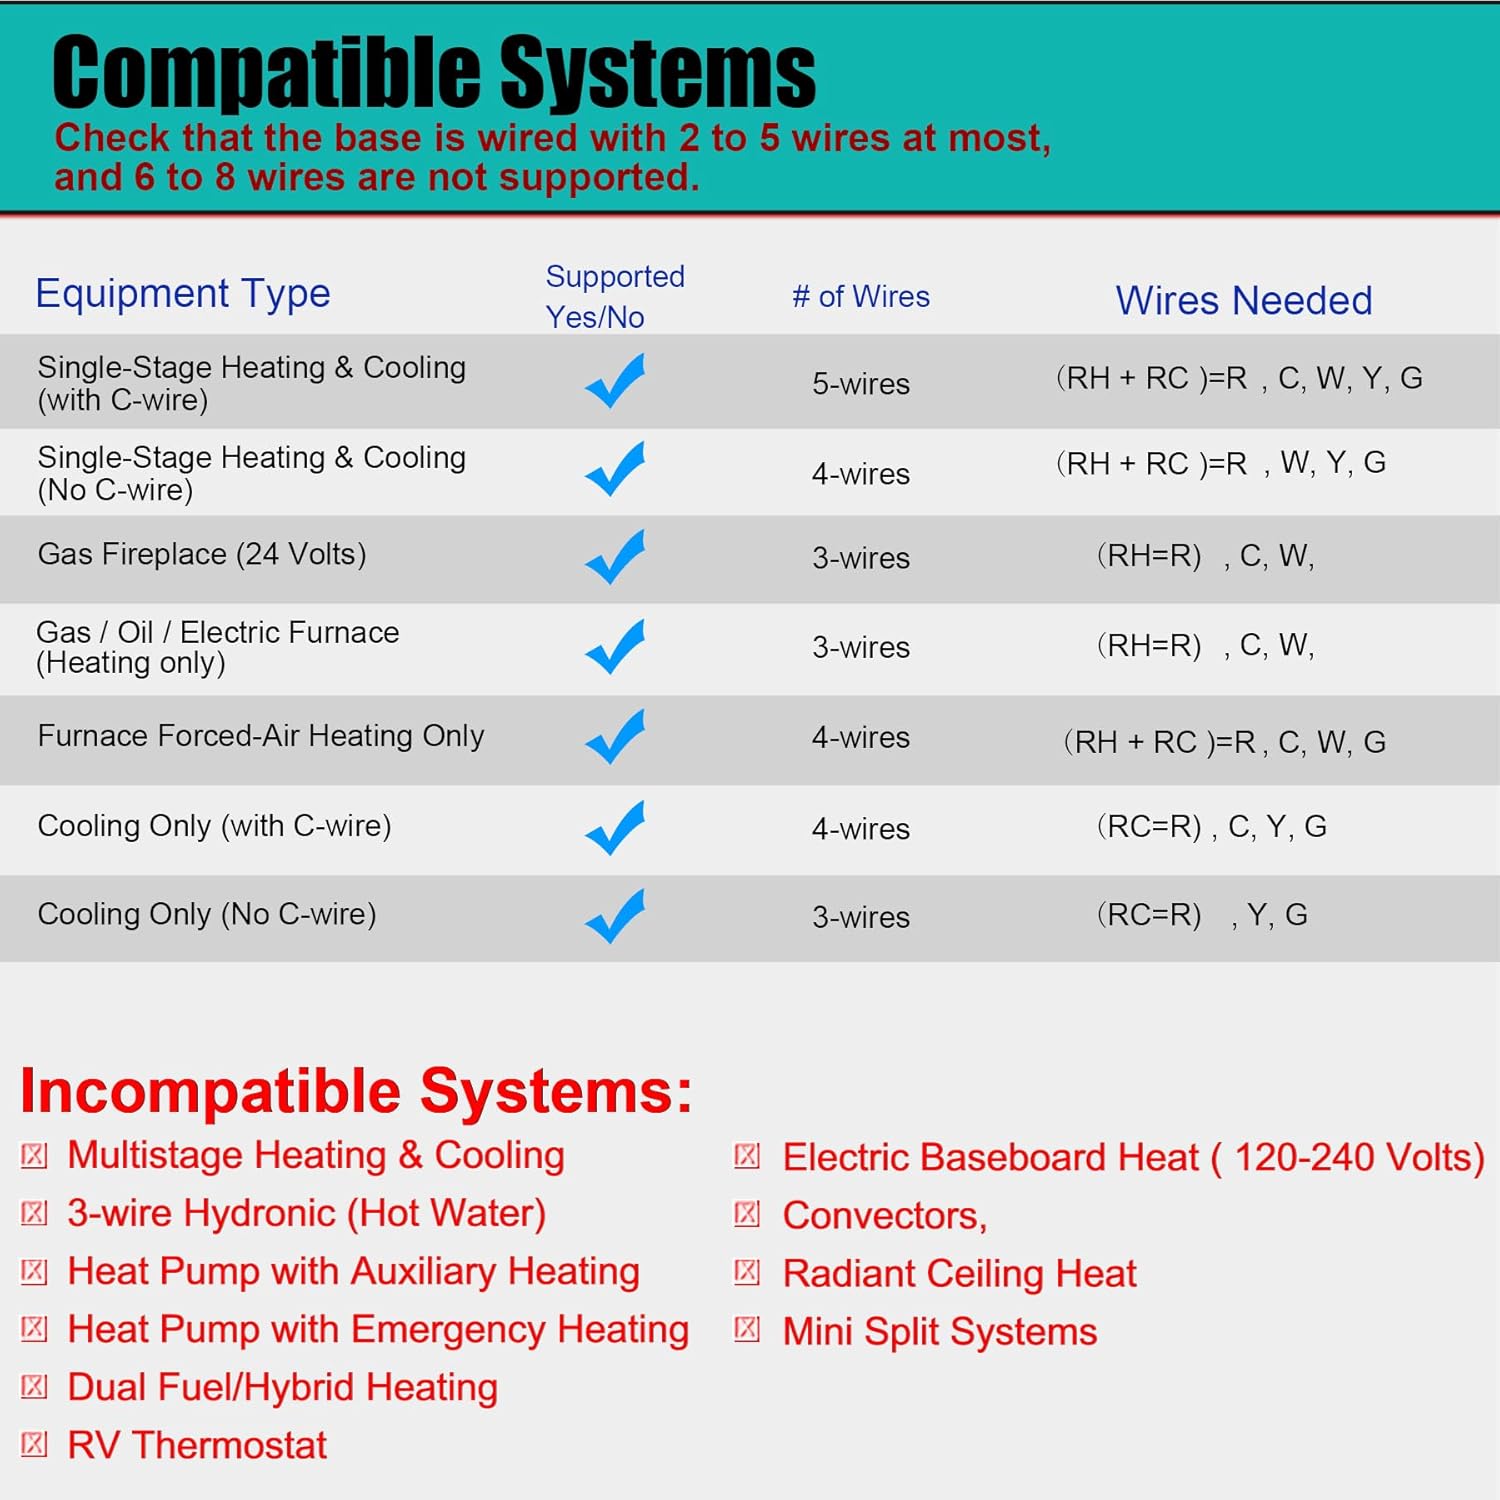
Image 4.1: Detailed compatibility chart for the Suuwer S701 thermostat.
5. Postavljanje i instalacija
Follow these steps for proper installation. It is recommended to take a picture of your old thermostat's wiring before disconnecting any wires.
5.1 Uklanjanje starog termostata
- Isključite napajanje: Pronađite prekidač ili kutiju s osiguračima koja kontrolira vaš sistem grijanja i hlađenja i isključite napajanje.
- Uklonite poklopac: Pažljivo uklonite poklopac starog termostata.
- Ožičenje fotografije: Take a clear picture of the wiring connections, noting which wire is connected to each terminal.
- Označavanje žica: Use the provided cable labels to mark each wire according to its terminal designation (e.g., R, W, Y, G, C).
- Isključite žice: Odspojite žice sa starih terminala termostata.
- Uklonite staru bazu: Odvijte i uklonite staru montažnu podlogu termostata sa zida.
5.2 Montiranje novog termostata
- Osnova pozicije: Hold the new Suuwer S701 thermostat base against the wall where you want to mount it.
- Mark screw holes: Mark the positions for the mounting screws. If possible, use existing screw holes.
- Izbušite rupe: If new holes are needed, drill pilot holes and insert the wall anchors.
- Sigurna baza: Pull the wires through the opening in the thermostat base and secure the base to the wall using the provided screws.
5.3 Ožičenje
Connect the labeled wires to the corresponding terminals on the Suuwer S701 thermostat base. Refer to the wiring diagram below and your photograph for accuracy.
- R/RC: 24VAC power (often jumpered, see diagram)
- G: Ventilator za unutrašnju upotrebu
- Y: 1st-stage cool
- W: 1st-stage heat
- C: Common wire (optional for battery-powered operation, but recommended for continuous backlight)

Image 5.1: Wiring diagram and system switch setting for the Suuwer S701 thermostat.
5.4 Setting the System Switch (GAS/ELEC)
On the back of the thermostat unit, locate the small switch labeled 'GAS' and 'ELEC'.
- Ako imate a gas or oil furnace, postavite prekidač na GAS.
- Ako imate electric furnace, postavite prekidač na ELEC.
5.5 Instaliranje baterija
The thermostat can be powered by 24VAC or 2 AAA batteries. Batteries are required for operation if no C-wire is connected. Even with a C-wire, batteries provide backup power.
- Open the battery compartment on the front of the thermostat.
- Umetnite dvije nove AAA alkalne baterije, pazeći na ispravan polaritet (+/-).
- Zatvorite odeljak za baterije.
5.6 Attaching the Thermostat to the Base
Align the thermostat unit with the mounted base and gently push it into place until it clicks securely.
5.7 Obnavljanje napajanja
Once the thermostat is securely mounted and wired, turn the power back on at the main circuit breaker or fuse box.
6. Uputstvo za upotrebu
The Suuwer S701 is a non-programmable thermostat, offering straightforward manual control of your home's temperature.

Image 6.1: Display and controls of the Suuwer S701 thermostat.
6.1 Prikaz prekoview
The large LCD with blue backlight shows the current room temperature and the set temperature. The backlight activates for 10 seconds when any button is pressed.
- soba: Prikazuje trenutnu temperaturu okoline.
- Postavljeno na: Prikazuje željenu postavku temperature.
- Cool/Heat/Off: Indicates the current system mode.
- Fan ON/AUTO: Označava trenutni način rada ventilatora.
6.2 Podešavanje temperature
Koristite + (gore) i - (Down) buttons on the right side of the thermostat to adjust the desired temperature setting. Each press changes the temperature by 1 degree Fahrenheit.
6.3 Odabir sistemskog načina rada
Koristite SISTEM switch located at the bottom right of the thermostat to select the operating mode:
- HLADNO: Aktivira sistem hlađenja kada temperatura u prostoriji poraste iznad podešene temperature.
- TOPLOTA: Aktivira sistem grijanja kada temperatura u prostoriji padne ispod podešene temperature.
- ISKLJUČENO: Isključuje i sisteme grijanja i hlađenja.
6.4 Odabir načina rada ventilatora
Koristite FAN switch located at the bottom left of the thermostat to select the fan operating mode:
- AUTOMATSKI: Ventilator radi samo kada je sistem grijanja ili hlađenja aktivno uključen. Ovo je najčešće i energetski najefikasnije podešavanje.
- ON: Ventilator radi neprekidno, bez obzira na to da li je sistem grijanja ili hlađenja aktivan.
6.5 Adjusting Temperature Swing (Cycle Rate)
The temperature swing, also known as cycle rate or differential, determines how much the temperature can vary from your setpoint before the system turns on. A smaller swing results in more frequent, shorter cycles, while a larger swing results in less frequent, longer cycles.
The swing is adjustable from 0.2°F to 2°F. The factory default is 0.5°F for both heating and cooling.

Image 6.2: Thermostat display showing the temperature swing setting.
To adjust the temperature swing:
- Pritisnite i držite FAN button for approximately 3 seconds until the display changes to show the current swing setting.
- Koristite + (Gore) ili - (Down) buttons to adjust the swing value.
- Pritisnite FAN button again to toggle between heating and cooling swing settings.
- The thermostat will automatically save the setting after a few seconds of inactivity.
7. Održavanje
7.1 Zamjena baterije
When the low battery indicator (a battery icon) appears on the display, it is time to replace the batteries. Replace with two new AAA alkaline batteries. Refer to Section 5.5 for battery installation steps.
7.2 Čišćenje
Obrišite vanjski dio termostata mekom,amp tkanina. Nemojte koristiti abrazivna sredstva za čišćenje ili rastvarače.
8. Otkrivanje problema
Ako imate problema s termostatom, pogledajte sljedeće uobičajene probleme i rješenja:
| Problem | Mogući uzrok | Rješenje |
|---|---|---|
| Ekran je prazan | Nema struje, prazne baterije ili isključeni osigurač. | Check batteries and replace if necessary. Ensure power is on at the circuit breaker. Verify wiring connections. |
| Sistem grijanja/hlađenja ne reaguje | Incorrect system mode, incorrect wiring, or system issue. | Ensure SYSTEM switch is set to HEAT or COOL. Verify wiring. Check if furnace/AC unit has power. |
| Očitavanje temperature izgleda netačno | Thermostat location, or calibration needed. | Ensure thermostat is not in direct sunlight or near heat sources. The thermostat has a room temperature calibration adjustment for +/-1-degree F. Consult the full installation manual for advanced settings. |
| Low Battery Indicator (battery icon) | Baterije su slabe. | Replace with two new AAA alkaline batteries immediately. |
| Compressor short cycling (turning on/off too frequently) | Temperature swing set too low. | Adjust the temperature swing to a higher value (e.g., 1.0°F or 1.5°F). |
Za detaljnije rješavanje problema, pogledajte Vodič za rješavanje problema (PDF).
9. Specifikacije
- Model: S701
- Dimenzije proizvoda: 0.98"D x 4.72"Š x 3.86"H
- Težina artikla: 6.7 unce (0.42 funte)
- Boja: Plavo pozadinsko osvetljenje
- Materijal: Plastika
- Vrsta prikaza: LCD sa plavim pozadinskim osvetljenjem
- Veličina ekrana: 4.5 inča
- Vrsta kontrole: Push Button / Button Control
- Vrsta montaže: Zidni nosač
- Izvor napajanja: 24 Volts (AC) or 2 AAA Batteries
- Raspon regulacije temperature: 44°F do 90°F
- Room Temperature Display Range: 41°F do 95°F
- Preciznost temperature: +/-1°F
- Posebne karakteristike: Non-Programmable, Separate Heating and Cooling Swing (0.2°F to 2°F), Low Battery Indicator, 5 Minute Compressor Delay Protection (Selectable ON or OFF)
- UPC: 709327753278
10. Garancija i podrška
10.1 Informacije o garanciji
The Suuwer S701 Non-Programmable Thermostat comes with a Dvogodišnja garancija bez brige od datuma kupovine. Ova garancija pokriva nedostatke u materijalu i izradi pri normalnoj upotrebi. Molimo sačuvajte dokaz o kupovini za reklamacije.
10.2 Korisnička podrška
For technical assistance, troubleshooting, or warranty inquiries, please contact Suuwer customer service. We offer 24-hour customer service to assist you.
Dodatni resursi:


