1. Proizvod je gotovview
The AJA Ki Pro GO is a portable multi-channel H.264 recorder and player designed for professional video workflows. It enables simultaneous recording of up to four channels of HD and SD video directly to readily available USB drives, offering redundant recording capabilities for enhanced reliability.
Equipped with 4 x 3G-SDI and 4 x HDMI digital video inputs, the Ki Pro GO provides flexible channel assignments, allowing connection to a wide range of modern video sources, including various cameras. Its Genlock-free recording feature simplifies integration by permitting the mixing and matching of incoming video sources without requiring external synchronization.
For audio, the unit supports high-quality 2-channel embedded audio or balanced XLR analog audio, which can be assigned to any recording channel. A multi-channel matrix monitoring function allows for the display of multiple video channels on a single HDMI monitor, streamlining monitoring tasks.
With a compact 2RU design, the Ki Pro GO is both portable and rack-mountable, making it suitable for diverse production environments.
Ključne karakteristike:
- Multi-channel H.264 recording and playback.
- Five USB recording media slots, compatible with commercially available USB 3.0 media.
- Redundant recording capability.
- Genlock-free input for flexible source integration.
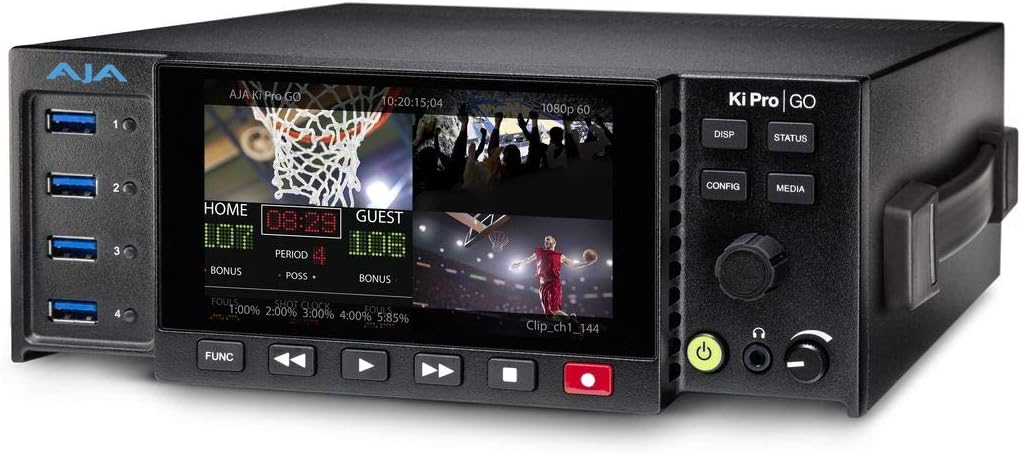
Slika 1: Prednja strana view of the AJA Ki Pro GO, showing the display with a multi-view layout, USB ports on the left, and control buttons on the right.
2. Vodič za postavljanje
2.1 Raspakivanje i pregled
- Carefully remove the Ki Pro GO unit and all accessories from its packaging.
- Inspect the unit for any signs of physical damage. If damage is found, contact your dealer immediately.
- Provjerite da li su prisutne sve komponente navedene na listi za pakovanje.
2.2 Priključak za napajanje
- Connect the provided power supply to the 12V-18V DC input on the rear of the Ki Pro GO.
- Plug the power supply into a suitable AC outlet.
- The unit will power on automatically or can be powered on using the front panel power button.
2.3 Priključci za video ulaze
The Ki Pro GO supports both 3G-SDI and HDMI video inputs.
- Connect your video sources (e.g., cameras, switchers) to the SDI IN 1-4 or HDMI IN 1-4 ports on the rear panel.
- Uverite se da su kablovi dobro povezani.
2.4 Priključci audio ulaza
Audio can be input via embedded SDI/HDMI or balanced XLR analog inputs.
- For analog audio, connect XLR cables from your audio source to the ANALOG AUDIO IN (CH 1/L, CH 2/R) ports.
- Adjust the +48V MIC/LINE switch as appropriate for your microphone or line-level source.
2.5 USB Media Installation
The Ki Pro GO records to standard USB 3.0 drives.
- Insert up to five formatted USB 3.0 drives into the USB ports on the front panel.
- Ensure drives are properly seated. The unit will detect and prepare them for recording.
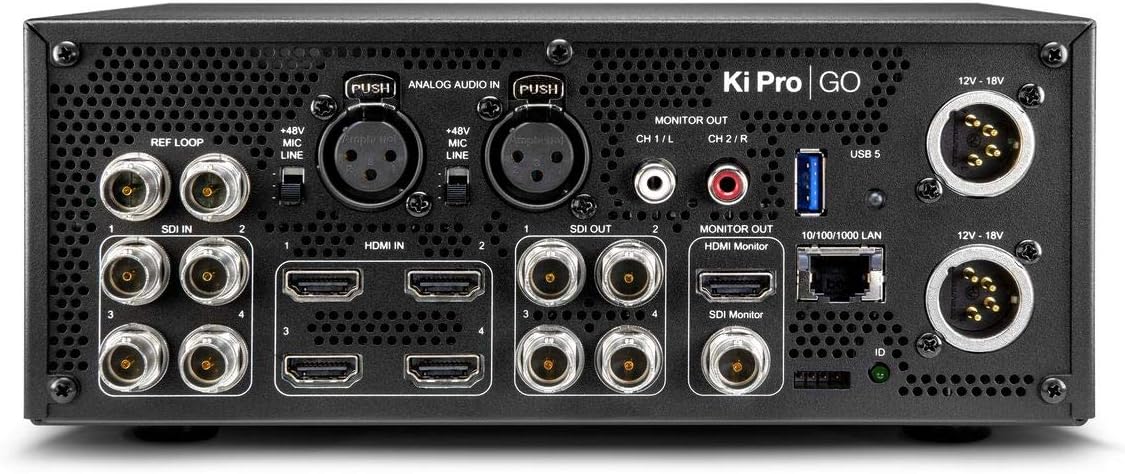
Slika 2: Pozadi view of the AJA Ki Pro GO, showing various input/output ports including SDI, HDMI, XLR audio, LAN, and power inputs.
3. Uputstvo za upotrebu
3.1 Početno uključivanje i konfiguracija
- After connecting power, the unit will boot up. The front display will show the current status.
- Pritisnite CONFIG dugme za pristup glavnom meniju.
- Use the rotary knob to navigate through menu options and press to select.
- Configure video input settings, audio routing, and recording parameters as needed.
3.2 Snimanje
- Ensure USB drives are inserted and recognized by the unit.
- Verify input signals are present and correctly configured on the multi-view displej.
- Pritisnite RECORD button (red button) on the front panel to begin recording. The button will illuminate red.
- Za zaustavljanje snimanja pritisnite STOP dugme.
- For redundant recording, ensure multiple USB drives are inserted; the unit will automatically record to all available drives.
3.3 Reprodukcija
- Pritisnite MEDIJI button to access recorded clips.
- Use the rotary knob to select the desired clip from the list.
- Pritisnite IGRAJ button (triangle icon) to start playback.
- Koristite FAST FORWARD i REWIND dugmad za navigaciju.
- Pritisnite STOP da završite reprodukciju.
3.4 Monitoring
The Ki Pro GO offers multi-channel matrix monitoring via its HDMI monitor output.
- Connect an HDMI display to the HDMI MONITOR OUT port on the rear panel.
- Koristite DISP button on the front panel to cycle through display modes, including multi-view and single-channel views.

Figure 3: Closer front view of the AJA Ki Pro GO, highlighting the display and front panel controls for operation.
4. Održavanje
4.1 Čišćenje
Za održavanje optimalnih performansi i izgleda:
- Ensure the unit is powered off and disconnected from power before cleaning.
- Za brisanje vanjskih površina koristite meku, suhu krpu koja ne ostavlja dlačice.
- Za tvrdokorne mrlje, malo damp Može se koristiti krpa s blagim, neabrazivnim sredstvom za čišćenje, a zatim suha krpa.
- Izbjegavajte upotrebu jakih hemikalija, rastvarača ili abrazivnih materijala, jer oni mogu oštetiti završnu obradu.
- Održavajte ventilacijske otvore čistim od prašine i otpada.
4.2 Ažuriranja firmvera
AJA periodically releases firmware updates to improve performance, add features, or address issues. It is recommended to keep your Ki Pro GO firmware up to date.
- Visit the official AJA webstranica (www.aja.com) to check for the latest firmware for the Ki Pro GO.
- Follow the instructions provided with the firmware download for the update procedure. Typically, this involves loading the firmware onto a USB drive and updating via the unit's menu.
5. Otkrivanje problema
5.1 Nema napajanja
- Provjerite priključak za napajanje: Ensure the power supply is securely connected to both the Ki Pro GO and a working AC outlet.
- Provjerite napajanje: Confirm the power supply is the correct one for the unit and is functioning.
5.2 No Video Input Detected
- Provjera kablova: Ensure all SDI or HDMI cables are correctly connected and not damaged.
- Izvorni izlaz: Verify that the video source is powered on and outputting a signal.
- Ulazni format: Check that the input video format is supported by the Ki Pro GO.
- Konfiguracija: Review the input settings in the Ki Pro GO's configuration menu.
5.3 Problemi sa snimanjem
- USB Drive Status: Ensure USB drives are inserted, properly formatted, and have sufficient free space. Check the drive status on the unit's display.
- Kompatibilnost pogona: Use recommended USB 3.0 drives for optimal performance.
- Ulazni signal: Confirm that a valid video input signal is present and stable.
5.4 Bez zvuka
- Izvor zvuka: Verify the audio source is active and connected correctly.
- XLR Settings: If using XLR, check the +48V MIC/LINE switch setting.
- Usmjeravanje zvuka: Confirm audio routing settings in the Ki Pro GO's menu are correct for your inputs and outputs.
6. Specifikacije
| Feature | Specifikacija |
|---|---|
| Brand | AJA |
| Broj modela | KI-PRO-GO-R0 |
| USB portovi | 5 |
| Kanali | 4 (Multi-channel recording) |
| Video ulazi | 4 x 3G-SDI, 4 x HDMI |
| Audio ulazi | Embedded SDI/HDMI, Balanced XLR Analog |
| Format snimanja | H.264 |
| Mediji za snimanje | USB 3.0 Drives |
| Dimenzije proizvoda | 34.04 x 24.38 x 16 cm |
| Težina proizvoda | 3.59 kg |
| Baterije uključene | br |
| Baterije su potrebne | br |
7. Garancija i podrška
For detailed warranty information, please refer to the warranty card included with your product or visit the official AJA website. AJA provides technical support and resources for its products.
7.1 Tehnička podrška
If you encounter issues not covered in this manual or require further assistance, please contact AJA Technical Support through their official webstranica:
- AJA Webstranica: www.aja.com/support
The website offers FAQs, knowledge base articles, and contact information for direct support.


