1. Uvod
This manual provides essential instructions for the installation, operation, and maintenance of your EPEVER 80A MPPT Solar Charge Controller. This device is designed to manage the power flow from your solar panels to your battery bank, ensuring efficient charging and protecting your batteries from overcharge and over-discharge. It supports 12V, 24V, 36V, and 48V battery systems automatically and is compatible with various lead-acid battery types including Sealed, AGM, Gel, and Flooded batteries.
2. Sigurnosne informacije
Molimo vas da pažljivo pročitate sva uputstva i upozorenja prije instalacije i rada. Nepoštivanje ovih uputstava može dovesti do strujnog udara, požara ili teških povreda.
- Ensure all wiring is correctly polarized and securely connected. Incorrect wiring can damage the controller and other components.
- Always disconnect the battery first, then the solar panel, before performing any maintenance or disconnection. Reconnect in reverse order: solar panel first, then battery.
- Kontroler instalirajte u dobro prozračenom prostoru, dalje od zapaljivih materijala i korozivnih plinova.
- Kontroler je namijenjen za upotrebu u zatvorenom prostoru. Zaštitite ga od direktne sunčeve svjetlosti, visokih temperatura i vlage.
- Use appropriate circuit breakers or fuses for both the solar panel and battery circuits to prevent overcurrent.
- This device is a common negative ground controller. Ensure proper grounding.
- Do not attempt to disassemble or repair the controller yourself. Contact qualified service personnel.
3. Proizvod je gotovview
3.1 Ključne karakteristike
- Automatski sistem voltage identification: 12V/24V/36V/48V DC.
- Advanced MPPT technology with ultra-fast tracking speed (up to 99.5% efficiency).
- Maximum DC/DC transfer efficiency up to 98.7%.
- Automatic control system to limit charging power and current.
- Real-time energy recording and statistical functions.
- Funkcija kompenzacije temperature baterije.
- Isolated RS-485 communication interface with MODBUS protocol.
- Support for parallel operation of up to 8 units to expand system capacity.
- Compatible with Sealed, AGM, Gel, and Flooded lead-acid batteries.
3.2 Fizičke dimenzije

Slika 3.2.1: Physical dimensions of the EPEVER 80A MPPT Solar Charge Controller. The controller measures approximately 394mm (L) x 240mm (W) x 134mm (H).
The controller has a robust design with integrated heat sinks for efficient thermal management. The overall dimensions are approximately 394mm in length, 240mm in width, and 134mm in height. The mounting holes are designed for secure installation.
3.3 Identifikacija komponente
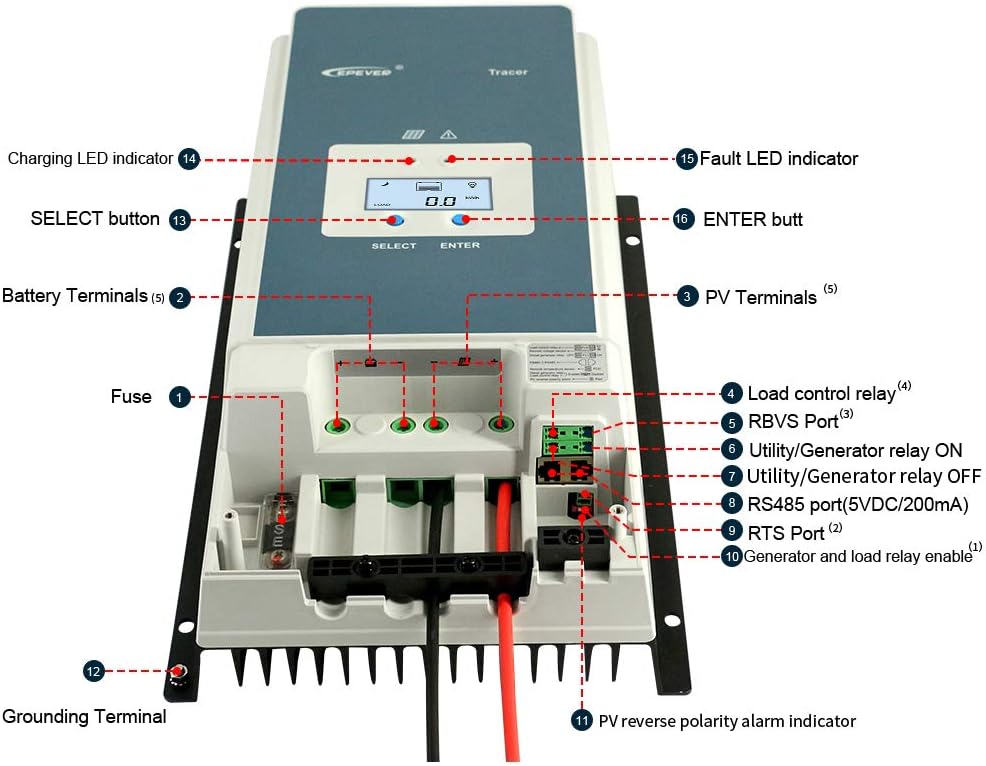
Slika 3.3.1: Front view of the EPEVER 80A MPPT Solar Charge Controller with labeled components.
- Osigurač: Overcurrent protection for the battery circuit.
- Terminali akumulatora: Povežite se s baterijskim blokom.
- PV terminali: Povežite se na niz solarnih panela.
- Load Control Relay: Output for connecting DC loads (if applicable).
- RBVS Port: Remote Battery Voltage Sensor port.
- Utility/Generator Relay ON: Control signal for external utility/generator.
- Utility/Generator Relay OFF: Control signal for external utility/generator.
- RS485 Port (5VDC/200mA): Communication port for remote monitoring or parallel connection.
- RTS port: Remote Temperature Sensor port.
- Generator and Load Relay Enable: Control input for generator and load relays.
- PV Reverse Polarity Alarm Indicator: LED indicator for PV reverse polarity.
- Terminal za uzemljenje: For system grounding.
- Dugme SELECT: Used to navigate menu options.
- LED indikator punjenja: Označava status punjenja.
- Fault LED Indicator: Indicates system faults.
- Dugme ENTER: Koristi se za potvrdu izbora.
3.4 Interfejs ekrana

Slika 3.4.1: Example screens of the LCD display showing various system parameters.
The integrated LCD provides real-time monitoring of system parameters such as PV voltage, struja punjenja, zapremina baterijetage, load status, and temperature. Use the "SELECT" and "ENTER" buttons to navigate through the display screens and adjust settings.
4. Podešavanje i instalacija
Pravilna instalacija je ključna za siguran i efikasan rad vašeg solarnog regulatora punjenja. Pažljivo slijedite ove korake.
4.1 Montaža kontrolera
- Choose a vertical mounting location that is well-ventilated and protected from direct sunlight, high temperatures, and moisture.
- Ensure there is sufficient clearance around the controller for heat dissipation, especially above and below the heat sink fins.
- Mount the controller securely using appropriate fasteners for the mounting surface.
4.2 Ožičenje
Važno: Always connect the battery first, then the solar panel. Disconnect in the reverse order: solar panel first, then battery. Ensure all connections are tight and secure to prevent loose connections and overheating.

Slika 4.2.1: Standard connection diagram for the EPEVER 80A MPPT Solar Charge Controller with a single battery, PV panel, and AC load via an inverter.
- Spojite bateriju: Connect the positive and negative terminals of the battery bank to the controller's battery terminals. Observe correct polarity. Use recommended cable size (e.g., 16mm² / 6AWG).
- Spojite solarni panel: Connect the positive and negative terminals of the solar panel array to the controller's PV terminals. Ensure the PV open circuit voltage ne prelazi 150VDC.
- Spojite opterećenje (opciono): If using the load control feature, connect your DC load to the controller's load terminals.
- Povežite daljinski senzor temperature (RTS): Plug the RTS cable into the RTS port. This ensures accurate battery temperature compensation.
- Connect Remote Battery Voltage Senzor (RBVS) (opciono): Plug the RBVS cable into the RBVS port for more accurate battery voltage mjerenje.
- uzemljenje: Spojite uzemljenje kontrolera na uzemljenje.
4.3 Paralelna veza (opciono)
The EPEVER 80A MPPT controller supports parallel operation of up to 8 units to increase system capacity. This requires an RS485 communication cable and proper configuration.
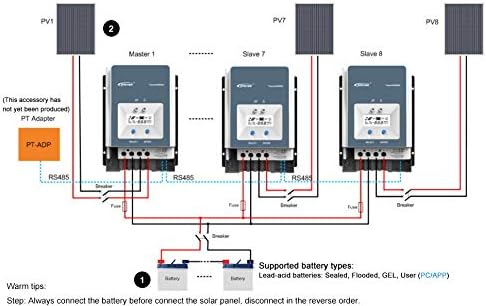
Slika 4.3.1: Diagram illustrating the parallel connection of multiple EPEVER MPPT controllers to a single battery bank.
For parallel connection, ensure all controllers are connected to the same battery bank and configured correctly via the RS485 communication port. Refer to the advanced user manual for detailed instructions on parallel setup and master/slave configuration.
4.4 Odabir tipa baterije
The controller supports various lead-acid battery types. It is crucial to select the correct battery type in the controller's settings to ensure optimal charging and battery longevity.
- Zapečaćeno: For sealed lead-acid batteries.
- AGM: For Absorbed Glass Mat batteries.
- gel: Za gel baterije.
- Poplavljeno: For flooded (wet cell) lead-acid batteries.
- Korisnik: Allows for custom charging parameters for specific battery types (e.g., non-standard lead-acid or user-defined settings). Note: This controller is not designed for Lithium batteries.
Refer to your battery manufacturer's specifications for recommended charging voltages and select the corresponding type in the controller's menu. Incorrect battery type selection can damage your batteries.
5. Operacija
5.1 Početno napajanje
After all connections are made and verified, the controller will power on automatically. The LCD display will show the current system status. The Charging LED indicator will illuminate when charging is active.
5.2 Status sistema za praćenje
Use the "SELECT" button to cycle through various display screens, showing parameters such as:
- PV Voltage (V) and Current (A)
- Battery Voltage (V) and Charging Current (A)
- Load Voltage (V) and Current (A)
- Battery Temperature (°C)
- Total Charged Energy (kWh)
- Total Discharged Energy (kWh)
5.3 Postavke parametara
To enter the parameter setting mode, press and hold the "ENTER" button for a few seconds. Use the "SELECT" button to navigate through parameters and the "ENTER" button to confirm changes. Parameters that can be adjusted include:
- Vrsta baterije
- Charging Voltage Setpoints (Float, Boost, Equalization)
- Load Control Mode (e.g., always on, dusk to dawn, timer)
- Vrijeme pozadinskog osvjetljenja LCD-a
- Koeficijent temperaturne kompenzacije
Refer to the detailed programming guide for specific values and advanced settings.
6. Održavanje
Regular maintenance ensures the longevity and optimal performance of your charge controller.
- Provjerite veze: Periodically inspect all wiring connections for tightness, corrosion, or damage. Tighten any loose connections.
- Očistite kontroler: Keep the controller clean and free of dust and debris. Use a dry cloth to wipe the exterior. Ensure the heat sink fins are not obstructed.
- Pregledajte ima li oštećenja: Provjerite ima li fizičkih oštećenja na casing, kablove ili terminale.
- Performanse monitora: Regularly check the display for normal operation and compare readings with expected values.
- Održavanje baterije: Follow your battery manufacturer's maintenance guidelines.
7. Otkrivanje problema
This section outlines common issues and their potential solutions. If the problem persists, contact customer support.
7.1 Common Protections and Indicators
The controller includes several protection mechanisms. The Fault LED indicator will illuminate or flash to indicate a fault condition.
- PV Over Current/Power: The solar input power or current exceeds the controller's rated limits. The controller will automatically limit the charging. Check PV array size.
- Kratki spoj fotonaponskog sistema: A short circuit in the solar panel wiring. Disconnect PV, check wiring, and reconnect.
- PV obrnuti polaritet: Solar panel connected with incorrect polarity. Disconnect PV, correct wiring, and reconnect. The PV reverse polarity alarm indicator will be active.
- Noćno obrnuto punjenje: Current flowing from battery to PV at night. This is usually prevented by the controller; if it occurs, check PV wiring.
- Battery Over Voltage: Battery voltage exceeds the overcharge protection setting. The controller will stop charging.
- Prekomjerno pražnjenje baterije: Battery voltage drops below the over-discharge protection setting. The load output will be disconnected.
- Pregrijavanje baterije: Battery temperature is too high. Charging current will be reduced or stopped. Ensure proper battery ventilation.
- Pregrijavanje kontrolera: Internal temperature of the controller is too high. Charging current will be reduced. Ensure adequate ventilation around the controller.
- TVS High Voltage Tranzijenti: Internal protection against voltage spikes.
7.2 Opći koraci za rješavanje problema
- Nema prikaza/Nema napajanja: Check battery connections and fuse. Ensure battery voltage je unutar radnog raspona (8V~68V).
- Bez punjenja: Check PV connections, ensure solar panels are receiving sunlight, and verify PV voltage is sufficient (above battery voltage). Check for PV short circuit or reverse polarity.
- Niska struja punjenja: Check PV array size, shading, and battery state of charge. Ensure battery type settings are correct.
- Učitavanje ne radi: Check load connections, ensure battery voltage is above over-discharge protection, and verify load control settings.
8. Specifikacije
| Parametar | Vrijednost |
|---|---|
| System Voltage | 12V / 24V / 36V / 48V DC Auto |
| Nazivna struja punjenja | 80A |
| Max. PV ulazna snaga | 1000W (12V), 2000W (24V), 3000W (36V), 4000W (48V) |
| Max. PV Open Circuit Voltage | 150VDC |
| Izbor vrste baterije | Lead-acid (Gel, Sealed, AGM, Flooded) and User |
| Uzemljenje | Common Negative Ground |
| Ulaz baterije Voltage domet | 8V ~ 68V |
| Temperaturna kompenzacija | -3mV / ℃ / 2V (zadano) |
| Preporučena veličina kabla | 16 mm² (6AWG) |
| Dimenzije (D x Š x V) | 394 mm × 236 mm × 119 mm |
| Težina | 4.5 kg (9.92 lbs) |
| Komunikacija | Isolated RS-485 (5VDC/200mA) with MODBUS protocol |
| Max. Efikasnost | 98.7% |
9. Jamstvo i podrška
EPEVER products are designed for reliability and performance. This product comes with a standard manufacturer's warranty against defects in materials and workmanship. Please refer to the warranty card included with your product or visit the official EPEVER webstranicu za detaljne uslove i odredbe garancije.
For technical support, troubleshooting assistance, or warranty claims, please contact EPEVER customer service through their official website or the contact information provided in your product packaging. When contacting support, please have your product model number and purchase date available.
Webstranica: www.epever.com (Examplink, stvarni link se može razlikovati)


