1. Uvod
This manual provides essential information for the safe and efficient operation of your Casio XJ-F10X LED XGA Projector. Please read this manual thoroughly before using the projector and retain it for future reference. Understanding the instructions will ensure optimal performance and extend the lifespan of your device.
2. Važna sigurnosna uputstva
Pridržavajte se sljedećih sigurnosnih mjera opreza kako biste spriječili oštećenje projektora i osigurali sigurnost korisnika:
- Ne blokirajte ventilacijske otvore. Osigurajte dovoljno prostora oko projektora za pravilan protok zraka.
- Ne izlažite projektor kiši ili vlazi kako biste smanjili rizik od požara ili strujnog udara.
- Use only the power cord supplied with the projector or an approved replacement.
- Avoid looking directly into the projector lens when the light source is active, as it can cause eye damage.
- Ne pokušavajte sami servisirati ovaj proizvod. Sve servise prepustite kvalificiranom servisnom osoblju.
- Postavite projektor na stabilnu, ravnu površinu kako biste spriječili njegov pad.
3. Sadržaj paketa
Provjerite da li su sve stavke prisutne u paketu:
- Casio XJ-F10X Projector
- Kabl za napajanje
- Daljinski upravljač (sa baterijama)
- VGA kabel
- Korisnički priručnik (ovaj dokument)
4. Proizvod je gotovview
Familiarize yourself with the various parts and controls of your Casio XJ-F10X projector.
4.1 Prednja ploča

The front panel features the projection lens, which emits the image. Ventilation grilles are located on the side to ensure proper cooling during operation. A small infrared receiver for the remote control may also be present.
4.2 Zadnja ploča i priključci

The rear panel houses all the necessary input and output ports for connecting external devices. These include:
- HDMI Type A x 2: For digital video and audio input (HDCP support).
- VGA (D-Sub 15-pin): For analog computer input.
- S-Video: Za analogni video ulaz.
- Kompozitni video (RCA): For standard definition video input.
- Audio In (RCA L/R, 3.5mm mini jack): Za analogni audio ulaz.
- Audio Out (3.5mm mini jack): Za povezivanje eksternih audio sistema.
- RS-232: Za upravljanje projektorom putem računara ili kontrolnog sistema.
- USB (Type A, Type B): Za servis ili ažuriranja firmvera.
- Ulaz za napajanje: Za spajanje AC kabla za napajanje.
4.3 Kontrole na gornjoj ploči
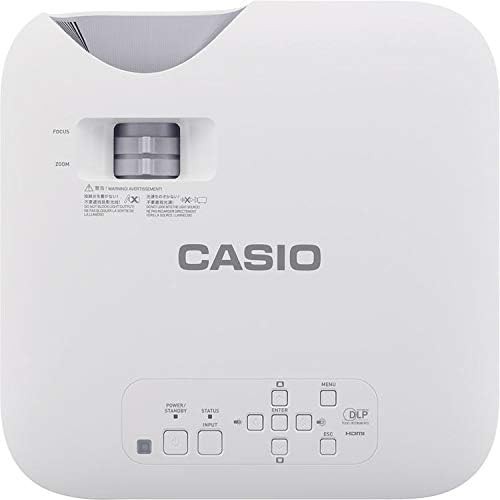
The top panel provides direct access to essential projector functions:
- Dugme za napajanje: Uključuje ili isključuje projektor.
- Dugme za unos: Odabire ulazni izvor (HDMI, VGA, itd.).
- Dugme menija: Otvara meni na ekranu (OSD).
- Navigacijski gumbi (gore/dolje/lijevo/desno): Koristi se za navigaciju kroz opcije menija.
- Dugme Enter: Potvrđuje odabire u meniju.
- ESC dugme: Izlazi iz trenutnog menija ili se vraća na prethodni ekran.
- Ručica za zumiranje: Podešava veličinu slike.
- Prsten za fokus: Oštri projektovanu sliku.
5. Vodič za postavljanje
5.1 Postavljanje projektora
Proper placement is crucial for optimal image quality.
- Udaljenost: Position the projector at an appropriate distance from the screen to achieve the desired image size. Refer to the specifications for throw ratio details.
- ugao: Ensure the projector is perpendicular to the screen for a rectangular image. Use the keystone correction function if the image appears trapezoidal.
- ventilacija: Maintain clear space around the projector's ventilation openings to prevent overheating.
5.2 Povezivanje uređaja
Follow these steps to connect your source devices:
- Ensure the projector and all source devices are powered off before making connections.
- Connect the appropriate video cable (HDMI, VGA, S-Video, or Composite) from your source device to the corresponding input port on the projector's rear panel.
- If using an analog video input (VGA, S-Video, Composite), connect an audio cable from your source device's audio output to the projector's Audio In port. HDMI carries both video and audio.
- Connect the power cord to the projector's power inlet and then to a grounded electrical outlet.
6. Uputstvo za upotrebu
6.1 Uključivanje i isključivanje
- Uključeno: Press the Power button on the projector's top panel or the remote control. The projector will reach full brightness in approximately 5 seconds due to its Direct On/Off function.
- Iskljuciti: Press the Power button again. The projector will shut down immediately without a cool-down period.
6.2 Osnovna projekcija
- Turn on the projector and your source device.
- Pritisnite Input button on the projector or remote control repeatedly to select the correct input source (e.g., HDMI 1, VGA).
- Podesite Zoom lever to achieve the desired image size on the screen.
- Podesite Focus ring until the image appears sharp and clear.
- If the image is distorted (trapezoidal), use the keystone correction feature in the OSD menu to correct it.
7. Održavanje
7.1 Čišćenje projektora
- Objektiv: Gently wipe the lens with a soft, lint-free cloth specifically designed for optical surfaces. Do not use abrasive cleaners.
- Casing: Obrišite projektor casing with a soft, dry cloth. For stubborn dirt, slightly dampNamočite krpu vodom i blagim deterdžentom, a zatim obrišite suhom krpom.
- ventilacija: Periodically check and clean the ventilation grilles to ensure they are free from dust and debris. Use a soft brush or compressed air.
7.2 Light Source Longevity
The Casio XJ-F10X utilizes a mercury-free LED hybrid light source, offering exceptional durability and a long operational life of up to 20,000 hours without requiring lamp replacement. This significantly reduces maintenance needs and costs.
8. Otkrivanje problema
Ako naiđete na probleme s projektorom, pogledajte sljedeće uobičajene probleme i rješenja:
- Nema slike:
- Provjerite je li projektor uključen i je li kabel za napajanje sigurno spojen.
- Provjerite da li je odabran ispravan ulazni izvor.
- Provjerite spojni kabel između projektora i izvornog uređaja.
- Provjerite je li izvorni uređaj uključen i daje li signal.
- Zatamnjena slika:
- Check the projector's brightness settings in the OSD menu.
- Ensure the room is sufficiently dark for projection.
- Nema zvuka:
- If using an analog video input, ensure the audio cable is connected.
- Provjerite postavke jačine zvuka i na projektoru i na izvornom uređaju.
- Ensure the correct audio input is selected if applicable.
- Slika je mutna:
- Podesite fokusni prsten na sočivu projektora.
- Ensure the projector is placed at an appropriate distance from the screen.
- Slika je trapezoidna:
- Use the keystone correction function in the OSD menu to adjust the image shape.
- Pokušajte postaviti projektor što je moguće okomito u odnosu na platno.
9. Tehničke specifikacije
| Feature | Specifikacija |
|---|---|
| Broj modela | XJ-F10X |
| Native Resolution | XGA (1024 x 768) |
| Osvetljenost | 3,300 lumena |
| Kontrast Ratio | 20,000:1 |
| Display Chip | 0.65" DLP Chip |
| Izvor svjetlosti | Hibridna LED |
| Život izvora svjetlosti | Do 20,000 sati |
| Lens Type | 1.5x Manual Zoom & Focus |
| Aspect Ratio | 4:3 Native |
| Inputs | HDMI Type A x 2, S-Video, VGA, RS-232, Composite Video, RCA Audio In |
| Dimenzije proizvoda | 11.8 x 11.8 x 3.8 inča |
| Težina artikla | 10.78 funte |
10. Garancija i korisnička podrška
The Casio XJ-F10X Projector is covered by a 3-year parts and labor warranty. The LED hybrid light source is covered by a 5-year or 10,000-hour warranty, whichever comes first. For technical support, service, or warranty claims, please contact Casio customer support through their official webweb-mjesto ili kontakt informacije navedene u dokumentaciji o kupovini.
Please have your model number (XJ-F10X) and purchase date available when contacting support.


