1. Uvod
The Movo VS2000PRO is a professional-grade, hand-held camera stabilizing system designed to achieve smooth, fluid motion shots with DSLR cameras and camcorders weighing up to 6.6 lbs (3 kg). This manual provides detailed instructions for assembly, balancing, operation, and maintenance to ensure optimal performance and longevity of your stabilizer.
2. Komponente proizvoda
The VS2000PRO system consists of several key components that work together to provide stable footage. Familiarize yourself with each part before proceeding with setup.
- Quick-Release Camera Plate: For secure and rapid attachment/detachment of your camera.
- Three-Axis Gimbal: Allows for smooth, isolated movement of the camera from the operator's hand.
- Ergonomski rukohvat: Omogućava udobno i sigurno rukovanje.
- Telescoping Central Post: Adjustable height for vertical balance.
- Base Platform with Counterweights: Provides the necessary weight for vertical balance.
- Micro Balancing Adjustment Screws: For precise fore-and-aft and side-to-side horizontal balancing.

Figure 1: The Movo VS2000PRO Telescoping Video Stabilizer System, fully assembled.

Slika 2: Krupni plan view of the quick-release camera plate with micro-adjustment knobs.

Figure 3: The three-axis gimbal and ergonomic hand grip for smooth camera movement.

Figure 4: The base platform with adjustable counterweights for vertical balance.
3. Setup and Balancing
Proper balancing is crucial for the stabilizer to function correctly. This process involves both horizontal and vertical adjustments.
3.1 Pričvršćivanje kamere
- Ensure the quick-release plate is detached from the stabilizer.
- Securely attach your camera to the quick-release plate using the provided mounting screw. Ensure it is tightened firmly to prevent movement.
- Slide the quick-release plate with the camera attached back onto the stabilizer's camera platform. Lock it into place using the designated lever or knob.
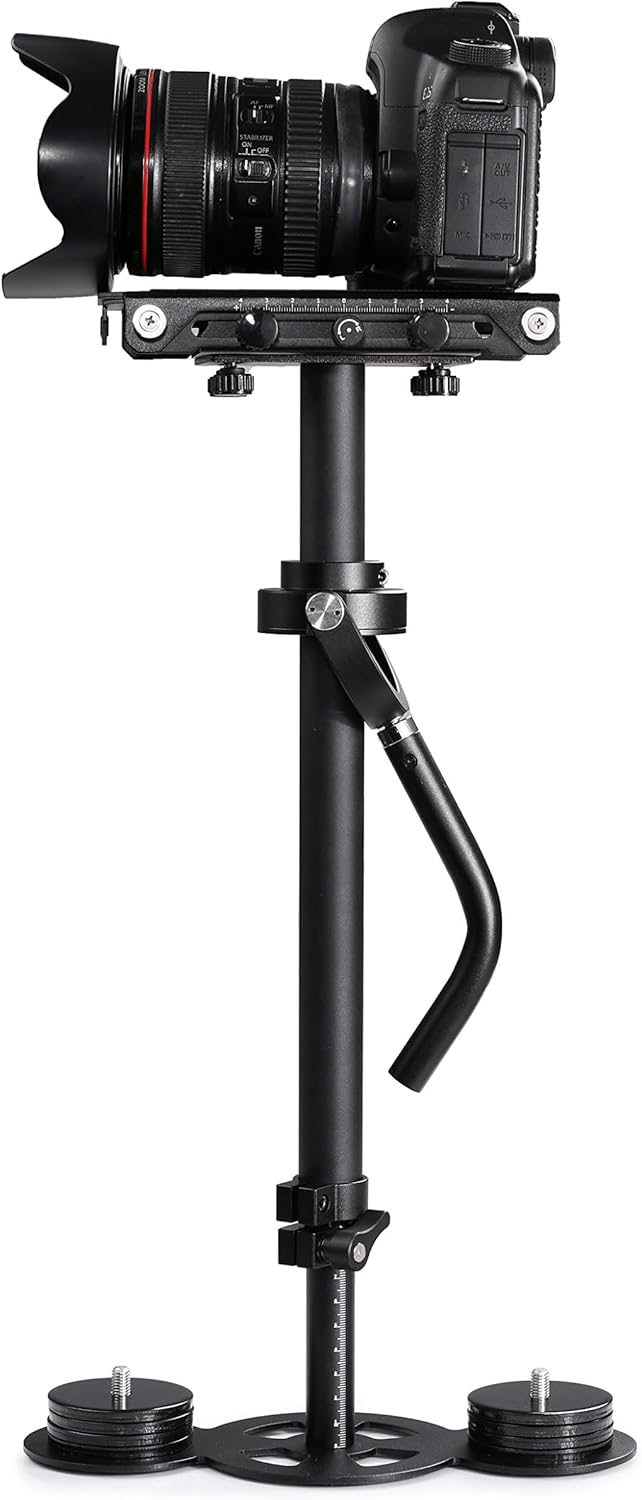
Figure 5: A DSLR camera mounted on the VS2000PRO stabilizer.
3.2 Initial Balance Adjustment (Telescoping Post)
The length of the telescoping central post affects the vertical balance. Begin by extending the post to a medium length.
- Loosen the locking knob on the telescoping post.
- Adjust the post length. A longer post generally requires more counterweights.
- Tighten the locking knob to secure the post at the desired length.

Figure 6: The stabilizer with its telescoping post extended.
3.3 Horizontal Balancing (Fore-and-Aft, Side-to-Side)
This step ensures the camera is centered directly above the gimbal. Use the micro-adjustment screws on the camera platform.
- Hold the stabilizer by the gimbal handle, ensuring the camera platform is level.
- Observe if the camera tilts forward/backward or left/right.
- Use the fore-and-aft trim screw to move the camera platform forward or backward until it is horizontally balanced.
- Use the side-to-side trim screw to move the camera platform left or right until it is horizontally balanced.
- The camera should remain level when released.

Figure 7: Close-up of the camera platform with fore-and-aft and side-to-side adjustment knobs.
3.4 Vertical Balancing (Drop Time)
Vertical balance is achieved by adjusting the number of counterweights and the length of the telescoping post. The goal is a 'drop time' of 2-3 seconds.
- With the camera horizontally balanced, hold the stabilizer horizontally and tilt the camera 90 degrees to one side.
- Release the camera and time how long it takes to swing back to the vertical position. This is the 'drop time'.
- If the drop time is too fast (less than 2 seconds), the stabilizer is top-heavy. Add more counterweights to the base or shorten the telescoping post.
- If the drop time is too slow (more than 3 seconds), the stabilizer is bottom-heavy. Remove counterweights from the base or lengthen the telescoping post.
- Repeat steps 1-4 until a drop time of 2-3 seconds is achieved.

Figure 8: The base platform showing the attachment points for counterweights.
4. Smjernice za rad
Once balanced, the VS2000PRO allows for smooth camera movements. Practice is key to mastering its operation.
4.1 Holding the Stabilizer
- Hold the ergonomic hand grip gently. Avoid gripping too tightly, as this can transfer unwanted movements to the camera.
- Keep your arm slightly bent to act as a shock absorber.
- Use your free hand to lightly guide the camera's direction, if necessary, by touching the central post or the camera itself, but avoid applying pressure that would disrupt the balance.
4.2 Movement Techniques
- hodanje: Walk with a smooth, gliding motion, bending your knees slightly to absorb impacts.
- Pomicanje: Rotate your body smoothly from the hips to achieve horizontal camera movement.
- Naginjanje: Gently raise or lower the hand grip to achieve vertical camera movement.
- Low Angle Shots: Extend the telescoping post and hold the stabilizer upside down for low-to-the-ground shots.
5. Održavanje
Regular maintenance will help preserve the functionality and appearance of your Movo VS2000PRO stabilizer.
- čišćenje: Wipe down the stabilizer with a soft, dry cloth after each use to remove dust and fingerprints. For stubborn dirt, use a slightly damp krpom i dobro osušite. Izbjegavajte jake hemikalije.
- Skladištenje: Store the stabilizer in a clean, dry place, preferably in a protective case, to prevent damage and dust accumulation.
- inspekcija: Periodically check all screws, knobs, and connections to ensure they are tight. Ensure the gimbal moves freely without resistance.
- podmazivanje: The gimbal is designed for smooth operation and generally does not require lubrication. If you notice stiffness, contact support.
6. Otkrivanje problema
If you encounter issues with your VS2000PRO, refer to the following common problems and solutions:
| Problem | Mogući uzrok | Rješenje |
|---|---|---|
| Wobbly or unstable footage | Improper balancing (horizontal or vertical) | Re-balance the stabilizer carefully, following the steps in Section 3. Ensure the drop time is 2-3 seconds. |
| Camera drifts to one side | Horizontal balance is off | Adjust the side-to-side trim screw on the camera platform until the camera remains level. |
| Difficulty achieving smooth pans/tilts | Grip is too tight or gimbal is stiff | Hold the gimbal handle gently. Ensure the gimbal moves freely. If stiff, inspect for obstructions. |
| Stabilizer feels too heavy/light | Incorrect number of counterweights or post length | Adjust the number of counterweights and/or the telescoping post length to achieve proper vertical balance and desired feel. |
7. Specifikacije
Detailed technical specifications for the Movo VS2000PRO Telescoping Video Stabilizer System:
| Feature | Specifikacija |
|---|---|
| Građevinski materijal | Aluminijum |
| Maksimalna podržana težina | 6.6 lbs (3 kg) |
| Adjustable Post Length | 15.7 - 23.6 inča (40 - 60 cm) |
| Težina artikla | 4.6 lbs (2.1 kg) |
| Dimenzije paketa | 48.01 x 23.6 x 16 cm |
| Boja | Crna |
| Kompatibilni uređaji | Camcorder, Camera (DSLR) |
| UPC | 817711020155 |
8. Garancija i podrška
The Movo VS2000PRO Telescoping Video Stabilizer System is backed by a 1-Year Movo WarrantyOva garancija pokriva nedostatke u proizvodnji i osigurava da vaš proizvod radi kako se očekuje pri normalnoj upotrebi.
For technical assistance, troubleshooting, or warranty claims, please contact Movo's U.S.A.-based support team. Refer to the official Movo webstranicu za najnovije kontakt informacije.
Online resursi: For additional tips, video tutorials, and frequently asked questions, visit the official Movo support page.


