
Image: The WAVLINK WL-WN518W Wireless-N WiFi Range Extender, a compact wall-plug device.
1. Uvod
The WAVLINK WL-WN518W is a compact Wireless-N WiFi Range Extender designed to enhance the coverage and signal strength of your existing wireless network. It helps eliminate Wi-Fi "dead zones" and provides reliable internet access in areas with weak signals. This device supports 300Mbps wireless N speeds and can also function as a wireless adapter for wired devices via its Ethernet port.
2. Sadržaj paketa
Provjerite da li se sve stavke nalaze u vašem paketu:
- 1 x WAVLINK WL-WN518W Wireless-N WiFi Range Extender
- 1 x mrežni kabel RJ-45
- 1 x Korisnički priručnik (ovaj dokument)

Image: The WAVLINK WL-WN518W WiFi Range Extender shown with its included RJ-45 networking cable and user manual.
3. Proizvod je gotovview
Familiarize yourself with the components of your WAVLINK WL-WN518W extender.
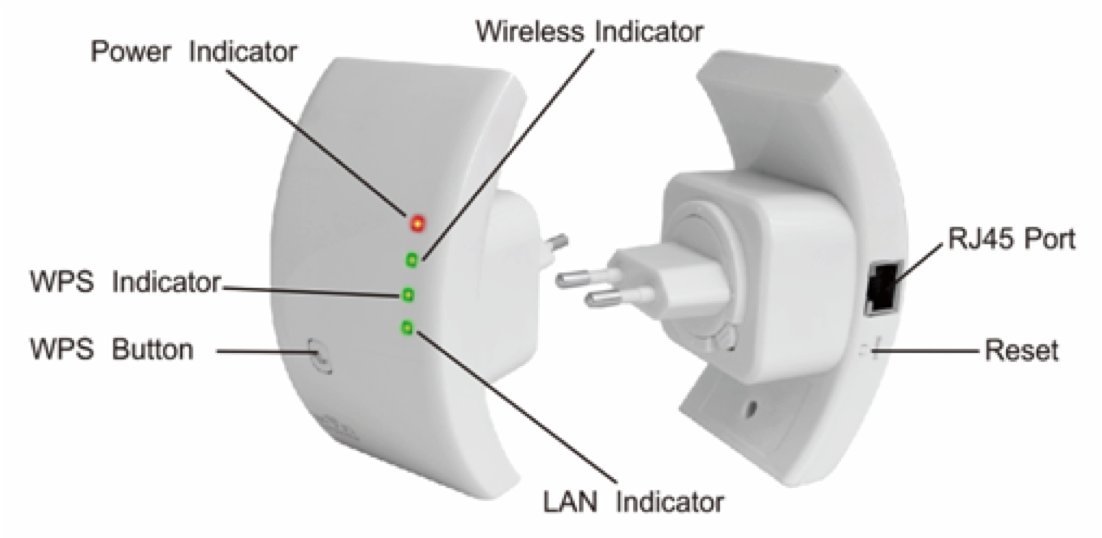
Image: A diagram illustrating the various ports and LED indicators on the WAVLINK WL-WN518W extender, including Power, Wireless, WPS, LAN indicators, WPS button, RJ45 Port, and Reset button.
- Indikator napajanja: Svijetli kada je uređaj uključen.
- Indikator bežične mreže: Označava bežičnu aktivnost.
- WPS indikator: Shows the status of the WPS connection.
- LAN indikator: Označava aktivnost na Ethernet portu.
- WPS dugme: Koristi se za brzo podešavanje s ruterima koji podržavaju WPS.
- RJ45 port: Ethernet port for connecting wired devices or for AP mode setup.
- Dugme za resetiranje: Koristi se za vraćanje uređaja na tvorničke postavke.
4. Podešavanje
4.1 Optimalno postavljanje
For best performance, plug the extender into an electrical outlet that is approximately halfway between your router and the area with a weak Wi-Fi signal. Avoid placing it near large metal objects, concrete walls, or other devices that may cause interference.
4.2 Quick Setup using WPS (Wi-Fi Protected Setup)
- Plug the WAVLINK extender into a power outlet. Wait for the Power LED to turn on.
- Pritisnite WPS dugme na vašem glavnom ruteru.
- Within two minutes, press the WPS button on the WAVLINK extender.
- The WPS indicator on the extender will flash during the connection process and then turn solid when successfully connected.
- Relocate the extender to an optimal position (see 4.1) if necessary.
4.3 Ručno podešavanje putem Web Browser
- Plug the WAVLINK extender into a power outlet near your computer.
- Connect your computer to the extender either wirelessly or via an Ethernet cable.
- bežični: Connect to the extender's default Wi-Fi network (e.g., "WAVLINK_EXT" or similar, check the label on the device).
- Ožičeno: Connect an Ethernet cable from your computer's LAN port to the RJ45 port on the extender.
- Otvori a web preglednik (npr. Chrome, Firefox, Edge) i unesite zadanu IP adresu ili naziv domene (npr. http://192.168.10.1 or http://ap.setup) into the address bar. Refer to the device label for the exact default access details.
- Enter the default username and password (usually "admin" for both, check the device label).
- Follow the on-screen wizard to select your desired operating mode (Repeater or AP) and configure the network settings.
- Once configured, you can relocate the extender to an optimal position.
5. Načini rada
5.1 Režim ponavljanja
In Repeater Mode, the device extends the coverage of an existing wireless network. It connects to your main router wirelessly and rebroadcasts the signal, creating a larger Wi-Fi coverage area. This is ideal for eliminating dead zones in your home or office.
5.2 Režim pristupne tačke (AP)
In AP Mode, the device transforms a wired network connection into a wireless one. Connect the extender to your router or network switch via an Ethernet cable, and it will create a new wireless network for your devices to connect to. This is useful for adding Wi-Fi capability to a wired-only network.
5.3 Router Mode (If Applicable)
While primarily an extender/AP, some models may offer a basic Router Mode. In this mode, the device connects to an internet source (like a modem) via its Ethernet port and creates a private wireless network, acting as a primary router. Refer to the device's web interface for specific router functionalities if available.
6. Održavanje
6.1 Nega uređaja
- Keep the device in a dry environment, away from water and excessive humidity.
- Izbjegavajte izlaganje uređaja ekstremnim temperaturama.
- Uređaj čistite mekom, suhom krpom. Ne koristite tekuća sredstva za čišćenje ili aerosole.
6.2 Ažuriranja firmvera
Povremeno provjeravajte službene WAVLINK stranice website for firmware updates. Firmware updates can improve performance, add new features, and fix bugs. Follow the instructions provided on the website carefully when performing an update.
6.3 Vraćanje na tvorničke postavke
If the device is not functioning correctly or you forget the login credentials, you can perform a factory reset. With the device powered on, press and hold the Reset button (usually located in a small pinhole) for about 5-10 seconds until the LEDs flash. The device will restart with default settings.
7. Otkrivanje problema
- Nema napajanja: Ensure the extender is securely plugged into a working electrical outlet. Check if the power outlet is functional.
- Ne mogu pristupiti Web Stranica upravljanja:
- Verify your computer is connected to the extender's network (either wirelessly or via Ethernet).
- Ensure your computer's IP settings are set to "Obtain an IP address automatically".
- Pokušajte obrisati keš memoriju i kolačiće vašeg preglednika ili koristite drugi preglednik.
- Confirm the correct IP address or domain name is entered (e.g., http://192.168.10.1).
- Izvršite vraćanje na fabrička podešavanja ako je potrebno.
- Slab signal ili česti prekidi veze:
- Relocate the extender closer to your main router, ensuring it's still within a good signal range.
- Avoid physical obstructions and sources of interference.
- Provjerite je li firmver vašeg rutera ažuriran.
- Incorrect Password for Extended Network: Ensure you are entering the correct Wi-Fi password for your main network. If you changed the extender's network name or password, use those credentials.
8. Specifikacije
| Feature | Opis |
|---|---|
| Model | WL-WN518W |
| Bežični standard | IEEE 802.11b/g/n |
| Bežična brzina | Do 300Mbps |
| Frekvencijski opseg | 2.4 GHz |
| Antena | 2 x 2dBi Integrated Antennas |
| Luke | 1 x RJ45 Ethernet Port |
| Dugmad | Reset, WPS |
| LED indikatori | Power, WLAN, WPS, LAN |
| Sigurnost | 64/128-bit WEP, AES, TKIP, WPA, WPA2, 802.1x, WPA-PSK, WPA2-PSK, MAC, WDS |
| Napajanje | Internal DC5V / 1A |
| Potrošnja energije | 2.3W |
| Dimenzije | 12.4 x 12 x 9.6 cm (pakovanje) |
| Težina | 240 g |
| Radni režimi | Repeater, AP |
9. Garancija i podrška
For warranty information and technical support, please refer to the official WAVLINK webweb-mjesto ili kontaktirajte njihovu korisničku službu. Sačuvajte račun za kupovinu u slučaju reklamacije.
Zvanični WAVLINK Webstranica: www.wavlink.com