1. Uvod
This manual provides essential information for the safe and efficient use of your Hitachi CP-EX251N XGA 3LCD Projector. Please read this manual thoroughly before operating the projector and keep it for future reference. The CP-EX251N is designed for clear, bright projections with 2700 lumens brightness and XGA (1024x768) native resolution, featuring 3LCD technology and a long-life lamp.
2. Sigurnosne informacije
Pridržavajte se sljedećih sigurnosnih mjera opreza kako biste spriječili požar, strujni udar ili ozljede.
- Izvor napajanja: Use only the power supply specified for this unit. Ensure the power cord is securely plugged into an outlet.
- ventilacija: Ne blokirajte ventilacijske otvore. Osigurajte dovoljno prostora oko projektora za pravilan protok zraka kako biste spriječili pregrijavanje.
- toplina: Projektor lamp becomes very hot during operation. Allow the projector to cool down before handling or performing maintenance.
- Lamp: Ne gledajte direktno u sočivo projektora kada je lamp je uključen, jer jarko svjetlo može oštetiti vaše oči.
- Vlaga: Ne izlažite projektor kiši ili vlazi kako biste spriječili požar ili strujni udar.
- servisiranje: Za sve servisne radove obratite se kvalifikovanom servisnom osoblju. Ne pokušavajte sami otvarati ili popravljati projektor.
3. Sadržaj paketa
Provjerite da li su sve stavke prisutne u paketu:
- Hitachi CP-EX251N Projector
- Kabl za napajanje
- Daljinski upravljač sa baterijama
- VGA kabel
- Korisnički priručnik (ovaj dokument)
4. Proizvod je gotovview

Slika 4.1: Pod uglom view of the Hitachi CP-EX251N Projector, showing the lens, control panel, and ventilation.
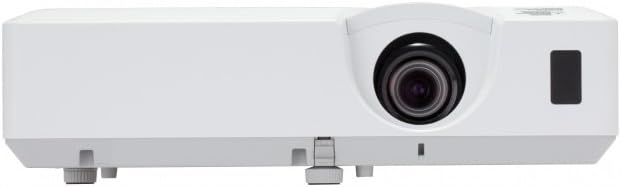
Slika 4.2: Prednja strana view of the Hitachi CP-EX251N Projector, highlighting the projection lens and front IR receiver.
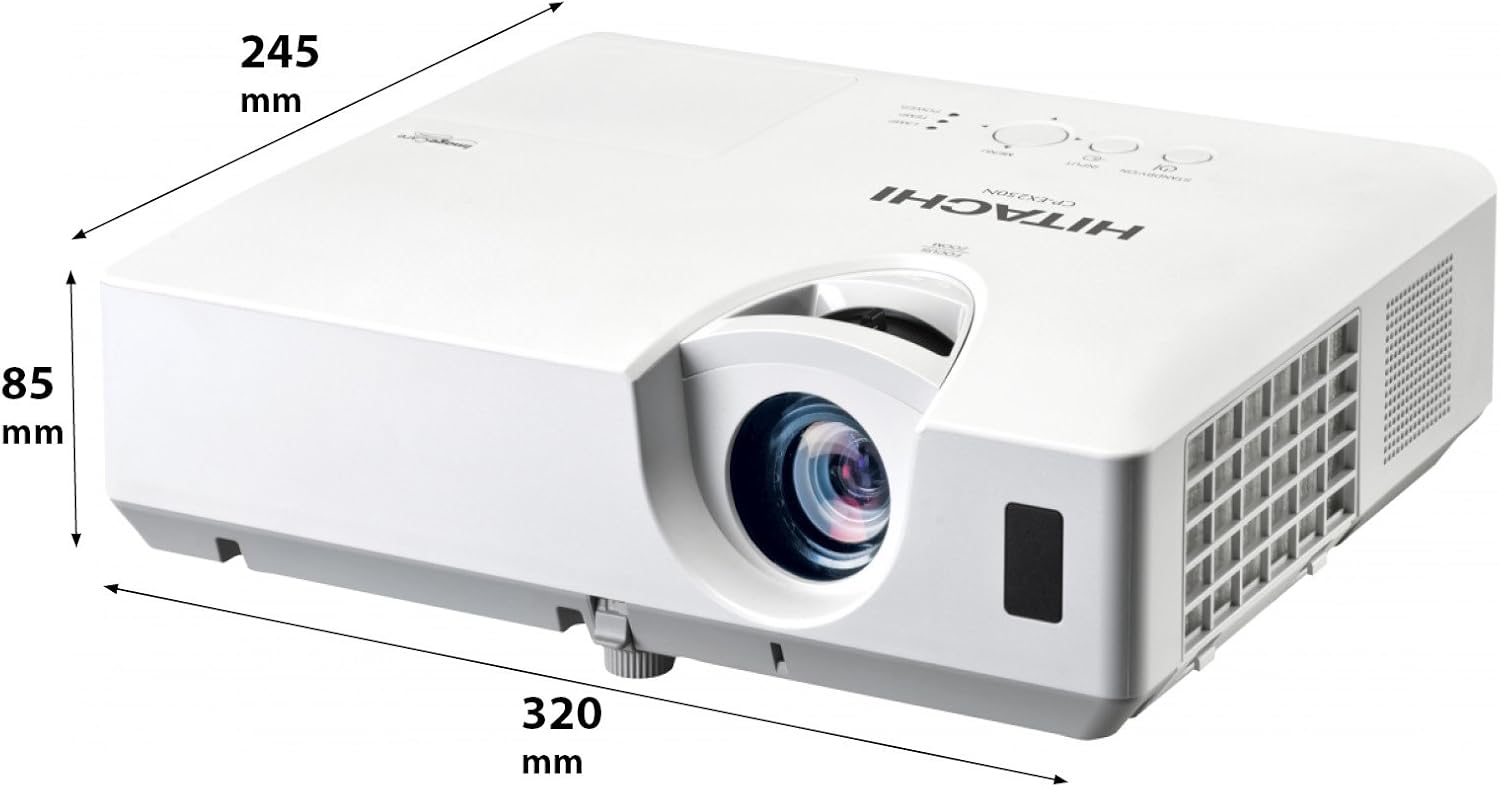
Slika 4.3: Pod uglom view of the projector illustrating its approximate dimensions (320mm length, 245mm width, 85mm height).
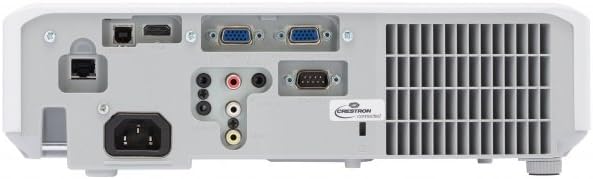
Figure 4.4: Rear panel of the projector, showing various input and output ports including HDMI, VGA, Composite, RS232C, and RJ45.
5. Podešavanje
5.1 Postavljanje
Position the projector on a stable, flat surface or mount it securely. Ensure the projector is at an appropriate distance from the screen to achieve the desired image size. Maintain clear space around the projector for ventilation.
5.2 Povezivanje napajanja
- Spojite kabel za napajanje na AC utičnicu projektora.
- Uključite drugi kraj kabla za napajanje u uzemljenu električnu utičnicu.
5.3 Povezivanje ulaznih izvora
The CP-EX251N offers multiple connectivity options:
- HDMI: Connect an HDMI cable from your source device (e.g., laptop, Blu-ray player) to the projector's HDMI port.
- VGA: Connect a VGA cable from your computer to one of the projector's VGA ports (VGA1 or VGA2).
- Kompozitni video: Use an RCA composite video cable to connect devices like DVD players to the composite video input.
- audio: Connect audio cables to the corresponding audio input jacks if using analog video sources.
- Kontrola: For remote control and monitoring, connect an RS232C serial cable or an RJ45 Ethernet cable to a control system.
5.4 Početno uključivanje i podešavanje slike
- Press the Power button on the projector or remote control. The power indicator will light up.
- Podesite Fokusni prsten on the lens until the image is sharp.
- Podesite Zoom Ring on the lens to achieve the desired image size.
- Ako slika izgleda trapezoidno, koristite Ispravka Keystone-a function (usually found in the projector menu or via dedicated buttons on the remote) to square the image.
6. Operativni
6.1 Uključivanje/isključivanje napajanja
- Za uključivanje: Pritisnite dugme za uključivanje jednom.
- Za isključivanje: Press the Power button twice. The projector will enter a cooling cycle before shutting down completely. Do not unplug the projector during the cooling cycle.
6.2 Odabir ulaza
Press the 'Input' or 'Source' button on the remote control or projector control panel to cycle through available input sources (HDMI, VGA1, VGA2, Composite).
6.3 Navigacija izbornikom
Use the 'Menu' button to access the on-screen display (OSD) menu. Navigate using the arrow buttons and confirm selections with the 'Enter' button. The menu allows adjustment of picture settings, audio, display options, and system settings.
6.4 Podešavanja slike
Unutar OSD menija možete podesiti:
- Svjetlina: Podesite ukupnu svjetlinu ili tamu slike.
- Kontrast: Adjust the difference between the light and dark areas of the image.
- Način rada u boji: Select from various preset modes (e.g., Standard, Dynamic, Cinema, sRGB) or customize settings.
- Omjer širine i visine: Promijenite omjer prikaza (npr. 4:3, 16:9).
6.5 Ekološki režim
Activate Eco Mode to reduce lamp brightness, conserve energy, and extend lamp life up to 10,000 hours. This setting can be found in the projector's OSD menu.
7. Održavanje
7.1 Čišćenje objektiva
Pažljivo obrišite sočivo projektora mekom krpom koja ne ostavlja dlačice, posebno dizajniranom za optičke površine. Nemojte koristiti abrazivna sredstva za čišćenje ili prekomjernu silu.
7.2 Čišćenje vazdušnog filtera
Regularly clean the air filter to maintain optimal performance and prevent overheating. Refer to the projector's OSD menu for filter usage time. Remove the filter cover and gently clean the filter with a soft brush or vacuum cleaner. Replace the filter if it is damaged or excessively dirty.
7.3 Lamp Zamjena
Projektor lamp has a long lifespan, but will eventually require replacement. When the lamp indicator lights up or the image becomes dim, replace the lamp. Always use a genuine Hitachi replacement lamp. Allow the projector to cool completely before attempting lamp replacement. Consult the full service manual for detailed lamp upute za zamjenu.
7.4 Skladištenje
When storing the projector for an extended period, ensure it is powered off and cooled down. Store it in a cool, dry place, away from direct sunlight and extreme temperatures.
8. Otkrivanje problema
| Problem | Mogući uzrok | Rješenje |
|---|---|---|
| Nema struje | Power cord disconnected; Power outlet faulty; Projector in standby mode. | Check power cord connection; Try a different outlet; Press the Power button. |
| Nema prikazane slike | Input source not selected; Cable not connected properly; Source device not outputting signal. | Select correct input source; Reconnect video cable; Check source device settings. |
| Slika je iskrivljena ili mutna | Focus/Zoom not adjusted; Keystone not corrected; Projector not perpendicular to screen. | Adjust Focus and Zoom rings; Use Keystone correction; Reposition projector. |
| Nema zvuka | Audio cable not connected; Volume too low; Mute function active. | Connect audio cable (if applicable); Increase volume; Deactivate mute. |
| Daljinski upravljač ne radi | Batteries depleted; Obstruction between remote and projector; Remote sensor blocked. | Replace batteries; Remove obstructions; Ensure clear line of sight to IR sensor. |
9. Specifikacije
| Feature | Specifikacija |
|---|---|
| Broj modela | CP-EX251N |
| Display Technology | 3LCD |
| Osvetljenost | 2700 lumena |
| Native Resolution | XGA (1024 x 768) |
| Lamp Život | Up to 10,000 hours (in Eco Mode) |
| Povezivanje | HDMI x 1, VGA x 2, Component (Shared) x 2, Composite x 1, RS232C, RJ45 |
| Audio izlaz | 16W zvučnik |
| Težina artikla | 6.83 funte (otprilike 3.1 kg) |
| Dimenzije proizvoda | 6 x 12 x 14 inča (približno 15.2 x 30.5 x 35.6 cm) |
| Preporučena upotreba | Posao, obrazovanje, igre, kućno kino |
| Posebna karakteristika | Prijenosni |
10. Garancija i podrška
Za informacije o garanciji, molimo pogledajte garantni list koji ste dobili uz proizvod ili posjetite službenu Hitachi web stranicu. website. For technical support, service, or inquiries about replacement parts, please contact Hitachi customer service through their official channels.
Online podrška: www.hitachi.com/support (Npramplink, molimo pogledajte stvarnu dokumentaciju proizvoda za ispravne URL)


