1. Uvod
This manual provides detailed instructions for the assembly, operation, maintenance, and troubleshooting of your TOOLPORT 13x20 ft Marquee Party Tent. Please read this manual thoroughly before attempting to set up or use the tent to ensure safe and correct usage.

Image 1.1: Fully assembled TOOLPORT 13x20 ft Marquee Party Tent. This image shows the tent's exterior with its white PVC canopy and arched window sections.
2. Sigurnosne informacije
Adherence to these safety guidelines is crucial for preventing injury and damage to the tent.
- Vremenski uslovi: Do not set up or use the tent in severe weather conditions, including strong winds, heavy rain, snow, or thunderstorms. The tent is designed for temporary use and is not intended to withstand extreme weather.
- Sidrenje: Always ensure the tent is securely anchored to the ground using the provided ground pegs and safety ropes. Insufficient anchoring can lead to the tent lifting or collapsing in windy conditions.
- Protivpožarna sigurnost: Keep all heat sources, open flames, and flammable materials away from the tent fabric. The PVC material is not fireproof.
- Montaža: Assembly should be performed by at least two adults. Follow all steps in the assembly instructions carefully.
- Strukturalni integritet: Do not hang heavy objects from the tent frame or canopy. The frame is designed to support the tent structure, not additional loads.
- Odabir lokacije: Choose a level, clear area free from overhead obstructions (e.g., tree branches, power lines) and sharp objects on the ground.
3. Sadržaj paketa
Prije početka montaže provjerite jesu li sve komponente prisutne. Ako bilo koji dijelovi nedostaju ili su oštećeni, obratite se korisničkoj podršci.
- Komponente čeličnih okvira (cijevi i spojnice)
- PVC Roof Tarpaulin (one piece)
- PVC Sidewalls (with integrated wind deflectors and window sections)
- PVC Front and Rear Panels (front panel with entrances)
- Ground Pegs
- Sigurnosna užad
- Uputstvo za montažu (ovaj dokument)
4. Upute za postavljanje
Follow these steps for proper assembly of your marquee tent. It is recommended that at least two people assist with the setup.
4.1 Sklapanje okvira
- Raspakujte komponente: Lay out all steel frame tubes and connectors on a clean, flat surface.
- Sastavite osnovni okvir: Connect the horizontal and vertical tubes to form the base rectangle of the tent. Ensure all connections are securely bolted.
- Ugradnja krovne konstrukcije: Attach the roof support tubes and ridge poles to the vertical uprights. The connections are bolted for stability.

Image 4.1: Diagram illustrating the steel frame structure of the tent. Numbered components indicate different parts of the frame for assembly reference.

Slika 4.2: Krupni plan view of a bolted connection point within the steel frame, highlighting the secure fastening mechanism.
4.2 Canopy and Sidewall Installation
- Drape Roof Tarpaulin: Carefully drape the one-piece PVC roof tarpaulin over the assembled frame. Ensure it is centered and evenly distributed.
- Pričvrstite bočne zidove: Secure the PVC sidewalls to the frame. The sidewalls feature integrated wind deflectors for improved climate control.
- Secure Tarpaulins: Use the provided elastic loops and eyelets to securely fasten all tarpaulins to the frame.

Image 4.3: An assembled tent with key components labeled: 1 for the roof, 2 for the sidewalls, and 3 for the wind deflector along the base.

Image 4.4: A close-up of hands demonstrating how to secure the tent tarpaulin to the frame using an elastic loop threaded through an eyelet.
4.3 Sidrenje
- Secure Foot Plates: Insert ground pegs through the holes in the foot plates of each vertical pole to anchor the tent to the ground.
- Attach Safety Ropes: Connect the safety ropes to designated points on the tent frame and secure them firmly to the ground using additional pegs. This provides extra stability against wind.

Image 4.5: Detail of a tent pole's foot plate firmly secured into the grass using a ground peg, demonstrating proper anchoring.
5. Uputstvo za upotrebu
Once assembled, the tent is ready for use. Consider the following for optimal experience:
- Ulazi: The front panel features entrances that can be rolled up and secured to allow access.
- ventilacija: The sidewalls can be partially opened or removed to provide ventilation, especially in warm weather. The integrated wind deflectors help manage airflow while maintaining privacy.
- Interior Space: The tent provides a spacious interior suitable for various events.

Image 5.1: Interior perspective of the marquee tent, showcasing the spacious area and the windowed sidewalls that allow natural light.
6. Održavanje
Regular maintenance will extend the lifespan of your tent.
- čišćenje: Clean the PVC tarpaulins with mild soap and water. Avoid harsh chemicals or abrasive cleaners, which can damage the material. Rinse thoroughly and allow to air dry completely before storage.
- Pregled okvira: Periodically check all frame connections and bolts for tightness. Tighten any loose bolts to maintain structural integrity.
- Skladištenje: When not in use, disassemble the tent and store all components in a dry, cool place, away from direct sunlight and pests. Ensure all fabric parts are completely dry to prevent mold and mildew.
- Popravak: Small tears in the PVC tarpaulin can often be repaired with a suitable PVC repair kit.
7. Otkrivanje problema
Ovaj odjeljak se bavi uobičajenim problemima s kojima se možete susresti.
- Nestabilnost šatora: Ensure all ground pegs are fully inserted and safety ropes are taut. Check that all frame connections are securely bolted. High winds require additional anchoring measures.
- Nakupljanje vode na krovu: Ensure the roof tarpaulin is stretched tightly and evenly over the frame to prevent sagging, which can lead to water pooling. Clear any debris from the roof regularly.
- Difficulty Assembling Frame: Double-check that you are using the correct tubes and connectors for each section as per the assembly diagram. Ensure bolts are not overtightened prematurely, allowing for slight adjustments during assembly.
- Lijepljenje patentnih zatvarača: Apply a silicone-based lubricant to the zipper teeth to improve smooth operation. Keep zippers clean from dirt and debris.
8. Specifikacije
| Feature | Detalj |
|---|---|
| Brand | TOOLPORT |
| Broj modela | PRO Smart |
| Veličina | 13x20 stopa (240"D x 156"Š x 79"V) |
| Površina poda | 23.57 kvadratnih metara |
| Materijal (okvir) | Steel (approx. 38mm tubes, 42mm connectors) |
| Material (Canopy/Tarpaulins) | PVC 700 N |
| Boja | Bijelo |
| Nivo vodootpornosti | Vodootporan |
| Zaštita od ultraljubičastog svjetla | 50+ |
| Težina artikla | 201 funti (91300 grama) |
| Obavezna montaža | Da |
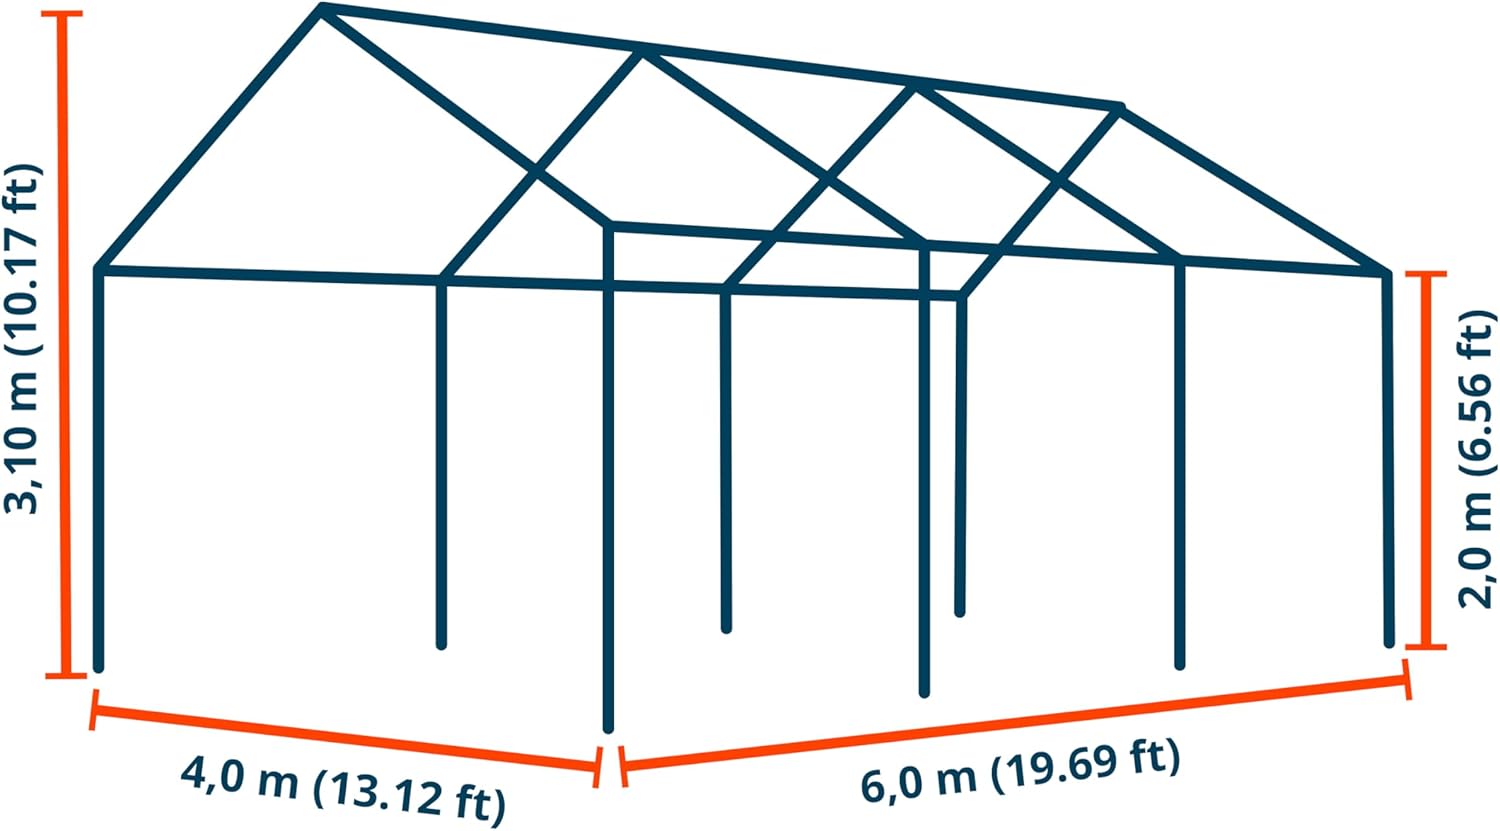
Image 8.1: A technical diagram illustrating the key dimensions of the tent frame, including height, width, and length, provided in both meters and feet.
9. Garancija i podrška
Za informacije o garanciji ili tehničkoj podršci, obratite se službenom servisu proizvođača website or contact TOOLPORT customer service directly. Keep your purchase receipt as proof of purchase.


