1. Uvod
This manual provides detailed instructions for the installation, configuration, and operation of your ASRock H81 PRO BTC Motherboard. Designed for reliable performance, this ATX motherboard supports Intel LGA 1150 processors and DDR3 memory, featuring multiple PCI Express slots suitable for various computing applications, including multi-GPU setups. Please read this manual thoroughly before beginning the installation process to ensure proper setup and to maximize the stability and longevity of your system.
2. Sadržaj paketa
Provjerite da li se sve dolje navedene stavke nalaze u pakovanju vaše matične ploče. Ako bilo koja stavka nedostaje ili je oštećena, obratite se prodavaču.
- ASRock H81 PRO BTC Motherboard
- Vodič za brzu instalaciju
- Support CD (Drivers and Utilities)
- I / O štit
- 2 x SATA kablovi za prenos podataka
3. Podešavanje sistema
3.1. Instalacija CPU-a
The ASRock H81 PRO BTC motherboard uses an LGA 1150 socket. Handle the CPU and socket with extreme care to avoid damaging the pins.
- Locate the CPU socket on the motherboard. Lift the load lever and open the metal load plate.
- Carefully align the CPU with the socket, ensuring the gold triangle on the CPU matches the triangle on the socket. Gently place the CPU into the socket without forcing it.
- Close the load plate and press down the load lever until it locks into place.
- Nanesite termalnu pastu na procesor i instalirajte hladnjak procesora prema uputama proizvođača.
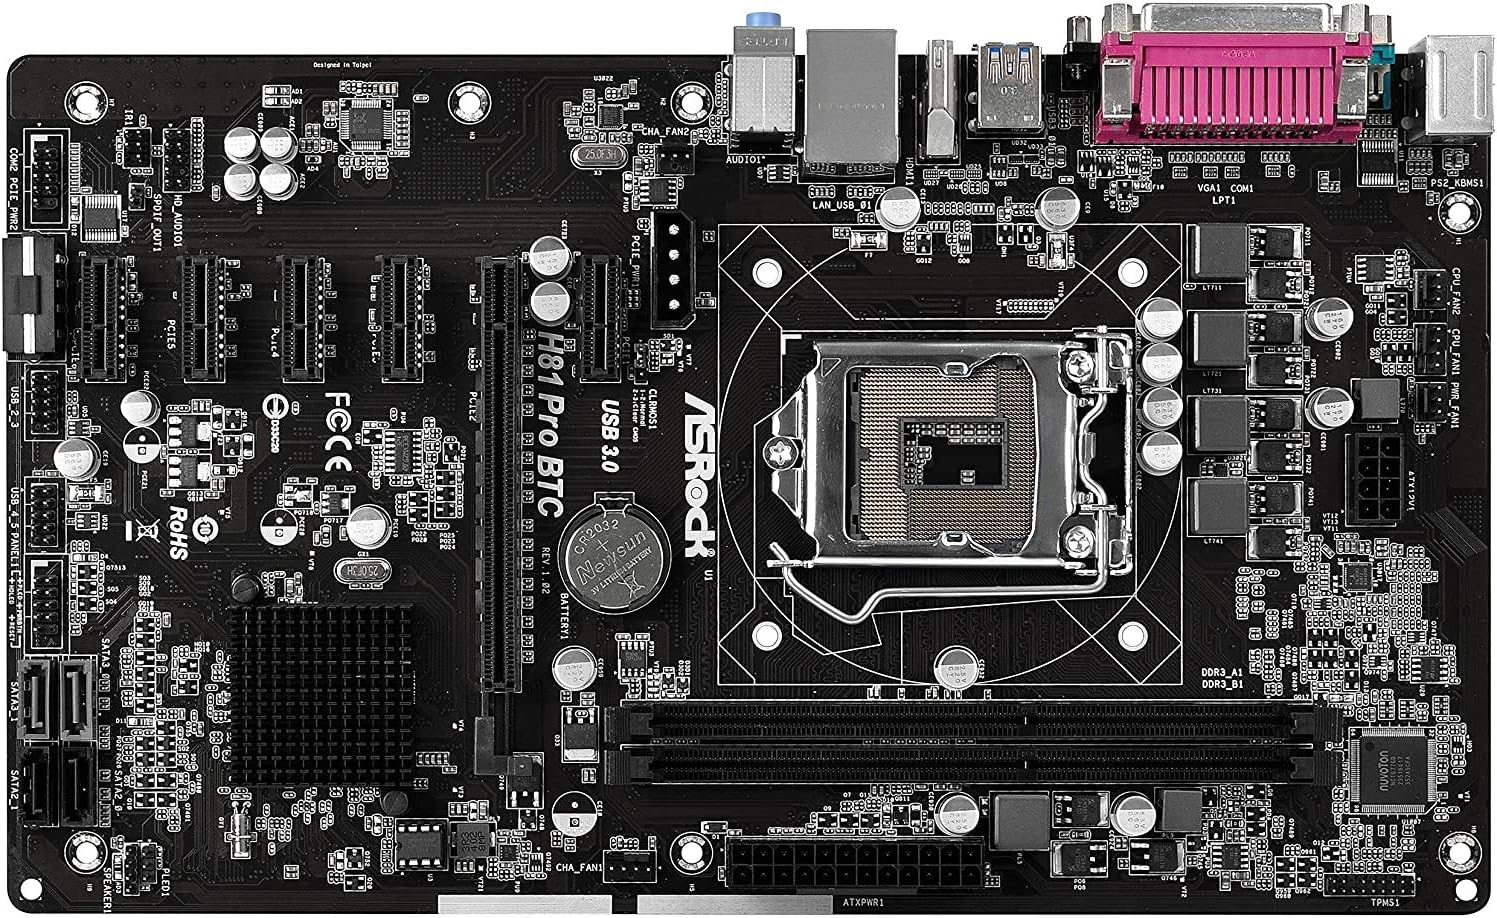
Slika 1: Od vrha prema dolje view of the ASRock H81 PRO BTC Motherboard. This image displays the LGA 1150 CPU socket at the center, flanked by two DDR3 DIMM slots on the right and multiple PCI Express slots below.
3.2. Instalacija memorije
This motherboard supports DDR3 DIMM modules. Ensure the memory modules are compatible with the motherboard's specifications (DDR3-1600/1333/1066).
- Otvorite kopče na oba kraja DIMM utora.
- Poravnajte zarez na DDR3 memorijskom modulu s ključem u DIMM utoru.
- Čvrsto umetnite memorijski modul u utor dok se kopče ne uklope na svoje mjesto. Provjerite da li su obje kopče potpuno zatvorene.
3.3. Ugradnja matične ploče u kućište
Install the motherboard into a compatible ATX chassis.
- Instalirajte I/O štitnik u zadnji otvor kućišta.
- Align the motherboard with the standoffs in the chassis.
- Pričvrstite matičnu ploču vijcima, pazeći da je čvrsto postavljena.
3.4. Povezivanje perifernih uređaja i napajanja
Connect all necessary components and power cables to the motherboard.
- Konektori napajanja: Connect the 24-pin ATX power connector and the 8-pin EPS power connector from your power supply to the motherboard. For multi-GPU configurations, connect the two additional Molex power connectors for PCIe stability.
- SATA uređaji: Connect your storage drives (HDDs/SSDs) to the SATA3 (6Gb/s) or SATA2 (3Gb/s) ports.
- Konektori prednje ploče: Connect the chassis's front panel cables (power button, reset button, USB ports, audio jacks, LED indicators) to the corresponding headers on the motherboard. Refer to the motherboard diagram for exact locations.
- USB uređaji: Connect USB 2.0 and USB 3.0 devices to the rear I/O ports or internal headers.
- PCI Express Cards: Install graphics cards or other expansion cards into the PCI Express 2.0 x16 slot or the five PCI Express 2.0 x1 slots.
- Izlaz ekrana: Connect your monitor to the VGA or HDMI port on the rear I/O panel if using integrated graphics, or to your dedicated graphics card.

Slika 2: Pod uglom view of the ASRock H81 PRO BTC Motherboard. This image highlights the various internal connectors such as SATA ports, USB headers, and the arrangement of PCI Express slots.

Slika 3: Bočno ugaono view of the ASRock H81 PRO BTC Motherboard. This perspective shows the main 24-pin ATX power connector, the 8-pin EPS power connector, and the two Molex power connectors designed to provide stable power to multiple PCI Express devices.

Figure 4: Close-up of the ASRock H81 PRO BTC Motherboard's rear I/O panel. This detailed view displays the PS/2 keyboard and mouse ports, a serial port, VGA and HDMI display outputs, two USB 3.0 ports, four USB 2.0 ports, an RJ45 LAN port, and audio input/output jacks.
4. Uputstvo za upotrebu
4.1. Prvo pokretanje i podešavanje BIOS-a/UEFI-ja
Nakon što sastavite sistem, uključite ga. Pritisnite dugme Del or F2 key during startup to enter the BIOS/UEFI setup utility. Here you can configure system settings such as boot order, date/time, and advanced hardware parameters.
- Redoslijed pokretanja: Set your preferred boot device (e.g., USB drive for OS installation, SSD/HDD).
- Informacije o sistemu: Provjerite detekciju CPU-a, memorije i uređaja za pohranu podataka.
- Napredne postavke: Adjust settings for integrated peripherals, power management, and CPU features as needed.
- Sačuvaj i izađi: Save your changes and exit the BIOS/UEFI to proceed with operating system installation.
4.2. Instalacija drajvera
After installing your operating system, install the necessary drivers from the provided support CD or download the latest versions from the ASRock official website. This includes chipset drivers, LAN drivers, audio drivers, and any other specific device drivers.
5. Specifikacije
| Čipset | Intel H81 |
| CPU Socket | LGA 1150 |
| Kompatibilni procesori | Intel Core i3/i5/i7 (4th and 5th Gen) |
| Memorija | 2x DDR3 DIMM Slots, Dual Channel, Non-ECC, Buffered, Max 16GB, DDR3-1600/1333/1066 MHz |
| Slotovi za proširenje | 1x PCI-Express 2.0 x16, 5x PCI-Express 2.0 x1 |
| Skladištenje | 2x SATA3 (6Gb/s) Ports, 2x SATA2 (3Gb/s) Ports |
| LAN | Realtek RTL8111GR Gigabit Ethernet Controller |
| USB portovi | 2x USB 3.0 (rear), 6x USB 2.0 (2 rear, 4 via headers) |
| Stražnji I/O portovi | 1x PS/2 Keyboard, 1x PS/2 Mouse, 1x VGA, 1x HDMI, 1x Serial Port, 1x RJ45 LAN, Audio I/O Jacks |
| Interni konektori | 1x Parallel Port Header, 1x Serial Port Header, 2x SLI/Xfire Molex Power Connectors |
| Form Factor | ATX |
| Dimenzije | 13.2 x 3 x 10 inča (približno) |
| Podrška za operativni sistem | Microsoft Windows 10/8.1/8/7 (32-bit/64-bit) |
6. Otkrivanje problema
Ako naiđete na probleme, pogledajte sljedeće uobičajene korake za rješavanje problema:
- Nema napajanja: Ensure all power cables (24-pin ATX, 8-pin EPS, Molex for PCIe) are securely connected. Check the power supply unit (PSU) and wall outlet.
- Bez prikaza: Verify that the monitor is connected to the correct display output (integrated graphics or dedicated GPU). Reseat the graphics card and memory modules.
- System Fails to POST (Power-On Self-Test): Listen for beep codes (if a speaker is connected) which can indicate specific hardware issues. Reseat CPU, memory, and expansion cards. Clear CMOS by removing the CMOS battery for a few minutes or using the clear CMOS jumper.
- Operativni sistem se ne pokreće: Check boot order in BIOS/UEFI. Ensure the storage drive with the OS is properly connected and detected.
- Periferni uređaj nije otkriven: Ensure the device is properly connected to the correct port/slot. Install or update relevant drivers.
For more advanced troubleshooting, consult the ASRock official webstranicu ili kontaktirajte njihovu tehničku podršku.
7. Održavanje
Redovno održavanje pomaže u osiguravanju dugotrajnosti i optimalnih performansi vaše matične ploče.
- Uklanjanje prašine: Povremeno čistite prašinu sa matične ploče i komponenti komprimiranim zrakom. Prije čišćenja provjerite je li sistem isključen iz struje.
- Ažuriranja BIOS-a/UEFI-ja: Provjerite ASRock website for BIOS/UEFI updates. Updates can improve compatibility, stability, and performance. Follow update instructions carefully.
- Ažuriranja drajvera: Keep your system drivers updated to ensure compatibility and optimal performance with your operating system and peripherals.
8. Garancija i podrška
This ASRock H81 PRO BTC Motherboard is covered by the manufacturer's warranty. For specific warranty terms and conditions, please refer to the warranty card included in your package or visit the official ASRock website.
For technical assistance, driver downloads, or further support, please visit the ASRock official support page:


