1. Uvod
This manual provides detailed instructions for the installation, operation, and maintenance of the Supermicro MBD-X10SLH-F-O uATX Server Motherboard. Please read this manual thoroughly before beginning installation to ensure proper setup and to maximize the performance and longevity of your system. This motherboard is designed for server applications, supporting Intel LGA1150 processors and DDR3 memory.
2. Proizvod je gotovview
The Supermicro MBD-X10SLH-F-O is a high-performance uATX server motherboard featuring the Intel C226 chipset. It is engineered for reliability and efficiency in server environments.
Ključne karakteristike:
- CPU utičnica: LGA1150, supporting Intel Xeon E3-1200 v3/v4 series, 4th/5th Gen Core i3, Pentium, Celeron processors.
- Memorija: 4x 204-pin DDR3-1600 SODIMM slots, supporting up to 32GB ECC/non-ECC Unbuffered memory.
- Slotovi za proširenje: 1x PCI-Express 3.0 x16, 1x PCI-Express 2.0 x8, 1x PCI-Express 2.0 x4.
- Skladištenje: 6x SATA3 (6Gbps) portova.
- Povezivanje: Dual Gigabit Ethernet LAN ports (2x RJ45) and 1x Dedicated IPMI LAN port (RJ45).
- USB portovi: 4x USB 3.0 ports, 6x USB 2.0 ports.
- Video izlaz: 1x VGA port.
- Form Faktor: uATX (9.6" x 9.6").
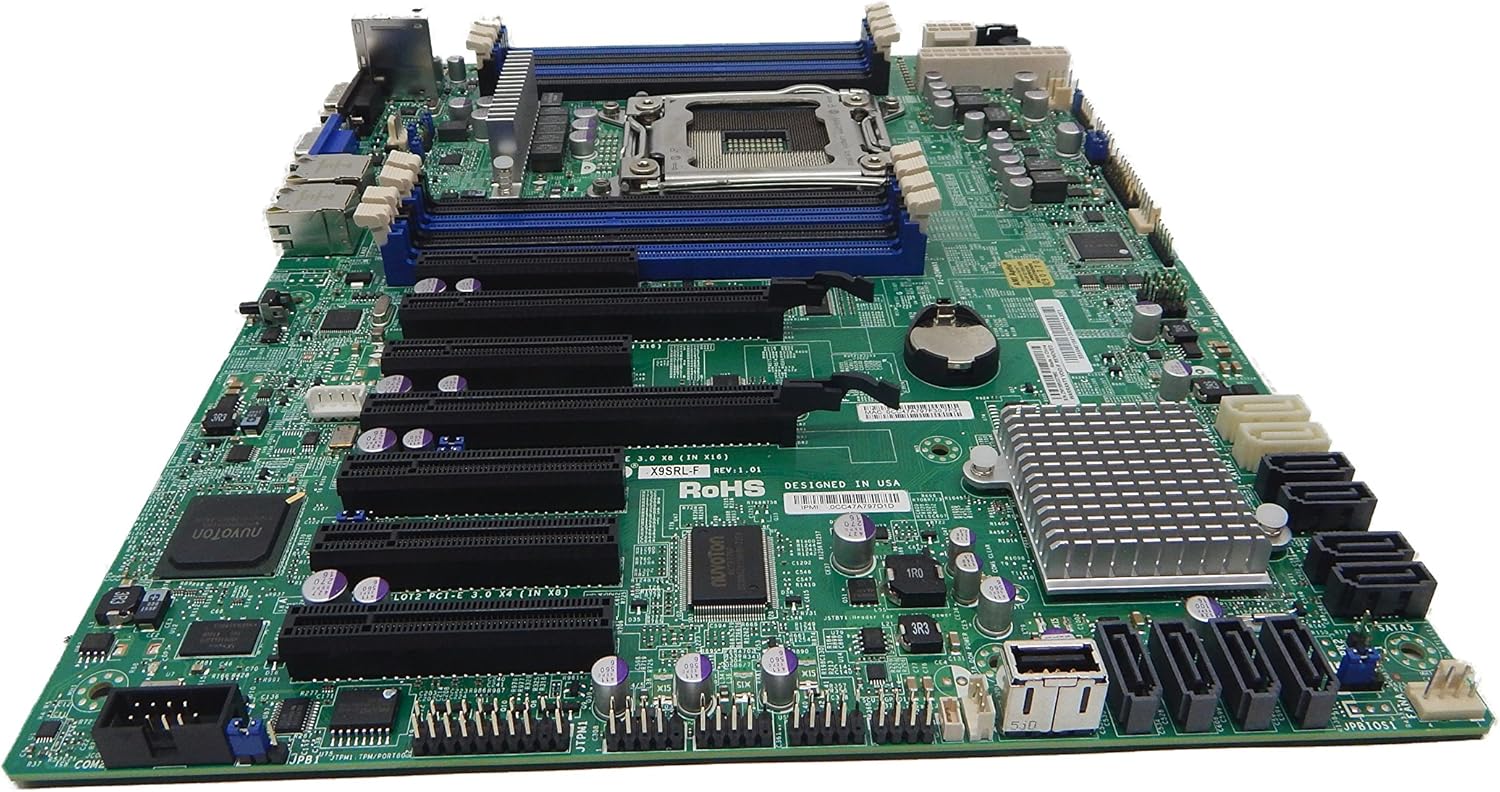
Slika 2.1: Odozgo view of the Supermicro MBD-X10SLH-F-O motherboard, showing the CPU socket, RAM slots, and various expansion slots.

Slika 2.2: Ugao view of the motherboard, highlighting the LGA1150 CPU socket and the four DDR3 SODIMM memory slots.

Slika 2.3: Pozadi view of the Supermicro MBD-X10SLH-F-O motherboard, displaying the I/O panel with USB, VGA, LAN, and IPMI ports.

Slika 2.4: Close-up view of the motherboard, showing the six SATA3 ports and other onboard connectors.
3. Specifikacije
| Feature | Specifikacija |
|---|---|
| Brand | Supermicro |
| Naziv modela | MBD-X10SLH-F-O |
| CPU Socket | LGA 1150 |
| Tip čipseta | Intel C226 |
| Kompatibilni procesori | Intel Core i3-4xxx, i5-4xxx, i7-4xxx, i3-5xxx, i5-5xxx, i7-5xxx, Intel Xeon E3-1200 v3/v4 series |
| Tehnologija RAM memorije | DDR3 |
| Brzina memorije | 1600 MHz |
| Maksimalna podržana RAM memorija | 32 GB |
| Broj USB 2.0 portova | 6 |
| Broj USB 3.0 portova | 4 |
| SATA portovi | 6x SATA3 (6Gbps) |
| Slotovi za proširenje | 1x PCIe 3.0 x16, 1x PCIe 2.0 x8, 1x PCIe 2.0 x4 |
| Form Factor | uATX |
| Dimenzije (DxŠxV) | 14 x 11 x 3.5 inča |
| Težina artikla | 3.52 unce |
4. Podešavanje
Before beginning installation, ensure your system is powered off and disconnected from the power source. Always handle the motherboard by its edges to avoid static discharge.
4.1. Instalacija CPU-a
- Gently lift the CPU socket lever.
- Align the CPU with the socket, ensuring the gold triangle on the CPU matches the triangle on the socket.
- Pažljivo postavite CPU u utičnicu bez upotrebe sile.
- Lower the socket lever and secure it.
- Nanesite termalnu pastu i instalirajte hladnjak procesora prema uputama proizvođača.
4.2. Instalacija memorije
- Otvorite kopče na oba kraja DIMM utora.
- Poravnajte zarez na memorijskom modulu s ključem u DIMM utoru.
- Čvrsto pritisnite oba kraja memorijskog modula dok se kopče ne uklope na svoje mjesto.
4.3. Instalacija kartice za proširenje
- Uklonite odgovarajući poklopac utora sa kućišta.
- Poravnajte karticu za proširenje sa željenim PCIe utorom.
- Press down firmly until the card is fully seated.
- Secure the card with a screw or retention clip.
4.4. Povezivanje uređaja za pohranu podataka
- Spojite jedan kraj SATA podatkovnog kabela na SATA priključak na matičnoj ploči.
- Connect the other end of the SATA data cable to your storage device (HDD/SSD).
- Spojite SATA kabel za napajanje s uređaja za pohranu podataka na napajanje.
4.5. Priključci za napajanje
- Spojite 24-pinski ATX glavni konektor za napajanje s vašeg napajanja na matičnu ploču.
- Spojite 8-pinski (ili 4-pinski) ATX 12V konektor za napajanje procesora na matičnu ploču.
4.6. Priključci na prednjoj ploči
Connect the front panel headers (Power LED, HDD LED, Power Switch, Reset Switch, USB, Audio) to the corresponding pins on the motherboard. Refer to the motherboard's silkscreen labels for correct pin orientation.
5. Uputstvo za upotrebu
5.1. Početno pokretanje
- After all components are installed and connected, connect the power cord to your power supply and turn on the power switch.
- Pritisnite dugme za napajanje na kućištu.
- The system should power on, and you should see a display on your monitor.
5.2. Pristup BIOS-u/UEFI-ju
To enter the BIOS/UEFI setup utility, press the designated key (commonly DEL or F2) during the initial boot sequence. The exact key may vary; observe the on-screen prompts.
5.3. IPMI Remote Management
This motherboard features a dedicated IPMI LAN port for remote management. To access the IPMI interface, connect the IPMI LAN port to your network. Obtain the IP address assigned to the IPMI interface (either from BIOS or a network scan) and access it via a web browser from another computer on the same network. Java may be required for remote console functionality.
6. Održavanje
Regular maintenance helps ensure the stability and longevity of your motherboard and system.
- Uklanjanje prašine: Povremeno čistite prašinu sa matične ploče i komponenti komprimiranim zrakom. Prije čišćenja provjerite je li sistem isključen iz struje.
- Upravljanje kablovima: Osigurajte da su svi kablovi uredno postavljeni i osigurani kako biste spriječili ometanje protoka zraka i slučajno isključenje.
- Ažuriranja BIOS-a/firmvera: Provjerite Supermicro website for the latest BIOS and IPMI firmware updates. Follow the provided instructions carefully. Note that IPMI BIOS upgrades may require a separate license. Always update BIOS before IPMI firmware.
- Provjere komponenti: Occasionally inspect all connections (power, data, expansion cards) to ensure they are securely seated.
7. Otkrivanje problema
Ovaj odjeljak se bavi uobičajenim problemima s kojima se možete susresti.
7.1. Sistem se ne pokreće
- Provjerite priključke za napajanje: Ensure the 24-pin ATX and 8-pin CPU power connectors are securely attached.
- Ponovno postavljanje komponenti: Remove and re-install the CPU, memory modules, and any expansion cards to ensure they are properly seated.
- Obriši CMOS: Refer to your motherboard's detailed manual for instructions on how to clear the CMOS, which can resolve boot issues caused by incorrect BIOS settings.
- Minimalna konfiguracija: Try booting with only essential components (CPU, one RAM stick, power supply, and display) to isolate the problem.
7.2. Fan Speed Issues
Some low RPM, high-efficiency fans may not be accurately detected by the motherboard's fan controller, leading to erratic fan speed behavior (e.g., fans spinning up to max RPM). This is often due to the controller expecting server-grade fans with higher RPM ranges.
- BIOS postavke: Check BIOS settings for fan control options. Adjust fan curves or modes if available.
- 3-Pin vs. 4-Pin Fans: If using 4-pin PWM fans that exhibit this behavior, consider using 3-pin adapters if available with your fans. This can sometimes provide a more stable, albeit less precise, fan control.
- IPMI Fan Control: While IPMI offers fan control, it may have limitations for low RPM fans.
7.3. SATA Port Obstruction
When installing a full-size graphics processing unit (GPU), some SATA ports may become physically blocked or difficult to access.
- Planirajte unaprijed: Connect SATA cables to the necessary ports before installing large expansion cards.
- Angled SATA Cables: Use SATA cables with angled connectors if straight connectors are obstructed.
- Alternative Ports: Utilize any unblocked SATA ports first.
8. Informacije o garanciji i podršci
For detailed warranty information, including terms, conditions, and duration, please refer to the official Supermicro website or the warranty card included with your product. For technical support, driver downloads, and additional documentation, visit the Supermicro support portal.
Supermicro Official Webstranica: www.supermicro.com