
1. Uvod
This manual provides detailed instructions for the installation, operation, and maintenance of your HillMiles Universal LCD Display. This display is designed to enhance your riding experience by providing essential information at a glance.

Figure 1: HillMiles Universal LCD Display and Control Pad
Ova slika prikazuje prednji dio view of the HillMiles Universal LCD Display, featuring a large screen that displays speed, battery level, distance, and assistance mode. Below the display, the wired control pad with its five distinct buttons is visible.
2. Kompatibilnost
The HillMiles Universal LCD Display is specifically designed for use with HillMiles electric bicycle models. It is compatible with:
- HillMiles MileCity 1
- HillMiles MilePort 1
- HillMiles MileTrail 1
Important: This display is not compatible with e-bike models from other brands.
3. Ključne karakteristike
The HillMiles Universal LCD Display offers a range of features to enhance your e-bike experience:
- Multifunkcionalni displej: A 6.2 x 9.7 cm LED screen clearly shows:
- Trenutna brzina (km/h)
- Nivo baterije
- Distance Traveled (ODO for total distance)
- Assistance Mode (Booster Mode)
- Ekran sa pozadinskim osvetljenjem: Ensures excellent visibility day and night.
- Digital Speedometer: Provides accurate speed readings.
- ODO Display: Monitors total distance covered.
4. Postavljanje i instalacija
The HillMiles Universal LCD Display features a universal mounting bracket for easy installation on compatible HillMiles e-bikes. Follow these general steps for installation:
- Identify a suitable mounting location on your e-bike's handlebars, typically near the left grip.
- Securely attach the display's mounting bracket to the handlebar using the provided tools. Ensure it is firm and does not rotate.
- Connect the display's cable to the corresponding port on your HillMiles e-bike's wiring harness. Ensure the connection is secure and fully seated.
- Route the cable neatly along the handlebar and frame, securing it with cable ties if necessary, to prevent interference with steering or other components.
- Verify all connections are tight and the display is positioned for optimal viewing during riding.
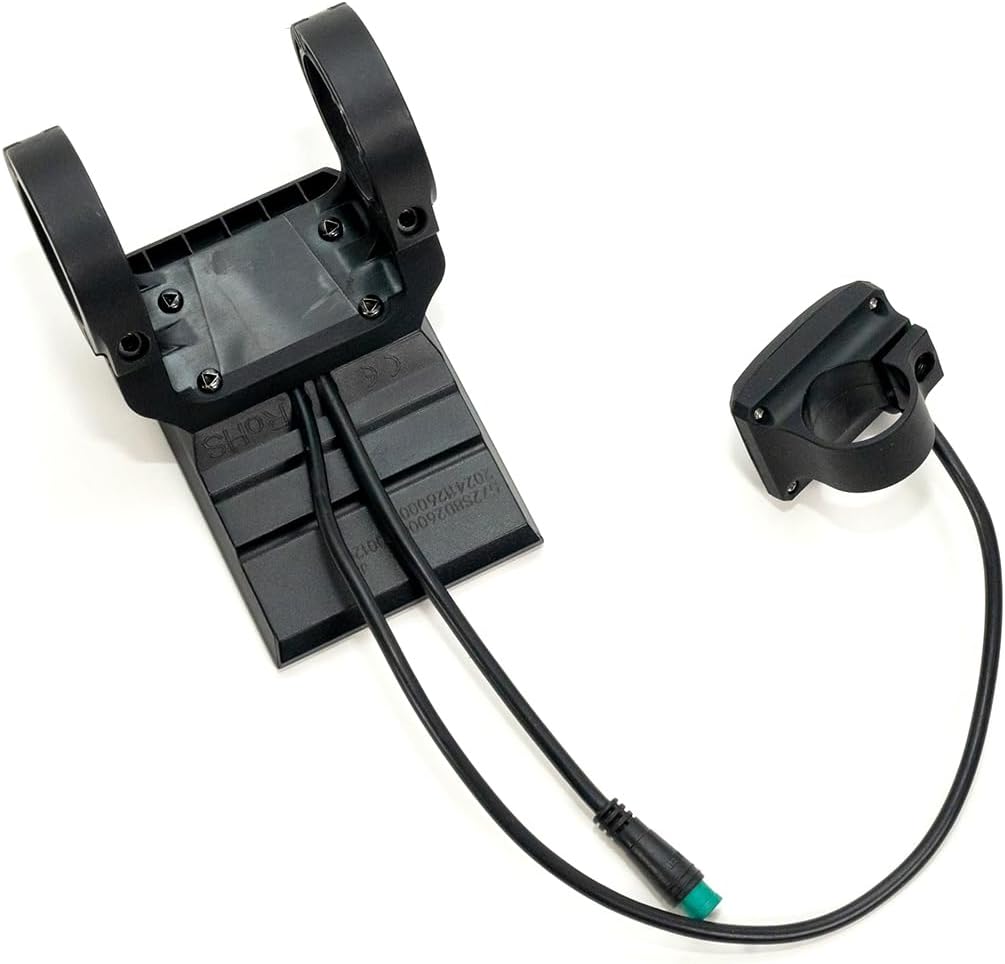
Slika 2: Pozadi View of Display and Control Pad
This image displays the rear of the HillMiles Universal LCD Display, highlighting its mounting points and the cable connections. The separate control pad is also shown from the rear, illustrating its compact design and cable.
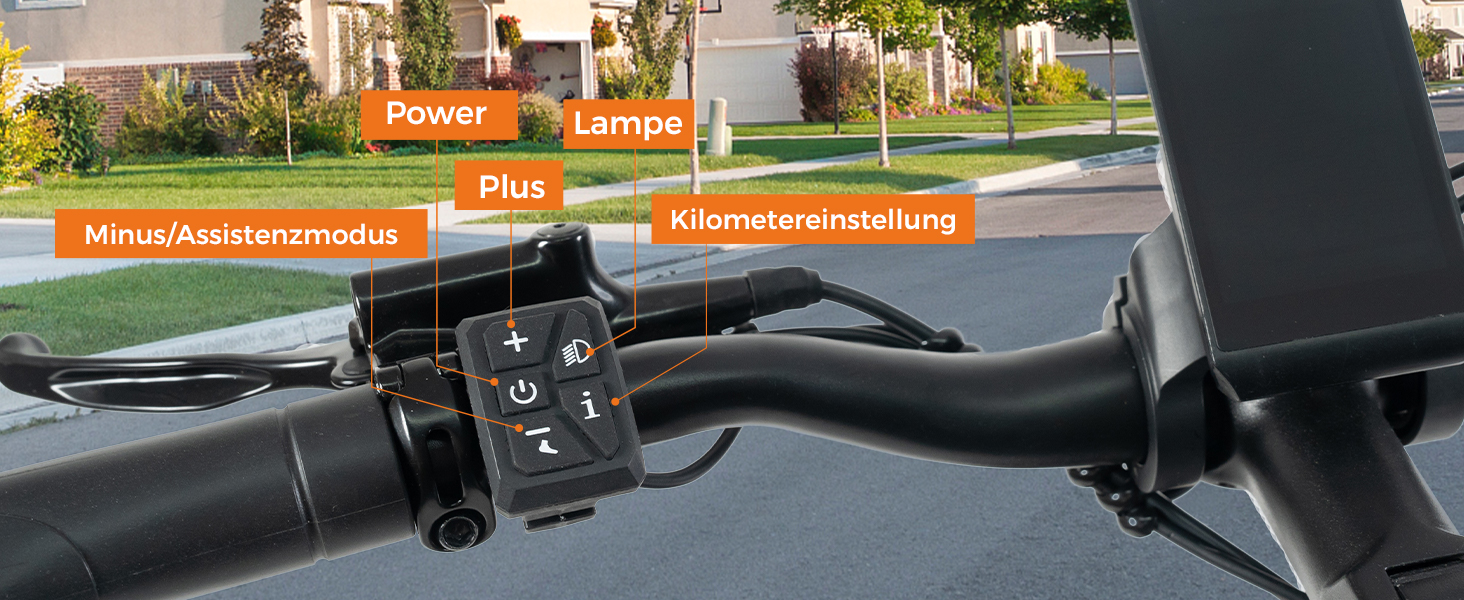
Figure 3: Display Mounted on Handlebar with Button Labels
This image shows the HillMiles Universal LCD Display and its control pad mounted on an e-bike handlebar. The control pad buttons are clearly labeled, indicating their functions: Power, Lamp, Plus, Minus/Assistance Mode, and Kilometer Setting.
5. Uputstvo za upotrebu
The control pad provides intuitive access to the display's functions:
| Dugme | Funkcija |
|---|---|
| Dugme za napajanje (⏻) | Controls the power on/off function of the display and e-bike system. |
| Light Button (💡) | Turns the e-bike's lights on or off. |
| "+" Button | Increases the assistance level (Booster Mode). |
| "-" Button | Decreases the assistance level (Booster Mode). |
| "i" Button (Information/Mode) | Adjusts the mileage display mode (e.g., switch between Trip distance and ODO total distance). |
For detailed settings and advanced functions, refer to your specific HillMiles e-bike's main user manual, as some display settings may be controlled via the e-bike's central system.
6. Održavanje
To ensure the longevity and optimal performance of your HillMiles LCD Display, follow these maintenance guidelines:
- čišćenje: Obrišite ekran i kućište mekom,amp krpu. Izbjegavajte abrazivna sredstva za čišćenje ili rastvarače koji bi mogli oštetiti ekran iliasing.
- zaštita: Protect the display from direct impact, extreme temperatures, and prolonged exposure to direct sunlight when not in use.
- Veze: Periodically check that all cable connections are secure and free from corrosion.
- Izloženost vodi: While the display is designed to be weather-resistant, avoid submerging it in water or exposing it to high-pressure water jets.
7. Otkrivanje problema
If you encounter issues with your HillMiles LCD Display, consider the following common troubleshooting steps:
- Ekran se ne uključuje:
- Ensure your e-bike's battery is charged and properly connected.
- Check all cable connections between the display and the e-bike's system for looseness or damage.
- Pritisnite i držite dugme za napajanje nekoliko sekundi.
- Incorrect Readings (Speed/Distance):
- Verify that the speed sensor on your e-bike is clean and properly aligned.
- Ensure the wheel size setting in your e-bike's main system (if applicable) is correct.
- Dugmad ne reagiraju:
- Provjerite ima li fizičkih prepreka ili ostataka oko dugmadi.
- Ensure the control pad cable is securely connected.
If problems persist, please contact HillMiles customer support or a qualified e-bike technician.
8. Specifikacije
| Feature | Detalj |
|---|---|
| Brand | HillMiles |
| Kompatibilnost modela | HillMiles MileCity 1, MilePort 1, MileTrail 1 |
| Display Type | LED |
| Veličina ekrana | 6.2 x 9.7 cm (približno 2.44 x 3.82 inča) |
| Boja | Crna |
| Težina artikla | 250 grama |
| Izvor napajanja | Battery (powered by e-bike battery) |
| Uključene komponente | Set alata |
9. Garancija i podrška
For information regarding warranty coverage and customer support for your HillMiles Universal LCD Display, please refer to the warranty documentation included with your original e-bike purchase or visit the official HillMiles website. You may also contact HillMiles customer service directly for assistance with product inquiries, technical support, or warranty claims.
Please have your product model number (MileCity 1/MilePort 1/MileTrail 1 Universal LCD Display) and purchase details ready when contacting support.