
Uvod
This manual provides comprehensive instructions for the assembly, operation, maintenance, and troubleshooting of your 5 CORE Dual Z Style Heavy Duty 2 Tier Piano Keyboard Stand. Please read this manual thoroughly before assembly and use to ensure proper function and safety.
The 5 CORE KS Z1 BLK HD + 2T is designed to securely hold 54, 61, and 88-key keyboards, digital pianos, and synthesizers, offering robust support and adjustability for various musical setups.

Image: The 5 CORE Dual Z Style Heavy Duty 2 Tier Piano Keyboard Stand, fully assembled and ready for use. This image showcases the robust Z-frame design and the two adjustable tiers.
Važne informacije o sigurnosti
- Ensure all components are securely fastened before placing any instruments on the stand.
- Do not exceed the maximum weight capacity: 250 lbs for the first tier, 60 lbs for the second tier.
- Postavite postolje na stabilnu, ravnu površinu kako biste spriječili prevrtanje.
- Držite ruke i prste dalje od pokretnih dijelova tokom podešavanja.
- Regularly inspect the stand for any signs of wear, damage, or loose connections.
Sadržaj paketa
Prije početka montaže provjerite da li su sve komponente prisutne:
- Main Z-frame components
- Adjustable second tier arms
- Kukica za slušalice
- All necessary screws, knobs, and fasteners
- Rubberized non-slip feet
Note: Keyboards and other equipment are not included with the product.
Postavljanje i montaža
Assembly of the 5 CORE keyboard stand is straightforward and does not require special tools.
Step 1: Assemble the Main Z-Frame
- Unfold the main Z-frame components.
- Connect the horizontal support bar between the two Z-shaped legs, securing it with the provided knobs. Ensure the frame is stable.

Image: Illustration showing the assembly process of the main Z-frame, highlighting the connection points for stability.
Step 2: Attach the First Tier Arms
- Slide the first tier support arms into the designated slots on the main Z-frame.
- Secure them using the locking mechanisms or knobs.
Slika: Krupni plan view of the first tier arms being attached to the main stand, demonstrating the secure fitting.
Step 3: Install the Second Tier
- Attach the second tier arms to the upper part of the main frame.
- Adjust the height and tilt of the second tier as desired using the adjustment knobs. The second tier features 10-degree tilting increments.

Image: The second tier being installed, showing the adjustable arms and tilting mechanism for optimal positioning.
Step 4: Attach Headphone Hook and Secure Strap
- Locate the designated attachment point for the headphone hook and secure it.
- Utilize the secure strap and screw mechanism to prevent the keyboard from sliding or shifting during use.
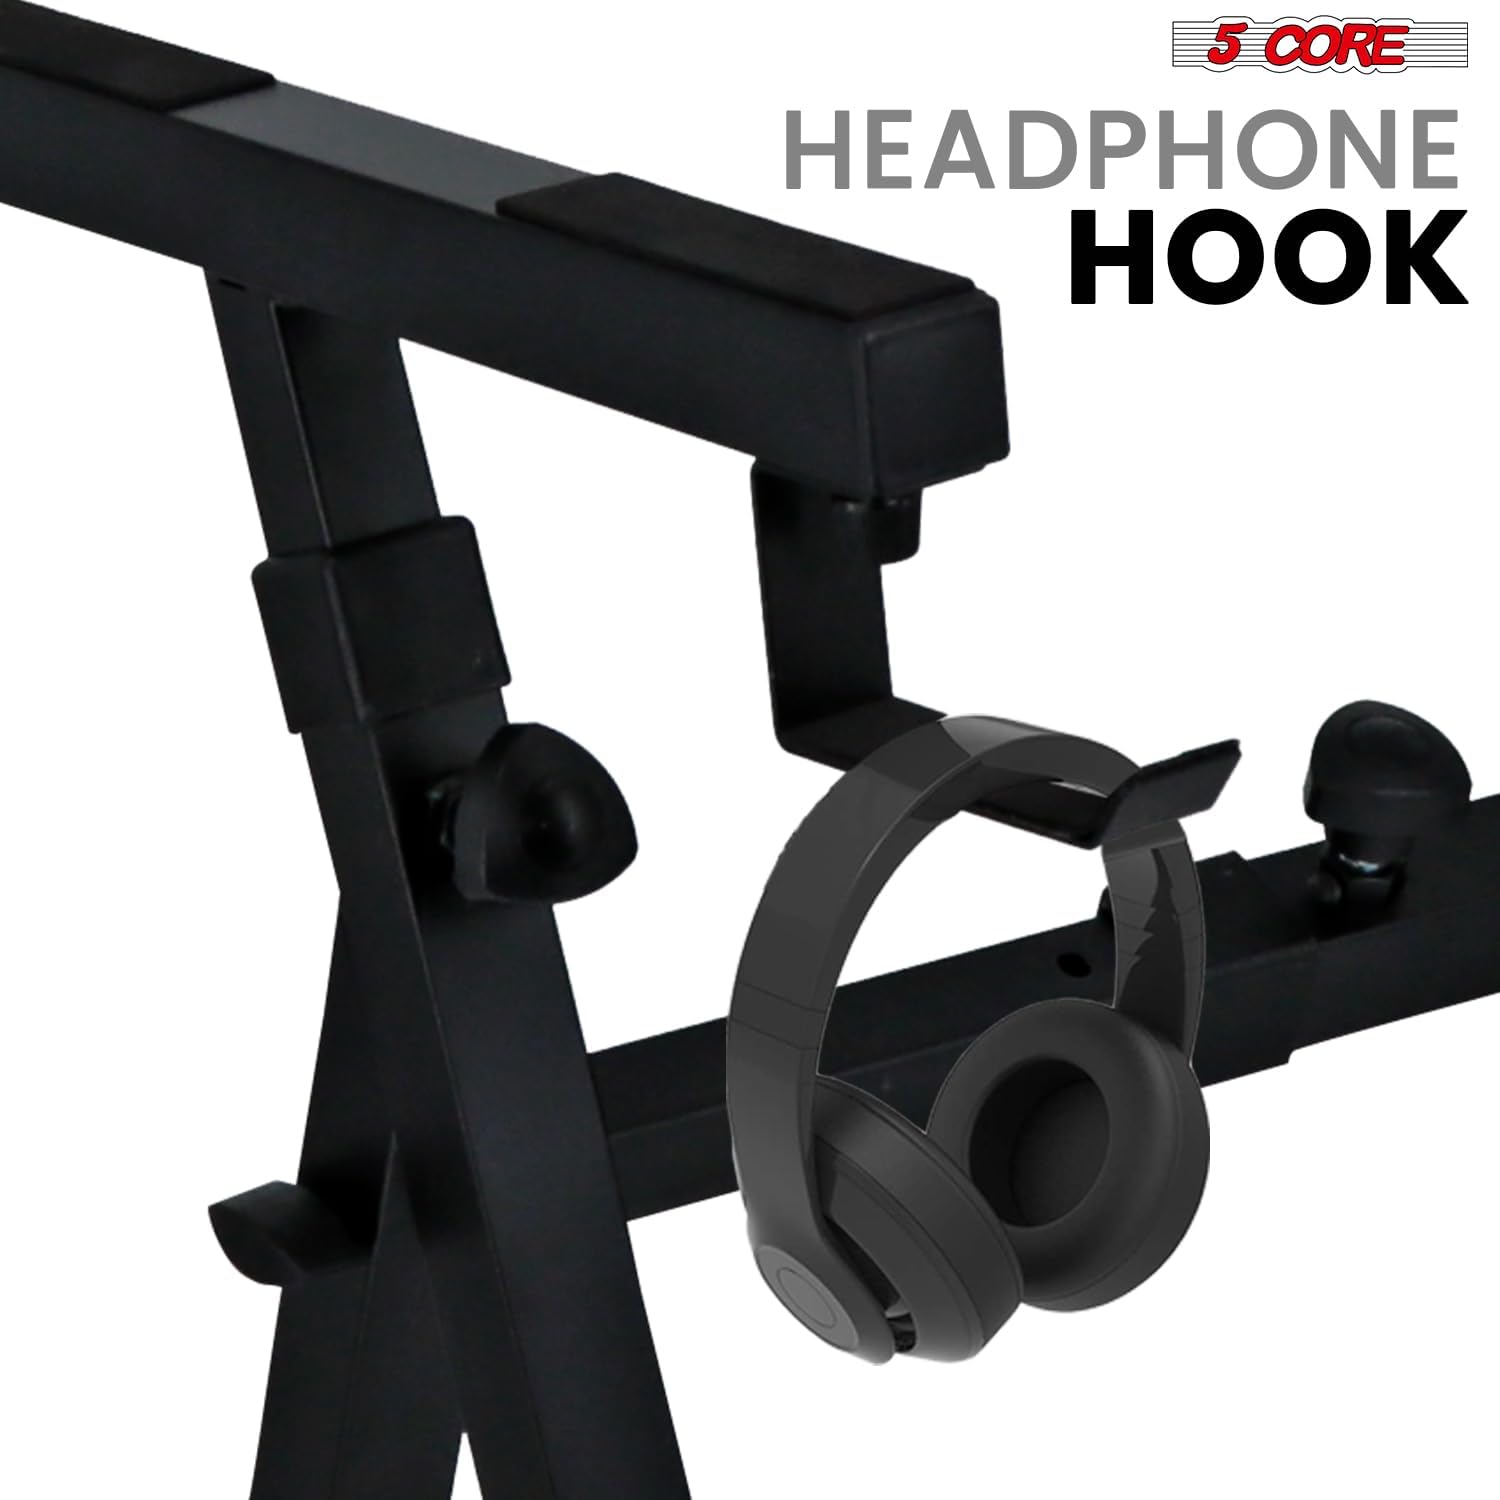
Image: A close-up of the integrated headphone hook, designed for convenient storage of headphones.

Image: Detail of the secure strap and screw, illustrating how it prevents keyboard movement on the stand.
Uputstvo za upotrebu
Podešavanje visine i širine
The 5 CORE keyboard stand offers extensive adjustability to accommodate various keyboard sizes and user preferences.
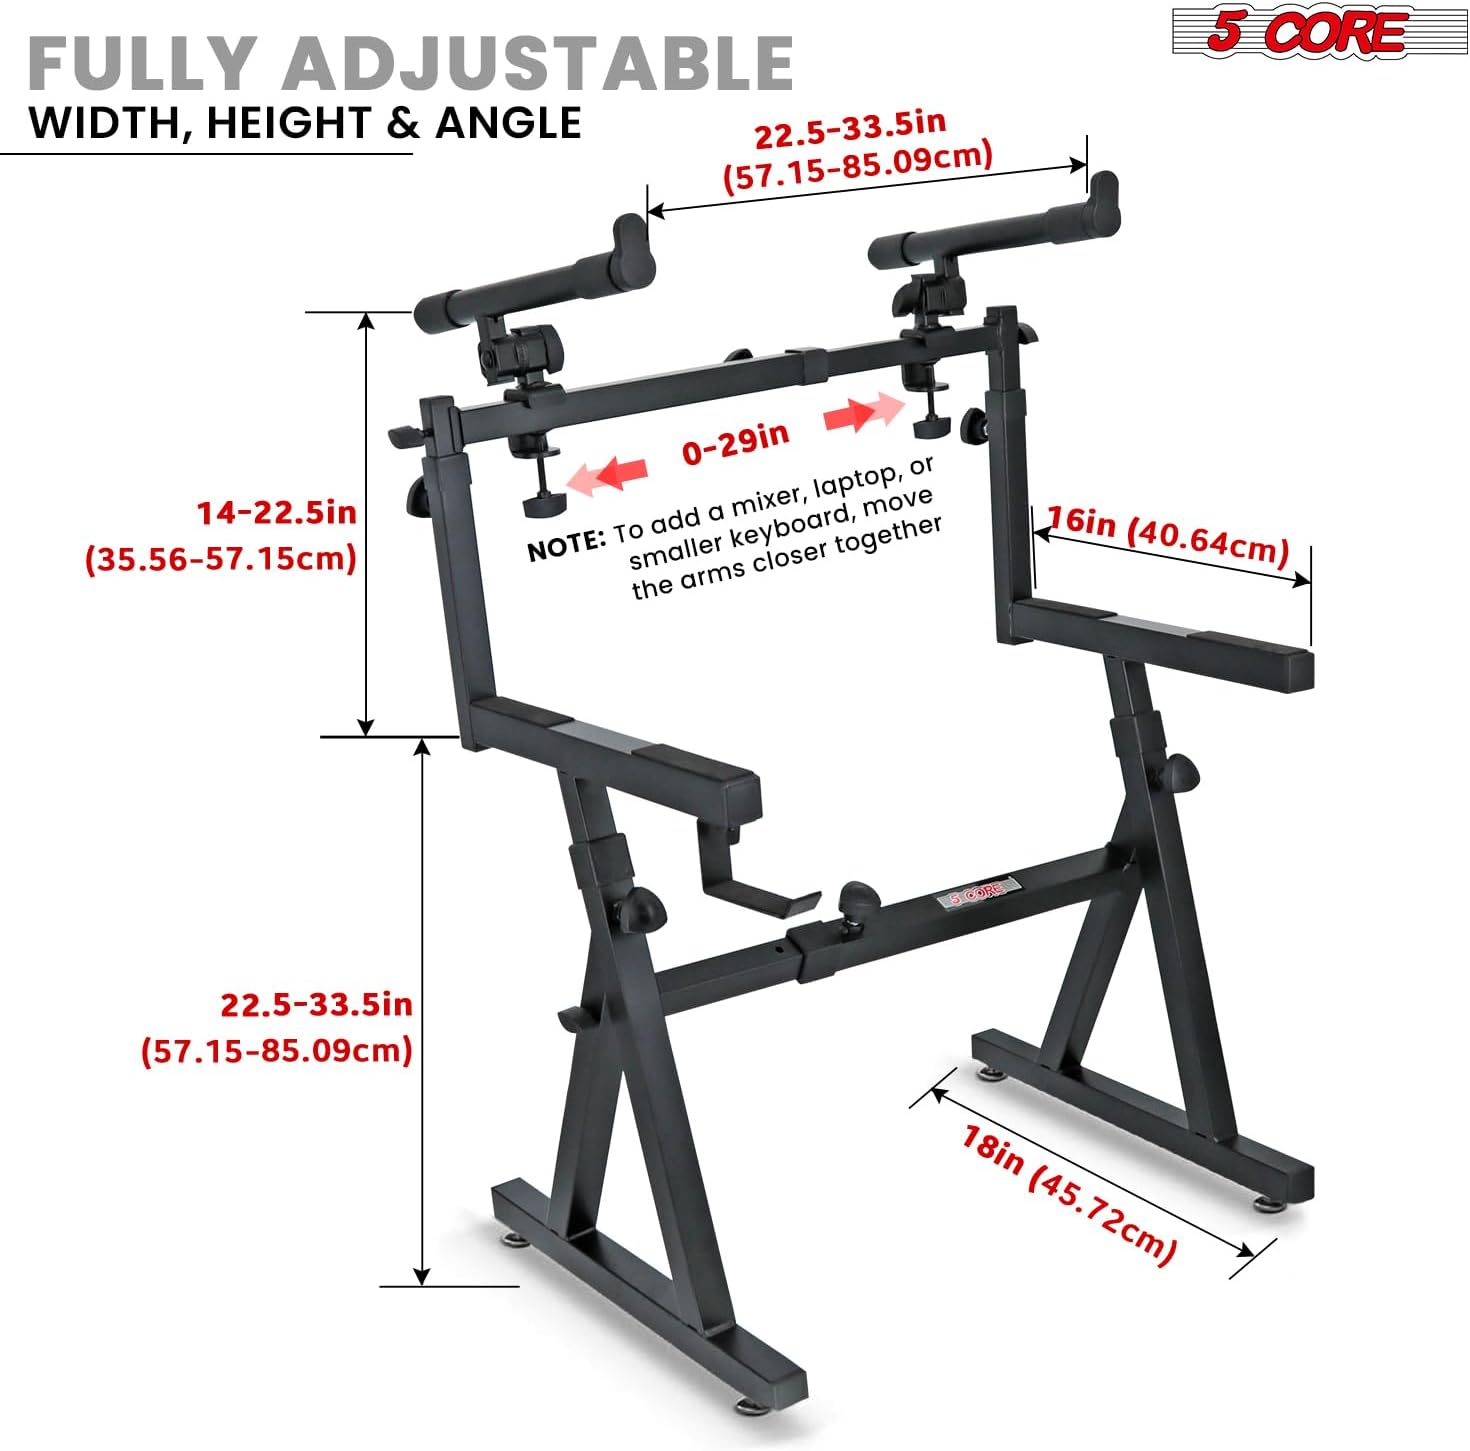
- First Tier Height: Adjusts from 22.5 to 33.5 inches (57.15-85.09 cm). Loosen the adjustment knobs on the main Z-frame legs, set to desired height, and re-tighten securely.
- Second Tier Height: Adjusts from 14 to 22.5 inches (35.56-57.15 cm) above the first tier. Loosen the knobs on the second tier arms, set height, and re-tighten.
- Second Tier Width: Adjustable from 22.5 to 33.5 inches (57.15-85.09 cm). To accommodate smaller keyboards or mixers, move the arms closer together (0-29 inches). Loosen the knobs on the horizontal bar of the second tier, slide arms to desired width, and re-tighten.
Image: Diagram illustrating the full range of height, width, and angle adjustments for both tiers of the keyboard stand, with measurements in inches and centimeters.

Image: The keyboard stand supporting a keyboard, with labels indicating the maximum weight capacities for the first tier (250 lbs) and second tier (60 lbs).
Osiguravanje stabilnosti
The Z-frame design combined with rubberized, non-slip feet ensures superior stability.
- Always ensure the stand is placed on a flat, stable surface.
- Verify that all adjustment knobs are tightened firmly after making any changes to prevent wobbling.
- The non-slip padding on the feet prevents accidental movement during performance.

Image: Visual representation of the heavy-duty construction and stability features, including a close-up of the secure double-level keyboard stand mechanism.

Slika: Detaljna view of the non-slip rubber feet, emphasizing their role in providing sturdy support and preventing movement.
Održavanje
- čišćenje: Wipe the stand with a soft, dry cloth to remove dust and debris. For stubborn marks, a slightly damp Može se koristiti krpa, nakon čega slijedi odmah sušenje. Izbjegavajte abrazivna sredstva za čišćenje ili rastvarače.
- inspekcija: Periodically check all bolts, screws, and adjustment knobs to ensure they are tight. Re-tighten as necessary.
- Skladištenje: When not in use, the stand can be disassembled into a compact shape for easy storage and transport. Store in a dry environment to prevent rust.
Rješavanje problema
| Problem | Mogući uzrok | Rješenje |
|---|---|---|
| Stalak se ljulja ili je nestabilan. | Labavi spojevi; neravna površina. | Ensure all knobs and screws are tightened. Place stand on a level surface. |
| Difficulty adjusting height/width. | Knobs are too tight; mechanism is stiff. | Loosen knobs sufficiently. Apply a small amount of silicone lubricant to sliding parts if necessary (avoiding contact with rubber feet). |
| Keyboard slides on the stand. | Keyboard not properly secured; non-slip pads are dirty or worn. | Ensure the secure strap and screw are used. Clean non-slip pads. |
Specifikacije
| Feature | Detalj |
|---|---|
| Model | KS Z1 BLK HD + 2T |
| Brand | 5 JEZGRO |
| Materijal | Metalna legura |
| Tip završetka | Powder Coated |
| Base Type | Leg (Z Style) |
| 1st Tier Load Capacity | 250 lbs (113.4 kg) |
| 2nd Tier Load Capacity | 60 lbs (27.2 kg) |
| 1st Tier Height Adjustment | 22.5 to 33.5 inches (57.15 - 85.09 cm) |
| 2nd Tier Height Adjustment | 14 to 22.5 inches (35.56 - 57.15 cm) |
| 2nd Tier Width Adjustment | 22.5 to 33.5 inches (57.15 - 85.09 cm) |
| Posebne karakteristike | Removable second tier, adjustable tilt (10° increments), Z-frame design, non-slip feet, headphone hook, secure strap. |
| Obavezna montaža | Da |
| Težina artikla | 24.7 funte (11.2 kg) |
| Dimenzije paketa | 22.8 x 22.5 x 3.5 inča (57.9 x 57.15 x 8.9 cm) |
| UPC | 810144131962 |
Informacije o garanciji
Specific warranty details for 5 CORE products are typically provided with the product packaging or available on the manufacturer's official website. Please refer to the documentation included with your purchase for precise warranty terms and conditions. Generally, products are covered against manufacturing defects for a specified period from the date of purchase.
For warranty claims, retain your proof of purchase (receipt or invoice).
Korisnička podrška
For technical assistance, troubleshooting, or inquiries regarding your 5 CORE Piano Keyboard Stand, please contact 5 CORE customer support.
- Proizvođač: 5 Core Inc.
- Webstranica: Visit the 5 CORE Store on Amazon (for general product information and contact options)
- Refer to your product packaging for direct contact information (phone number or email) if available.
When contacting support, please have your product model number (KS Z1 BLK HD + 2T) and purchase details ready.