1. Uvod
The PEAKMETER PM2016S is a compact and intelligent digital clamp meter designed for accurate electrical measurements. This instrument features a liquid crystal display with a maximum count value of 5999 and a backlight function for improved visibility in various environments. It offers a range of measurement functions with automatic range selection, making it suitable for both beginners and experienced users. The PM2016S can measure AC and DC voltage, AC current, resistance, frequency, and also includes continuity testing, Non-Contact Voltage (NCV) detection, and V/Ω/A auto-scan capabilities. Its portable design ensures ease of use and convenience.
2. Sigurnosne informacije
WARNING: To avoid electric shock or personal injury, read and understand all instructions and safety information before using this instrument.
- Uvijek se uvjerite da je instrument u dobrom radnom stanju prije upotrebe.
- Nemojte nanositi više od naznačenog volumenatage, as marked on the instrument, between the terminals or between any terminal and earth ground.
- Budite oprezni kada radite sa voltagiznad 30V AC RMS, 42V peak ili 60V DC. Ovi volumenitagpredstavljaju opasnost od strujnog udara.
- Do not use the instrument if it appears damaged or if the insulation is compromised.
- Ensure the test leads are in good condition, without any cracks or breaks in the insulation.
- Uvijek isključite mjerne kablove iz strujnog kola prije promjene funkcija.
- Odmah zamijenite baterije kada se pojavi indikator slabe baterije kako biste osigurali tačna očitavanja.
- Pridržavajte se lokalnih i nacionalnih sigurnosnih kodeksa.
This instrument complies with EN61010-1, EN61010-2-033, EN61326, CAT. III 600V safety ratings.
3. Značajke proizvoda
- High Quality Jaw Head: Durable and precise clamp mechanism for current measurement.
- Clear LCD Display and Backlight: Easy-to-read 6000-count display with backlight for visibility in various lighting conditions.
- Lako rukovanje: Simple, intuitive controls, often requiring just one click for common functions.
- Automatsko podešavanje raspona: Automatski odabire odgovarajući raspon mjerenja, pojednostavljujući rad.
- Zadržavanje podataka: Zamrzava prikazano očitanje radi praktičnog snimanja.
- Non-Contact VoltagDetekcija e (NCV): Sigurno detektuje jačinu naizmjenične strujetage bez direktnog kontakta.
- V/Ω/A Auto Scan: Automatically identifies and measures voltage, resistance, or current.
- Test kontinuiteta: Checks for electrical continuity with an audible buzzer.
- Mjerenje frekvencije: Measures frequency via clamp ili voltage ulaz.
- Kompaktan i lagan: Handheld design for portability and ease of use.
- Automatsko isključivanje: Automatically shuts down after 10 minutes of inactivity to conserve battery life.
4. Sadržaj paketa

Paket obično uključuje sljedeće stavke:
- Color Box (Packaging)
- PEAKMETER PM2016S Digital Clamp Meter
- Ispitni kablovi (crveni i crni)
- AAA Batteries (2x 1.5V)
- Uputstvo za upotrebu
Description: This image displays the complete contents of the PEAKMETER PM2016S Digital Clamp Multimeter package, including the device itself, test leads, batteries, and the user manual, all presented within its retail packaging.
5. Podešavanje
5.1 Instalacija baterije
The PM2016S requires two 1.5V AAA batteries. To install or replace batteries:
- Provjerite je li mjerač isključen.
- Pronađite poklopac odjeljka za baterije na stražnjoj strani mjerača.
- Upotrijebite odvijač da otvorite odjeljak za baterije.
- Umetnite dvije AAA baterije, pazeći na ispravan polaritet (+ i -).
- Vratite poklopac odeljka za baterije i pričvrstite ga vijkom.
5.2 Spajanje mjernih kabela
Za voltage, resistance, frequency (voltage), and continuity measurements, connect the test leads:
- Umetnite crni mjerni kabel u ulazni priključak "COM" (zajednički).
- Insert the red test lead into the "VΩ" input jack.
6. Uputstvo za upotrebu
The PM2016S features an auto-ranging function, simplifying most measurements. Press the red power button to turn the meter on or off. The meter will typically start in auto-scan mode (V/Ω/A Auto Scan).
6.1 AC/DC Voltage Measurement
- Spojite mjerne kablove kao što je opisano u Odjeljku 5.2.
- Turn on the meter. It will automatically detect AC or DC voltage.
- Dodirnite crvenu i crnu mjernu sondu tačkama u kolu gdje želite izmjeriti napontage.
- Pročitajte voltage vrijednost na LCD zaslonu.
Description: This video demonstrates the unboxing of the PEAKMETER PM2016S and its accessories, followed by a practical demonstration of measuring AC voltage using the test leads. The user connects the leads to a power outlet and the meter displays the voltage čitanje.
6.2 Mjerenje naizmjenične struje (Clamp funkcija)
- Ensure the meter is on.
- Pritisnite clamp okidač za otvaranje čeljusti.
- Enclose a single conductor (not a bundle of wires) within the jaws. Ensure the jaws are fully closed.
- The meter will display the AC current reading.
Description: This video demonstrates the AC current measurement function of the PEAKMETER PM2016S. The user clamps the meter around a power cable connected to an appliance (kettle), and the meter displays the current draw.
6.3 Mjerenje frekvencije
The PM2016S can measure frequency in two ways:
- Via Test Leads (Voltage Frequency): U voltage measurement mode, the meter can display frequency. Press the "Hz/NCV" button to toggle to frequency display.
- Via Clamp (Current Frequency): Prilikom mjerenja naizmjenične struje pomoću clamp, the meter can also display the frequency of the current. Press the "Hz/NCV" button to toggle to frequency display.

Description: This image shows the clear LCD display of the PM2016S, highlighting its backlight feature and the various measurement indicators, including frequency (Hz).
6.4 Non-Contact Voltage (NCV) Detekcija
- Press the "Hz/NCV" button to activate NCV mode. The display will show "NCV".
- Move the top end of the meter near a live AC voltage izvor.
- The meter will beep and the NCV indicator will light up, with the frequency of beeps and light increasing kako se približava volumenutage izvor.
Description: This video demonstrates the NCV (Non-Contact Voltage) function of the PEAKMETER PM2016S. The user activates NCV mode and brings the meter near a power outlet, showing the audible and visual alerts when voltage je otkriven.
6.5 Test kontinuiteta
- Spojite mjerne kablove kao što je opisano u Odjeljku 5.2.
- The meter will automatically enter continuity mode if resistance is low.
- Dodirnite mjerne sonde dvije tačke na kojima želite provjeriti kontinuitet.
- If there is continuity (resistance less than 30Ω), the buzzer will sound.
6.6 Zadržavanje podataka i pozadinsko osvjetljenje
- Zadržavanje podataka: Press the "HOLD" button (often combined with the backlight button) to freeze the current reading on the display. Press again to release.
- Pozadinsko osvjetljenje: Press and hold the "HOLD" button (or a dedicated backlight button if present) to turn the backlight on or off.

Description: This image highlights the user-friendly design of the PM2016S, showing the main power button and other function buttons, emphasizing its easy operation.
7. Održavanje
7.1 Čišćenje
Obrišite kućište oglasomamp krpu i blagi deterdžent. Ne koristite abrazivna sredstva ili rastvarače. Ulazne terminale držite čistima od prljavštine i vlage.
7.2 Zamjena baterije
Kada se na ekranu pojavi indikator slabe baterije, zamijenite baterije kao što je opisano u odjeljku 5.1. Izvadite baterije ako se mjerač ne koristi duži period kako biste spriječili curenje.
8. Otkrivanje problema
- Nema prikaza/Mjerač se ne uključuje: Provjerite jesu li baterije ispravno postavljene i uvjerite se da nisu ispražnjene. Zamijenite ih ako je potrebno.
- Netačna očitavanja: Ensure test leads are properly connected. Check for damaged leads. Verify the correct measurement function is selected (though auto-ranging minimizes this). Ensure the clamp jaws are fully closed for current measurements.
- "OL" ili indikacija preopterećenja: The measured value exceeds the meter's range. Select a higher range if available, or ensure the input is within the meter's specifications.
- Nema detekcije NCV-a: Ensure NCV mode is active. The NCV sensor is typically at the top of the clamp head; ensure it is close to the AC source.
9. Specifikacije
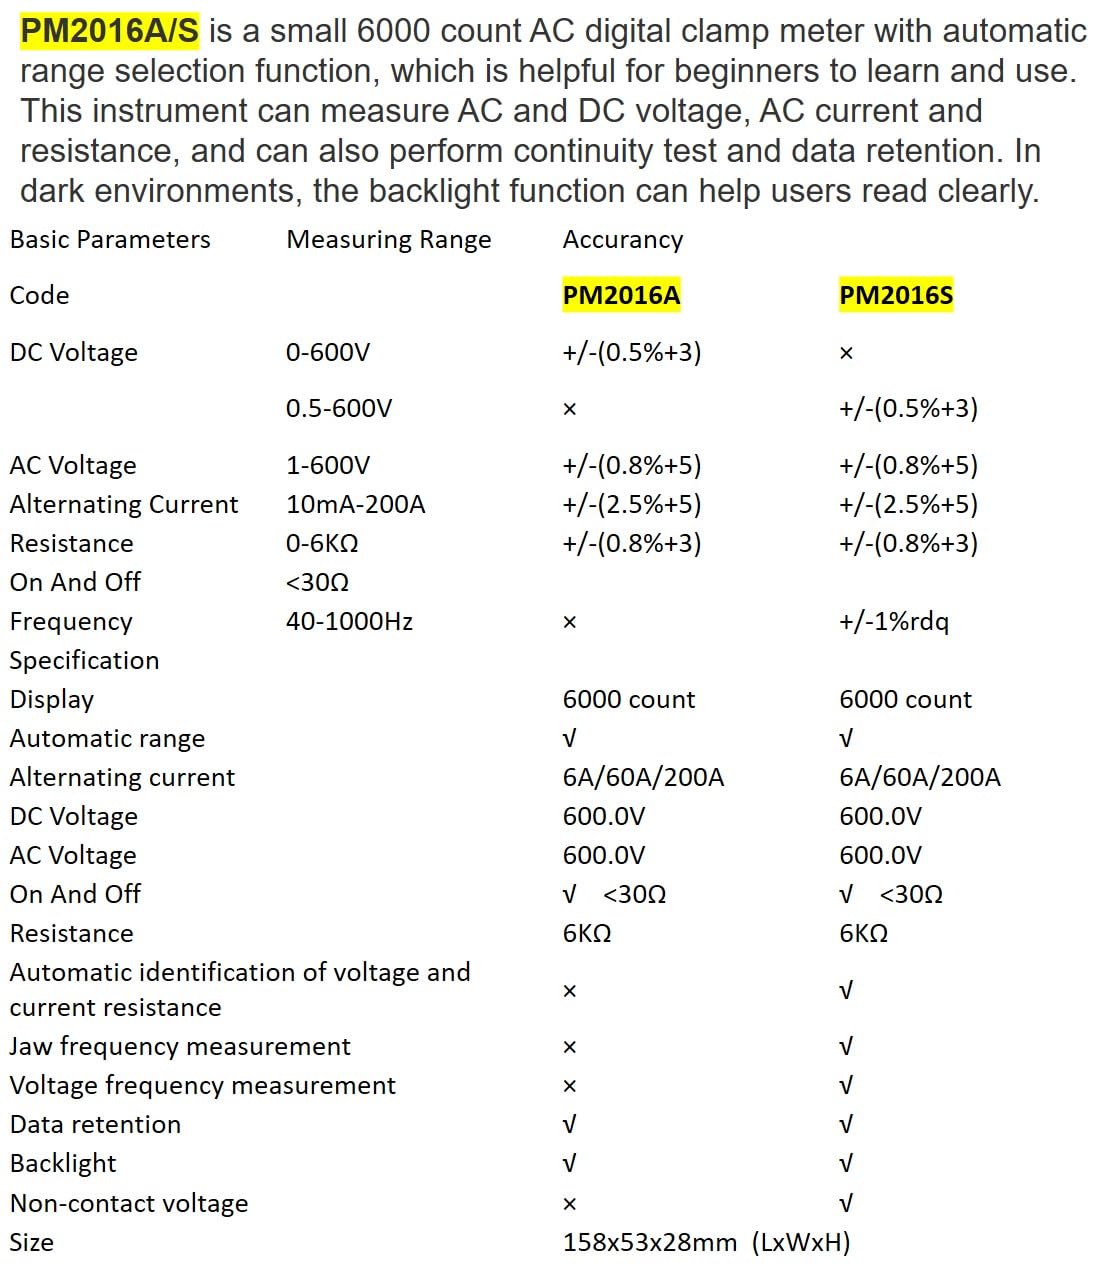
Description: This image presents a comprehensive table detailing the basic parameters, measuring ranges, and accuracy for both the PM2016A and PM2016S models, including features like display count, auto-ranging, and NCV.
| Parametar | Range (PM2016S) | Accuracy (PM2016S) |
|---|---|---|
| DC Voltage | 0.5~600V | ±(0.5%+3) |
| AC Voltage | 1.0~600V | ±(0.8%+5) |
| AC struja | 6A/60A/200A | ±(2.5%+8) |
| Otpor | 0~6 kΩ | ±(0.8%+3) |
| Frekvencija | 60Hz~1000Hz | ±(1.0%+5) |
| Display | 6000 counts | |
| Automatski domet | Da | |
| Kontinuitet | <30Ω | |
| V/Ω/A Auto Scan | Da | |
| Frequency (Clamp) | Da | |
| Frequency (Voltage) | Da | |
| Zadržavanje podataka | Da | |
| Pozadinsko osvetljenje | Da | |
| NCV | Da | |
| Napajanje | 2*1.5V AAA baterije | |
| Neto težina | 122.4g (bez baterija) | |
| Veličina | 158mm*55mm*29mm | |
| Veličina čeljusti | Ø20mm | |
| Safety Rating | EN61010-1, EN61010-2-033, EN61326, CAT. III 600V | |

Description: This image provides a visual representation of the physical dimensions of the PEAKMETER PM2016S, including its length, width, and jaw opening size, along with its weight.
10. Garancija i podrška
The PEAKMETER PM2016S Digital Clamp Multimeter comes with a 1 godine garancije od datuma kupovine. Ova garancija pokriva nedostatke u materijalu i izradi pri normalnoj upotrebi.
For technical support, warranty claims, or service inquiries, please contact your retailer or the manufacturer directly. Keep your purchase receipt as proof of purchase for warranty purposes.