1. Uvod
Thank you for choosing the Upperizon Portable Monitor. This 16-inch 2K QHD (2560x1600) monitor is designed to enhance your productivity and entertainment experience with its high resolution, fast refresh rate, and versatile connectivity. This manual provides essential information for setting up, operating, maintaining, and troubleshooting your new monitor.

Slika: Prekoview of the Upperizon 16-inch 2.5K 144Hz QHD Portable Monitor's key features.
2. Sadržaj paketa
Molimo označite kućicu za sljedeće stavke:
- 1 × Upperizon 16-inch Portable Monitor
- 1 × 30W adapter za napajanje
- 2 × USB-C to USB-C Display Cables (for both video & power)
- 1 × HDMI to HDMI Cable (for video only)
- 1 × Protective Sleeve Case

Slika: Svi artikli uključeni u paket proizvoda.
3. Upute za postavljanje
3.1 Connecting to a Laptop/PC via USB-C
For devices with a full-featured USB-C port (Thunderbolt 3/4/5 or DisplayPort Alt Mode support), a single USB-C to USB-C cable can transmit both video and power.
- Spojite jedan kraj USB-C na USB-C kabela na USB-C priključak monitora.
- Connect the other end of the USB-C to USB-C cable to your laptop's full-featured USB-C port.
- The monitor should automatically detect the signal and power on. If the screen flickers, please use the original power adapter for stable power supply.

Image: Single USB-C connection for power and video. Ensure your device's USB-C port supports Thunderbolt 3/4/5 or DisplayPort Alt Mode.
3.2 Connecting to a Laptop/PC via HDMI
For devices without a full-featured USB-C port, or for gaming consoles, use the HDMI and power adapter for connection.
- Connect one end of the HDMI cable to the monitor's HDMI port.
- Connect the other end of the HDMI cable to your device's HDMI output.
- Connect the provided 30W power adapter to the monitor's USB-C power input port and to a power outlet.
- The monitor should power on and display the signal.

Image: HDMI and power cable connection for devices that require separate power input.
3.3 Connecting to Mac Devices
The 16:10 aspect ratio of this monitor is designed to seamlessly match 16-inch MacBook screens without black bars. For MacBooks with full-featured USB-C (Thunderbolt) ports, a single USB-C cable is sufficient. Older MacBooks may require a Mini DisplayPort to HDMI adapter.
For Mac Mini, connect to the rear USB-C ports. Do not connect to the front USB-C ports.

Image: The 16:10 aspect ratio of the Upperizon monitor provides a perfect match for MacBooks.

Image: Connecting the portable monitor to a Mac Mini using the rear USB-C ports.
3.4 Connecting to Gaming Consoles
The monitor is compatible with PS4/5, Xbox, and Steam Deck. Please use an HDMI cable for connecting to Nintendo Switch, as USB-C is not compatible with Switch.

Image: Portable monitor connected to a gaming console, supporting 60Hz SDR/HDR and 120Hz SDR/HDR.
3.5 Using the Integrated Kickstand and VESA Mount
The monitor features an integrated kickstand that allows for 0° to 180° adjustment, supporting both landscape and portrait modes. For a more permanent setup, the monitor is VESA compatible (M4*6mm, 75x75mm) for mounting on a desktop arm or wall mount (VESA stand not included).
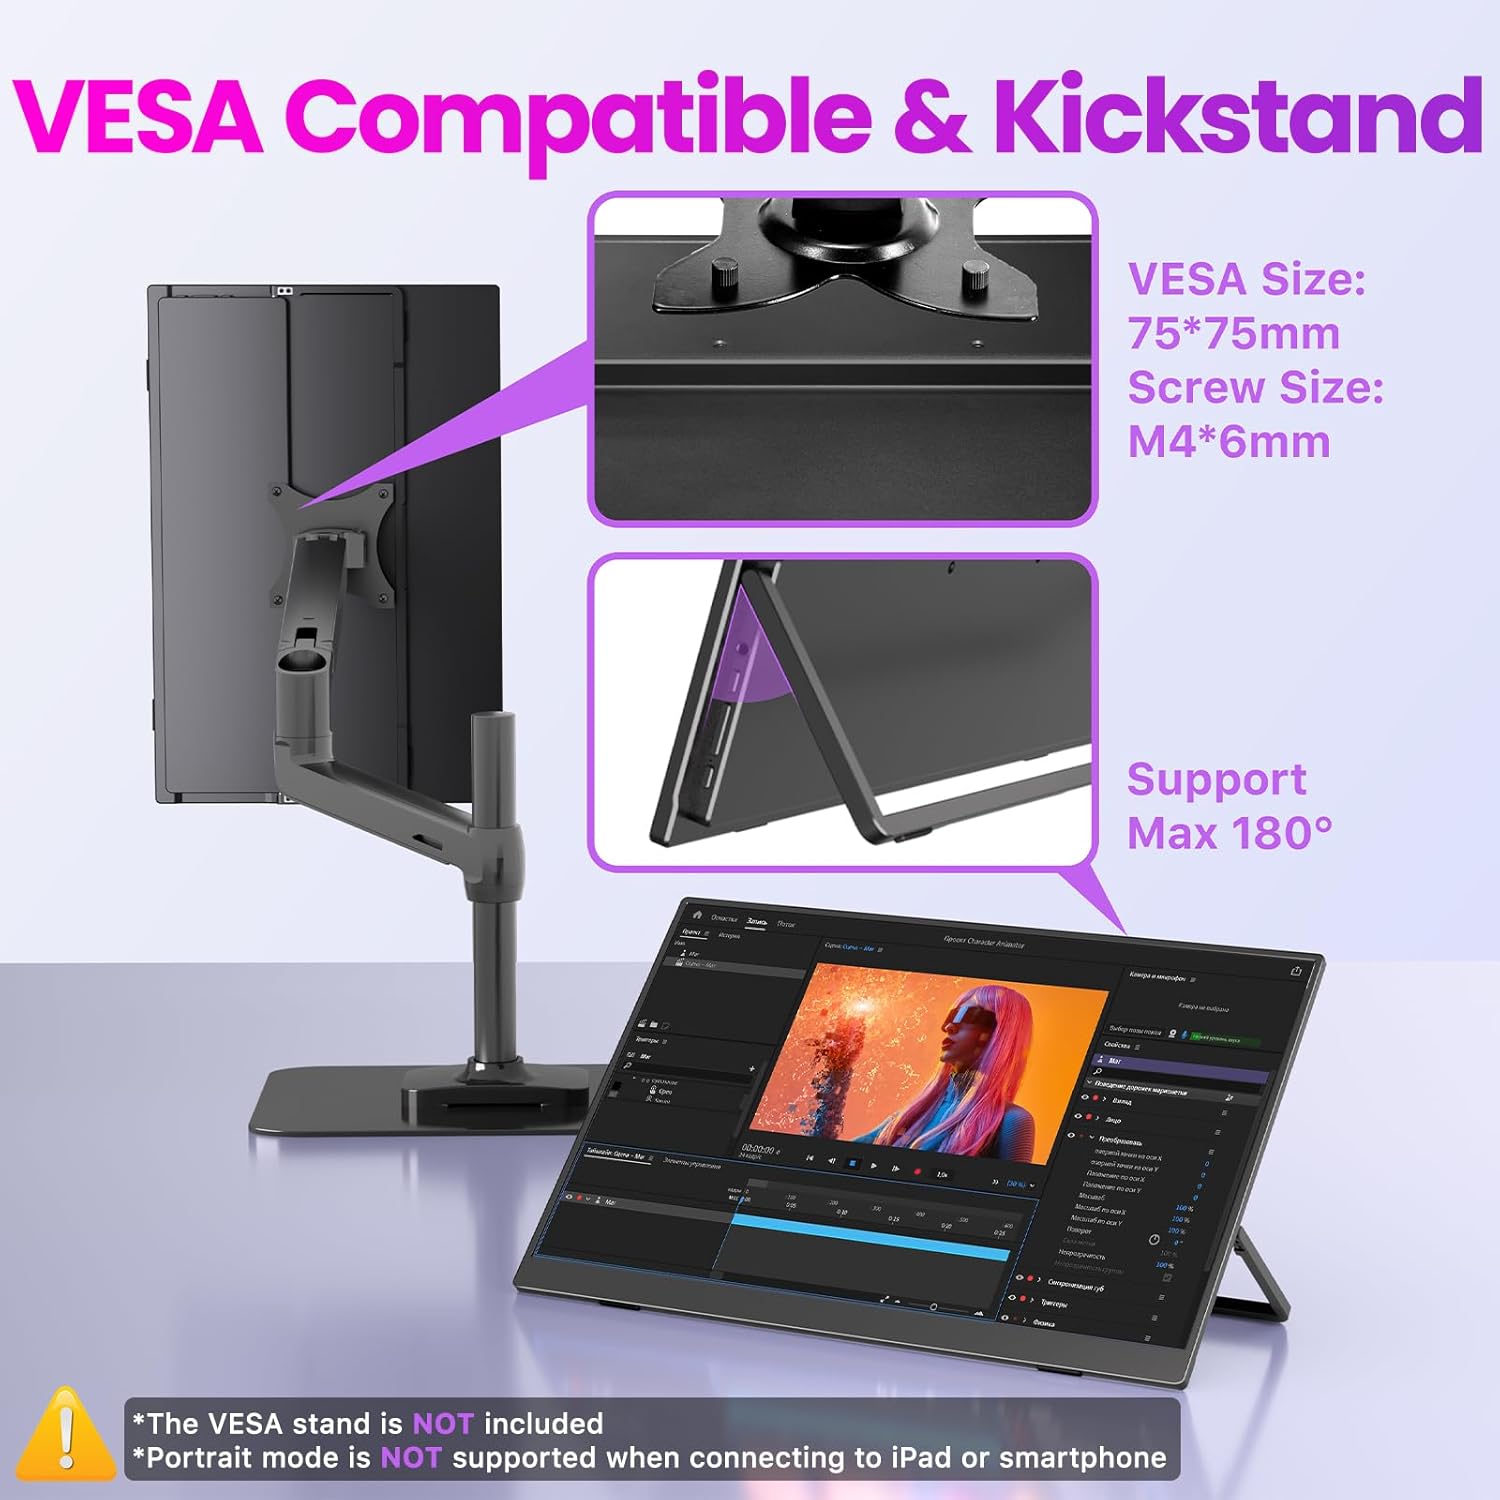
Image: The monitor's integrated kickstand and VESA compatibility for flexible placement.

Image: The adjustable kickstand allows for optimal viewing angles in both landscape and portrait modes.

Image: VESA compatible mounting for a clean and professional workstation setup.
4. Uputstvo za upotrebu
4.1 Kontrole monitora
The monitor features intuitive controls for power, menu navigation, brightness, and volume adjustments.
- Power/Exit Button: Press to turn the monitor on/off. Use to exit the OSD menu.
- Down/Up Button: Navigate through OSD menu options. Quick press for volume/brightness adjustment.
- Dugme za izbor/potvrdu: Press to enter the OSD menu. Use to confirm selections within the menu.

Slika: Prekoview of the monitor's control buttons and ports.
4.2 On-Screen Display (OSD) meni
To access the OSD menu, press the Menu/Confirm button. Use the Up/Down buttons to navigate and the Menu/Confirm button to select options. The OSD menu allows you to adjust various settings such as:
- Svjetlina/kontrast: Adjust display luminance.
- Postavke boja: Promijenite temperaturu boje, nijansu i zasićenost.
- Izvor ulaza: Ručno odaberite između USB-C i HDMI ulaza.
- HDR način rada: Omogućite ili onemogućite visoki dinamički raspon.
- Omjer širine i visine: Adjust display aspect ratio.
- audio: Control volume and mute.
4.3 Audio karakteristike
The monitor includes built-in speakers for convenience. For private listening, a 3.5mm audio jack is available for connecting headphones or external speakers.

Image: The monitor's built-in speakers provide audio for media and games.
5. Karakteristike ekrana
5.1 Visoka rezolucija i brzina osvježavanja
Experience crisp visuals with 2560x1600 QHD resolution. The monitor supports a 144Hz refresh rate via USB-C and 120Hz via HDMI, providing smooth motion for gaming and fast-paced content.

Image: Comparison of 60Hz vs. 144Hz refresh rates for gaming, highlighting smoother visuals.

Image: Visual comparison of 2.5K QHD versus 1080P resolution.
5.2 Color Accuracy and Brightness
The monitor boasts 145% sRGB and 100% DCI-P3 wide color gamut, along with 1.07 billion colors (10-bit color depth) and 400 nits brightness, ensuring vibrant and accurate color reproduction. Advanced low blue light and flicker-free technology reduce eye strain.

Image: High color fidelity features for expressive hues.

Image: Comparison of 100% DCI-P3 & 145% sRGB wide color gamut for a better viewing iskustvo.

Image: HDR (High Dynamic Range) support for an immersive visual experience.
6. Održavanje
6.1 Čišćenje monitora
- Always power off the monitor and disconnect all cables before cleaning.
- Lagano koristite meku krpu koja ne ostavlja dlačice dampvodom ili neabrazivnim sredstvom za čišćenje ekrana.
- Ne prskajte sredstvo za čišćenje direktno na ekran.
- Izbjegavajte upotrebu alkohola, amonijaka ili abrazivnih sredstava za čišćenje, jer mogu oštetiti površinu ekrana.
6.2 Skladištenje
- When not in use, store the monitor in its protective sleeve case to prevent scratches and dust accumulation.
- Monitor držite na hladnom i suhom mjestu, dalje od direktne sunčeve svjetlosti i ekstremnih temperatura.
7. Otkrivanje problema
7.1 Nema signala / Crni ekran
- Ensure all cables (USB-C or HDMI + Power) are securely connected to both the monitor and your device.
- Verify that your device's USB-C port supports video output (DisplayPort Alt Mode or Thunderbolt).
- Pokušajte povezati monitor s drugim uređajem kako biste isključili problem s izvornim uređajem.
- If using HDMI, ensure the power adapter is connected to the monitor.
- Provjerite OSD meni kako biste bili sigurni da je odabran ispravan ulazni izvor.
7.2 Screen Flickering
- Ensure the monitor is receiving sufficient power. Use the provided 30W power adapter, especially when using HDMI or if your device's USB-C port cannot provide enough power.
- Pokušajte s drugim USB-C ili HDMI kabelom.
- Podesite postavke brzine osvježavanja na povezanom uređaju.
7.3 Nema zvuka iz zvučnika
- Check the volume settings on both the monitor (via OSD menu) and your connected device.
- Provjerite da monitor nije isključen.
- If using HDMI, ensure your device is configured to output audio through HDMI.
- Test with headphones connected to the monitor's audio jack.
8. Specifikacije
| Feature | Specifikacija |
|---|---|
| Veličina ekrana | 16 inča |
| Rezolucija | 2560 x 1600 piksela (2K QHD) |
| Aspect Ratio | 16:10 |
| Refresh Rate | 144Hz (USB-C), 120Hz (HDMI) |
| Gamut boja | 145% sRGB, 100% DCI-P3 |
| Dubina boje | 1.07 Billion colors (10-bit) |
| Osvetljenost | 400 kandela (nita) |
| Kontrast Ratio | 1200:1 |
| Površina ekrana | Matte IPS |
| HDR podrška | Da |
| Povezivanje | 2 x Full-featured USB-C, 1 x HDMI |
| Audio | Built-in Speakers, 3.5mm Audio Jack |
| Montaža | Integrated Kickstand (0-180°), VESA Compatible (75x75mm, M4*6mm) |
| Dimenzije proizvoda | 14.06 x 9.49 x 0.55 inča |
| Težina artikla | 1.56 funte |
| Broj modela | U16LS |

Image: Physical dimensions of the Upperizon 16-inch Portable Monitor.
9. Garancija i podrška
This product comes with a 2-Year Warranty. For any support inquiries or warranty claims, please contact Upperizon customer service. You can find contact information on the warranty card included in your package or by visiting the official Upperizon website.
Proizvođač: Upperizon
prodavač: Upperizon