1. Uvod
The SHIDU M500 is a compact and portable wired voice amplifier designed to project your voice clearly and powerfully. It is an ideal tool for teachers, presenters, tour guides, and anyone who needs to amplify their voice in various settings. This device also supports music playback from multiple sources.

Image 1.1: SHIDU M500 Wired Voice Amplifier. This image shows the front view of the compact, black and white voice amplifier.
2. Proizvod je gotovview
2.1. Komponente i kontrole
Familiarize yourself with the various parts and controls of your SHIDU M500 ampdizalica:

Image 2.1: SHIDU M500 Controls and Ports Diagram. This diagram illustrates the top panel controls including Play/Pause, Recording, Previous, Next, Mode Switch, LED Screen, and the Switch/Volume knob. It also shows the side ports: USB, TF card socket, DC 5V charging port, AUX-IN, and MIC-IN.
- Switch/Vol Knob: Okrenite za uključivanje/isključivanje i podešavanje jačine zvuka.
- LED ekran: Displays current mode, battery level, and track information.
- Dugme za reprodukciju/pauzu: Starts or pauses audio playback.
- Dugme za snimanje: Initiates or stops audio recording.
- Prethodno dugme: Skips to the previous track or navigates menus.
- Dalje dugme: Skips to the next track or navigates menus.
- Dugme za promjenu načina rada: Toggles between different input modes (e.g., USB, TF card, AUX).
- USB port: For connecting USB flash drives for music playback.
- Utičnica za TF karticu: For inserting a TF (MicroSD) card for music playback.
- DC 5V priključak: Ulazna snaga za punjenje amplifier.
- AUX-IN priključak: Za povezivanje eksternih audio uređaja putem 3.5 mm audio kabla.
- MIC-IN Port: Za povezivanje žičanog mikrofona.
3. Podešavanje
3.1. Punjenje Amplifier
- Connect the provided charging cable to the DC 5V port na amplifier.
- Drugi kraj kabla priključite na standardni USB adapter za napajanje (nije uključen) ili USB port računara.
- LED ekran će prikazivati status punjenja. Potpuno punjenje obično traje 3-5 sati.
- Osigurajte amplifier is fully charged before first use for optimal battery life.
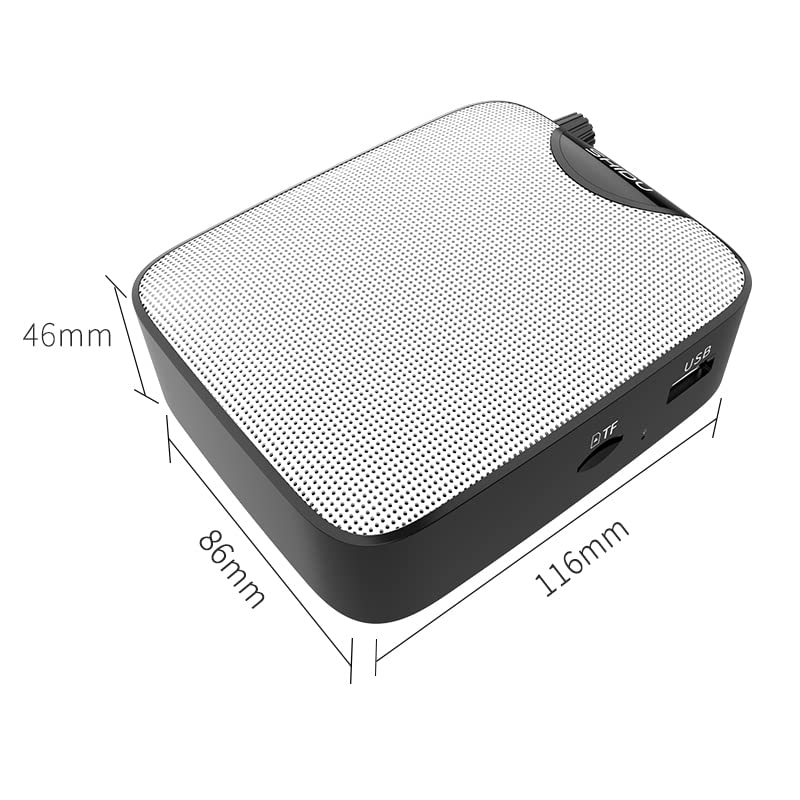
Image 3.1: SHIDU M500 Built-in 1800mAh Battery. This image highlights the amplifier's internal 1800mAh high-quality lithium battery, indicating long standby time and extended battery life.
3.2. Spajanje mikrofona
- Insert the 3.5mm plug of the wired microphone into the MIC-IN port na amplifier.
- Position the microphone headset comfortably on your head, ensuring the microphone is close to your mouth for best voice pickup.
3.3. Uključivanje/isključivanje i podešavanje jačine zvuka
- Da biste uključili napajanje, okrenite Switch/Vol Knob clockwise until you hear a click and the LED screen illuminates.
- Nastavite okretati dugme u smjeru kazaljke na satu da biste povećali jačinu zvuka. Okrenite suprotno od smjera kazaljke na satu da biste smanjili jačinu zvuka.
- Da biste isključili napajanje, okrenite Switch/Vol Knob counter-clockwise until you hear a click and the LED screen turns off.
4. Uputstvo za upotrebu
4.1. glas Amplifikacija
- Ensure the microphone is connected and the ampLifier je uključen.
- Podesite Switch/Vol Knob po Vašoj želji ampnivo lifikacije.
- Speak clearly into the microphone. Avoid placing the microphone too close to the amplifier to prevent feedback (a high-pitched squeal).
4.2. Music Playback (USB/TF Card/AUX-IN)
- USB/TF kartica: Umetnite USB fleš disk u USB port or a TF card into the Utičnica za TF karticu. The amplifier will automatically switch to the corresponding mode and begin playback. If not, press the Dugme za promjenu načina rada.
- AUX-IN: Povežite eksterni audio uređaj (npr. pametni telefon, MP3 plejer) na AUX-IN priključak using a 3.5mm audio cable. Press the Dugme za promjenu načina rada until 'AUX' is displayed on the LED screen.
- Koristite Pusti/Pauza, Prethodno, i Sledeći buttons to control music playback.
- Podesite glasnoću pomoću Switch/Vol Knob.
4.3. Funkcija snimanja
- Ensure a USB flash drive or TF card is inserted to save recordings.
- Pritisnite Dugme za snimanje to start recording. The LED screen will indicate recording status.
- Govori u mikrofon.
- Pritisnite Dugme za snimanje again to stop recording. The recording will be saved to the inserted storage device.
5. Održavanje
5.1. Čišćenje
- Obrišite ampVanjski dio spajderice obrišite mekom, suhom krpom.
- Ne koristite jake hemikalije, rastvarače ili abrazivna sredstva za čišćenje.
- Održavajte portove čistim od prašine i ostataka.
5.2. Održavanje baterije
- Napunite amplifier regularly, even if not in frequent use, to maintain battery health.
- Izbjegavajte potpuno pražnjenje baterije prije ponovnog punjenja.
- Nemojte izlagati ampusisivač do ekstremnih temperatura.
5.3. Skladištenje
- Čuvajte amplifier in a cool, dry place away from direct sunlight and moisture.
- When storing for extended periods, ensure the battery is partially charged (around 50%).
6. Otkrivanje problema
| Problem | Mogući uzrok | Rješenje |
|---|---|---|
| Nema zvuka iz amplifier | Amplifier is off; Volume is too low; Microphone not connected properly; Incorrect mode selected. | Uključite amplifier and increase volume; Ensure microphone is fully plugged into MIC-IN; Press Mode Switch to select correct input. |
| Iskrivljen zvuk ili povratna informacija | Volume too high; Microphone too close to amplifier; Microphone damaged. | Decrease volume; Increase distance between microphone and amplifier; Try a different microphone if available. |
| Baterija se ne puni | Charging cable not connected properly; Faulty cable or adapter; Amplifier not powered off during charging. | Ensure cable is securely connected to DC 5V port and power source; Try a different USB cable or adapter; Power off the amplifier while charging. |
| Reprodukcija muzike ne radi | USB/TF card not inserted correctly; Incorrect mode selected; Corrupt audio files. | Reinsert USB/TF card; Press Mode Switch to select USB/TF mode; Ensure audio files su u kompatibilnom formatu. |
7. Specifikacije
- Model: SHIDU M500
- Dimenzije (D x Š x V): 8.6 x 2.8 x 10.4 centimetara
- Težina: 280 grama
- Tehnologija povezivanja: Žičani
- Izlazna snaga: 10W
- baterija: Built-in 1800mAh High Quality Lithium Battery
- Kompatibilni uređaji: Laptop, MP3 Player, Smartphone (via AUX-IN)
- Ulazi za ulaz: MIC-IN (3.5mm), AUX-IN (3.5mm), USB, TF Card Slot, DC 5V (Charging)
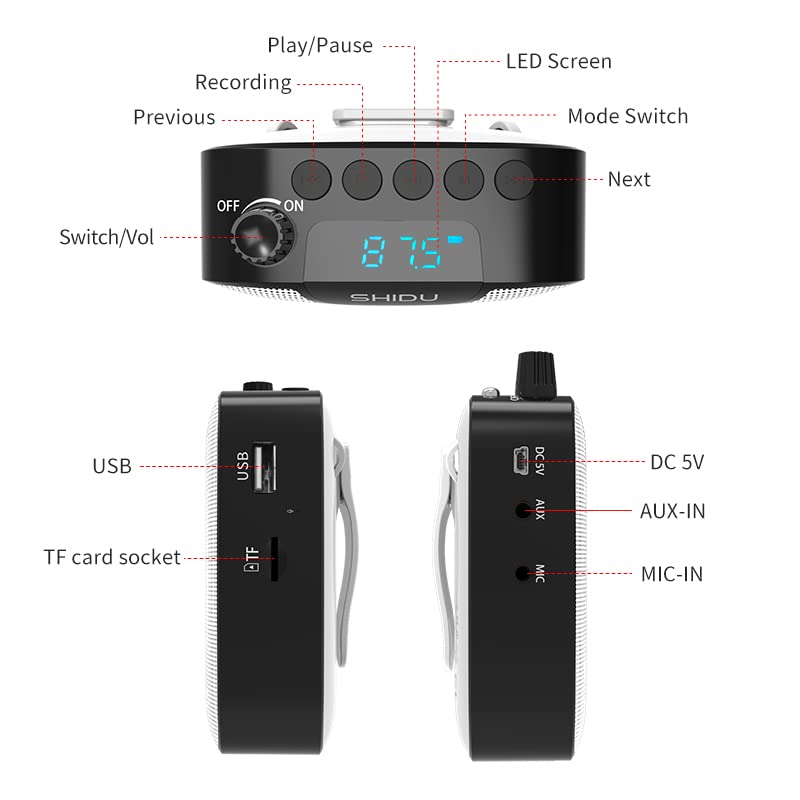
Image 7.1: SHIDU M500 Dimensions Diagram. This image shows the amplifier's dimensions: 116mm length, 86mm width, and 46mm height.

Image 7.2: SHIDU M500 10W High Power Acoustic Amplifier. This image illustrates the amplifier's 10W power output, capable of providing loud and clear sound in a standard 500m² space.

Image 7.3: SHIDU M500 Mini and Portable. This image emphasizes the amplifier's compact size and light weight of only 282g, comparable to the size of a mobile phone.

Image 7.4: SHIDU M500 High-Fidelity Dual Magnetic Speaker. This image highlights the advanced speaker technology for realistic vocal reproduction and powerful bass and treble.
8. Informacije o garanciji
SHIDU warrants its voice amplifier hardware products against defects in materials and workmanship for a period of jednu godinu from the date of original purchase, provided the purchase was made from an authorized SHIDU dealer. This warranty is void if the equipment is altered, misused, mishandled, suffers excessive wear, or is serviced by any parties not authorized by SHIDU.
9. Podrška
For further assistance, technical support, or warranty claims, please refer to the contact information provided with your purchase or visit the official SHIDU website. Ensure you have your product model number (M500) and proof of purchase ready when contacting support.