X99-BD4
HUANANZHI X99-BD4 Server Mainboard User Manual
Model: X99-BD4 | Brand: Generic
1. Uvod
This user manual provides comprehensive instructions for the installation, operation, and maintenance of the HUANANZHI X99-BD4 Server Mainboard. Designed for server applications, this mainboard supports LGA 2011-3 processors and features a 4-channel memory architecture. Please read this manual thoroughly before proceeding with installation to ensure proper setup and optimal performance.
2. Sigurnosne informacije
Always observe the following safety precautions when handling the mainboard and other computer components:
- Sprečavanje elektrostatičkog pražnjenja (ESD): Always wear an anti-static wrist strap or frequently touch a grounded metal object before handling the mainboard to prevent ESD damage.
- Isključivanje struje: Prije instaliranja ili uklanjanja bilo kakvih komponenti provjerite je li napajanje isključeno iz zidne utičnice.
- Rukovanje komponentama: Handle components by their edges. Avoid touching pins, leads, or circuit paths.
- ventilacija: Ensure adequate ventilation within the computer case to prevent overheating.
- Profesionalna instalacija: Ako niste sigurni u vezi s bilo kojim koracima instalacije, potražite pomoć kvalificiranog tehničara.
3. Sadržaj paketa
Provjerite da li se u paketu nalaze svi artikli. Ako bilo koji artikl nedostaje ili je oštećen, obratite se prodavaču.
- HUANANZHI X99-BD4 Server Mainboard
- I / O štit
- SATA kablovi (količina može varirati)
- Korisnički priručnik (ovaj dokument)
- CD/USB sa drajverima (ako je uključen)
4. Proizvod je gotovview
The HUANANZHI X99-BD4 mainboard is designed for high-performance server and workstation applications. Below are key components and their locations.

Slika 4.1: Od vrha prema dolje view of the HUANANZHI X99-BD4 Server Mainboard, showing the LGA 2011-3 CPU socket, four DDR4 DIMM slots, multiple PCIe slots, and various headers.

Slika 4.2: Pod uglom view highlighting the CPU socket area, VRM heatsinks, and the layout of the memory and expansion slots.
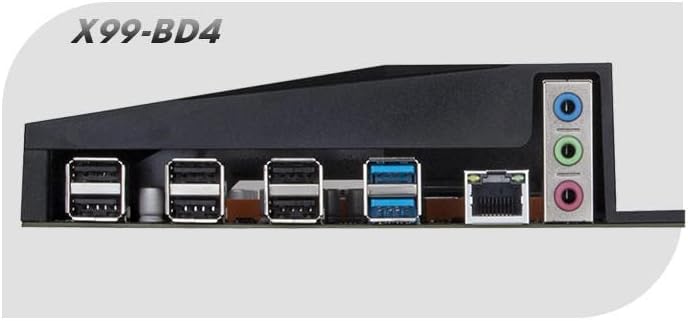
Figure 4.3: Close-up of the rear I/O panel, displaying USB ports, Ethernet port, and audio jacks.
Ključne komponente:
- CPU Socket (LGA 2011-3): Supports Intel Haswell-E, Broadwell-E, and Skylake-E processors.
- DDR4 DIMM Slots (4-Channel): Four slots for DDR4 memory modules, supporting quad-channel configurations.
- PCI Express Slots: Multiple PCIe slots for graphics cards, network cards, and other expansion cards.
- SATA portovi: Connect storage devices such as HDDs and SSDs.
- M.2 utor: For high-speed NVMe or SATA M.2 SSDs.
- USB portovi: Various USB 2.0 and USB 3.0 ports on the rear I/O panel and internal headers.
- Ethernet priključak: Za mrežnu povezanost.
- Audio priključci: Za audio ulaz i izlaz.
- 24-Pin ATX Power Connector: Main power input for the motherboard.
- 8-Pin EPS Power Connector: Dodatno napajanje za CPU.
- Debug LED: A two-digit display that shows POST codes for troubleshooting.
5. Postavljanje i instalacija
Follow these steps carefully to install your HUANANZHI X99-BD4 mainboard and its components.
5.1. Preparing the Mainboard
- Place the mainboard on a non-conductive, flat surface (e.g., the anti-static bag it came in).
- Instalirajte CPU:
- Open the CPU socket retention levers.
- Carefully align the CPU with the socket, ensuring the gold triangle on the CPU matches the triangle on the socket.
- Pažljivo spustite CPU u utičnicu. Nemojte ga silom umetnuti.
- Close the retention levers to secure the CPU.
- Instalirajte hladnjak procesora:
- Apply thermal paste to the CPU if not pre-applied on the cooler.
- Mount the CPU cooler according to its manufacturer's instructions.
- Connect the CPU fan cable to the CPU_FAN header on the mainboard.
- Install Memory Modules (RAM):
- Otvorite kopče na oba kraja DIMM utora.
- Poravnajte zarez na DDR4 memorijskom modulu s ključem u DIMM utoru.
- Press down firmly on both ends of the memory module until the clips snap into place. For quad-channel, refer to the mainboard's silkscreen for recommended slot population order.
5.2. Installing the Mainboard into the Chassis
- Install the I/O Shield into the rear opening of your computer case.
- Align the mainboard with the standoffs in the chassis.
- Secure the mainboard with screws, ensuring it is firmly seated.
5.3. Povezivanje perifernih uređaja i napajanja
- Connect the 24-pin ATX power cable from the power supply to the mainboard.
- Connect the 8-pin EPS (CPU) power cable from the power supply to the mainboard.
- Install your graphics card (if applicable) into the primary PCIe x16 slot and connect any required PCIe power cables from the power supply.
- Connect SATA data cables from your storage devices (HDDs/SSDs) to the SATA ports on the mainboard. Connect SATA power cables from the power supply to the devices.
- Connect front panel cables (Power SW, Reset SW, HDD LED, Power LED, USB, Audio) to their respective headers on the mainboard. Refer to the mainboard's silkscreen or a detailed diagram for correct pin assignments.
- Connect any additional fans to the fan headers on the mainboard.
6. Uputstvo za upotrebu
After successful installation, you can proceed with initial boot-up and system configuration.
6.1. Početno pokretanje
- Uvjerite se da su sve veze sigurne.
- Povežite monitor, tastaturu i miš.
- Connect the power supply to a wall outlet and flip the power switch on the PSU to the 'ON' position.
- Pritisnite dugme za napajanje na kućištu računara.
- Observe the POST (Power-On Self-Test) process. The debug LED on the mainboard will display codes indicating the boot status.
- Press the designated key (usually DEL or F2) during boot-up to enter the BIOS/UEFI setup utility.
6.2. Podešavanje BIOS-a/UEFI-ja
The BIOS (Basic Input/Output System) or UEFI (Unified Extensible Firmware Interface) is the firmware that initializes hardware during the boot process. Key settings include:
- Redoslijed pokretanja: Set the priority of boot devices (e.g., USB drive for OS installation, then SSD/HDD).
- Datum i vrijeme: Set the system clock.
- CPU Settings: Adjust CPU-related features (e.g., virtualization technology, power management).
- Postavke memorije: Configure memory frequency and timings (XMP/DOCP profiles).
- SATA Configuration: Set SATA mode (AHCI is recommended for SSDs).
- Kontrola ventilatora: Adjust fan speeds based on temperature.
Save changes and exit the BIOS/UEFI to continue with operating system installation.
6.3. Instalacija drajvera
After installing your operating system, install the necessary drivers for the mainboard's components to ensure full functionality and optimal performance. Drivers typically include:
- Drajveri čipseta
- LAN (Ethernet) drajveri
- Audio Drivers
- USB drajveri (ako su potrebni određeni)
- SATA/NVMe drajveri
Drajveri se obično mogu pronaći na proizvođačevoj website or on the included driver CD/USB.
7. Održavanje
Proper maintenance can extend the lifespan of your mainboard and ensure stable operation.
- Uklanjanje prašine: Redovno čistite prašinu iz unutrašnjosti kućišta računara, posebno s ventilatora i hladnjaka, koristeći komprimirani zrak. Prije čišćenja provjerite je li sistem isključen iz struje.
- Ažuriranja BIOS-a/UEFI-ja: Povremeno provjeravajte proizvođačeve website for BIOS/UEFI updates. Updates can improve compatibility, stability, and performance. Follow the update instructions carefully to avoid damaging the mainboard.
- Ažuriranja drajvera: Redovno ažurirajte upravljačke programe sistema kako biste osigurali kompatibilnost i optimalne performanse s novim softverom i hardverom.
- Kontrola okoline: Operate the system in a cool, dry, and well-ventilated environment. Avoid extreme temperatures and humidity.
8. Otkrivanje problema
Ovaj odjeljak pruža rješenja za uobičajene probleme s kojima se možete susresti.
8.1. Debug LED Codes
The mainboard features a two-digit debug LED display that shows POST (Power-On Self-Test) codes. These codes can help identify the component causing a boot failure. Refer to the mainboard's specific documentation (if available) for a full list of codes. Common codes include:
- 00 / FF: Usually indicates a successful boot or a problem with the CPU/BIOS.
- 20-2F: Memory initialization issues.
- 40-4F: Graphics card issues.
- 50-5F: Storage device issues.
8.2. Uobičajeni problemi i rješenja
- Nema napajanja:
- Check if the power supply is connected to the wall outlet and switched on.
- Ensure the 24-pin ATX and 8-pin EPS power cables are securely connected to the mainboard.
- Verify the front panel power button cable is correctly connected to the mainboard header.
- Bez prikaza:
- Ensure the monitor is connected to the graphics card (or integrated graphics, if applicable) and powered on.
- Ponovo umetnite grafičku karticu u njen PCIe slot.
- Try one RAM stick at a time in different slots to rule out faulty memory.
- Check the debug LED for relevant error codes.
- Nestabilnost sistema / Padovi sistema:
- Provjerite temperaturu CPU i GPU. Osigurajte adekvatno hlađenje.
- Provjerite jesu li svi priključci za napajanje sigurni.
- Pokrenite alate za dijagnostiku memorije da biste provjerili ima li grešaka u RAM-u.
- Provjerite da li su svi upravljački programi ažurirani.
- Operativni sistem nije pronađen:
- Check SATA/NVMe cable connections to storage devices.
- Verify boot order in BIOS/UEFI.
- Ensure the operating system is correctly installed on the drive.
9. Specifikacije
Detailed technical specifications for the HUANANZHI X99-BD4 Server Mainboard:
| Feature | Specifikacija |
|---|---|
| Brand | Generic |
| Naziv modela | X99-BD4 |
| CPU Socket | LGA 2011-3 |
| Kompatibilni procesori | Intel Haswell-E, Broadwell-E, Skylake-E |
| Tip čipseta | Intel X99 |
| Dostupni memorijski slotovi | 4 (DDR4, Quad-Channel) |
| Interfejs grafičke kartice | PCI Express |
| Tip glavnog konektora za napajanje | 24-Pin ATX |
| Broj portova | 20 (various I/O and internal headers) |
| Kompatibilni uređaji | Server |
10. Garancija i podrška
This product is covered by a standard manufacturer's warranty. For specific warranty terms and conditions, please refer to the documentation provided with your purchase or contact your retailer. For technical support, driver downloads, and BIOS updates, please visit the official HUANANZHI webstranice ili kontaktirajte njihovu korisničku službu.
Datum prve dostupnosti: 23. aprila 2023
Povezani dokumenti - X99-BD4
 |
HUANANZHI X10X99-16D Motherboard User Manual Detailed user manual and specifications for the HUANANZHI X10X99-16D motherboard, featuring LGA 2011-3 socket, DDR4 RAM support, M.2 NVMe slots, and multiple interface options. |
 |
HUANANZHI X99-8D3 Dual Motherboard User Manual Comprehensive user manual for the HUANANZHI X99-8D3 Dual Motherboard, covering safety precautions, installation, BIOS settings, and driver installation for LGA 2011-3 processors. |
 |
HUANANZHI X99-F8D PLUS Uputstvo za upotrebu matične ploče User manual for the HUANANZHI X99-F8D PLUS motherboard, detailing its specifications, interfaces, and system compatibility for PC builders and enthusiasts. |
 |
MACHINIST X99-RS9 Uputstvo za upotrebu matične ploče Sveobuhvatno korisničko uputstvo za matičnu ploču MACHINIST X99-RS9, sa detaljnim specifikacijama i komponentama.view, vodiči za instalaciju CPU-a, ventilatora, memorije i kartica za proširenje, konektori na zadnjoj ploči, interni konektori, podešavanje BIOS-a i rješavanje problema. |
 |
MACHINIST X99-K9 Motherboard User Manual for Intel Xeon and Core i7 Processors User's manual for the MACHINIST X99-K9 motherboard, detailing specifications, component overview, installation guides for CPU, RAM, expansion cards, connectors, and BIOS setup. Supports Intel 5th/6th Gen Core i7 and Xeon E5 V3/V4 processors. |
 |
HUANANZHI X99-4MT Motherboard User Manual and Installation Guide Comprehensive user manual for the HUANANZHI X99-4MT motherboard, covering installation, setup, BIOS settings, driver installation, and safety precautions. Features Intel LGA 2011-3 support, DDR3 RAM, and M.2 NVME. |
Ask a question about this manual
Ask about setup, troubleshooting, compatibility, parts, safety, or missing instructions. Manuals+ will review the question and use this page’s manual context to help answer it.