1. Uvod
Thank you for choosing the CREWORKS 8-in-1 Heat Press. This versatile machine is designed for transferring designs onto various items such as T-shirts, bags, hats, mugs, and plates using heat transfer or sublimation paper and vinyl. Its 30x38cm heating platen provides ample space for creative projects, offering professional results for both personal and commercial use.
Key features of your heat press include:
- Powerful Functionality: Equipped with a 30x38cm Teflon-coated heating panel for efficient and safe operation.
- Dvostruki digitalni displej: Features a digital timer and dual temperature control display for precise and intuitive operation.
- Pogodan dizajn: Rack-type control box for easy connection and immediate use.
- Lako rukovanje: Drawer-type work platform allows for simple replacement of accessories. Aluminum grill lid base and baking sheets ensure mechanical strength and reduced weight.
- Svestranost: The 8-in-1 design accommodates a wide range of items including T-shirts, mouse pads, backpacks, pillowcases, mugs, and hats.
2. Sigurnosna uputstva
Please read all safety instructions carefully before operating the heat press to prevent injury or damage to the machine. Keep this manual for future reference.
- Uvijek priključite uređaj na uzemljenu utičnicu s odgovarajućim naponomtage (220V / 50Hz).
- Do not touch the heating platen or other hot surfaces during operation or immediately after use. Use heat-resistant gloves if necessary.
- Držite djecu i kućne ljubimce podalje od mašine tokom rada.
- Ensure adequate ventilation in the work area to dissipate heat and fumes from transfer materials.
- Never leave the machine unattended while it is powered on or operating.
- Ne rukujte mašinom mokrim rukama ili uamp uslovima.
- Isključite uređaj iz električne utičnice kada ga ne koristite ili prije čišćenja i održavanja.
- Ako je kabel za napajanje oštećen, mora ga zamijeniti proizvođač, njegov serviser ili slično kvalifikovane osobe kako bi se izbjegla opasnost.
- The machine is designed with a heat-resistant casing, capable of withstanding temperatures up to 250°C (480°F). However, direct contact with hot surfaces should still be avoided.

Figure 2.1: The heat press features a heat-resistant casing and insulation layers, designed to protect users from direct heat and capable of withstanding temperatures up to 250°C (480°F).
3. Komponente proizvoda
Familiarize yourself with the main parts of your CREWORKS 8-in-1 Heat Press:
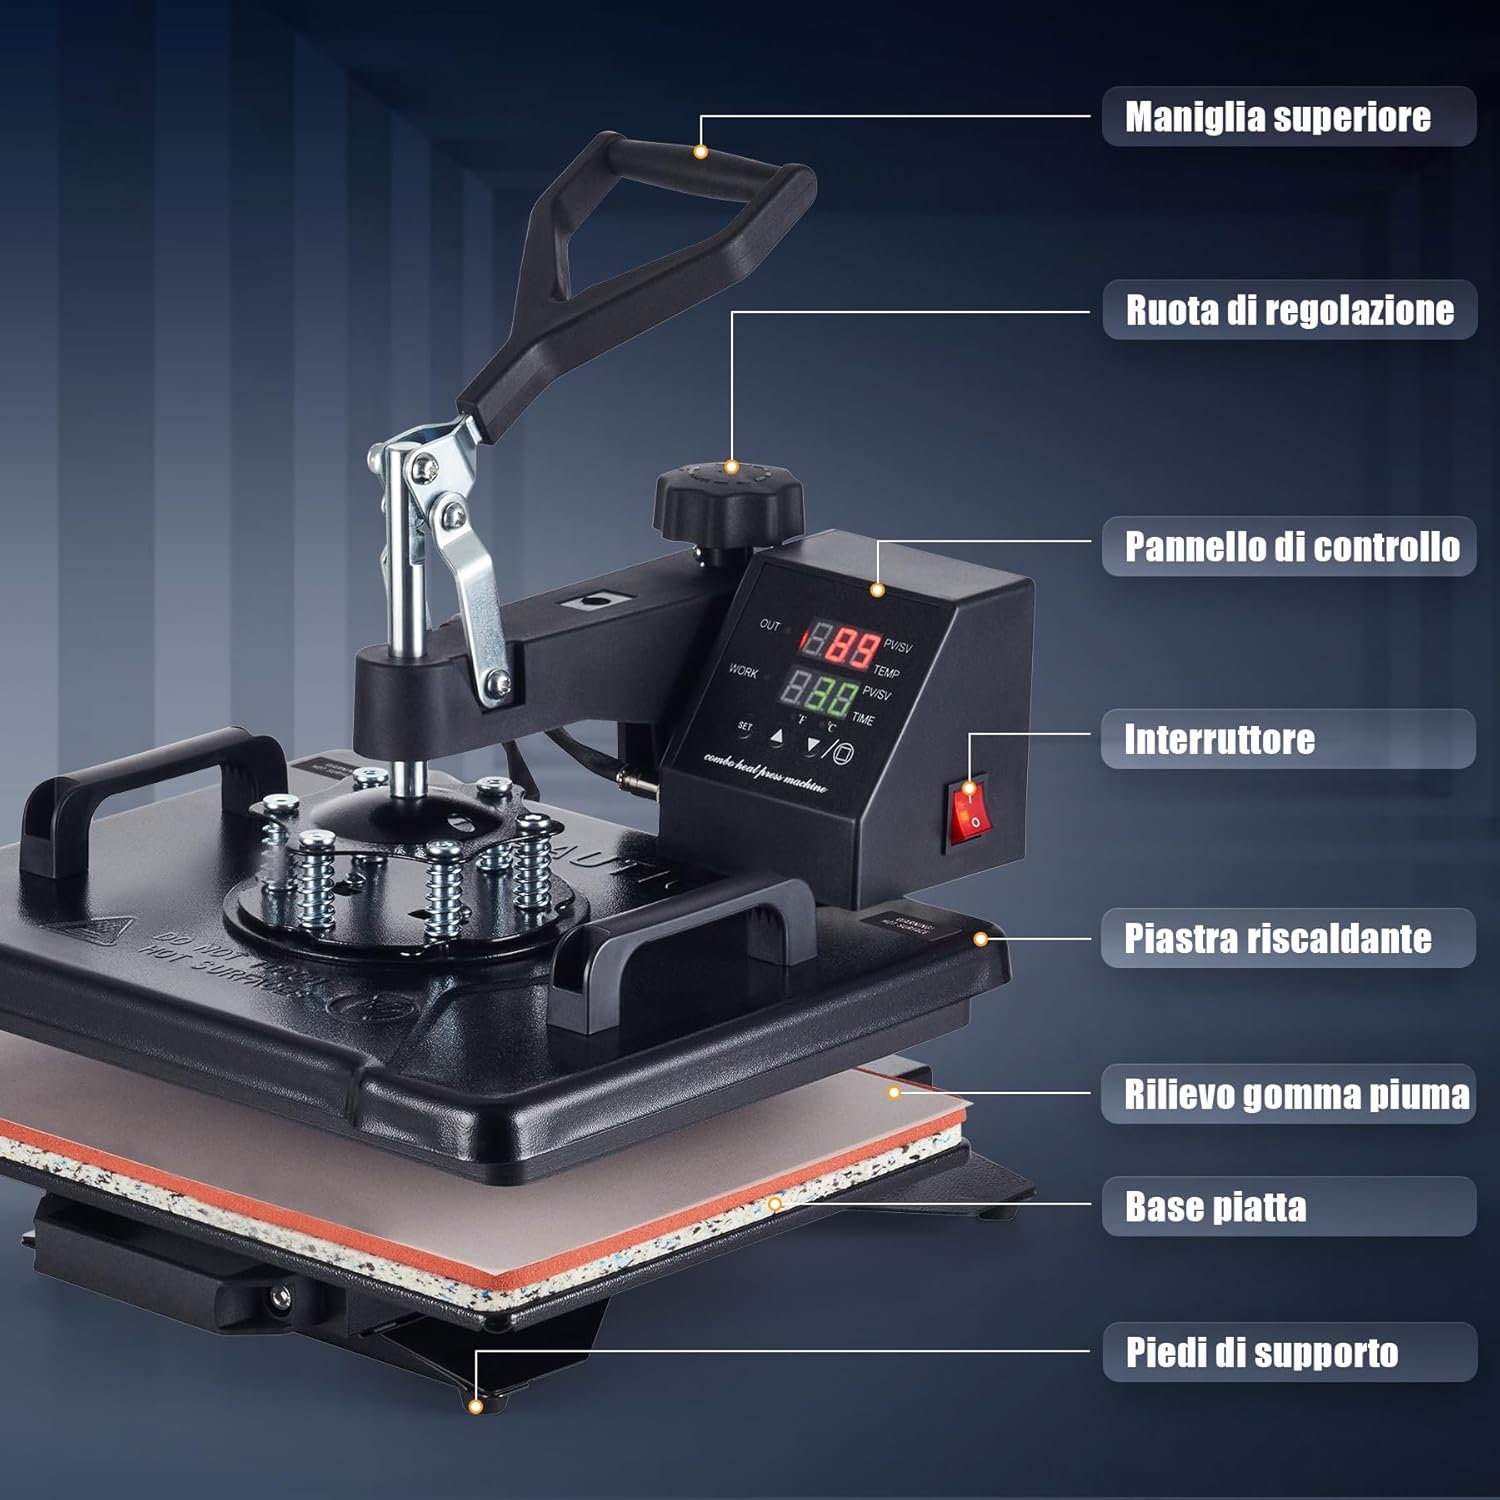
Figure 3.1: This diagram identifies the key parts of your heat press machine, including the top handle, adjustment wheel, control panel, power switch, heating platen, foam rubber pad, flat base, and support feet.
- Gornja ručka: Used to lift and lower the heating platen.
- Točak za podešavanje: Controls the pressure applied by the heating platen.
- Kontrolna tabla: Digitalni displej za podešavanje temperature i vremena.
- Prekidač: Uključuje/isključuje mašinu.
- Heating Platen: The upper heated surface that applies heat and pressure.
- Foam Rubber Pad: Provides a soft, heat-resistant surface for items.
- ravna baza: The lower platform where items are placed.
- Noge za podršku: Stabilize the machine during operation.
4. Sadržaj paketa
Prilikom raspakivanja, molimo Vas da provjerite da li su uključene sve sljedeće stavke:
- 1 x Glavna jedinica termoprese
- 1 x 9 oz Cup Press Attachment
- 1 x 11 oz Cup Press Attachment
- 1 x 12 oz Cup Press Attachment
- 1 x 17 oz Cup Press Attachment
- 1 x 5" Plate Press Attachment
- 1 x 6" Plate Press Attachment
- 1 x nastavak za zatvaranje
- 1 x Instruction Manual (English or German)
5. Specifikacije
| Feature | Specifikacija |
|---|---|
| Brand | CREWORKS |
| Model | 30x38cm 8 in 1 |
| Snaga | 1150W |
| Voltage | 220V / 50Hz |
| Max. Temperatura | 250°C (480°F) |
| Kontrola tajmera | 0-999 sekundi |
| Ukupne dimenzije | 30 x 38 x 49.5 cm (12 x 15 x 19.5 inča) |
| Height Range | 34-43 cm (13.25-17 inča) |
| Područje valjka | 30 x 38 cm (12 x 15 in) |
| Dužina kabla | 137 cm (4.5 stopa) |
| Težina artikla | 11.5 kilograma |
| Materijal | Ceramic, Silicone, Vinyl (for accessories) |
| Preporučena upotreba | Bag, Bottle, Cap, Handbag, Hat, Mouse Pad, Mug, Pillow, Plate, Socks, T-Shirt |
6. Podešavanje
Follow these steps for initial setup of your heat press:
- Raspakirajte: Pažljivo izvadite sve komponente iz ambalaže. Sačuvajte ambalažu za buduće skladištenje ili transport.
- plasman: Place the main heat press unit on a stable, heat-resistant surface in a well-ventilated area. Ensure there is enough space around the machine for safe operation and rotation.
- Priključak kontrolne kutije: The control box is designed for rack-type installation. Simply connect the control box to the main unit. Ensure all connections are secure.
- Priključak za napajanje: Plug the power cord into a grounded 220V / 50Hz electrical outlet.
- Početna provjera: Before first use, turn on the power switch and allow the machine to heat up to a low temperature (e.g., 100°C) to ensure all functions are working correctly. Observe for any unusual smells or sounds.
7. Uputstvo za upotrebu
This section outlines the general operation of your heat press. Specific settings (temperature, time, pressure) will vary depending on the material and transfer type.

Figure 7.1: Operating the heat press is simplified into three main steps: 1. Lift and rotate the heating platen away from the base. 2. Position your item and design on the silicone pad. 3. Lower the heating platen and apply pressure to begin the transfer.
7.1. Osnovni koraci rada
- Uključeno: Turn on the main power switch located on the control panel.
- Postavite temperaturu i vrijeme: Use the digital control panel to set the desired temperature and time according to your transfer material's specifications. Refer to Section 7.2 for details.
- Predgrevanje: Allow the machine to reach the set temperature. The display will indicate when the target temperature is achieved.
- Pripremi stavku: Lift the top handle and rotate the heating platen 360 degrees to the side, away from the base. This provides a clear workspace.
- Pozicija stavke: Place your item (e.g., T-shirt, mug) onto the appropriate pad or attachment. Lay your transfer design onto the item.
- Primijeniti pritisak: Rotate the heating platen back over the item. Lower the top handle firmly to engage the heating platen with the item. The timer will start automatically.
- Complete Transfer: Once the timer alarms, lift the top handle and rotate the heating platen away from the item. Carefully remove the transferred item.
- Iskljuciti: When finished, turn off the power switch and unplug the machine.
7.2. Control Panel Settings
The intuitive LED control panel allows precise adjustment of temperature and time.

Figure 7.2: The intuitive LED control panel displays the maximum temperature (250°C / 480°F) and timer interval (0-999 seconds). It also provides recommended temperature settings for common materials like chemical fibers (160°C), cotton apparel (170°C), and ceramic mugs (200°C).
- Postavka temperature: Press the 'SET' button, then use the up/down arrows to adjust the target temperature. Press 'SET' again to confirm. The maximum temperature is 250°C (480°F).
- Postavka vremena: Press the 'SET' button twice, then use the up/down arrows to adjust the transfer time in seconds. Press 'SET' again to confirm. The timer range is 0-999 seconds.
- Jedinica temperature: The display can switch between Celsius and Fahrenheit. Consult the manual for specific instructions on changing units if needed.
Preporučene smjernice za temperaturu:
- Chemical Fibers: Approximately 160°C
- Cotton Apparel: Approximately 170°C
- Ceramic Mugs: Approximately 200°C
Note: These are general guidelines. Always refer to the specific instructions provided with your transfer material and item.
7.3. Podešavanje pritiska
The pressure adjustment wheel allows you to fine-tune the downward force of the heating platen. Proper pressure is crucial for a successful transfer.

Figure 7.3: The machine features a 360-degree swivel design for safe and easy placement of items, along with a pressure adjustment knob to apply the correct force for various materials.
- To Increase Pressure: Turn the adjustment wheel clockwise.
- To Decrease Pressure: Turn the adjustment wheel counter-clockwise.
- Testing Pressure: Before heating, close the platen onto your item. You should feel a firm resistance when closing the handle. Adjust until the desired pressure is achieved.
7.4. Korištenje različitih priloga
The 8-in-1 heat press includes various attachments for different items. The drawer-type work platform makes changing accessories straightforward.
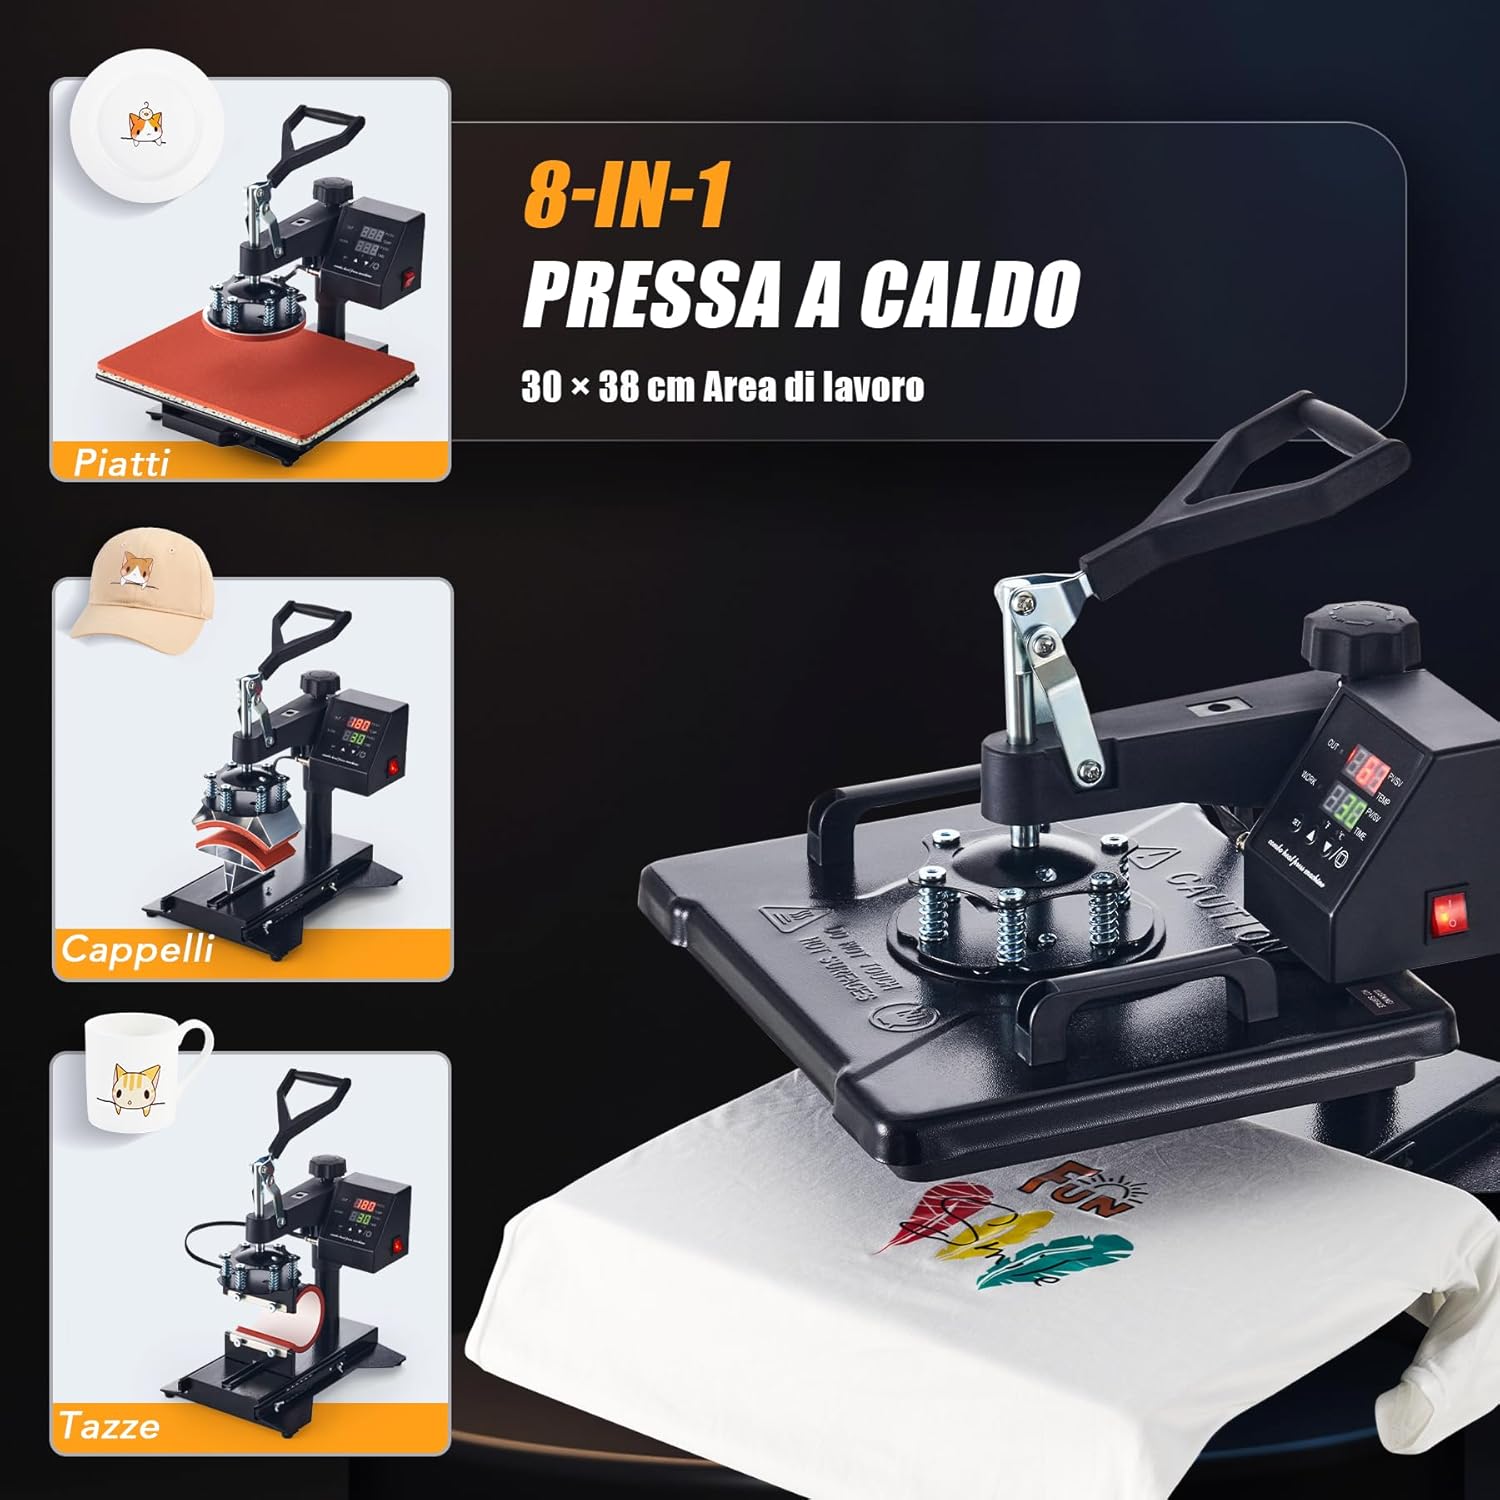
Figure 7.4: The CREWORKS 8-in-1 Heat Press comes with various attachments, allowing you to transfer designs onto different items such as plates, caps, and mugs, in addition to flat items like T-shirts.
- Promjena priloga: Ensure the machine is unplugged and cool. Loosen any securing screws or clips holding the current attachment. Carefully remove it and install the desired attachment (e.g., mug press, plate press, cap press). Secure it firmly.
- Presa za šalice: Use the appropriate mug attachment for your mug size (9oz, 11oz, 12oz, 17oz). Adjust the pressure knob on the mug attachment to ensure a snug fit around the mug.
- presa za ploče: Use the 5" or 6" plate attachment. Ensure the plate is centered and stable.
- Cap Press: Use the cap attachment. Position the cap securely on the curved surface.
7.5. Uniform Heat Transfer
The CREWORKS heat press is designed with a dual-tube heating element to ensure consistent results.
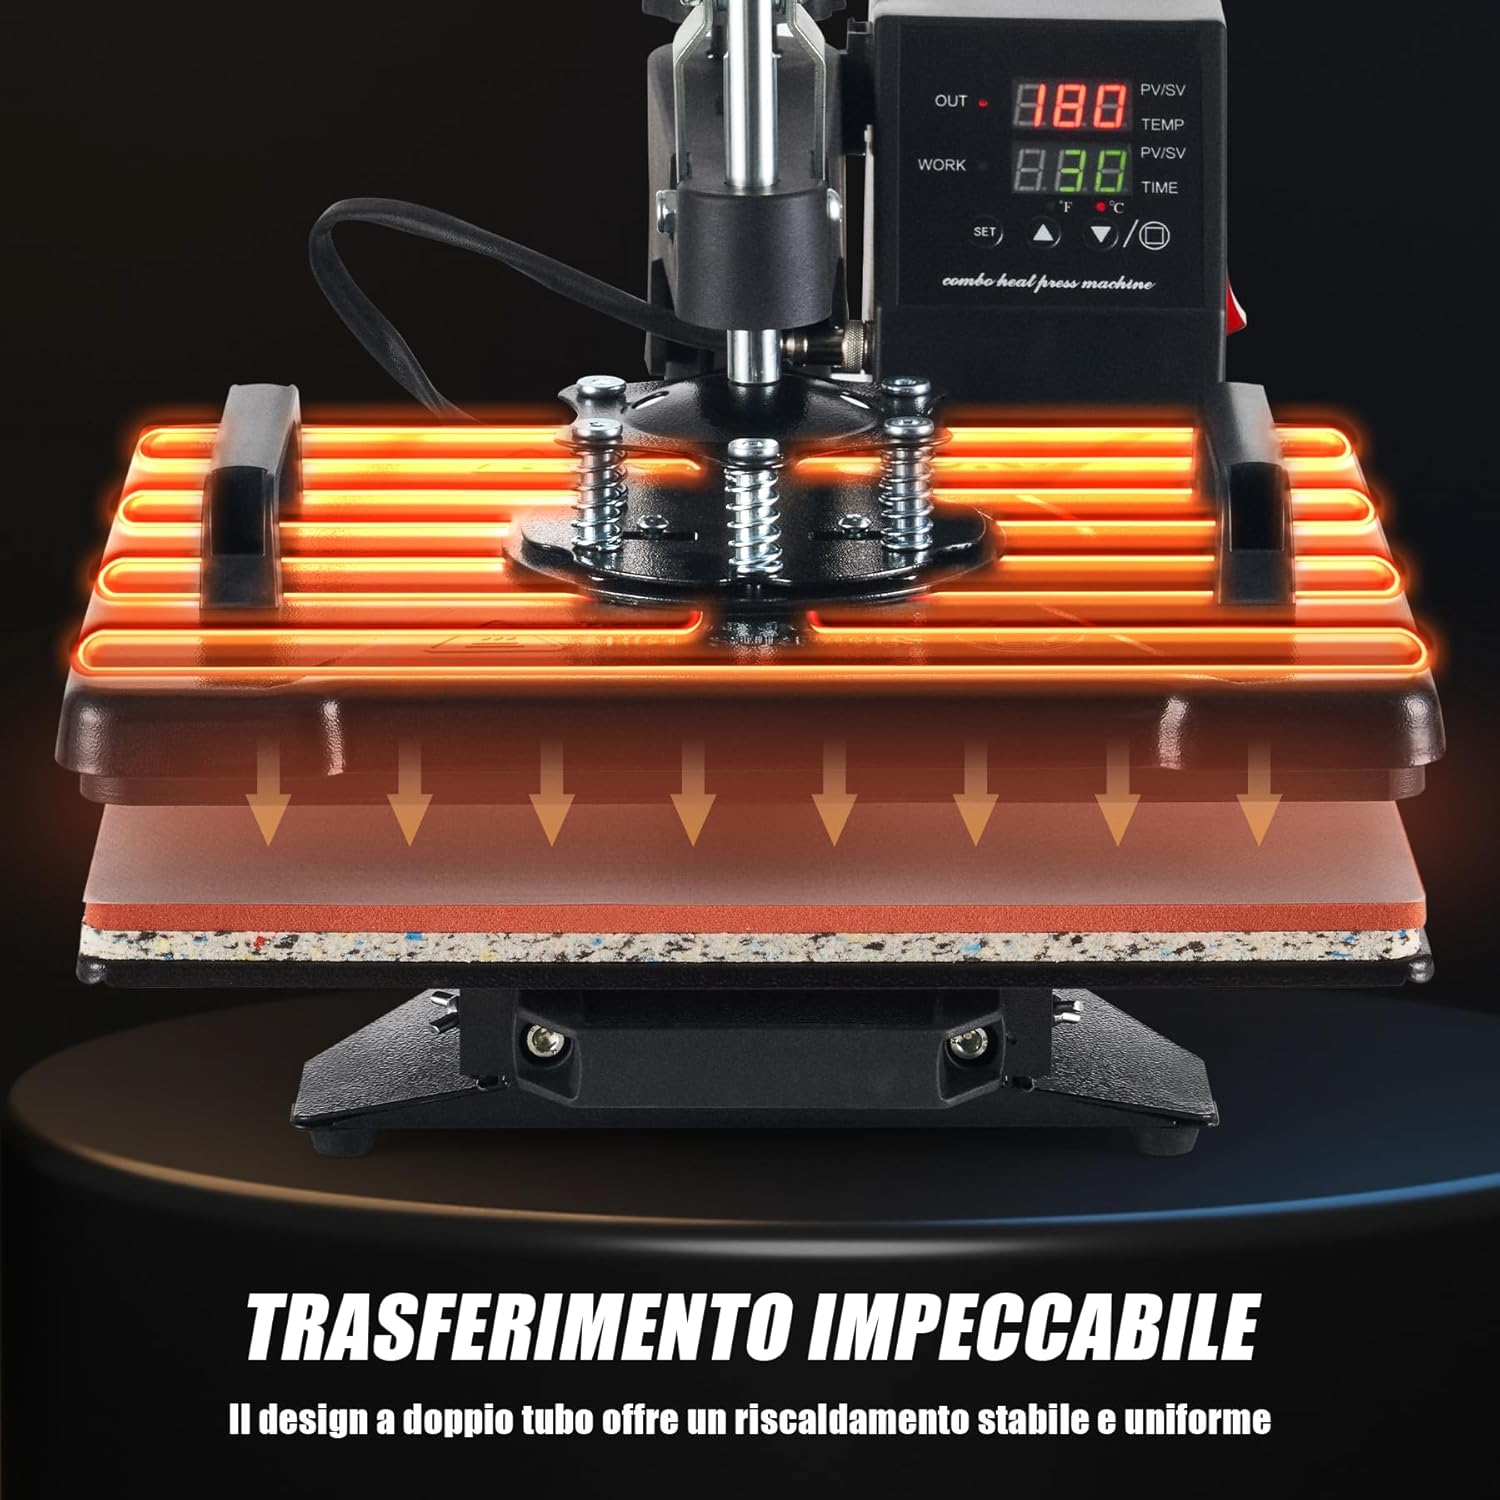
Figure 7.5: The dual-tube heating design ensures stable and uniform heat distribution across the entire platen, guaranteeing consistent and high-quality transfers.
The dual-tube heating design provides stable and uniform heat distribution across the entire platen surface. This minimizes cold spots and ensures that your designs are transferred evenly and consistently, resulting in professional-quality finished products.
8. Održavanje
Redovno održavanje osigurava dugotrajnost i optimalne performanse vaše prese za termiku.
- Čišćenje ploče: Ensure the machine is cool and unplugged. Use a soft, damp cloth to wipe down the Teflon-coated heating platen. For stubborn residue, use a specialized platen cleaner. Avoid abrasive cleaners or tools that could scratch the surface.
- Čišćenje silikonske podloge: The silicone pad can be wiped with a damp cloth. If it becomes heavily soiled or damaged, it may need replacement to ensure even pressure.
- Generalno čišćenje: Obrišite vanjski dio uređaja suhom ili blago natopljenom krpom.amp krpom za uklanjanje prašine i ostataka.
- Skladištenje: Store the heat press in a clean, dry environment when not in use.
- inspekcija: Periodically check all cables and connections for signs of wear or damage. Do not operate the machine if any part is damaged.
9. Otkrivanje problema
If you encounter issues with your heat press, refer to the table below for common problems and solutions.
| Problem | Mogući uzrok | Rješenje |
|---|---|---|
| Mašina se ne uključuje | Power cord not plugged in; Power outlet fault; Main switch off | Check power cord connection; Test outlet with another device; Ensure main switch is ON. |
| Grijaća ploča se ne zagrijava | Temperature not set; Heating element fault | Verify temperature setting on control panel; Contact customer support if issue persists. |
| Uneven transfer results | Uneven pressure; Incorrect temperature/time; Damaged silicone pad | Adjust pressure knob; Verify temperature and time settings; Inspect and replace silicone pad if damaged. |
| Prijenos se ne pridržava | Insufficient temperature; Insufficient time; Insufficient pressure; Incorrect transfer material | Increase temperature or time; Increase pressure; Ensure correct transfer material for item; Consult transfer material instructions. |
| Design peeling or cracking | Over-pressing; Too high temperature; Incorrect peeling method (hot/cold peel) | Reduce pressure or time; Lower temperature; Follow transfer material's specific peeling instructions. |
If you encounter a problem not listed here or if the suggested solutions do not resolve the issue, please contact CREWORKS customer support.
10. Garancija i podrška
CREWORKS products are manufactured to high-quality standards. For information regarding warranty coverage, please refer to the warranty card included with your product or visit the official CREWORKS website.
For technical assistance, troubleshooting, or spare parts, please contact CREWORKS customer support through the retailer where you purchased the product or via the contact information provided on the official CREWORKS website.