VIVIDIA VS-749
Vividia VS-749 All-in-One Pipe Sewer Drain Tube Video Inspection Camera User Manual
Model: VS-749
1. Proizvod je gotovview
The Vividia VS-749 is a comprehensive video inspection system designed for examining pipes, drains, sewers, ducts, chimneys, and other enclosed spaces. Its all-in-one compact design ensures portability and durability for various professional applications.

Figure 1: Vividia VS-749 All-in-One Pipe Inspection Camera system.
Ključne karakteristike:
- All-in-One Compact Design: Portable and robust for demanding environments.
- Long Push-Rod Cable: 40 meters (131 feet) fiberglass cable for extended reach.
- Waterproof Camera Head: 23mm diameter camera with Sony CCD sensor and 480P resolution.
- 7-inčni LCD monitor: Za jasno viewing of inspections.
- Mogućnost snimanja: Capture pictures and videos, saved to an SD card.
- Jarko LED osvetljenje: Adjustable LED lights on the camera head.
- Meter Counter: Built-in counter to track cable insertion distance.
2. Sadržaj paketa
Prije nego što nastavite s postavljanjem, provjerite da li se u paketu nalaze svi artikli.
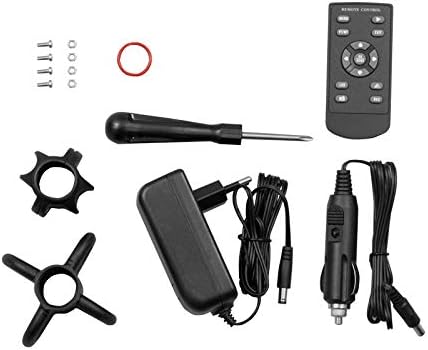
Figure 2: Included accessories for the Vividia VS-749 system.
- VS-749 Control Box with 7" LCD Monitor and Keyboard
- Fiberglass Push-Rod Cable Reel with 23mm Camera Head
- Adapter za napajanje
- Car Charger
- Daljinski upravljač
- Odvijač
- Skids (various sizes)
- Connection Cable
- Korisnički priručnik (ovaj dokument)
3. Upute za postavljanje
Follow these steps to set up your Vividia VS-749 inspection camera.
3.1 Početna montaža
- Raspakujte komponente: Pažljivo izvadite sve komponente iz pakovanja.
- Montirajte kontrolnu kutiju: Place the control box securely onto the cable reel frame. Ensure it clicks into place or is fastened according to the design.
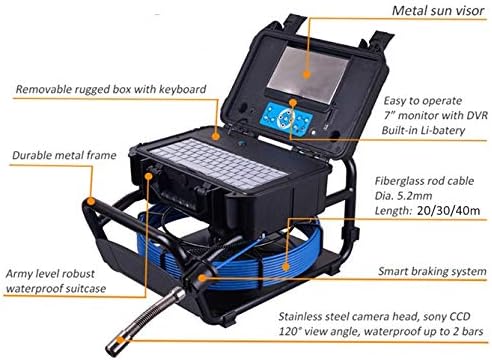
Figure 3: Control box mounted on the cable reel frame.
- Connect Camera Cable: Connect the camera cable from the reel to the designated port on the control box. Ensure a secure connection.
- Uključeno: Connect the power adapter or car charger to the control box and a power source. Press the power button to turn on the system.
- Umetnite SD karticu: Locate the SD card slot on the control box and insert a compatible SD card for recording.
3.2 Attaching Skids (Optional)
Skids can be attached to the camera head to protect it and help center it within larger pipes, improving visibility and maneuverability.
- Select the appropriate skid size for the pipe diameter.
- Carefully attach the skid to the camera head by screwing it on or snapping it into place, ensuring it is firm and secure.

Figure 4: Various skids for the camera head.
4. Uputstvo za upotrebu
This section details the operation of the Vividia VS-749 inspection camera.
4.1 Osnovni rad
- Uključeno: Press the green power button on the control panel to turn on the monitor.
- Prikaz monitora: The 7-inch LCD monitor will display the live feed from the camera.
- Cable Deployment: Slowly push the fiberglass cable into the pipe or area to be inspected. The built-in meter counter will display the inserted distance.
- Podesite LED svjetla: Use the LED brightness control buttons on the control panel to adjust the illumination level of the camera head. Increase brightness in dark environments and decrease to avoid glare.
4.2 Snimanje fotografija i videa
The system supports one-touch video/audio recording and image capture, saving filena umetnutu SD karticu.
- Uslikaj: Press the "Photo" button (usually indicated by a camera icon) to capture a still image.
- Pokreni/Zaustavi snimanje videa: Press the "Record" button (usually indicated by a red dot or REC icon) to start video recording. Press it again to stop.
- Reprodukcija: Pristupite meniju za reprodukciju da biste ponovoview snimljene fotografije i video zapisi.
Video 1: Demonstration of the Vividia VS-749's self-leveling camera and recording functions.
Video 2: General operation, including zoom and recording features, applicable to various Vividia pipe inspection cameras.
4.3 Funkcija zumiranja
The system features an 8-level digital zoom function to magnify the live image or recorded media.
- Use the "Zoom In" and "Zoom Out" buttons on the control panel to adjust the magnification.
4.4 Self-Leveling Camera Head
The 23mm camera head features a self-leveling function, ensuring the image remains upright regardless of the camera's rotation within the pipe.
4.5 Sonde Transmitter (Optional)
If equipped with the optional 512Hz Sonde transmitter, a compatible locator (sold separately) can be used to pinpoint the camera's exact location underground or within walls.
5. Održavanje
Proper maintenance ensures the longevity and optimal performance of your Vividia VS-749.
5.1 Čišćenje
- Glava kamere: After each use, gently clean the camera lens and housing with a soft, damp krpu. Izbjegavajte abrazivne materijale ili jake hemikalije.
- kabel: Wipe down the fiberglass cable with a damp cloth to remove dirt and debris before coiling it back onto the reel.
- Monitor and Control Box: Use a soft, dry cloth to clean the monitor screen and control panel.
5.2 Replacing Camera Covers
The camera covers are replaceable to maintain optimal image clarity and protection.
- Unscrew the old camera cover from the camera head.
- Carefully place a new, clean camera cover onto the camera head and screw it on until secure. Do not overtighten.

Figure 5: Replacing the protective camera cover.
5.3 Skladištenje
Store the system in its original waterproof carrying case in a cool, dry place when not in use.
6. Otkrivanje problema
Pogledajte ovaj odjeljak za uobičajene probleme i njihova rješenja.
| Problem | Mogući uzrok | Rješenje |
|---|---|---|
| Nema slike na ekranu. | Camera cable not connected properly; power issue. | Ensure camera cable is securely connected. Check power supply and battery level. |
| Nije moguće snimati fotografije/video zapise. | No SD card inserted; SD card full or corrupted; incorrect format. | Insert a formatted SD card. Check available space. Format the SD card if necessary (refer to system settings). |
| Slika je mutna. | Dirty camera lens/cover; focus issue (if applicable). | Clean the camera lens and cover. Ensure the camera is within its optimal focal range. |
| LED lights not working or dim. | Brightness setting too low; LED malfunction. | Adjust LED brightness using the control buttons. If problem persists, contact support. |
7. Specifikacije
| Feature | Detalj |
|---|---|
| Naziv modela | VS 749plus |
| Prečnik kamere | 23mm |
| Dužina kabla | 40m (131ft) Fiberglass Push Rod |
| Rezolucija video snimanja | 480p |
| Veličina ekrana | LCD od 7 inča |
| Tip senzora | Sony CCD |
| Nivo vodootpornosti | Waterproof (Camera Head) |
| Vrsta medija | SD Card (Max 256G) |
| File Format | AVI |
| Audio Recording | Da |
| Tehnologija povezivanja | USB |
| Trajanje baterije | Približno 6 sata |
8. Garancija i podrška
For warranty information, please refer to the documentation provided with your purchase or contact the seller directly. For technical support or inquiries, please contact Oasis Scientific Inc.
- prodavač: Oasis Scientific Inc.
- Amazon prodavnica: VIVIDIA trgovina na Amazonu
Ask a question about this manual
Ask about setup, troubleshooting, compatibility, parts, safety, or missing instructions. Manuals+ will review the question and use this page’s manual context to help answer it.