
LifePlus DBJ-32A
LifePlus Commercial Ice Maker Machine DBJ-32A User Manual
Model: DBJ-32A
Uvod
Thank you for choosing the LifePlus Commercial Ice Maker Machine. This manual provides essential information for the safe and efficient operation, installation, and maintenance of your ice maker. Please read it thoroughly before first use and keep it for future reference.
Važna napomena:
- Before first use, clean the ice machine and keep it in an upright position for 24 hours.
- Allow 30 minutes for the compressor to pre-cool after selecting the ice size for the first time.
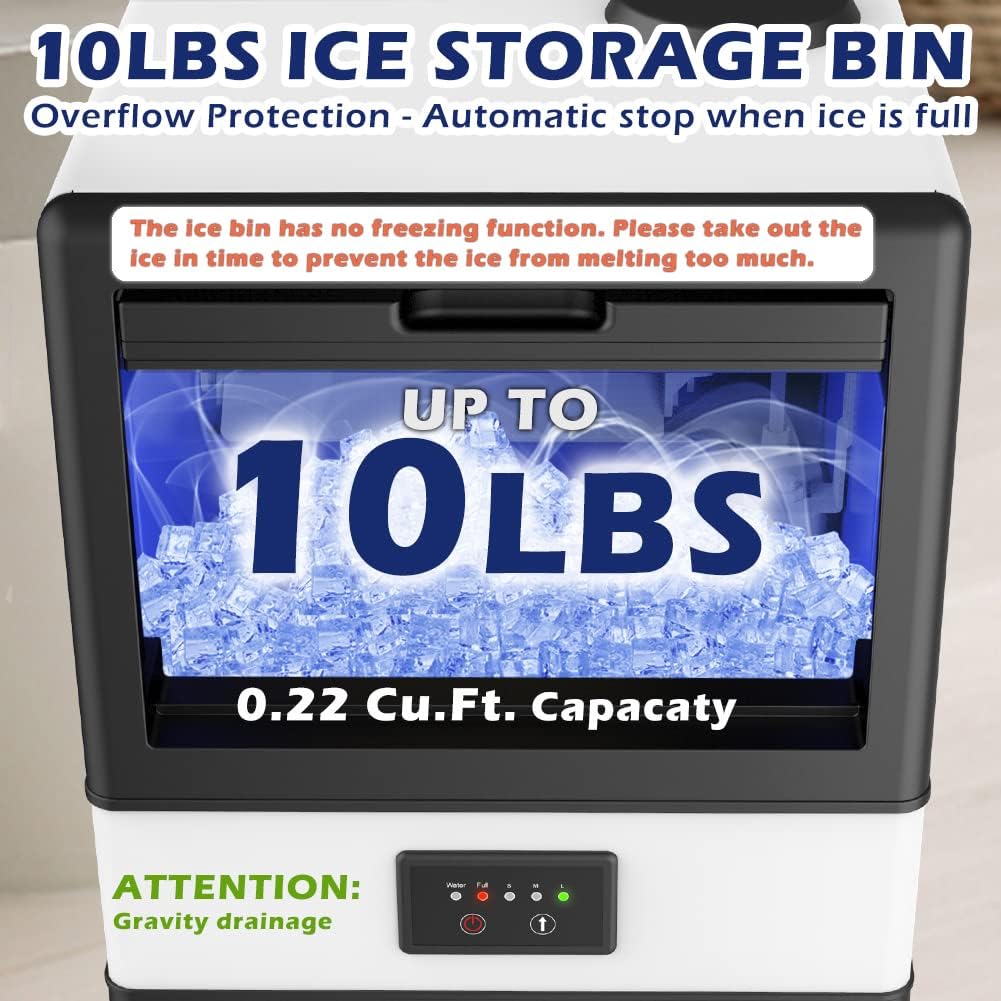
- This ice maker is not a refrigerator. If you produce a large quantity of ice cubes and do not use them immediately, transfer them to an ice pack and store them in a refrigerator.
- This ice maker requires a drain. Ensure you have a suitable drainage solution (e.g., a floor drain or a water tank) to collect melted ice water.
- If embedding the ice maker in a cabinet, leave at least 5 inches of space around the unit for proper heat dissipation.
Sigurnosna uputstva
Da biste osigurali siguran rad i spriječili povrede ili štetu, molimo vas da se pridržavate sljedećih sigurnosnih uputa:
- Always place the ice maker on a stable, level surface.
- Ne blokirajte ventilacijske otvore na uređaju.
- Pazite da kabel za napajanje nije oštećen ili priklješten.
- Nemojte rukovati aparatom mokrim rukama.
- Držite djecu dalje od aparata za led tokom rada.
- Za proizvodnju leda koristite samo pitku vodu.
- Isključite uređaj iz struje prije čišćenja ili bilo kakvog održavanja.
- Ne pokušavajte sami popravljati ili modificirati uređaj. Obratite se kvalificiranom servisnom osoblju.
Sadržaj paketa
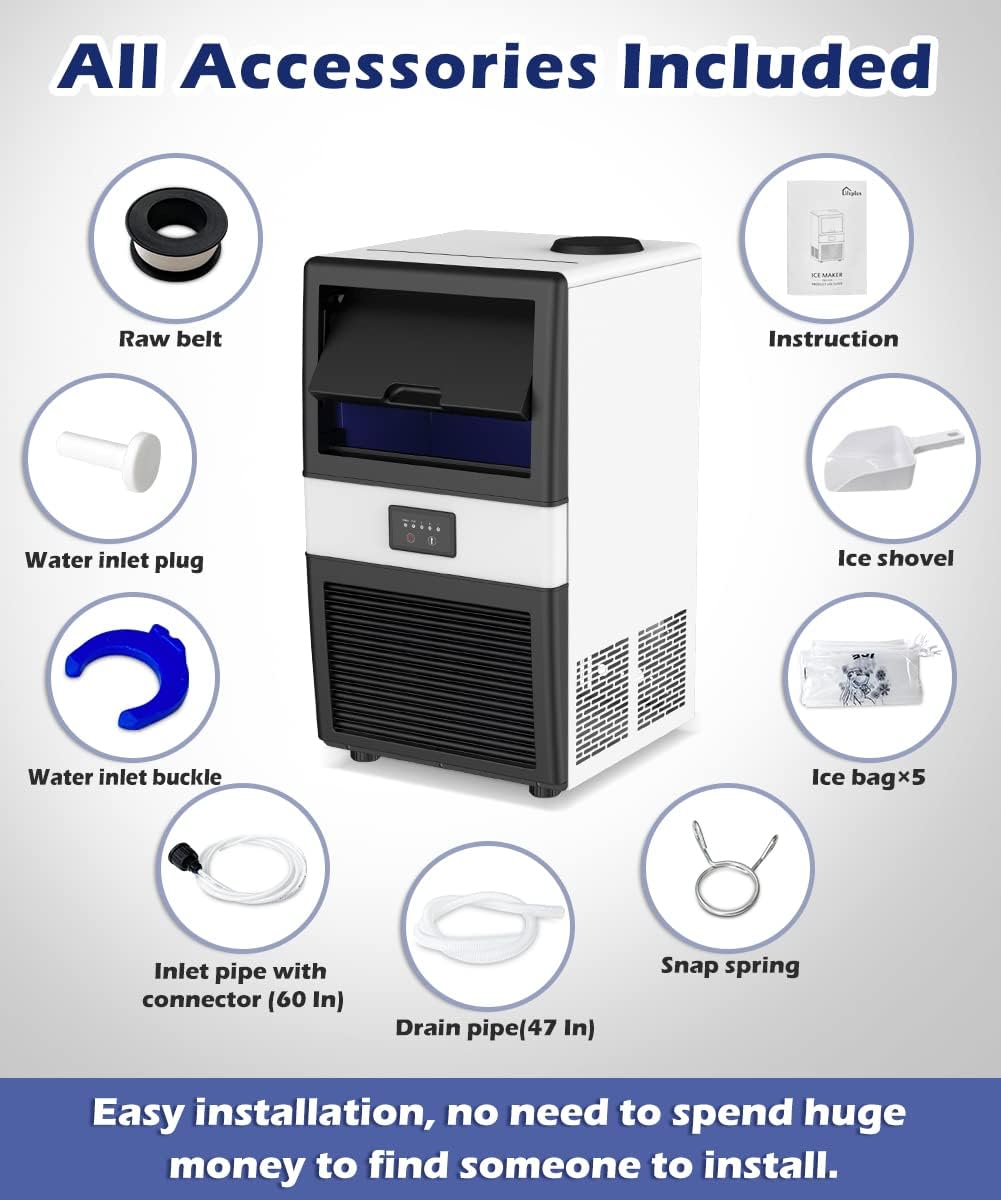
Your LifePlus Commercial Ice Maker Machine package includes the following items:
- LifePlus komercijalni aparat za led
- Ledica
- Water Supply Hose with Faucet Connector
- Drenažno crevo
- Raw Belt
- Čep za dovod vode
- Water Inlet Buckle
- Snap Spring
- Uputstvo za upotrebu (ovaj dokument)
Specifikacije
| Feature | Specifikacija |
|---|---|
| Brand | LifePlus |
| Naziv modela | Ice Maker Machine Under Counter Produce 70LBS (DBJ-32A) |
| Dimenzije proizvoda | 13.78"D x 14.09"Š x 24.8"H |
| Kapacitet posude za led | 10 LBS (0.22 Cubic Feet) |
| Ice Production (24 Hrs) | 70 LBS |
| Ice Production (per cycle) | 32 komada |
| Cycle Time | 11-20 minuta |
| Wattage | 280 vati |
| Voltage | 110 Volts |
| Rashladno sredstvo | R134a |
| Materijal | Metal |
| Težina artikla | 50.3 funte |

Postavljanje i instalacija
Proper setup is crucial for the optimal performance of your ice maker. Follow these steps carefully:
1. Raspakivanje i postavljanje
- Uklonite sve materijale za pakovanje.
- Postavite aparat za led na čvrstu, ravnu površinu.
- Ensure there is at least 5 inches of clearance around the unit for proper ventilation.
- Allow the unit to stand upright for 24 hours before plugging it in.
2. Priključak za vodu
Your ice maker supports two water inlet modes: bucket water supply or direct tap water supply. Both methods require a drain hose connection.
Spajanje odvodnog crijeva
Regardless of the water inlet method chosen, the drain hose must be connected to manage melted ice water. The ice maker uses gravity drainage, so ensure the drain hose is positioned below the drain outlet of the machine and leads to a suitable container or floor drain.

Option A: Bucket Water Supply
- Open the top cover of the ice maker.
- Locate the blue valve inside the water tank. Ensure the handle of the blue valve is perpendicular to the black door (this sets it to bucket water intake mode).
- Place a water bucket (e.g., a 5-gallon water jug) onto the designated area on top of the ice maker.

Option B: Tap Water Supply
- Open the top cover of the ice maker.
- Locate the blue valve inside the water tank. Ensure the handle of the blue valve is parallel to the black door (this sets it to tap water intake mode).
- Connect the provided water supply hose to the 'Water Inlet' port at the back of the machine. Secure it with the blue buckle.
- Connect the other end of the water supply hose to your tap water source. Use sealing tape to ensure a tight, leak-free connection.

Video: How to Install and Remove the Inlet Water Hose
Video 1: This video demonstrates the correct procedure for installing and removing the water inlet hose for the LifePlus ice maker.
3. Priključak za napajanje
- After connecting the water supply and drain, plug the ice maker into a grounded electrical outlet.
- Ensure the ice maker has been standing upright for at least 24 hours before plugging it in for the first time.
Uputstvo za upotrebu
The LifePlus ice maker features an intuitive LED control panel for easy operation.

1. Initial Power On and Water Intake
- Pritisnite dugme za napajanje (crveni krug) da biste uključili mašinu.
- The indicator lights will briefly illuminate.
- The red 'Water' light will go on, and the green thickness light will twinkle as the machine begins to take in water.
- Wait for the water intake to complete and the red 'Water' light to turn off.
2. Adjusting Ice Cube Thickness
You can select from three ice cube thickness settings: Small (S), Medium (M), or Large (L).
- Press the arrow button (strelica gore) to cycle through the thickness options. The corresponding light (S, M, or L) will illuminate.
- The machine will start pre-cooling for 3-30 minutes after a thickness is selected.


3. Proces pravljenja leda
- Once pre-cooling is complete, the ice maker will automatically begin producing ice.
- Each cycle produces 32 clear ice cubes within 11-20 minutes.
- The 'Ice Full' indicator light will illuminate when the ice bin is full, and the machine will automatically stop ice production.
4. Harvesting Ice Cubes
- When ice cubes fall into the bin, they may stick together, especially if a thicker setting is used.
- Use the provided ice shovel to separate the ice cubes. This also allows the ice bin to hold more ice.

Video: LifePlus Commercial Ice Maker Operation
Video 2: This video demonstrates the overall operation of the LifePlus Commercial Ice Maker, including water connection, power-on sequence, ice thickness adjustment, and ice harvesting.
Održavanje
Redovno čišćenje i održavanje produžit će vijek trajanja vašeg ledomata i osigurati higijensku proizvodnju leda.
1. Automatic Self-Cleaning Function
- In the off state, press and hold the arrow button (strelica gore) na 5 sekunde.
- The machine will initiate a self-cleaning cycle, circulating water to clean internal components.
- After cleaning, pull out the sewage outlet plug at the back of the machine to empty the dirty water.

2. Generalno čišćenje
- Isključite aparat za led iz električne utičnice.
- Remove the ice bin and clean it with mild soap and warm water. Rinse thoroughly.
- Wipe down the interior and exterior surfaces of the machine with a soft cloth and mild detergent.
- Ensure all parts are completely dry before reassembling and operating the machine.
Rješavanje problema
If you encounter issues with your LifePlus ice maker, refer to the table below for common problems and solutions.
| Problem | Mogući uzrok | Rješenje |
|---|---|---|
| Ledomat ne proizvodi led | No water supply; Water valve incorrect; Power issue; Compressor not pre-cooled. | Check water connection/bucket; Ensure water inlet valve is set correctly; Verify power connection; Allow 30 minutes for pre-cooling after first use or ice size change. |
| 'Water' indicator light is on | Water shortage. | Refill water bucket or check tap water supply. |
| 'Ice Full' indicator light is on | Posuda za led je puna. | Uklonite led iz posude. |
| Kockice leda su zalijepljene | Ice thickness setting too high; Ice not separated after falling. | Use the ice shovel to separate cubes; Consider a thinner ice setting (S or M). |
| Curenje vode | Loose connections; Improper drain setup. | Check all hose connections for tightness; Ensure drain hose is correctly positioned for gravity drainage. |
Garancija i podrška
For warranty information, technical support, or any questions not covered in this manual, please contact LifePlus customer service. Refer to your purchase documentation for specific warranty terms and contact details.
You can also visit the official LifePlus store on Amazon for more information: LifePlus Store
Ask a question about this manual
Ask about setup, troubleshooting, compatibility, parts, safety, or missing instructions. Manuals+ will review the question and use this page’s manual context to help answer it.