
Uvod
This user manual provides comprehensive instructions for the setup, operation, maintenance, and troubleshooting of your G-MARK X320FM Wireless Microphones System. Please read this manual thoroughly before using the product to ensure optimal performance and longevity.
Product Overview
Ključne karakteristike
- Unique LED Light Design: Microphones feature an LED halo for visual feedback.
- Podesiva frekvencija: Dual UHF technology with a selectable frequency range of 520 MHz to 560 MHz, allowing for frequency changes if interference occurs.
- Plug and Play, Auto Pairing: Automatic frequency synchronization between receiver and microphones upon power-on.
- Čvrsta konstrukcija: Microphones are constructed from metal for durability and impact resistance.
- LCD ekran: Professional receiver features an LCD screen displaying channels and frequencies.
- Široka primjena: Kompatibilan sa amplifiers, speakers, audio mixers, and other PA systems, suitable for karaoke, DJ events, parties, church, weddings, speeches, conferences, and outdoor events.
Sadržaj paketa
The G-MARK X320FM Wireless Microphones System package includes the following items:
- 1 x kutija za prijemnik
- 2 x UHF bežična ručna mikrofona
- 1 x 6.35 mm Audio kabel
- 1 x adapter za napajanje
- 2 x antene
- 2 x Anti-skid Rings
- 1 x Uputstvo za upotrebu

Figure 1: Contents of the G-MARK X320FM package, including the receiver, two handheld microphones, power adapter, audio cable, antennas, and anti-skid rings.
Identifikacija komponenti
Receiver Front and Rear Panels

Slika 2: Prednja strana view of the G-MARK X320FM receiver, showing the display, volume controls, and power switch. Rear view details XLR outputs, MIX OUT, power input, and antenna connections.
- Prednja ploča: Features UP/VOL and DW/VOL buttons for channel A and B, CHA/CHB frequency displays, RF/AF indicators, and a central power switch.
- Zadnji panel: Includes ANT-A and ANT-B antenna connectors, BALANCED OUT-A and BALANCED OUT-B XLR outputs, a MIX OUT (AF A+B) 6.35mm audio output, and a DC9-12V power input.
Handheld Microphone Details
Slika 3: Detaljno view of the G-MARK X320FM handheld microphone, showing the microphone head, internal components, battery compartment, and AFH switch for frequency selection.
- Glava mikrofona: Metal mesh grille for protection and clear sound quality.
- tijelo: Izdržljiva metalna konstrukcija.
- Prikaz: Shows battery level and current frequency.
- Dugme za napajanje: For turning the microphone on/off.
- Pretinac za baterije: Located at the bottom of the microphone for battery insertion.
- AFH Switch: Allows for channel selection (A, B, C, D) on the microphone.
Uputstva za postavljanje
1. Instalacija baterije
To install batteries in the handheld microphones:
- Odvrnite donji dio mikrofona kako biste otkrili odjeljak za bateriju.
- Umetnite dvije AA baterije, pazeći na ispravan polaritet.
- Čvrsto pričvrstite donji dio.
Video 1: Demonstrates battery installation in the handheld microphone (0:54 - 1:02).
2. Povezivanje prijemnika
Connect the receiver to your audio system using the provided 6.35mm audio cable or XLR cables (not included for XLR). Ensure you connect to the MIC priključak na vašem amplifier, speaker, or audio mixer, not the AUX jack.

Figure 4: Diagram illustrating how to connect the G-MARK X320FM receiver to various audio devices like a professional music mixer, amplifier, or karaoke machine. Note that connection to laptops, iPads, phones, or TVs is generally not compatible.
3. Antenska veza
Screw the two antennas onto the ANT-A and ANT-B connectors on the rear panel of the receiver. Position them vertically for optimal signal reception.
4. Uključivanje
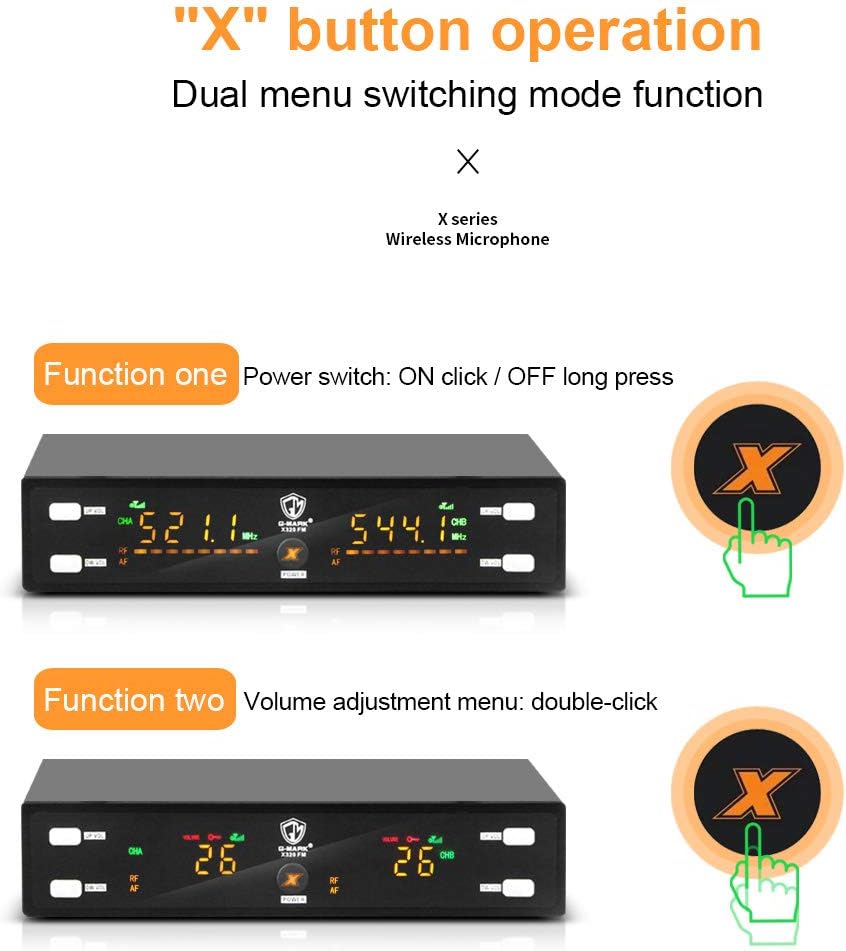
Connect the power adapter to the DC9-12V input on the receiver and plug it into a power outlet. Press the central POWER button on the receiver to turn it on. Then, press the POWER button on each handheld microphone to turn them on.
Video 2: Shows the receiver powering on (0:19 - 0:23) and a microphone powering on (1:02 - 1:07).
Uputstvo za upotrebu
1. Automatic Pairing (Flash Match)
The G-MARK X320FM system features automatic frequency synchronization. Once the receiver and microphones are powered on, they will automatically pair and lock to an available frequency. The receiver's display will show the synchronized frequency.

Figure 5: Illustrates the 'Flash Match' feature where the microphone and receiver automatically lock frequency immediately after power on.
2. Podešavanje frekvencije
If you experience interference, you can manually adjust the frequency on the handheld microphone. The receiver's frequency for that channel will automatically change to match the microphone's new frequency.
- Locate the AFH switch inside the microphone's battery compartment.
- Use the switch to select a different channel (A, B, C, or D).
- Observe the receiver's display; the frequency for the corresponding channel will update.
Video 3: Demonstrates frequency adjustment on the handheld microphone and how the receiver's frequency changes accordingly (1:24 - 1:46).
3. Podešavanje jačine zvuka
Adjust the volume for each microphone channel directly on the receiver:
- For Channel A, use the 'UP/VOL' and 'DW/VOL' buttons on the left side of the receiver.
- For Channel B, use the 'UP/VOL' and 'DW/VOL' buttons on the right side of the receiver.
- The volume level will be displayed on the receiver's LCD screen.
Video 4: Shows how to adjust the volume using the UP/VOL and DW/VOL buttons on the receiver (1:47 - 1:58).
4. Frequency Lock/Unlock
To prevent accidental frequency changes, you can lock the receiver's frequency. To unlock, double-click the UP/VOL and DW/VOL buttons simultaneously on the desired channel.
Video 5: Demonstrates how to lock and unlock the receiver's frequency by double-clicking two keys simultaneously (1:15 - 1:23).
Održavanje
- čišćenje: Use a soft, dry cloth to clean the receiver and microphones. Avoid using liquid cleaners or solvents.
- Održavanje baterije: Izvadite baterije iz mikrofona ako ih nećete koristiti duži period kako biste spriječili curenje.
- Skladištenje: Sistem čuvajte na hladnom i suhom mjestu, dalje od direktne sunčeve svjetlosti i ekstremnih temperatura.
- Rukovanje: Handle microphones and receiver with care to avoid physical damage.
Rješavanje problema
| Problem | Mogući uzrok | Rješenje |
|---|---|---|
| Nema zvuka iz mikrofona | Microphone or receiver not powered on; low batteries; incorrect connection; mismatched frequency; receiver connected to AUX jack. | Ensure all devices are powered on. Check microphone batteries. Verify receiver is connected to the MIC input of your audio system. Check that microphone and receiver frequencies match. |
| Smetnje ili loš kvalitet zvuka | Other wireless devices operating on the same frequency; too far from receiver; obstacles blocking signal. | Adjust microphone frequency to an unused channel. Reduce distance between microphone and receiver. Ensure a clear line of sight between devices. |
| Mala jačina zvuka | Microphone volume too low; receiver volume too low; audio system volume too low. | Increase volume on the microphone, receiver, and your connected audio system. |
| Receiver display is locked | Frequency lock feature is active. | Double-click the UP/VOL and DW/VOL buttons simultaneously on the respective channel to unlock the frequency. |
Specifikacije
| Feature | Detalj |
|---|---|
| Broj modela | G320FMus |
| Brand | G-MARK |
| Mikrofon Form Faktor | Handheld |
| Materijal | Metal |
| Frekvencija bežičnog mikrofona | 520 MHz - 560 MHz (Adjustable UHF) |
| Frekvencijski odziv | 18 KHz |
| Audio Sensitivity | 60 decibela |
| Polar Pattern | Jednosmjerno |
| Izvor napajanja | Battery Powered (Microphones) |
| Težina artikla | 3.08 funte (sistem) |
| Dimenzije proizvoda (D x Š x V) | 15.74 x 12.99 x 2.75 inča |
| Tehnologija povezivanja | XLR, 6.35 mm priključak |
| Kompatibilni uređaji | Amplifier, Audio Mixer, Karaoke Machine |
Garancija i podrška
For warranty information, technical support, or any inquiries regarding your G-MARK X320FM Wireless Microphones System, please contact G-MARK customer service through the official channels provided at the point of purchase or on the G-MARK webMolimo sačuvajte dokaz o kupovini za potrebe reklamacije.