
Uvod
The Perel EDIN305N is a 230V 16A 3600W DIN-rail mount digital weekly timer designed for indoor use. This device allows for precise, programmable control of electrical circuits, enabling automatic switching ON and OFF of connected appliances or lighting systems over a weekly cycle. It features a clear digital display and multiple programming options to suit various scheduling needs.
Sigurnosne mjere
UPOZORENJE: Electrical installation should only be performed by a qualified electrician. Incorrect wiring can lead to electric shock, fire, or damage to the device and connected equipment. Always disconnect power at the main circuit breaker before installation or maintenance.
- Ensure the power supply matches the device's specifications (230V~50Hz).
- Ne prekoračujte maksimalni kapacitet opterećenja od 16A / 3600W.
- This device is designed for indoor use only. Avoid exposure to moisture, dust, or extreme temperatures.
- Ne pokušavajte sami otvarati ili popravljati uređaj. Za sve servisne radove obratite se kvalifikovanom osoblju.
- Čuvati van domašaja djece.
Product Overview
The Perel EDIN305N digital timer consists of a main body with a digital display, control buttons, and terminal blocks for electrical connections. A transparent cover protects the display and buttons.
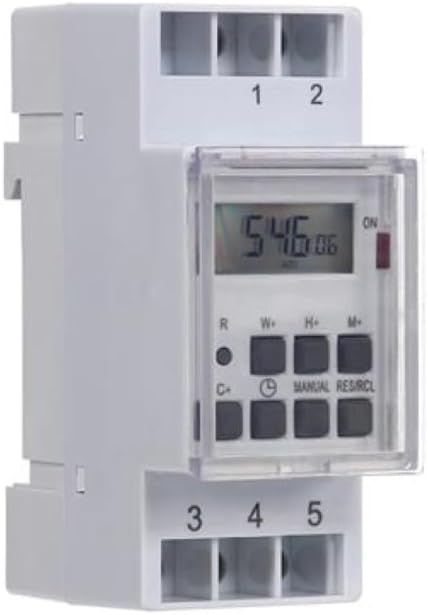
Slika 1: Front view of the Perel EDIN305N Digital Weekly Timer. The image displays the LCD screen, control buttons (R, W+, H+, M+, C+, Clock, Manual, RES/RCL), and numbered terminal blocks (1, 2 at the top, 3, 4, 5 at the bottom).
Kontrolna dugmad:
- R: Reset button (recessed).
- W+: Weekday setting.
- H+: Podešavanje sata.
- M+: Minute setting.
- C+: Clear program.
- Ikona sata: Used to set current time and day, and to exit programming mode.
- PRIRUČNIK: Manual override for ON/AUTO/OFF modes.
- RES/RCL: Reset/Recall program.
Terminalni blokovi:
- 1, 2: Power supply input (N, L).
- 3, 4, 5: Output terminals for controlled circuit (Common, Normally Open, Normally Closed).
Tehničke specifikacije
| Parametar | Vrijednost |
|---|---|
| Broj modela | EDIN305N |
| Voltage | 230V~50Hz |
| Max. Current | 16A |
| Max. Snaga | 3600W |
| Broj postavki | 7 (programa UKLJUČENO/ISKLJUČENO) |
| Vrsta montaže | DIN-šina |
| Dimenzije (D x Š x V) | 2.36 x 3.54 x 1.57 inča (60 x 90 x 40 mm) |
| Težina | 0.12 kg (4.2 unce) |
| Materijal | Plastika |
| Boja | Bijelo |
| Baterije su potrebne | No (internal battery for memory backup) |
Instalacija
1. Montaža
The Perel EDIN305N is designed for DIN-rail mounting. Securely attach the timer to a standard 35mm DIN-rail within an electrical enclosure. Ensure sufficient space for wiring and ventilation.
2. Ožičenje
VAŽNO: Ensure power is disconnected at the main circuit breaker before proceeding with wiring. Follow local electrical codes and regulations.
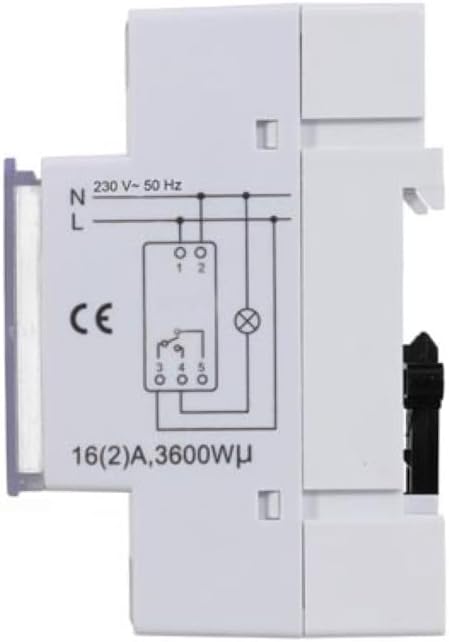
Slika 2: Side view of the Perel EDIN305N Digital Weekly Timer showing the electrical wiring diagram. It illustrates connections for Neutral (N), Live (L), and the output contacts (1, 2, 3, 4, 5) for controlling a load.
Refer to the wiring diagram (Figure 2) and the terminal block labels on the device:
- Connect the Neutral (N) wire of your 230V AC supply to terminal 1.
- Connect the Live (L) wire of your 230V AC supply to terminal 2.
- For the controlled circuit:
- Terminal 3: Common contact for the relay output.
- Terminal 4: Normally Open (NO) contact. The circuit connected here will be ON when the timer is active.
- Terminal 5: Normally Closed (NC) contact. The circuit connected here will be OFF when the timer is active.
- Connect the load (e.g., light, appliance) between the Live (L) supply and either terminal 4 (for NO operation) or terminal 5 (for NC operation), with terminal 3 connected to the Live (L) supply. Alternatively, connect the load between terminal 4 or 5 and the Neutral (N) supply, with terminal 3 connected to the Live (L) supply. Consult a qualified electrician for specific load wiring configurations.
Početno podešavanje i rad
1. Power On and Reset
After wiring and restoring power, the display will illuminate. If the display is blank or shows erratic characters, press the recessed R (Reset) button using a pointed non-metallic object (e.g., a pen tip). This will clear all settings and restore default values.
2. Podešavanje trenutnog vremena i dana
- Pritisnite i držite Ikona sata dugme.
- Dok držite Ikona sata dugme, pritisnite W+ to set the current day of the week (1=Monday, 7=Sunday).
- Dok držite Ikona sata dugme, pritisnite H+ da biste podesili trenutni sat (0-23).
- Dok držite Ikona sata dugme, pritisnite M+ za podešavanje trenutnih minuta (0-59).
- Otpustite Ikona sata dugme. Vrijeme i dan su sada podešeni.
3. Programiranje ciklusa UKLJUČENO/ISKLJUČENO
Tajmer podržava do 7 programa UKLJUČENO/ISKLJUČENO. Svaki program se sastoji od vremena UKLJUČENO i vremena ISKLJUČENO.
- Pritisnite Ikona sata button once to enter programming mode. The display will show "1 ON".
- Pritisnite W+ da odaberete dan(e) za ovaj program. Možete odabrati jedan dan, blok dana (npr. pon-pet) ili sve dane.
- Pritisnite H+ to set the ON hour for program 1.
- Pritisnite M+ to set the ON minute for program 1.
- Pritisnite Ikona sata ponovo pritisnite dugme. Na ekranu će se prikazati "1 ISKLJUČENO".
- Repeat steps 2-4 to set the OFF day(s), hour, and minute for program 1.
- To set additional programs (2-7), press the Ikona sata button to cycle through "2 ON", "2 OFF", etc., and repeat the setting process.
- Nakon što podesite sve željene programe, pritisnite dugme MANUAL dugme za izlazak iz režima programiranja i povratak na prikaz trenutnog vremena.
4. Ručno prebacivanje
Pritisnite MANUAL button repeatedly to cycle through the operating modes:
- ON: Izlaz je kontinuirano UKLJUČEN, poništavajući sve programe.
- AUTOMATSKI: Tajmer radi u skladu s programiranim ciklusima UKLJUČIVANJA/ISKLJUČIVANJA.
- ISKLJUČENO: Izlaz je kontinuirano ISKLJUČEN, što poništava sve programe.
Provjerite je li tajmer postavljen na AUTO za programirani rad.
5. Clearing Programs
Da biste obrisali određeni program:
- Enter programming mode by pressing the Ikona sata button until the desired program number (e.g., "3 ON") is displayed.
- Pritisnite C+ button. This will clear both the ON and OFF times for that specific program.
- Ponovite za ostale programe po potrebi.
- Pritisnite MANUAL da izađete iz režima programiranja.
To clear all programs and reset the device, use the recessed R Dugme (Resetovanje).
Održavanje
- Uređaj čistite mekom, suhom krpom. Ne koristite abrazivna sredstva za čišćenje ili rastvarače.
- Ensure the transparent cover is closed to protect the display and buttons from dust and splashes.
- Regularly check electrical connections for tightness, especially in high-vibration environments.
Rješavanje problema
| Problem | Mogući uzrok | Rješenje |
|---|---|---|
| Ekran je prazan. | Nema napajanja; interna baterija je prazna. | Check power connections (terminals 1 & 2). Ensure main power is ON. If power is present, press the R (Reset) button. The internal battery recharges when connected to power. |
| Tajmer se ne uključuje/isključuje kako je programirano. | Incorrect program settings; timer in manual ON/OFF mode. | Verify program settings (time, day, ON/OFF). Ensure the timer is in AUTO način rada pritiskom na MANUAL dugme. |
| Connected appliance not receiving power. | Incorrect wiring; appliance fault; timer fault. | Check wiring according to Figure 2. Test the appliance directly. If wiring and appliance are fine, the timer may be faulty. |
| Buttons unresponsive or display erratic. | Software glitch; low internal battery. | Pritisnite udubljeni R (Reset) button. Ensure the timer has been connected to power for at least 24 hours to fully charge the internal battery. |
Odlaganje
Do not dispose of this product with general household waste. This electronic device contains materials that can be recycled. Please dispose of it at a designated collection point for electrical and electronic equipment waste, in accordance with local regulations.
Garancija i podrška
Perel products are manufactured to high quality standards. For warranty information, technical support, or service inquiries, please refer to the documentation provided with your purchase or contact your local Perel distributor or retailer. Please have your model number (EDIN305N) and purchase details ready when contacting support.