
1. Uvod
Thank you for choosing the OSD Audio PRE-1 High Definition Preamplifier. This unit is designed to enhance your audio experience by providing versatile source selection and precise audio control. The PRE-1 acts as a central hub for various audio components, including turntables, CD/DVD players, and tape decks, delivering a clean and powerful signal to your main amplifier.
This manual provides detailed instructions for the proper setup, operation, and maintenance of your PRE-1 preamplifier. Please read this manual thoroughly before operating the unit to ensure optimal performance and longevity.
2. Važne informacije o sigurnosti
- Izvor napajanja: Connect the unit only to the type of power source indicated on the marking label.
- ventilacija: Ensure adequate ventilation. Do not block any ventilation openings. Install in accordance with the manufacturer’s instructions.
- Voda i vlaga: Ne koristite ovaj uređaj u blizini vode niti ga izlažite kapanju ili prskanju.
- toplina: Ne postavljajte u blizini izvora toplote kao što su radijatori, grejni registri, peći ili drugi uređaji (uključujući ampLifiers) koji proizvode toplotu.
- čišćenje: Čistite samo suhom krpom.
- servisiranje: Ne pokušavajte sami servisirati ovaj proizvod. Sve servise prepustite kvalificiranom servisnom osoblju.
- uzemljenje: Ova jedinica mora biti pravilno uzemljena.
3. Sadržaj paketa
Molimo Vas da provjerite da li se u Vašem paketu nalaze sljedeće stavke:
- OSD Audio PRE-1 High Definition Preamplifier
- Power Cable
- Korisnički priručnik (ovaj dokument)
4. Proizvod je gotovview
4.1. Prednja ploča
The front panel provides access to all primary controls and a microphone input for convenient use.

This image displays the front panel of the OSD Audio PRE-1 Preamplifier, including its physical dimensions for installation planning.

Detaljno view of the left side of the PRE-1's front panel, highlighting the Microphone Level, Bass, Midrange, and Treble adjustment knobs.

Detaljno view of the right side of the PRE-1's front panel, showing the Loudness, Balance, and Volume controls, along with input selection and function buttons.
- Dugme za napajanje: Uključuje ili isključuje jedinicu.
- Ulaz mikrofona: 1/4-inčni priključak za spajanje mikrofona.
- Razina mikrofona: Podešava jačinu zvuka mikrofonskog ulaza.
- Kontrola basa: Podešava niskofrekventni izlaz.
- Mid Control: Adjusts the mid-range frequency output.
- Kontrola visokih tonova: Podešava visokofrekventni izlaz.
- Glasnost: Engages or disengages a loudness contour for enhanced bass and treble at low volumes.
- Stanje: Podešava balans lijevog/desnog kanala.
- Volumen: Master volume control for all outputs.
- Odaberite ulaz: Rotary knob to choose between Phono, AUX1, AUX2, and CD/DVD inputs.
- Tape Button: Activates the Tape Monitor loop.
- Mono dugme: Combines stereo signals into a monaural output.
- Niski filter: Engages a low-frequency cut-off filter.
- Isključi zvuk: Silences all audio output.
4.2. Stražnja ploča
The rear panel houses all the necessary input and output connections for your audio system.
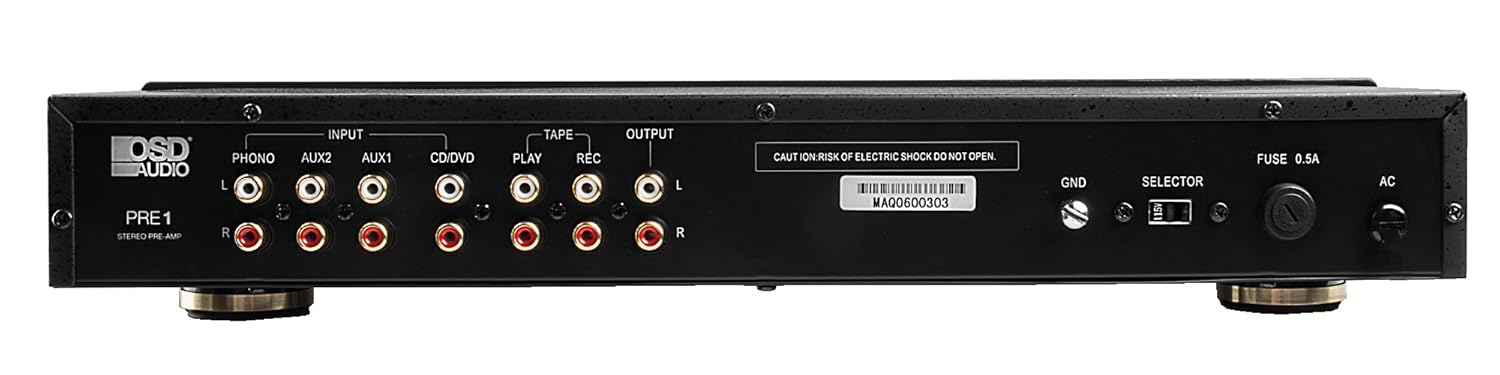
The rear panel of the PRE-1 Preamplifier, showing all input and output connections for various audio devices.
- Phono Input (L/R): RCA inputs for connecting a turntable. Includes a ground terminal.
- AUX1 Input (L/R): RCA inputs for general auxiliary devices.
- AUX2 Input (L/R): RCA inputs for a second auxiliary device.
- CD/DVD Input (L/R): RCA inputs for CD or DVD players.
- Tape Play (L/R): RCA inputs for the playback output of a tape deck or other recording device.
- Tape Rec (L/R): RCA outputs for connecting to the recording input of a tape deck or other recording device.
- Output (L/R): RCA outputs to connect to your main power amplifier.
- Uzemljeni terminal (GND): Connects to the ground wire of your turntable to reduce hum.
- Prekidač za biranje: For internal configuration (typically left in default position unless specified).
- Osigurač: Replace only with the specified fuse type and rating.
- Ulaz za izmjeničnu struju: Connects to the supplied power cable.
5. Podešavanje i veze
Follow these steps to properly set up your OSD Audio PRE-1 Preampdizalica:
- plasman: Place the PRE-1 on a stable, flat surface, ensuring adequate ventilation around the unit. Avoid placing it near heat sources or in direct sunlight.
- Iskljuciti: Ensure all audio components, including the PRE-1 and your main amplifier, are turned off before making any connections.
- Povežite izvore:
- Gramofon: Connect the RCA cables from your turntable to the Phono Input (L/R) on the PRE-1. Connect the turntable's ground wire to the GND terminal on the PRE-1.
- CD/DVD plejer: Connect the RCA cables from your CD/DVD player to the CD/DVD Input (L/R).
- Other Devices (e.g., Streamer, Tuner): Connect RCA cables from these devices to the AUX1 Input (L/R) or AUX2 Input (L/R).
- Tape Deck: Connect the playback outputs of your tape deck to the Tape Play (L/R) inputs. Connect the recording inputs of your tape deck to the Tape Rec (L/R) izlazi.
- Povežite se na Ampdizalica: Povežite Output (L/R) RCA jacks on the PRE-1 to the input jacks of your main power amplifier.
- Priključak za napajanje: Povežite isporučeni kabl za napajanje na Ulaz naizmenične struje on the rear panel of the PRE-1, then plug it into a suitable wall outlet.
- Početno uključivanje: Turn on your main power amplifier first, then turn on the PRE-1. When powering off, turn off the PRE-1 first, then your main amplifier.
6. Uputstvo za upotrebu
Once your PRE-1 is connected, follow these steps for basic operation:
- Odaberite unos: Koristite Odabir ulaza rotary knob on the front panel to choose the desired audio source (Phono, AUX1, AUX2, CD/DVD).
- Podesite glasnoću: Počnite sa Volume knob at its minimum setting. Begin playing your selected audio source and slowly increase the volume to a comfortable listening level.
- Kontrole tona: Koristite Bas, Mid, i Visoki tonovi knobs to adjust the tonal characteristics of your audio. Turn clockwise to increase, counter-clockwise to decrease.
- Kontrola ravnoteže: Podesite Balans knob to fine-tune the left and right channel output for optimal stereo imaging.
- Glasnost: Pritisnite Glasnoća button to activate a contour that boosts bass and treble frequencies, which can be beneficial at lower listening volumes. Press again to deactivate.
- Niski filter: Pritisnite Low Filter button to engage a filter that reduces very low frequencies. This can help eliminate rumble from turntables or other unwanted low-frequency noise. Press again to deactivate.
- Mono: Pritisnite Mono button to combine the left and right stereo channels into a single monaural signal. This is useful for playing mono recordings. Press again for stereo.
- Isključi zvuk: Pritisnite Mute button to instantly silence the audio output. Press again to restore sound.
- Upotreba mikrofona: Plug a microphone into the Mic Input. Adjust the microphone's volume using the Razina mikrofona dugme.
- Tape Monitoring/Recording: If you have a tape deck connected, select the appropriate input for playback. To record, ensure your tape deck is set to record and the PRE-1 is passing the desired source through the Tape Rec outputs.
7. Održavanje
Proper care and maintenance will ensure the longevity and optimal performance of your PRE-1 Preamplifier.
- čišćenje: Use a soft, dry cloth to clean the exterior of the unit. Do not use liquid cleaners, aerosols, or harsh chemicals, as they may damage the finish or internal components.
- ventilacija: Povremeno provjeravajte da li su ventilacijski otvori čisti od prašine i začepljenja.
- Veze: Occasionally check all cable connections to ensure they are secure. Loose connections can lead to signal loss or interference.
- Skladištenje: Ako uređaj skladištite duži period, isključite ga iz električne utičnice i čuvajte ga na hladnom i suhom mjestu, dalje od direktne sunčeve svjetlosti i ekstremnih temperatura.
8. Otkrivanje problema
If you experience issues with your OSD Audio PRE-1, refer to the following common problems and solutions:
| Problem | Mogući uzrok | Rješenje |
|---|---|---|
| Nema struje | Power cable not connected; Power outlet not active; Blown fuse | Ensure power cable is securely connected. Test the outlet with another device. Check and replace the fuse if necessary (refer to specifications for fuse type). |
| Nema izlaza zvuka | Incorrect input selected; Volume too low; Mute engaged; Loose audio cables; Main amplifier off or incorrect input selected | Select the correct input source. Increase the volume. Disengage Mute. Check all RCA cable connections. Ensure your main amplifier is on and set to the correct input. |
| Izobličen zvuk | Volume too high (clipping); Incorrect tone control settings; Faulty cables | Reduce the volume. Adjust Bass, Mid, and Treble controls to neutral or desired settings. Try replacing audio cables. |
| Zujanje ili zujanje | Ground loop; Loose ground wire (Phono); Interference from other electronics | Ensure turntable ground wire is connected to the PRE-1's GND terminal. Try moving the PRE-1 or other audio components away from power cables or other electronic devices. Use a ground loop isolator if necessary. |
| Mikrofon ne radi | Mic not connected; Mic Level too low; Faulty microphone | Ensure microphone is securely plugged into the Mic Input. Increase the Mic Level. Test with another microphone if available. |
9. Specifikacije
Below are the technical specifications for the OSD Audio PRE-1 Preampdizalica:
| Feature | Specifikacija |
|---|---|
| Model | PRE-1 |
| Brand | OSD audio |
| Broj kanala | 2 |
| Vrsta montaže | Surface Mount |
| UPC | 819603012446 |
| ASIN | B01MPYJLPX |
| Proizvođač | OSD audio |
10. Garancija i podrška
OSD Audio products are designed for reliability and performance. For specific warranty details and terms, please refer to the warranty card included with your product or visit the official OSD Audio website. If you require technical assistance or have questions not covered in this manual, please contact OSD Audio customer support.
OSD Audio Customer Support: Please visit the OSD Audio webstranica za kontakt informacije i resurse podrške.