
1. Važna sigurnosna uputstva
Prilikom korištenja električnih uređaja potrebno je pridržavati se osnovnih sigurnosnih mjera opreza, uključujući sljedeće:
- Prije korištenja uređaja pročitajte sva uputstva.
- Ne pokušavajte koristiti ovu pećnicu s otvorenim vratima jer to može dovesti do štetnog izlaganja mikrovalnoj energiji.
- Nemojte stavljati nikakve predmete između prednje strane pećnice i vrata i ne dozvolite da se prljavština ili ostaci sredstva za čišćenje nakupljaju na zaptivnim površinama.
- Nemojte uključivati pećnicu ako je oštećena. Posebno je važno da se vrata pećnice pravilno zatvaraju i da nema oštećenja: (1) vrata (savijena), (2) šarke i zasune (polomljene ili olabavljene), (3) brtve vrata i zaptivne površine.
- Rernu ne bi trebalo podešavati ili popravljati niko osim odgovarajuće kvalifikovanog servisera.
- Uvjerite se da je uređaj pravilno uzemljen.
- Ne uranjajte kabel ili utikač u vodu.
- Neophodan je pažljiv nadzor kada uređaj koriste djeca ili u blizini djece.
- Do not use the oven for purposes other than heating food.
2. Proizvod je gotovview
2.1. Microwave Oven Components

Slika 1: Prednja strana view of the Sharp R-369T Microwave Oven, showcasing its 33L capacity, 6 microwave power levels, and various cooking functions.
The Sharp R-369T is a 33-liter solo microwave oven designed for efficient food preparation. It features a sleek silver finish and a black glass door. Key components include the oven cavity, glass turntable, control panel, and door with a push-open mechanism.

Slika 2: Unutrašnjost view of the microwave oven, showing the spacious 33L cavity and the removable glass turntable for even cooking.
The interior includes a 272mm glass turntable that rotates during operation to ensure food is heated evenly. The oven door opens with a simple push mechanism.
2.2. Kontrolna tabla
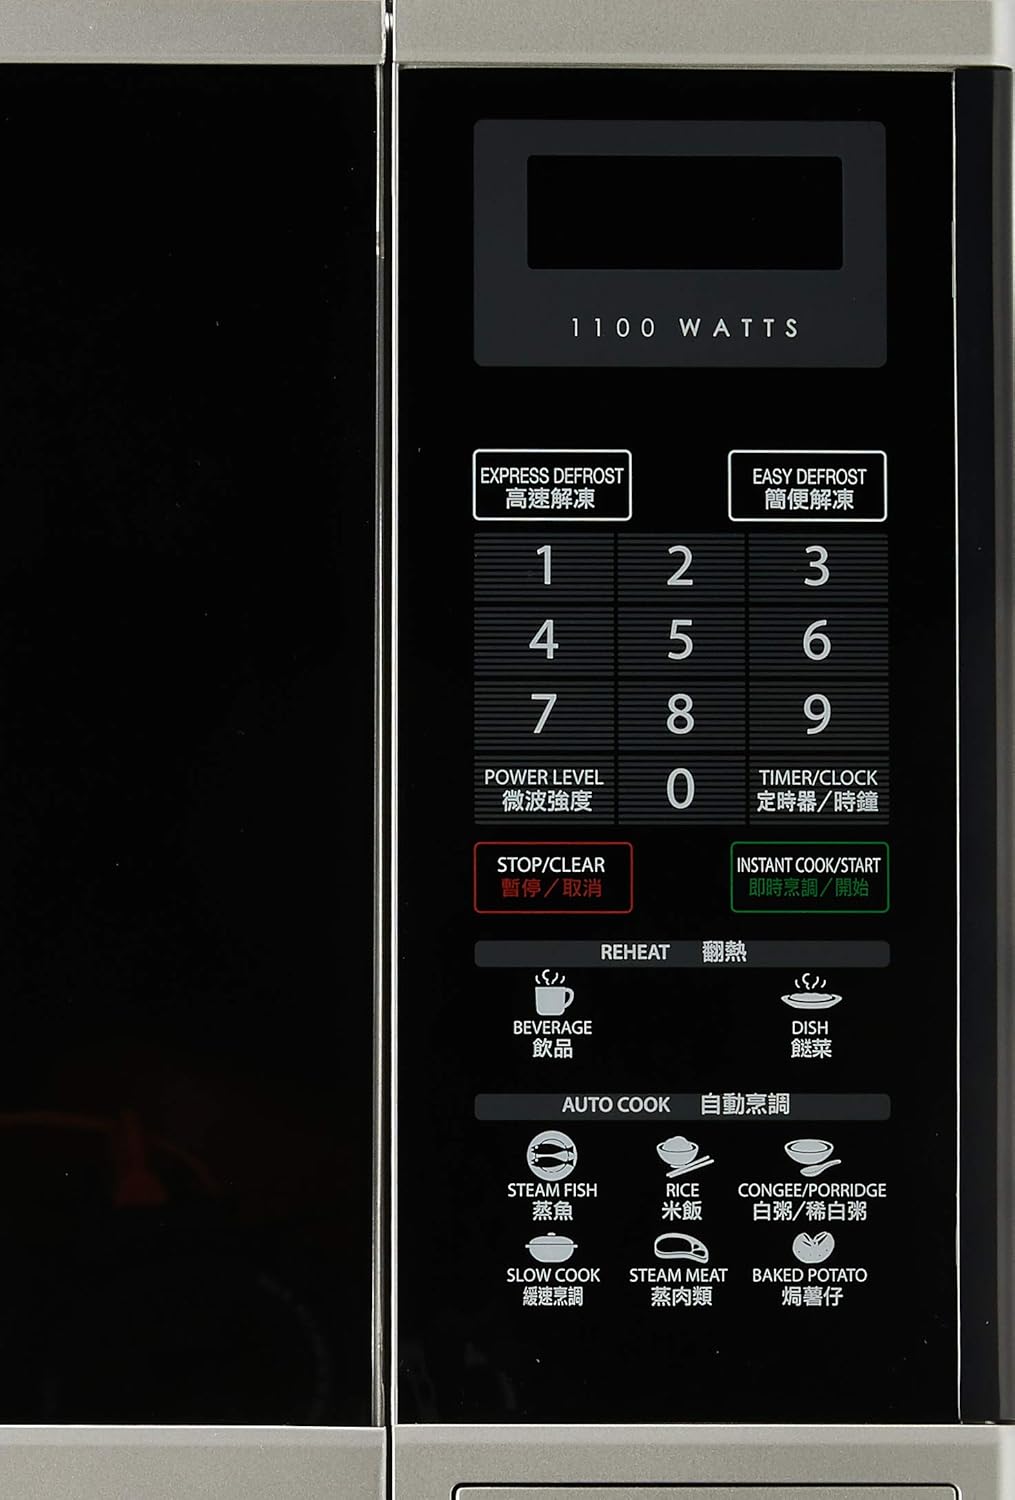
Slika 3: Detaljno view of the control panel, featuring numerical keys, function buttons, and the digital display.
The control panel is located on the right side of the oven and features a digital display, numerical keypad (0-9), and various function buttons:
- EXPRESS DEFROST / EASY DEFROST: For quick and convenient defrosting.
- NIVO SNAGE: Podešava izlaznu snagu mikrovalne pećnice.
- TAJMER/SAT: Sets the cooking timer or the current time.
- STOP/CLEAR: Zaustavlja trenutnu operaciju ili briše postavke.
- INSTANT COOK/START: Starts cooking immediately or confirms settings.
- PODGRIJATI: Dedicated buttons for reheating beverages and dishes.
- AUTO COOK: Pre-programmed settings for various food types like Steam Fish, Rice, Congee/Porridge, Slow Cook, Steam Meat, and Baked Potato.
3. Postavljanje i instalacija
3.1. Raspakivanje
Carefully remove the microwave oven and all packing materials from the carton. Check the oven for any damage, such as dents or a misaligned door. Do not operate the oven if it is damaged. Contact your dealer or authorized service center.
3.2. Plasman
- Place the oven on a flat, stable surface strong enough to hold its weight (approximately 17kg).
- Osigurajte adekvatnu ventilaciju. Ostavite najmanje 10 cm (4 inča) prostora na stražnjoj strani, 20 cm (8 inča) na vrhu i 5 cm (2 inča) sa svake strane za pravilan protok zraka.
- Nemojte blokirati ventilacione otvore.
- Držite pećnicu dalje od izvora toplote, pare ili prskajućih tečnosti.
- Ne postavljajte pećnicu blizu radija ili televizora, jer to može uzrokovati smetnje.
3.3. Električni priključak

Slika 4: Pozadi view of the microwave oven, illustrating the power cord connection and important safety warnings regarding microwave energy.
- Plug the oven into a properly grounded 220V, 50Hz AC outlet with a dedicated circuit.
- Nemojte koristiti produžne kablove ili adaptere.
- Pazite da kabel za napajanje nije oštećen ili priklješten.
4. Uputstvo za upotrebu
4.1. Podešavanje sata
- Pritisnite TAJMER/SAT dugme jednom.
- Use the numerical keypad to enter the current time (e.g., 12:30 for 12:30 PM).
- Pritisnite TAJMER/SAT ponovo dugme za potvrdu.
4.2. Osnovno kuhanje u mikrovalnoj pećnici
- Stavite hranu u posudu pogodnu za mikrovalnu pećnicu na stakleni rotirajući tanjir.
- Čvrsto zatvorite vrata pećnice.
- Pritisnite NIVO SNAGE button repeatedly to select the desired power level (e.g., P100 for 100% power, P80 for 80% power). The oven offers 6 microwave power levels.
- Use the numerical keypad to enter the cooking time.
- Pritisnite INSTANT COOK/START da počnete sa kuvanjem.
4.3. Odmrzavanje
The oven offers two defrost functions:
- EXPRESS DEFROST: For quick defrosting of smaller items. Follow on-screen prompts or manual for specific weight settings.
- EASY DEFROST: For more controlled defrosting. Refer to the manual for weight and food type guidelines.
- Stavite smrznutu hranu na okretni tanjir.
- Pritisnite bilo koji EKSPRESNO ODMRZAVANJE or EASY DEFROST.
- Enter the weight of the food using the numerical keypad.
- Pritisnite INSTANT COOK/START.
4.4. Reheat Functions
The oven includes 2 Reheat Menu keys for common items:
- PIĆE: For reheating drinks.
- DISH: For reheating prepared meals.
- Place the item to be reheated on the turntable.
- Pritisnite odgovarajući UGRIJATI button (BEVERAGE or DISH).
- The oven will automatically set the time. Press INSTANT COOK/START za početak.
4.5. Auto Cook Functions
The AUTO KUVAR menu provides pre-programmed settings for various foods:
- PARNA RIBA
- RICE
- CONGEE/PORRIDGE
- SPORI KUVAR
- MESO NA PARI
- BAKED POTATO
- Place the food in a suitable container on the turntable.
- Pritisnite željeno AUTO KUVAR dugme.
- Select the quantity or weight if prompted (refer to the full manual for specific auto cook settings).
- Pritisnite INSTANT COOK/START.
5. Održavanje i čišćenje
Redovno čišćenje vaše mikrovalne pećnice osigurat će njen dugotrajni i efikasan rad.
5.1. Vanjsko čišćenje
- Obrišite vanjske površine mekom krpom, damp tkanina.
- Nemojte koristiti abrazivna sredstva za čišćenje ili jake hemikalije.
5.2. Čišćenje unutrašnjosti
- Clean the oven cavity after each use with a mild detergent and a soft cloth.
- Za tvrdokorne mrlje od hrane, stavite posudu s vodom i kriškama limuna unutra i zagrijavajte u mikrovalnoj pećnici na visokoj temperaturi 2-3 minuta. Para će omekšati ostatke, što će olakšati čišćenje brisanjem.
- Ensure the door seals and sealing surfaces are clean to maintain proper operation.
5.3. Stakleni gramofon
- Stakleni okretni tanjir i valjkasti prsten mogu se ukloniti radi čišćenja.
- Operite ih u toploj vodi sa sapunom ili u mašini za pranje posuđa.
- Prije nego što ih vratite u pećnicu, provjerite da li su potpuno suhi.
6. Otkrivanje problema
Prije kontaktiranja servisa, provjerite sljedeće uobičajene probleme:
| Problem | Mogući uzrok | Rješenje |
|---|---|---|
| Pećnica se ne uključuje | Kabl za napajanje nije uključen; Vrata nisu pravilno zatvorena; Osigurač je pregorio ili je isključen prekidač. | Plug in power cord; Close door securely; Check fuse or reset circuit breaker. |
| Hrana se ne grije | Nepravilno postavljeno vrijeme kuhanja ili nivo snage; Vrata nisu pravilno zatvorena. | Adjust time/power; Ensure door is latched. |
| Gramofon se ne rotira | Gramofon nije pravilno postavljen; Prepreka ispod gramofona. | Vratite okretni tanjir i valjkasti prsten na mjesto; Uklonite sve prepreke. |
| Varnice unutar pećnice | Metal or foil in oven; Food splatters. | Uklonite metalne predmete; Temeljito očistite unutrašnjost pećnice. |
If the problem persists after checking these points, please contact an authorized service technician.
7. Specifikacije
| Brand | Sharp |
| Model | R-369T |
| Kapacitet | 33 litara |
| Izlazna snaga | 800W (mikrovalna) |
| Wattage | 1100 watts (Input) |
| Prečnik gramofona | 272mm |
| Vanjske dimenzije (Š x V x D) | 520 x 310 x 448 mm |
| Težina | 16.96 kg |
| Voltage | 220 Volts |
| Frekvencija | 50 Hz |
| Materijal | Čelik |
| Posebne karakteristike | Programmable, 6 Microwave Power Levels, 2 Reheat Menu Keys, Easy Defrost, Slow Cook Key, Black Glass Door |

Figure 5: Dimensional drawing of the Sharp R-369T Microwave Oven, illustrating its width (520 mm / 52 cm), height (310 mm / 31 cm), and depth (448 mm / 44.8 cm).
8. Garancija i podrška
Za informacije o garanciji i korisničkoj podršci, molimo pogledajte garantni list koji ste dobili uz proizvod ili posjetite službenu Sharpovu web stranicu. webstranicu za vašu regiju. Sačuvajte račun kao dokaz o kupovini za bilo kakve reklamacije u vezi s garancijom.
For technical assistance or service inquiries, please contact Sharp customer service.